steering MAZDA MODEL 3 HATCHBACK 2014 Smart Start Guide (in English)
[x] Cancel search | Manufacturer: MAZDA, Model Year: 2014, Model line: MODEL 3 HATCHBACK, Model: MAZDA MODEL 3 HATCHBACK 2014Pages: 46, PDF Size: 5.42 MB
Page 2 of 46
1
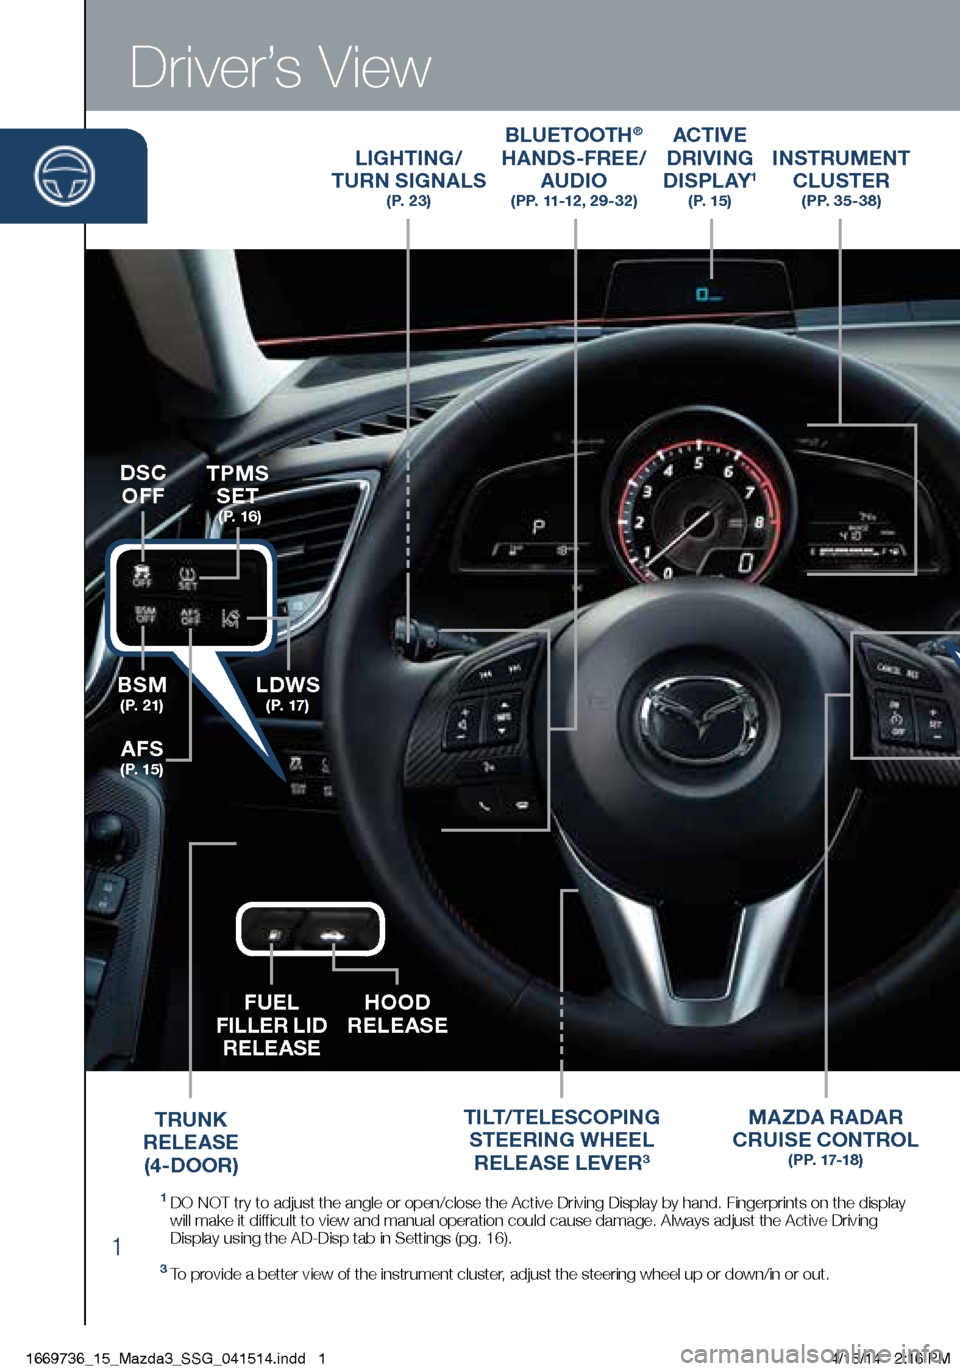
Driver’s View
LIGHTING/
TURN SIGNALS
( P. 2 3 )
BLUETOOTH®
HANDS-FREE/
AUDIO
(PP. 11-12 , 29-32)
ACTIVE
DRIVING
D I S P L AY
1 ( P. 1 5 )
TILT/TELESCOPING
STEERING WHEEL
RELEASE LEVER
3
BSM
( P. 2 1 )LDWS
( P. 17 )
TPMS SET
( P. 1 6 )
AFS
( P. 1 5 )
DSC
OFF
MA ZDA RADAR
CRUISE CONTROL
( P P. 17-1 8 )
FUEL
FILLER LID RELEASE HOOD
RELEASE
INSTRUMENT
CLUSTER
( P P. 3 5 - 3 8 )
1 DO NOT try to adjust the angle or open/close the Active Driving Display \
by hand. Fingerprints on the display
will make it difficult to view and manual operation could cause damage. Always adjust \
the Active Driving
Display using the AD-Disp tab in Settings (pg. 16).
3 To provide a better view of the instrument cluster, adjust the steering wheel up or down/in or out.
TRUNK
RELEASE (4-DOOR)
START/STOP
ENGINE BUTTON
( P P. 5 - 6 )
1669736_15_Mazda3_SSG_041514.indd 14/15/14 2:16 PM
Page 11 of 46
10
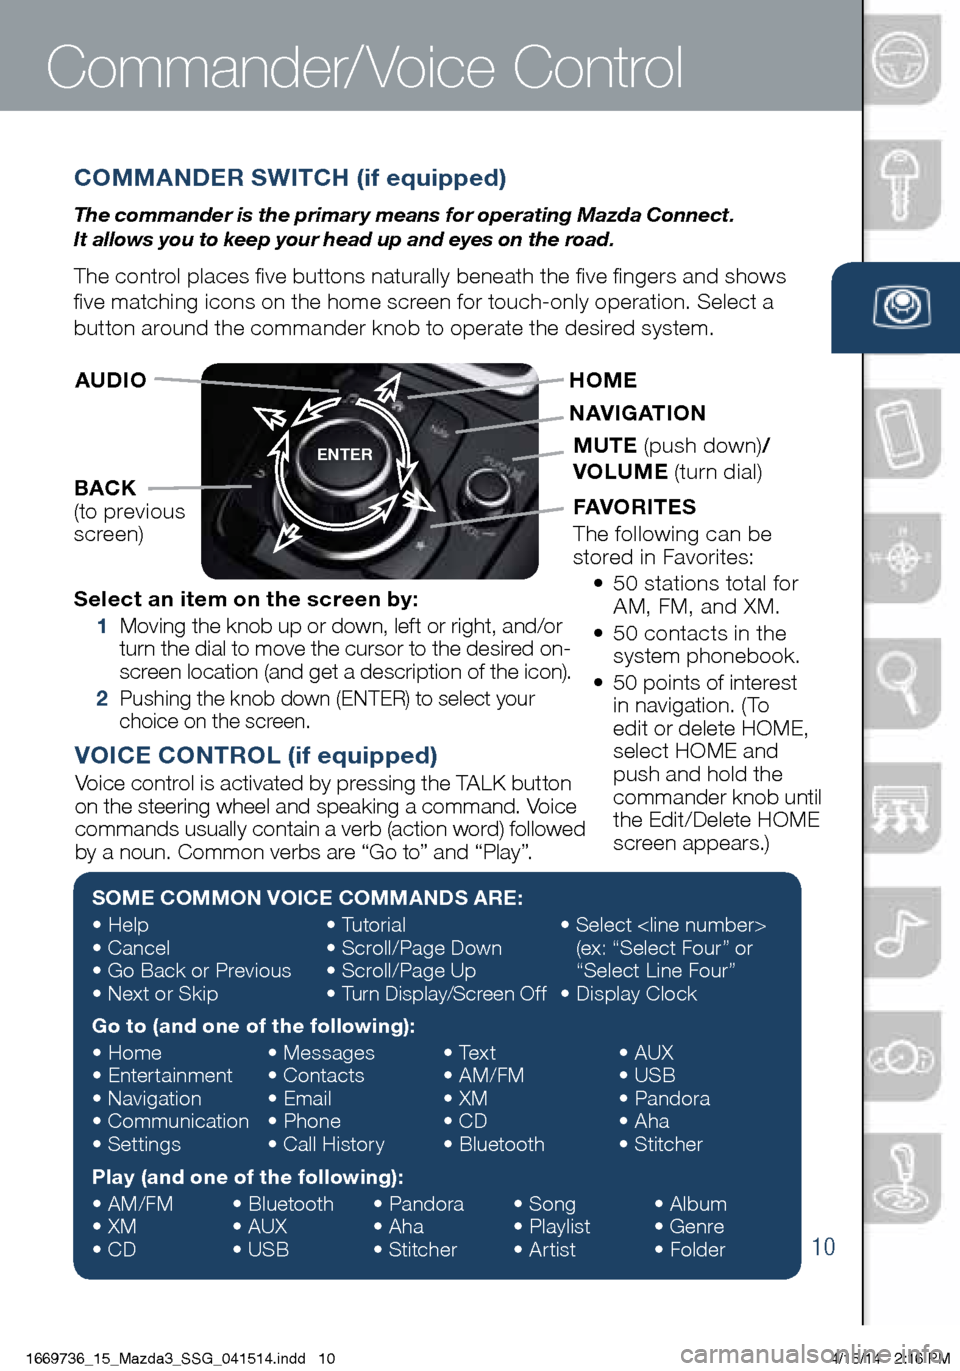
COMMANDER SWITCH (if equipped)
The commander is the primar y means for operating Mazda Connect.
It allows you to keep your head up and eyes on the road.
The control places five buttons naturally beneath the five fingers and shows
five matching icons on the home screen for touch-only operation. Select a
button around the commander knob to operate the desired system.
Commander/Voice Control
ENTER
Select an item on the screen by:
1 Moving the knob up or down, left or right, and/or
turn the dial to move the cursor to the desired on-
screen location (and get a description of the icon).
2 Pushing the knob down (ENTER) to select your
choice on the screen.
AUDIO
BACK
(to previous
screen) HOME
NAVIGATION
MUTE
(push down) /
VOLUME (turn dial)
FAVORITES
The following can be
stored in Favorites:
• 50 stations total for
AM, FM, and XM.
• 50 contacts in the
system phonebook.
• 50 points of interest
in navigation. (To
edit or delete HOME,
select HOME and
push and hold the
commander knob until
the Edit/Delete HOME
screen appears.)
SOME COMMON VOICE COMMANDS ARE:
• Help
• Cancel
• Go Back or Previous
• Next or Skip •
Tutorial
• Scroll/Page Down
• Scroll/Page Up
• Turn Display/Screen Off •
Select
(ex: “Select Four” or
“Select Line Four”
• Display Clock
Go to (and one of the following):
• Home
• Entertainment
• Navigation
• Communication
• Settings •
Messages
• Contacts
• Email
• Phone
• Call History •
Text
• AM/FM
• XM
• CD
• Bluetooth •
AUX
• USB
• Pandora
• Aha
• Stitcher
Play (and one of the following):
• AM/FM
• XM
• CD •
Bluetooth
• AUX
• USB •
Pandora
• Aha
• Stitcher •
Song
• Playlist
• Artist •
Album
• Genre
• Folder
VOICE CONTROL (if equipped)
Voice control is activated by pressing the TALK button
on the steering wheel and speaking a command. Voice
commands usually contain a verb (action word) followed
by a noun. Common verbs are “Go to” and “Play”.
1669736_15_Mazda3_SSG_041514.indd 104/15/14 2:16 PM
Page 12 of 46
11
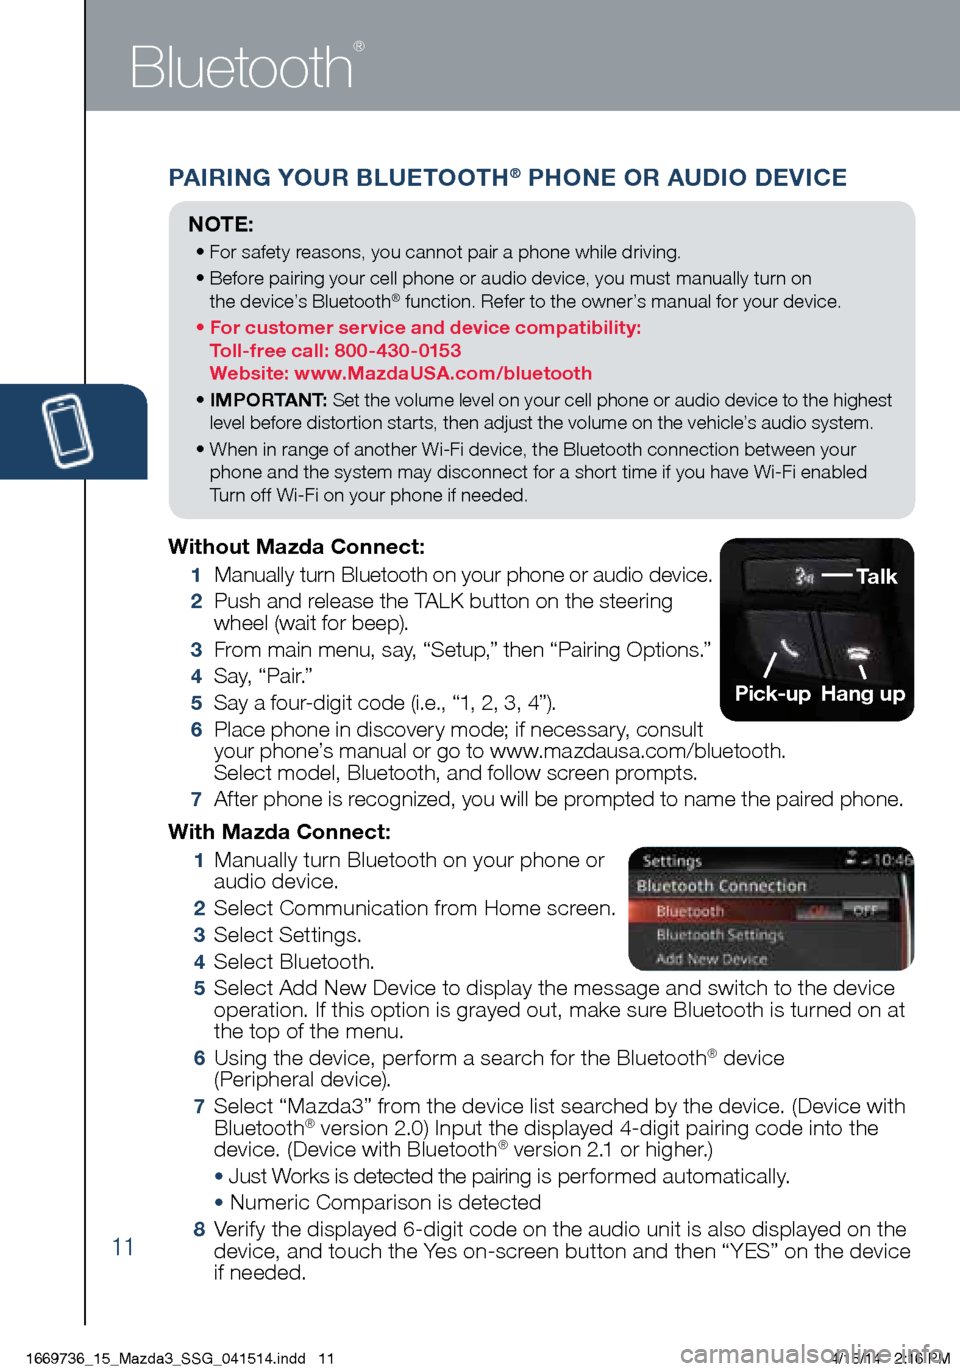
PAIRING YOUR BLUETOOTH® PHONE OR AUDIO DEVICE
Bluetooth
®
With Mazda Connect:
1 Manually turn Bluetooth on your phone or
audio device.
2 Select Communication from Home screen.
3 Select Settings.
4 Select Bluetooth.
5 Select Add New Device to display the message and switch to the device
operation. If this option is grayed out, make sure Bluetooth is turned on at
the top of the menu.
6 Using the device, perform a search for the Bluetooth® device
(Peripheral device).
7 Select “Mazda3” from the device list searched by the device. (Device with
Bluetooth® version 2.0) Input the displayed 4-digit pairing code into the
device. (Device with Bluetooth® version 2.1 or higher.)
• Just Works is detected the pairing is per formed automatically.
• Numeric Comparison is detected
8 Verify the displayed 6-digit code on the audio unit is also displayed on the
device, and touch the Yes on-screen button and then “YES” on the device
if needed.
Without Mazda Connect:
1
Manually turn Bluetooth on your phone or audio device.
2 Push and release the TALK button on the steering
wheel (wait for beep).
3 From main menu, say, “Setup,” then “Pairing Options.”
4 S a y, “ P a i r.”
5 Say a four-digit code (i.e., “1, 2, 3, 4”).
6 Place phone in discovery mode; if necessary, consult
your phone’s manual or go to www.mazdausa.com/bluetooth.
Select model, Bluetooth, and follow screen prompts.
7 After phone is recognized, you will be prompted to name the paired phone.
NOTE:
• For safety reasons, you cannot pair a phone while driving.
• Before pairing your cell phone or audio device, you must manually turn on
the device’s Bluetooth
® function. Refer to the owner’s manual for your device.
• For customer service and device compatibility:
Toll-free call: 800-430-0153
Website: www.MazdaUSA.com/bluetooth
• IMPORTANT: Set the volume level on your cell phone or audio device to the highest
level before distortion starts, then adjust the volume on the vehicle’s audio system.
• When in range of another Wi-Fi device, the Bluetooth connection between your
phone and the system may disconnect for a short time if you have Wi-Fi enabled
Turn off Wi-Fi on your phone if needed.
Talk
Pick-up
Hang up
1669736_15_Mazda3_SSG_041514.indd 114/15/14 2:16 PM
Page 15 of 46
14
Navigation System
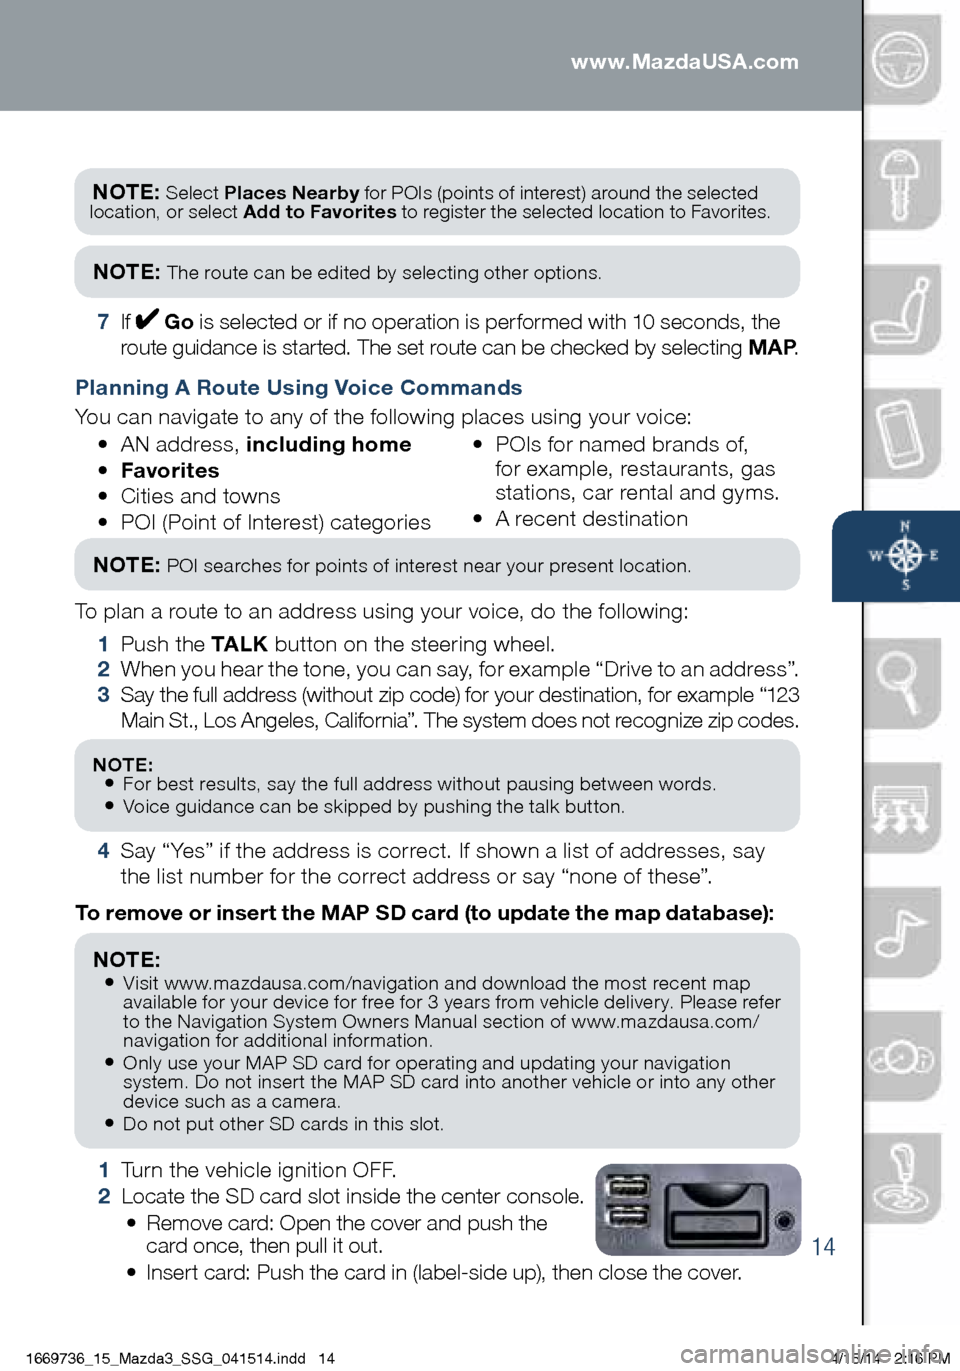
1 Turn the vehicle ignition OFF.
2 Locate the SD card slot inside the center console.
• Remove card: Open the cover and push the
card once, then pull it out.
• Insert card: Push the card in (label-side up), then close the cover.
To remove or insert the MAP SD card (to update the map database):
NOTE:
• Visit www.mazdausa.com/navigation and download the most recent map
available for your device for free for 3 years from vehicle delivery. Please refer
to the Navigation System Owners Manual section of www.mazdausa.com/
navigation for additional information.
• Only use your MAP SD card for operating and updating your navigation
system. Do not insert the MAP SD card into another vehicle or into any other
device such as a camera.
• Do not put other SD cards in this slot.
NOTE: Select Places Nearby for POIs (points of interest) around the selected
location, or select Add to Favorites to register the selected location to Favorites.
NOTE: The route can be edited by selecting other options.
7 If Go is selected or if no operation is performed with 10 seconds, the
route guidance is started. The set route can be checked by selecting MAP .
Planning A Route Using Voice Commands
You can navigate to any of the following places using your voice:
• AN address, including home
• Favorites
• Cities and towns
• POI (Point of Interest) categories •
POIs for named brands of,
for example, restaurants, gas
stations, car rental and gyms.
• A recent destination
To plan a route to an address using your voice, do the following:
1 Push the TA L K button on the steering wheel.
2 When you hear the tone, you can say, for example “Drive to an address”.
3 Say the full address (without zip code) for your destination, for example “123
Main St., Los Angeles, California”. The system does not recognize zip codes.
4 Say “Yes” if the address is correct. If shown a list of addresses, say
the list number for the correct address or say “none of these”.
NOTE: POI searches for points of interest near your present location.
NOTE: • For best results, say the full address without pausing between words.• Voice guidance can be skipped by pushing the talk button.
www.MazdaUSA.com
1669736_15_Mazda3_SSG_041514.indd 144/15/14 2:16 PM
Page 21 of 46
20
Lane Departure Warning System
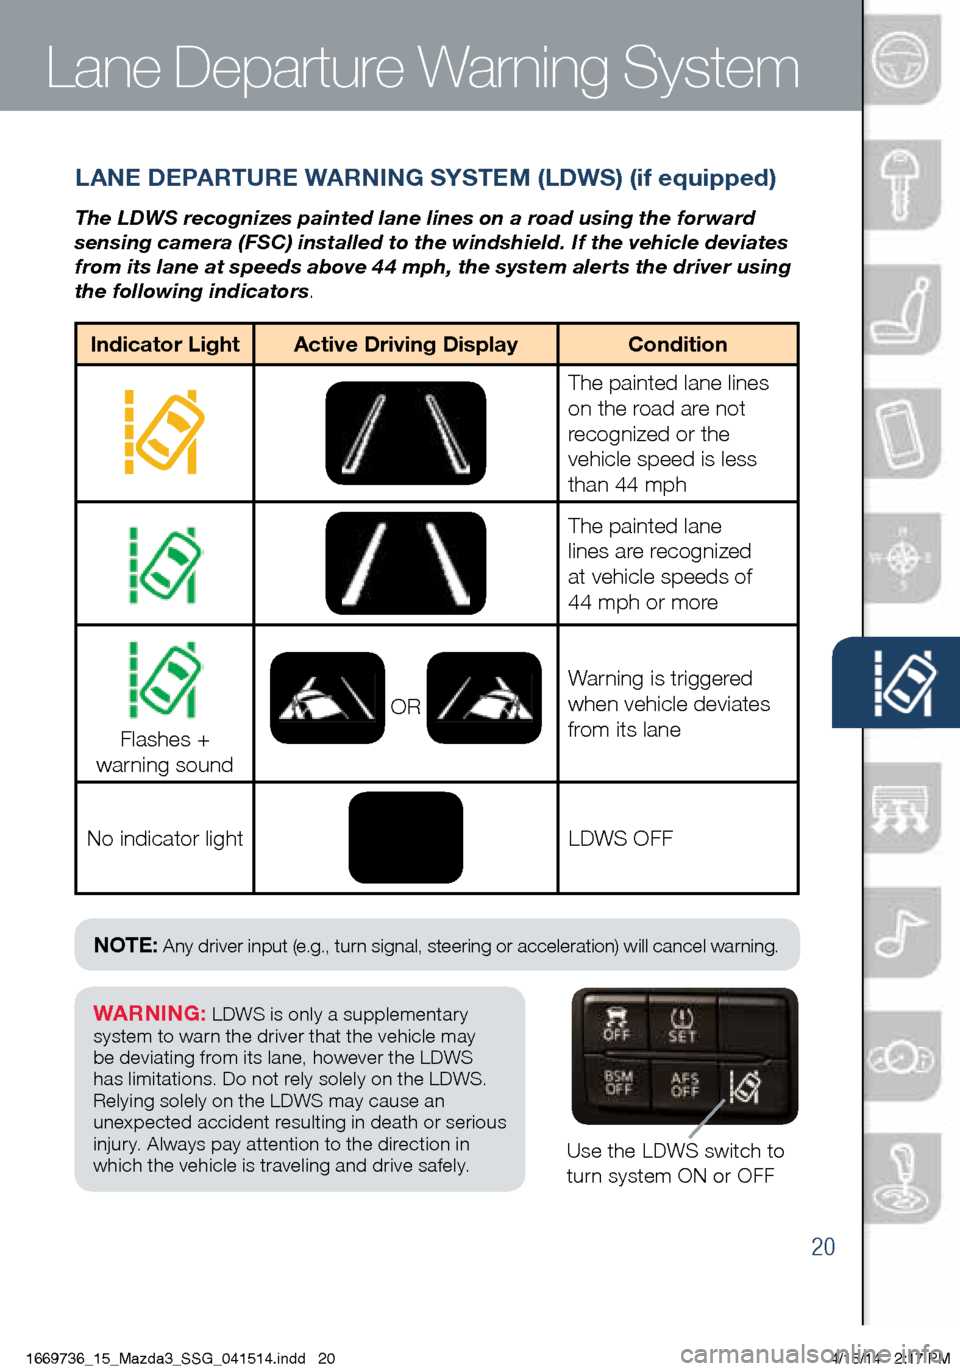
LANE DEPARTURE WARNING SYSTEM (LDWS) (if equipped)
The LDWS recognizes painted lane lines on a road using the forward
sensing camera (FSC) installed to the windshield. If the vehicle deviates
from its lane at speeds above 44 mph, the system alerts the driver using
the following indicators.
Use the LDWS switch to
turn system ON or OFF
Indicator LightActive Driving Display Condition
The painted lane lines
on the road are not
recognized or the
vehicle speed is less
than 44 mph
The painted lane
lines are recognized
at vehicle speeds of
44 mph or more
Flashes +
warning sound OR
Warning is triggered
when vehicle deviates
from its lane
No indicator light
LDWS OFF
WARNING: LDWS is only a supplementary
system to warn the driver that the vehicle may
be deviating from its lane, however the LDWS
has limitations. Do not rely solely on the LDWS.
Relying solely on the LDWS may cause an
unexpected accident resulting in death or serious
injury. Always pay attention to the direction in
which the vehicle is traveling and drive safely.
NOTE: Any driver input (e.g., turn signal, steering or acceleration) will cancel warning.
1669736_15_Mazda3_SSG_041514.indd 204/15/14 2:17 PM
Page 27 of 46
26
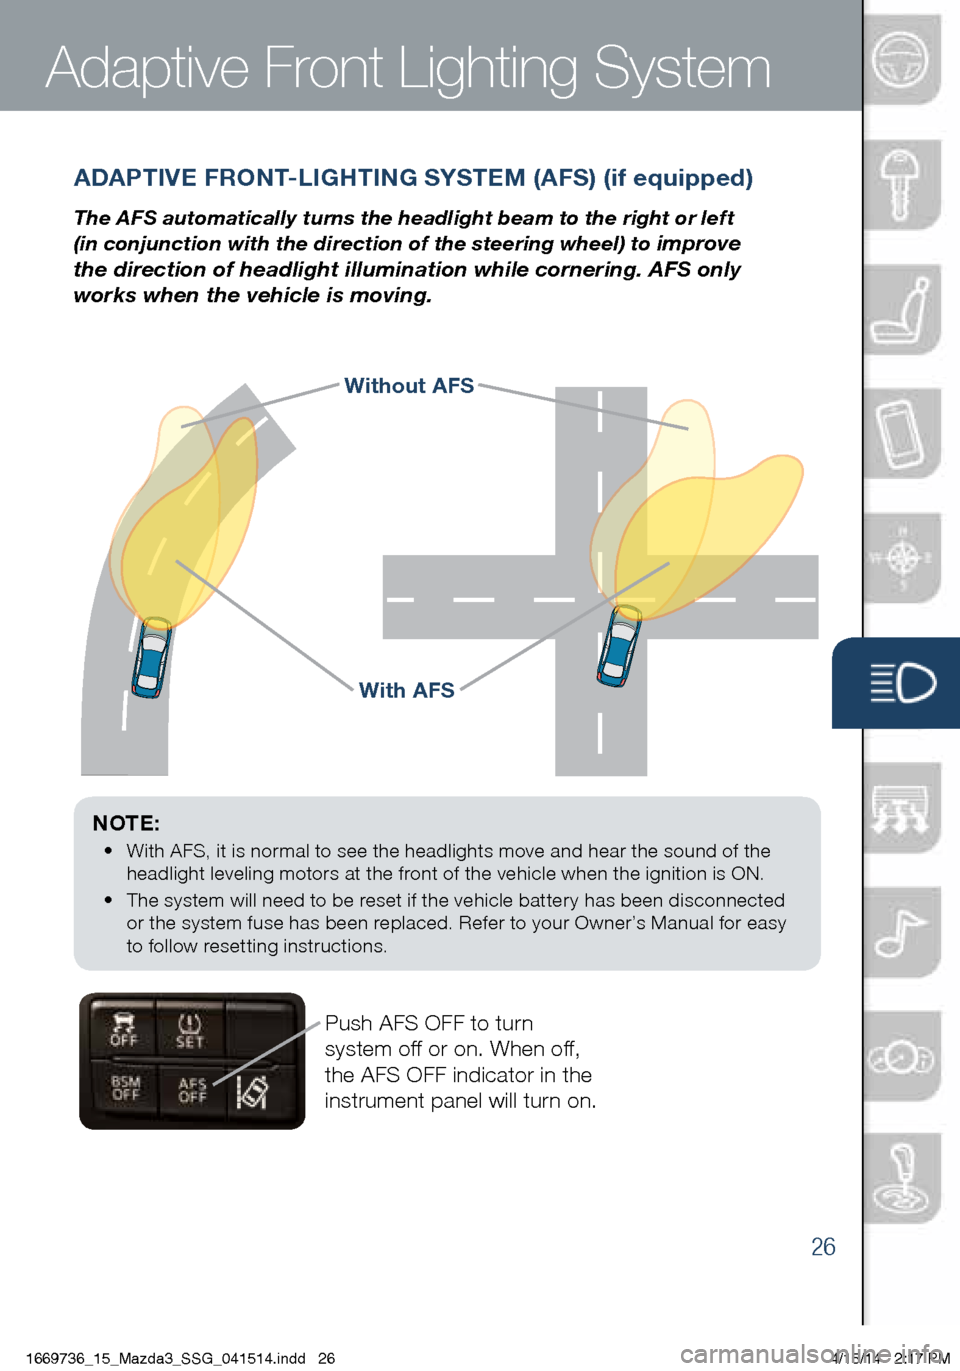
Push AFS OFF to turn
system off or on. When off,
the AFS OFF indicator in the
instrument panel will turn on.
With AFS
Without AFS
NOTE:
• With AFS, it is normal to see the headlights move and hear the sound of the
headlight leveling motors at the front of the vehicle when the ignition is ON.
• The system will need to be reset if the vehicle battery has been disconnected
or the system fuse has been replaced. Refer to your Owner’s Manual for easy
to follow resetting instructions.
ADAPTIVE FRONT-LIGHTING SYSTEM (AFS) (if equipped)
The AFS automatically turns the headlight beam to the right or left
(in conjunction with the direction of the steering wheel) to
improve
the direction of headlight illumination while cornering. AFS only
works when the vehicle is moving.
Adaptive Front Lighting System
1669736_15_Mazda3_SSG_041514.indd 264/15/14 2:17 PM
Page 33 of 46
32
AUDIO OPERATION
USING VOICE
Audio operation and media selection
can be done using voice. Push the
“TALK” button on the steering wheel, wait for a beep, then say a command in
a clear, natural voice (not too fast or too slow). Some common commands are listed below.
Play (and any of the following):
AM, FM, XM, CD, Bluetooth, Aha, Pandora, Stitcher, USB, AUX
Play or Resume / Pause or
Stop / Next or Previous
Play (and any of the following):
Song, Playlist
Artist
Tune to Station
Tune to Channel Number (XM)
HD RADIO
HD radio has a special
receiver which allows it to
receive digital broadcasts (where available) in addition to the analog broadcasts it already receives. Digital broadcasts have better
sound quality than analog broadcasts as digital
broadcasts provide free,
crystal clear audio.
When the HD radio button is ON (red), there could be a
noticeable difference in sound
quality and volume when a change from digital to analog signals occurs. If the sound
quality and volume becomes noticeably diminished or cuts
off, select the HD button to turn OFF HD radio (not red).
Audio Controls (with Mazda Connect)
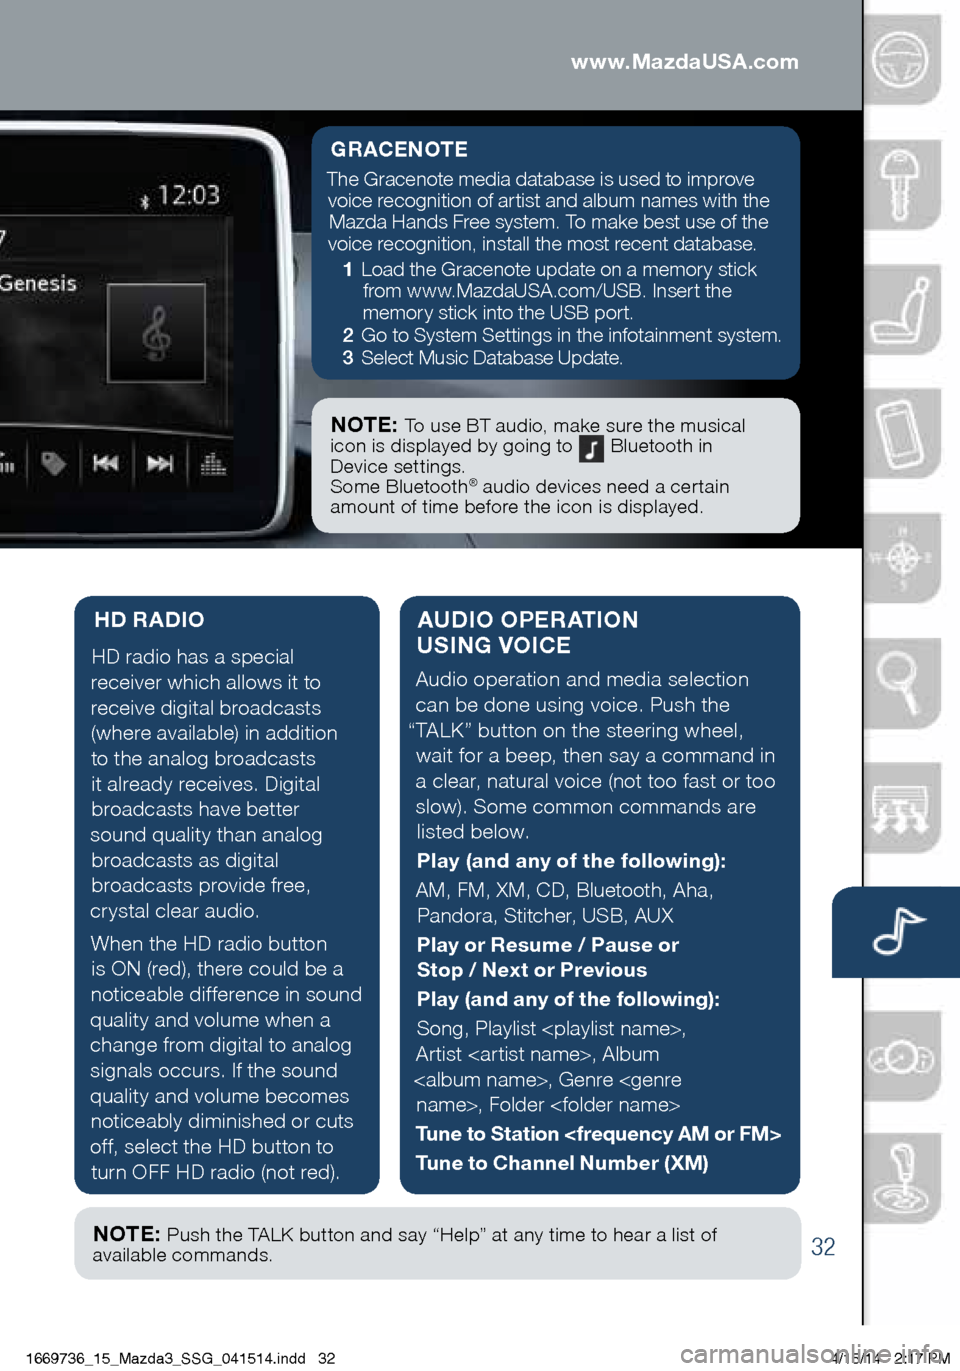
GRACENOTE
The Gracenote media database is used to improve voice recognition of artist and album names with the Mazda Hands Free system. To make best use of the
voice recognition, install the most recent database.
1 Load the Gracenote update on a memory stick
from www.MazdaUSA.com/USB. Insert the
memory stick into the USB port.
2 Go to System Settings in the infotainment system.
3 Select Music Database Update.
NOTE: To use BT audio, make sure the musical
icon is displayed by going to Bluetooth in
Device settings.
Some Bluetooth
® audio devices need a certain
amount of time before the icon is displayed.
NOTE: Push the TALK button and say “Help” at any time to hear a list of
available commands.
www.MazdaUSA.com
1669736_15_Mazda3_SSG_041514.indd 324/15/14 2:17 PM
Page 34 of 46
33
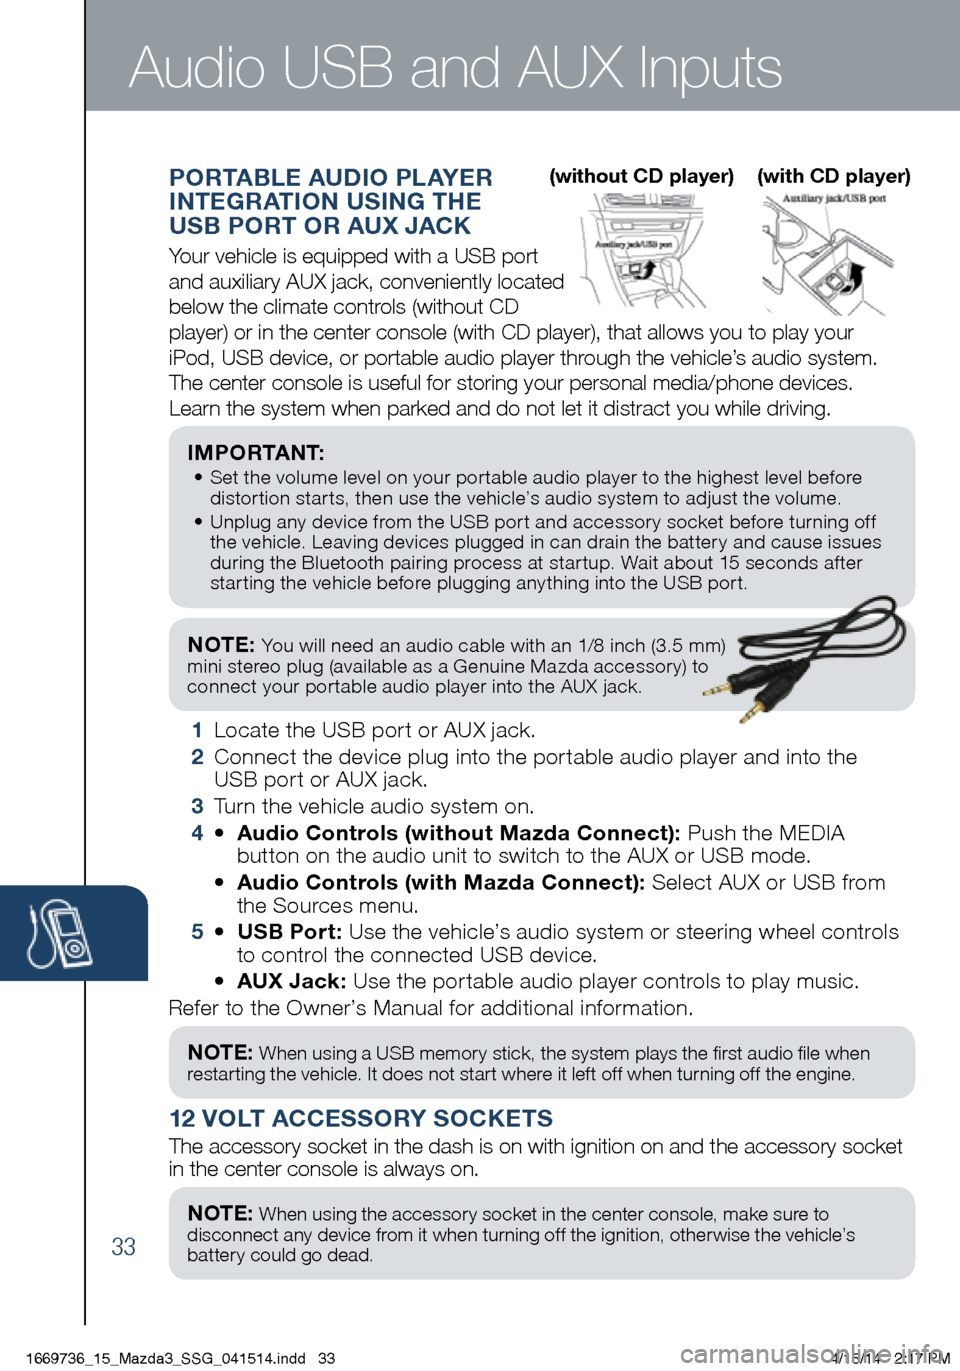
NOTE: You will need an audio cable with an 1/8 inch (3.5 mm)
mini stereo plug (available as a Genuine Mazda accessory) to
connect your portable audio player into the AUX jack.
I M P O R TA N T: • Set the volume level on your portable audio player to the highest level before
distortion starts, then use the vehicle’s audio system to adjust the volume.
• Unplug any device from the USB port and accessory socket before turning off
the vehicle. Leaving devices plugged in can drain the battery and cause issues
during the Bluetooth pairing process at startup. Wait about 15 seconds after
starting the vehicle before plugging anything into the USB port.
1 Locate the USB port or AUX jack.
2 Connect the device plug into the portable audio player and into the
USB port or AUX jack.
3 Turn the vehicle audio system on.
4 • Audio Controls (without Mazda Connect): Push the MEDIA
button on the audio unit to switch to the AUX or USB mode.
• Audio Controls (with Mazda Connect): Select AUX or USB from
the Sources menu.
5 • USB Port: Use the vehicle’s audio system or steering wheel controls
to control the connected USB device.
• AUX Jack: Use the portable audio player controls to play music.
Refer to the Owner’s Manual for additional information.
PORTABLE AUDIO PLAYER
INTEGRATION USING THE
USB PORT OR AUX JACK
Your vehicle is equipped with a USB port
and auxiliary AUX jack, conveniently located
below the climate controls (without CD
player) or in the center console (with CD player), that allows you to\
play your
iPod, USB device, or portable audio player through the vehicle’s audio system.
The center console is useful for storing your personal media/phone devic\
es.
Learn the system when parked and do not let it distract you while driving.
12 VOLT ACCESSORY SOCKETS
The accessory socket in the dash is on with ignition on and the accessor\
y socket
in the center console is always on.
Audio USB and AUX Inputs
NOTE: When using a USB memory stick, the system plays the first audio file when
restarting the vehicle. It does not start where it left off when turning off the engine.
NOTE: When using the accessory socket in the center console, make sure to
disconnect any device from it when turning off the ignition, otherwise the vehicle’s
battery could go dead.
(without CD player) (with CD player)
1669736_15_Mazda3_SSG_041514.indd 334/15/14 2:17 PM
Page 35 of 46
34
NOTE: • If the vehicle is jump started, leave the jumper cables connected until the
warning message is no longer displayed.
• If the vehicle is driven while the warning screen is displayed, a warning sound
will be heard and power steering assist will be limited.
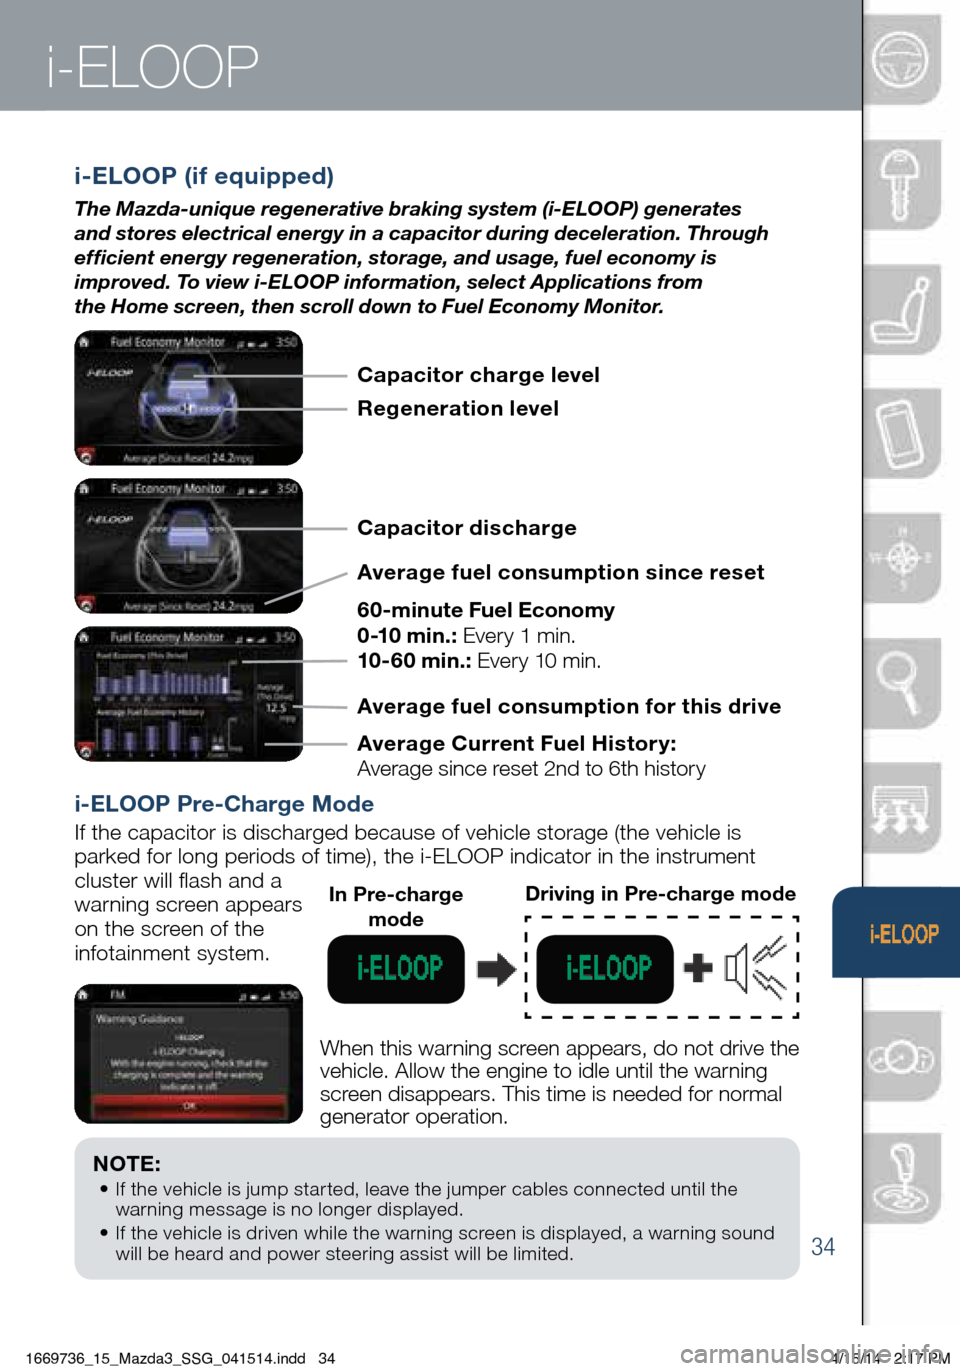
i-ELOOP
i-ELOOP (if equipped)
The Mazda-unique regenerative braking system (i-ELOOP) generates
and stores electrical energy in a capacitor during deceleration. Through
efficient energy regeneration, storage, and usage, fuel economy is
improved. To view i-ELOOP information, select Applications from
the Home screen, then scroll down to Fuel Economy Monitor.
i-ELOOP Pre-Charge Mode
If the capacitor is discharged because of vehicle storage (the vehicle \
is
parked for long periods of time), the i-ELOOP indicator in the instrume\
nt
cluster will flash and a
warning screen appears
on the screen of the
infotainment system.
When this warning screen appears, do not drive the
vehicle. Allow the engine to idle until the warning
screen disappears. This time is needed for normal
generator operation.
In Pre-charge modeDriving in Pre-charge mode
Capacitor charge level
Regeneration level
Capacitor discharge
Average fuel consumption since reset
60-minute Fuel Economy
0-10 min.: Every 1 min.
10-60 min.: Every 10 min.
Average Current Fuel Histor y:
Average since reset 2nd to 6th history Average fuel consumption for this drive
1669736_15_Mazda3_SSG_041514.indd 344/15/14 2:17 PM
Page 37 of 46
36
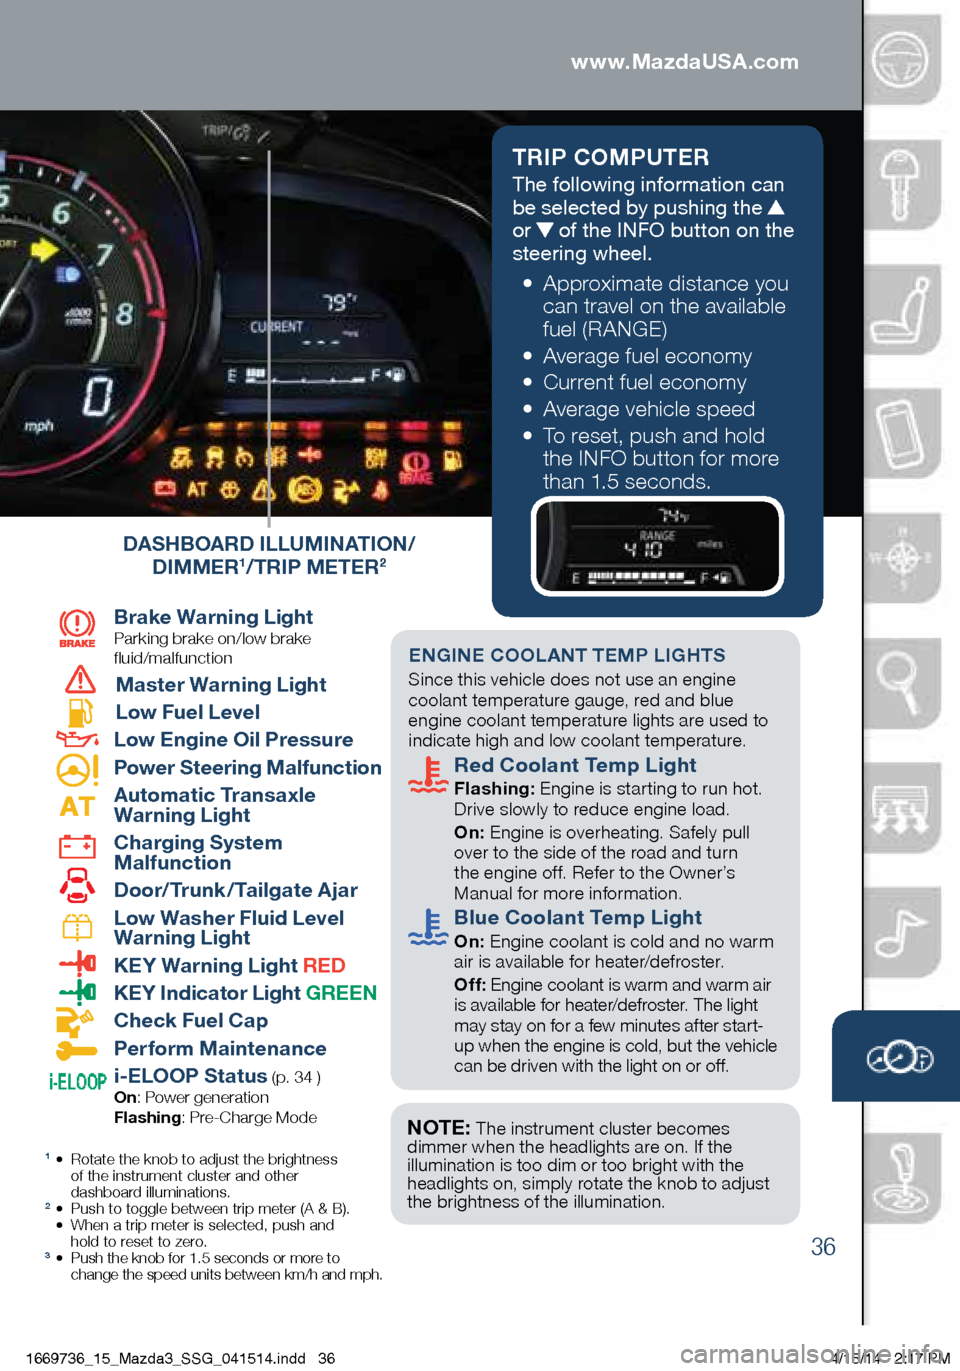
TRIP COMPUTER
The following information can
be selected by pushing the
or of the INFO button on the
steering wheel.
• Approximate distance you
can travel on the available
fuel (RANGE)
• Average fuel economy
• Current fuel economy
• Average vehicle speed
• To reset, push and hold
the INFO button for more
than 1.5 seconds.
1 • Rotate the knob to adjust the brightness
of the instrument cluster and other
dashboard illuminations.
2 • Push to toggle between trip meter (A & B).
• When a trip meter is selected, push and
hold to reset to zero.
3 • Push the knob for 1.5 seconds or more to
change the speed units between km/h and mph.
Brake Warning Light
Parking brake on/low brake
fluid/malfunction
Master Warning Light
Low Fuel Level
Low Engine Oil Pressure
Power Steering Malfunction
Automatic Transaxle
Warning Light
Charging System
Malfunction
Door/Trunk/Tailgate Ajar
Low Washer Fluid Level
Warning Light
KEY Warning Light RED
KEY Indicator Light GREEN
Check Fuel Cap
Perform Maintenance
i-ELOOP Status (p. 34 )
On : Power generation
Flashing : Pre-Charge Mode
ENGINE COOLANT TEMP LIGHTS Since this vehicle does not use an engine
coolant temperature gauge, red and blue
engine coolant temperature lights are used to
indicate high and low coolant temperature.
Red Coolant Temp Light
Flashing: Engine is starting to run hot.
Drive slowly to reduce engine load.
On: Engine is overheating. Safely pull
over to the side of the road and turn
the engine off. Refer to the Owner’s
Manual for more information.
Blue Coolant Temp Light
On: Engine coolant is cold and no warm
air is available for heater/defroster.
Off: Engine coolant is warm and warm air
is available for heater/defroster. The light
may stay on for a few minutes after start-
up when the engine is cold, but the vehicle
can be driven with the light on or off.
NOTE: The instrument cluster becomes
dimmer when the headlights are on. If the
illumination is too dim or too bright with the
headlights on, simply rotate the knob to adjust
the brightness of the illumination.
DASHBOARD ILLUMINATION/
DIMMER1/TRIP METER2
www.MazdaUSA.com
1669736_15_Mazda3_SSG_041514.indd 364/15/14 2:17 PM