ECU MAZDA MODEL 3 HATCHBACK 2018 (in English) Workshop Manual
[x] Cancel search | Manufacturer: MAZDA, Model Year: 2018, Model line: MODEL 3 HATCHBACK, Model: MAZDA MODEL 3 HATCHBACK 2018Pages: 624, PDF Size: 61.21 MB
Page 478 of 624

5. Disconnect the bulb by pulling it out.Rear turn signal lights, Brake lights/
Taillights/Rear side-marker lights
(Bulb type)
6. Install the new bulb in the reverseorder of the removal procedure.
7. Insert the cover tabs and install the cover.
Tabs
NOTE
Verify that the cover is securely
installed.
(Right side)
1. Make sure the ignition is switched off,and the headligh t switch is off.
2. Turn the knob and remove the cover.
3. Turn the wing bolt and jack screw
counterclockwise.
4. Remove the jack
5. Turn the socket and bulb assemblycounterclockwise and remove it.
Maintenance and Care
Owner Maintenance
6-50
Mazda3_8GE4-EA-17F_Edition1 2017-4-7 11:59:21
Page 480 of 624

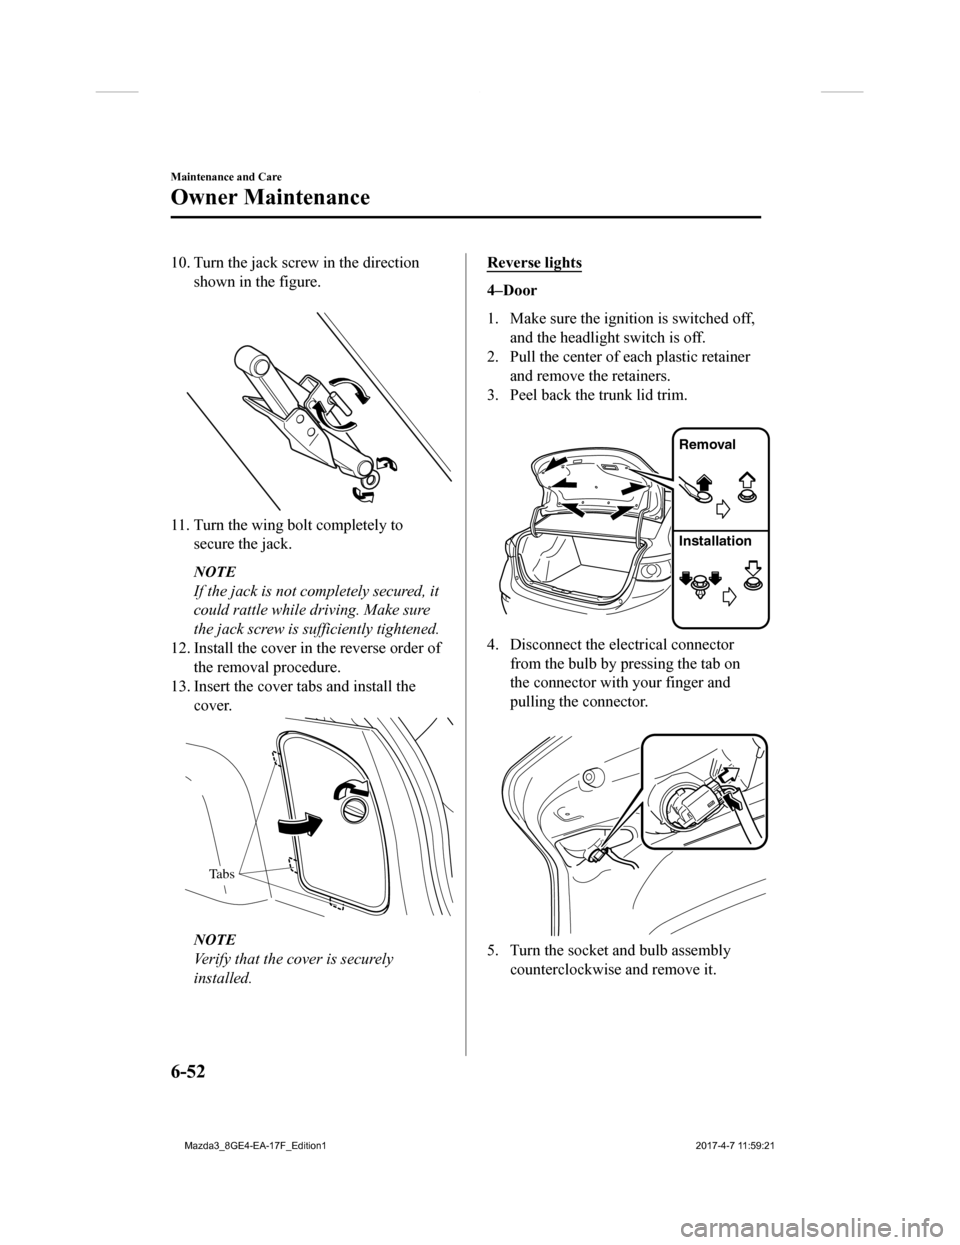
10. Turn the jack screw in the directionshown in the figure.
11. Turn the wing bolt completely tosecure the jack.
NOTE
If the jack is not completely secured, it
could rattle while driving. Make sure
the jack screw is sufficiently tightened.
12. Install the cover in the reverse order of the removal procedure.
13. Insert the cover tabs and install the cover.
Tabs
NOTE
Verify that the cover is securely
installed.
Reverse lights
4–Door
1. Make sure the ignition is switched off,
and the headligh t switch is off.
2. Pull the center of each plastic retainer
and remove the retainers.
3. Peel back the trunk lid trim.
Removal
Installation
4. Disconnect the electrical connectorfrom the bulb by pressing the tab on
the connector with your finger and
pulling the connector.
5. Turn the socket and bulb assemblycounterclockwise and remove it.
Maintenance and Care
Owner Maintenance
6-52
Mazda3_8GE4-EA-17F_Edition1 2017-4-7 11:59:21
Page 486 of 624

6. Reinstall the cover and make sure thatit is securely installed.
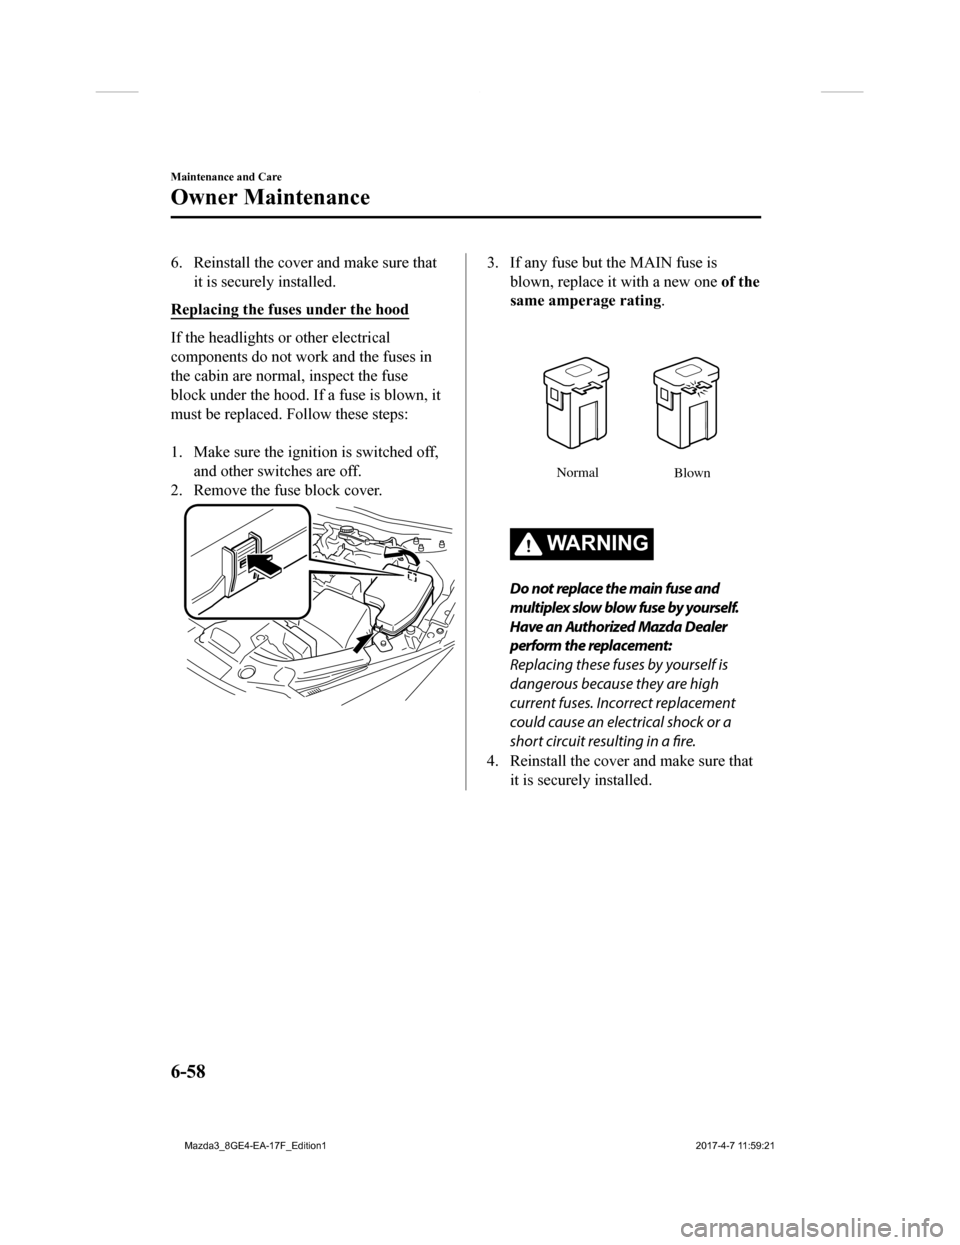
Replacing the fuses under the hood
If the headlights or other electrical
components do not work and the fuses in
the cabin are normal, inspect the fuse
block under the hood. If a fuse is blown, it
must be replaced. Follow these steps:
1. Make sure the ignition is switched off, and other switches are off.
2. Remove the fuse block cover.
3. If any fuse but the MAIN fuse is
blown, replace it with a new one of the
same amperage rating .
Normal
Blown
WARNING
Do not replace the main fuse and
multiplex slow blow fuse by yourself.
Have an Authorized Mazda Dealer
perform the replacement:
Replacing these fuses by yourself is
dangerous because they are high
current fuses. Incorrect replacement
could cause an electrical shock or a
short circuit resulting in a fire.
4. Reinstall the cover and make sure that it is securely installed.
Maintenance and Care
Owner Maintenance
6-58
Mazda3_8GE4-EA-17F_Edition1 2017-4-7 11:59:21
Page 500 of 624

▼Cleaning the Floor Mats
Rubber floor mats should be cleaned with
mild soap and water only.
WA R N I N G
Do not use rubber cleaners, such as tire
cleaner or tire shine, when cleaning rubber
floor mats:
Cleaning the rubber
floor mats with rubber
cleaning products makes the floor mats
slippery.
This may cause an accident when
depressing the accelerator, brake, or clutch
(Manual transaxle) pedal or when getting
in or out of the vehicle.
After removing the floor mats for
cleaning, always rein stall them securely
(page 3-46).
Maintenance and Care
Appearance Care
6-72
Mazda3_8GE4-EA-17F_Edition1 2017-4-7 11:59:21
Page 504 of 624

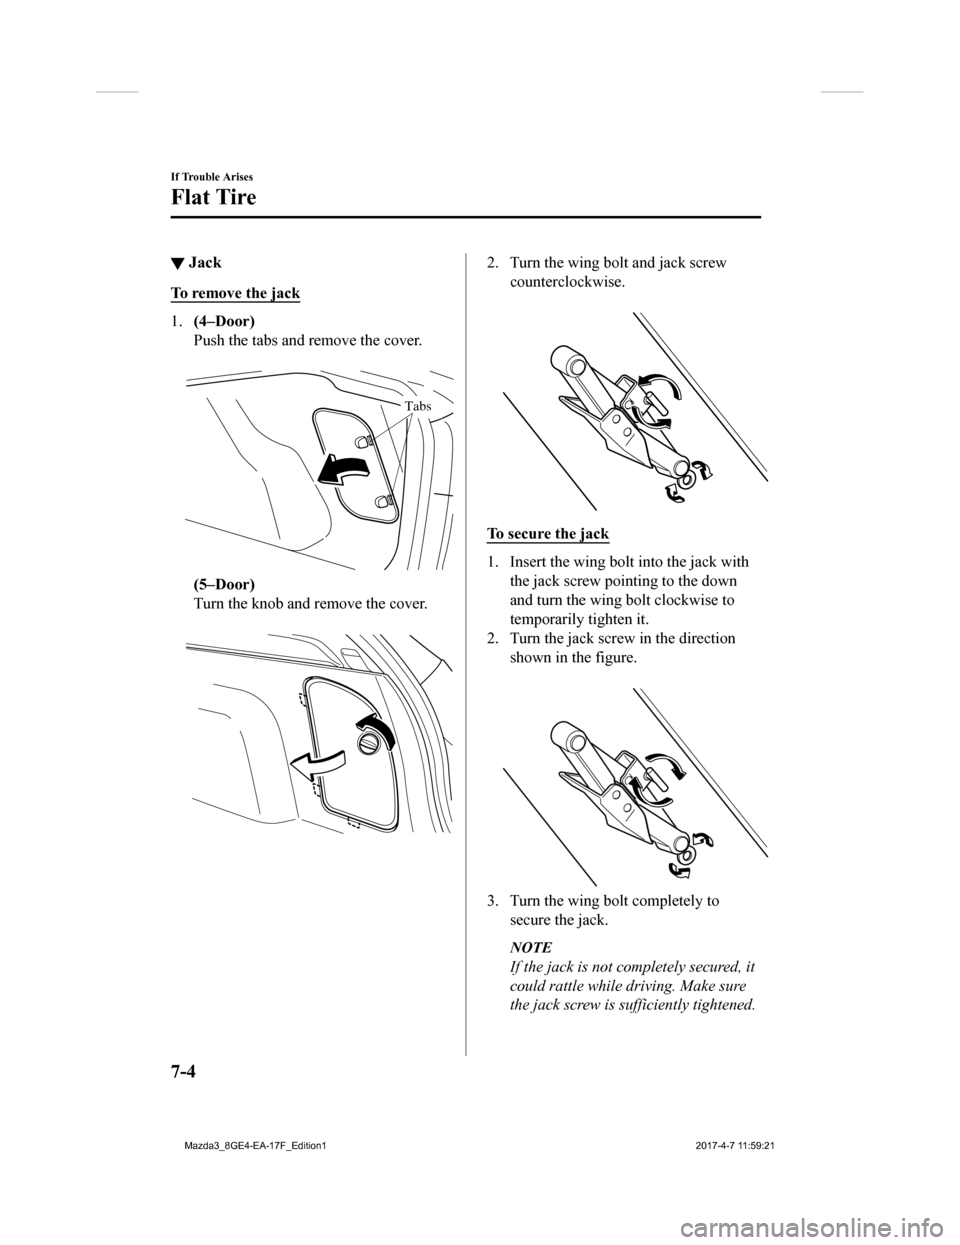
▼Jack
To remove the jack
1.
(4–Door)
Push the tabs and remove the cover.
Tabs
(5–Door)
Turn the knob and remove the cover.
2. Turn the wing bolt and jack screw
counterclockwise.
To secure the jack
1. Insert the wing bo lt into the jack with
the jack screw pointing to the down
and turn the wing bolt clockwise to
temporarily tighten it.
2. Turn the jack screw in the direction shown in the figure.
3. Turn the wing bolt completely to
secure the jack.
NOTE
If the jack is not completely secured, it
could rattle while driving. Make sure
the jack screw is sufficiently tightened.
If Trouble Arises
Flat Tire
7-4
Mazda3_8GE4-EA-17F_Edition1 2017-4-7 11:59:21
Page 505 of 624

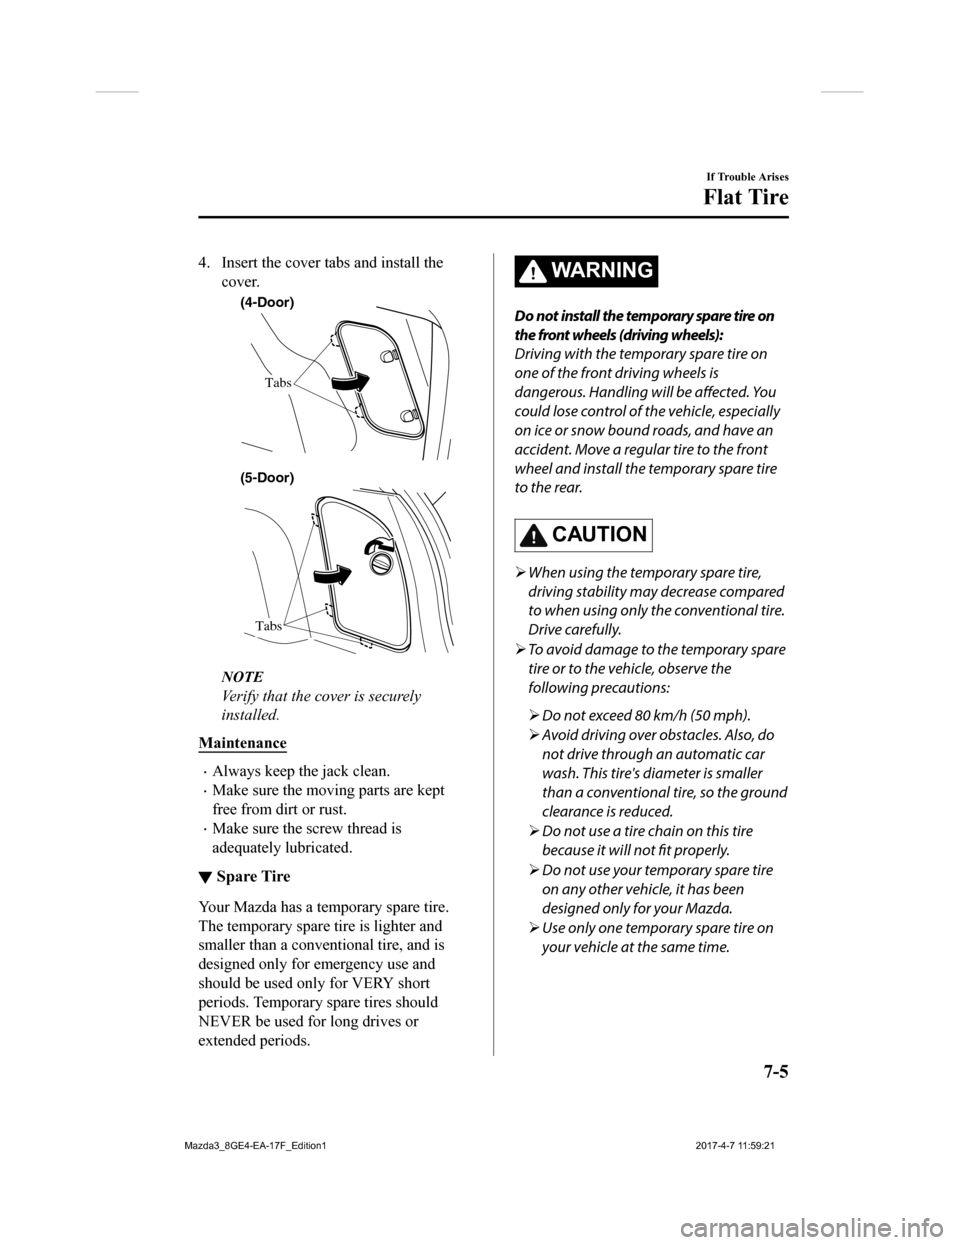
4. Insert the cover tabs and install thecover.
(4-Door)
Tabs
Tabs
(5-Door)
NOTE
Verify that the cover is securely
installed.
Maintenance
Always keep the jack clean.
Make sure the moving parts are kept
free from dirt or rust.
Make sure the screw thread is
adequately lubricated.
▼ Spare Tire
Your Mazda has a temporary spare tire.
The temporary spare tire is lighter and
smaller than a conventional tire, and is
designed only for emergency use and
should be used only for VERY short
periods. Temporary spare tires should
NEVER be used for long drives or
extended periods.
WA R N I N G
Do not install the temporary spare tire on
the front wheels (driving wheels):
Driving with the temporary spare tire on
one of the front driving wheels is
dangerous. Handling will be
affected. Yo u
could lose control of the vehicle, especially
on ice or snow bound roads, and have an
accident. Move a regular tire to the front
wheel and install the temporary spare tire
to the rear.
CAUTION
When using the temporary spare tire,
driving stability may decrease compared
to when using only the conventional tire.
Drive carefully.
To avoid damage to the temporary spare
tire or to the vehicle, observe the
following precautions:
Do not exceed 80 km/h (50 mph).
Avoid driving over obstacles. Also, do
not drive through an automatic car
wash. This tire's diameter is smaller
than a conventional tire, so the ground
clearance is reduced.
Do not use a tire chain on this tire
because it will not fit properly.
Do not use your temporary spare tire
on any other vehicle, it has been
designed only for your Mazda.
Use only one temporary spare tire on
your vehicle at the same time.
If Trouble Arises
Flat Tire
7-5
Mazda3_8GE4-EA-17F_Edition1 2017-4-7 11:59:21
Page 506 of 624

To remove the spare tire
1. Lift the trunk/luggage compartmentmat.
Trunk/Luggage compartment mat
2. Turn the spare tire hold-down boltcounterclockwise.
Spare tire hold-down bolt
To secure the spare tire
Store the spare tire in the reverse order of
removal. After storing, verify that the
spare tire is stored securely.
Changing a Flat Tire
NOTE
If the following occurs while driving, it
could indicate a flat tire.
Steering becomes difficult.
The vehicle begins to vibrate
excessively.
The vehicle pulls in one direction.
If you have a flat tire, drive slowly to a
level spot that is well off the road and out
of the way of traffic to change the tire.
Stopping in traffic or on the shoulder of a
busy road is dangerous.
WA R N I N G
Be sure to follow the directions for
changing a tire:
Changing a tire is dangerous if not done
properly. The vehicle can slip off the jack
and seriously injure someone.
No person should place any portion of their
body under a vehicle that is supported by a
jack.
Never allow anyone inside a vehicle
supported by a jack:
Allowing someone to remain in a vehicle
supported by a jack is dangerous. The
occupant could cause the vehicle to fall
resulting in serious injury.
NOTE
Make sure the jack is well lubricated
before using it.
1. Park on a hard, level surface off the right-of-way and firml y set the parking
brake.
If Trouble Arises
Flat Tire
7-6
Mazda3_8GE4-EA-17F_Edition1 2017-4-7 11:59:21
Page 512 of 624

3. Install the lug nuts with the bevelededge inward; tighten them by hand.
WARNING
Do not apply oil or grease to lug nuts
and bolts and do not tighten the lug
nuts beyond the recommended
tightening torque:
Applying oil or grease to lug nuts and
bolts is dangerous. The lug nuts could
loosen while driving and cause the tire
to come off, resulting in an accident. In
addition, lug nuts and bolts could be
damaged if tightened more than
necessary.
4. Turn the lug wrench counterclockwise and lower the vehicle.
5. Use the lug wrench to tighten the nuts
in the order shown.
If you are unsure of how tight the nuts
should be, have them inspected at an
Authorized Mazda Dealer.
Nut tightening torque
N·m (kgf·m, ft·lbf) 108―147 (12―14,
80―108)
WARNING
Always securely and correctly tighten
the lug nuts:
Improperly or loosely tightened lug nuts
are dangerous. The wheel could wobble
or come off. This could result in loss of
vehicle control and cause a serious
accident.
Be sure to reinstall the same nuts you
removed or replace them with metric
nuts of the same configuration:
Because the wheel studs and lug nuts
on your Mazda have metric threads,
using a non-metric nut is dangerous.
On a metric stud, it would not secure
the wheel and would damage the stud,
which could cause the wheel to slip off
and cause an accident.
If Trouble Arises
Flat Tire
7-12
Mazda3_8GE4-EA-17F_Edition1 2017-4-7 11:59:21
Page 513 of 624

6.(Without flat tire belt)
Store the damaged tire in the trunk/
luggage compartment.
(With flat tire belt)
Open the trunk/luggage compartment
mat.
Trunk/Luggage compartment mat
7. Remove the belt for securing the flat
tire.
8. Put the flat tire into the trunk/luggage
compartment on the left and toward the
back.
9. (Split-folding type seat)
Fold the rear seatback forward on the
right side of the rear seat.
10.(Split-folding type seat)
Unlock the rear seatback on the left
side and assure a clearance to pass the
belt.
(One-piece folding type seat)
Unlock the rear seatback and assure a
clearance to pass the belt.
11. Pass the belt through the rear seatback as shown in the figure.
After passing the be lt through, return
the rear seatback to the original
position.
(Split-folding type seat)
Belt
(One-piece folding type seat)
Belt
If Trouble Arises
Flat Tire
7-13
Mazda3_8GE4-EA-17F_Edition1 2017-4-7 11:59:21
Page 514 of 624

NOTE
Pass the belt underneath the seatbelts.
BeltSeat belt
12. Pass the buckle through the wheel as
shown in the figure and secure it so
that the buckle does not contact the
wheel.
(Aluminum wheel)
(Steel wheel)
13. Pass the belt through the buckle, thenpull the belt end to secure the flat tire.
14.(Split-folding type seat)
Return the rear seatback on the right
side of the rear seatback to its original
position.
15. Remove the tire blocks and store the tools and jack.
16. Check the inflation pressure. Refer to Tires on page 9-10.
17. Have the flat tire repaired or replaced
as soon as possible.
NOTE
Do not press the tire pressure monitoring
system set switch after installing the spare
tire. The switch is only to be pressed after
installing the repaired flat tire or installing
a replacement tire (page 4-23).
If Trouble Arises
Flat Tire
7-14
Mazda3_8GE4-EA-17F_Edition1 2017-4-7 11:59:21