brake light MAZDA MODEL 3 HATCHBACK 2020 (in English) Workshop Manual
[x] Cancel search | Manufacturer: MAZDA, Model Year: 2020, Model line: MODEL 3 HATCHBACK, Model: MAZDA MODEL 3 HATCHBACK 2020Pages: 598, PDF Size: 89.37 MB
Page 309 of 598

If the vehicle is stopped by the SBS-RC
operation and the brake pedal is not
depressed, displaying in meter
“Emergency Braking Activated. Depress
Brake Pedal to Hold Stop”, after about
2 seconds and the SBS-RC brake is
automatically released.
▼Collision Warning
If there is a possibility of a collision, the
collision warning sound is activated
continuously and a warning is displayed
on the active driving display and the
multi-information display.
Multi-information display
1. “BRAKE!” message is displayed
Active driving display
1. “BRAKE!” message is displayed
▼Stopping the Smart Brake Support
[Rear Crossing] (SBS-RC) System
Operation
The SBS-RC can be changed to
inoperable.
Refer to the Settings section in the Mazda
Connect Owner's Manual.
When the SBS-RC is canceled, the SBS
OFF indicator light turns on.
NOTE
When the ignition is switched OFF
while the SBS-RC is canceled, the
SBS-RC is automatically enabled the
next time the ignition is switched ON.
When the SBS-RC is canceled, the Smart
Brake Support [Rear] (SBS-R) is also
canceled.
When Driving
i-ACTIVSENSE
4-165
Mazda3_8HZ1-EA-19G_Edition1_old
2019-5-17 13:49:03
Page 345 of 598

Be careful not to scratch the Forward
Sensing Camera (FSC) lens or allow it
to get dirty.
Do not remove the Forward Sensing
Camera (FSC) cover.
Do not place objects on the dashboard
which
reflect light.
Always keep the windshield glass
around the camera clean by removing
dirt or fogging. Use the windshield
defroster to remove fogging on the
windshield.
Consult an Authorized Mazda Dealer
regarding cleaning the interior side of
the windshield around the Forward
Sensing Camera (FSC).
Consult an Authorized Mazda Dealer
before performing repairs around the
Forward Sensing Camera (FSC).
The Forward Sensing Camera (FSC) is
installed to the windshield. Consult an
Authorized Mazda Dealer for
windshield repair and replacement.
When cleaning the windshield, do not
allow glass cleaners or similar cleaning
fluids to get on the Forward Sensing
Camera (FSC) lens. In addition, do not
touch the Forward Sensing Camera
(FSC) lens.
When performing repairs around the
rearview mirror, consult an Authorized
Mazda Dealer.
Consult an Authorized Mazda Dealer
regarding cleaning of the camera lens.Do not hit or apply strong force to the
Forward Sensing Camera (FSC) or the
area around it. If the Forward Sensing
Camera (FSC) is severely hit or if there
are cracks or damage caused by
flying
gravel or debris in the area around it,
stop using the following systems and
consult an Authorized Mazda Dealer.
High Beam Control System (HBC)
Lane Departure Warning System
(LDWS)
Traffic Sign Recognition System
(TSR)
Distance & Speed Alert (DSA)
Driver Attention Alert (DAA)
Driver Monitoring (DM)
Mazda Radar Cruise Control (MRCC)
Mazda Radar Cruise Control with
Stop & Go function (MRCC with Stop
& Go function)
Lane-keep Assist System (LAS)
Traffic Jam Assist (TJA)
Smart Brake Support (SBS)
The direction in which the Forward
Sensing Camera (FSC) is pointed has
been finely adjusted. Do not change
the installation position of the Forward
Sensing Camera (FSC) or remove it.
Otherwise, it could result in damage or
malfunction.
Always use tires for all wheels that are of
the specified size, and the same
manufacturer, brand, and tread pattern.
In addition, do not use tires with
significantly different wear patterns on
the same vehicle as the system may not
operate normally.
When Driving
i-ACTIVSENSE
4-201
Mazda3_8HZ1-EA-19G_Edition1_old 2019-5-17 13:49:03
Page 359 of 598

▼To Resume Cruising Speed at More
Than 30 km/h (19 mph)
If the cruise control system is temporarily
canceled (such as by applying the brake
pedal) and the system is still activated, the
most recent set speed will automatically
resume when the RES switch is pressed.
If vehicle speed is below 30 km/h (19
mph), increase the veh
icle speed up to 30
km/h (19 mph) or more and press the RES
switch.
▼ To Temporarily Cancel
To temporarily cancel the system, use one
of these methods:
Slightly depress
the brake pedal.
Press the CANCEL switch.
(Manual transmission)
Depress the clutch pedal.
If the RES switch i s pressed when the
vehicle speed is 30 km/h (19 mph) or
higher, the system reverts to the previously
set speed.
NOTE
If any of the follow ing conditions occur,
the cruise control system is temporarily
canceled.
Even when the brake pedal is slightly
depressed.
The DSC is operating.
There is a problem in the system.
Any of the doors is opened.
The driver's seat belt is unfastened.
The parking brake is applied.
(Automatic transmission)
The selector lever is in the P or N
position.
(Manual transmission)
The shift lever is in the neutral
position.
When the cruise control system is
temporarily canceled by even one of the
applicable cancel conditions, the speed
cannot be re-set.
(Automatic transmission)
The cruise control cannot be canceled
while driving in manual mode (selector
lever shifted from D to M position).
Therefore, engine braking will not be
applied even if the transmission is
shifted down to a lower gear. If
deceleration is required, lower the set
speed or depress the brake pedal.
▼ To Deactivate
Press the cruise switch again.
When Driving
Cruise Control
4-215
Mazda3_8HZ1-EA-19G_Edition1_old
2019-5-17 13:49:03
Page 383 of 598

DisplayDistance between vehicle and obstruction
Without 360° view monitor
With 360° viewmonitor Front ultrasonic sen‐
sor
*/Front corner
ultrasonic sensor*
Rear ultrasonic sen‐ sor/Rear corner ul‐
trasonic sensor/Rear side ultrasonic sen‐
sor
*
Without front ul‐
trasonic sensor and front corner ultra‐ sonic sensor With front ultra‐
sonic sensor and
front corner ultra‐ sonic sensor
Red
Front ultrasonic sen‐ sor:
Within approx. 35.0 cm (13.7 in)
Front corner ultrason‐ ic sensor:
Within approx. 25 cm (9.8 in) Rear ultrasonic sen‐
sor:
Within approx. 35.0 cm (13.7 in)
Rear corner ultrasonic sensor/Rear side ul‐ trasonic sensor:
Within approx. 25 cm (9.8 in)
▼Park Assist Sensor System
Operation
When the parking sensor switch is pressed
with the ignition switched ON, the
indicator light turns on.
When the ignition is switched ON with the
parking sensor activated, the indicator
light turns on.
Press the switch again to stop the
operation.
1. Indicator light
NOTE
When the ignition is
switched OFF, the
system status before it was turned off is
maintained. For exampl e, if the ignition is
switched OFF while the parking sensor is
activated, the system will be activated
when the ignition is switched ON the next
time.
Operation conditions
The parking sensor system can be used
when all of the foll owing conditions are
met:
The ignition is switched ON.
The parking sensor switch is turned on.
NOTE
(Automatic vehicle)
The detection indicator and buzzer of
the front sensors/front corner sensors do
not operate when the selector lever is in
the P position.
The detection indicator and buzzer
sound do not activate when the parking
brake is applied.
When Driving
Parking Sensor System
*Some models.4-239
Mazda3_8HZ1-EA-19G_Edition1_old 2019-5-17 13:49:03
Page 433 of 598

6Maintenance and Care
How to keep your Mazda in top condition.
Essential Information........................6-2 Introduction.................................. 6-2
Scheduled Maintenance.................... 6-4 Scheduled Maintenance................ 6-4
Owner Maintenance........................ 6-11 Owner Maintenance
Precautions..................................6-11
Hood........................................... 6-12
Engine Compartment
Overview.................................... 6-14
Engine Oil...................................6-15
Engine Coolant........................... 6-17
Brake/Clutch Fluid ..................... 6-19
Washer Fluid............................... 6-19
Body Lubrication...... .................. 6-20
Wiper Blades.............................. 6-21
Battery........................................ 6-26
Key Battery Replacement........... 6-28
Tires............................................ 6-31
Light Bulbs................................. 6-35
Fuses........................................... 6-38
Appearance Care............................. 6-44
Exterior Care.............................. 6-44
Interior Care................................6-50
6-1
Mazda3_8HZ1-EA-19G_Edition1_old 2019-5-17 13:49:03
Page 436 of 598

Scheduled Maintenance
▼Scheduled Maintenance (U.S.A. and Puerto Rico)
Vehicles utilizing the vehicle status monitor feature:
The vehicle status monitor featur
e alerts you of maintenance needs by turning on the wrench
indicator light or displaying a message in the instrument panel , or both.
Every maintenance must be done when the display/wrench indicati on comes on. The dis‐
play/wrench indication will come on before reaching the maximum interval of 16,000 km
(10,000 miles), or 12 months (after the previous maintenance).
If you drive your vehicle under any of the following conditions , follow the Severe Driving
Scheduled Maintenance and replace the engine oil and filter eve ry 8,000 km (5,000 miles)
or 6 months, whichever comes first.
Otherwise, follow the Normal Driving Scheduled Maintenance inte rvals.
1. The vehicle is idled for long periods or driven at low speeds , such as with police cars,
taxis, or driver's education school car.
2. Driving under dusty conditions.
3. Driving for long periods in co ld temperatures or driving regularly for short distances on‐
ly.
4. Driving under extremely high temperature conditions.
5. Driving continuously in mountainous regions.
If you are following the Severe Driving Scheduled Maintenance ( 8,000 km (5,000 miles) or
6 months oil replacemen t interval), set the vehicle status moni tor manually.
Refer to the Information section in the Mazda Connect Owner's M anual. Please contact an
Authorized Mazda Dealer if necessary.
USA and Puerto Rico Residents (Normal Driving Scheduled Mainten ance):
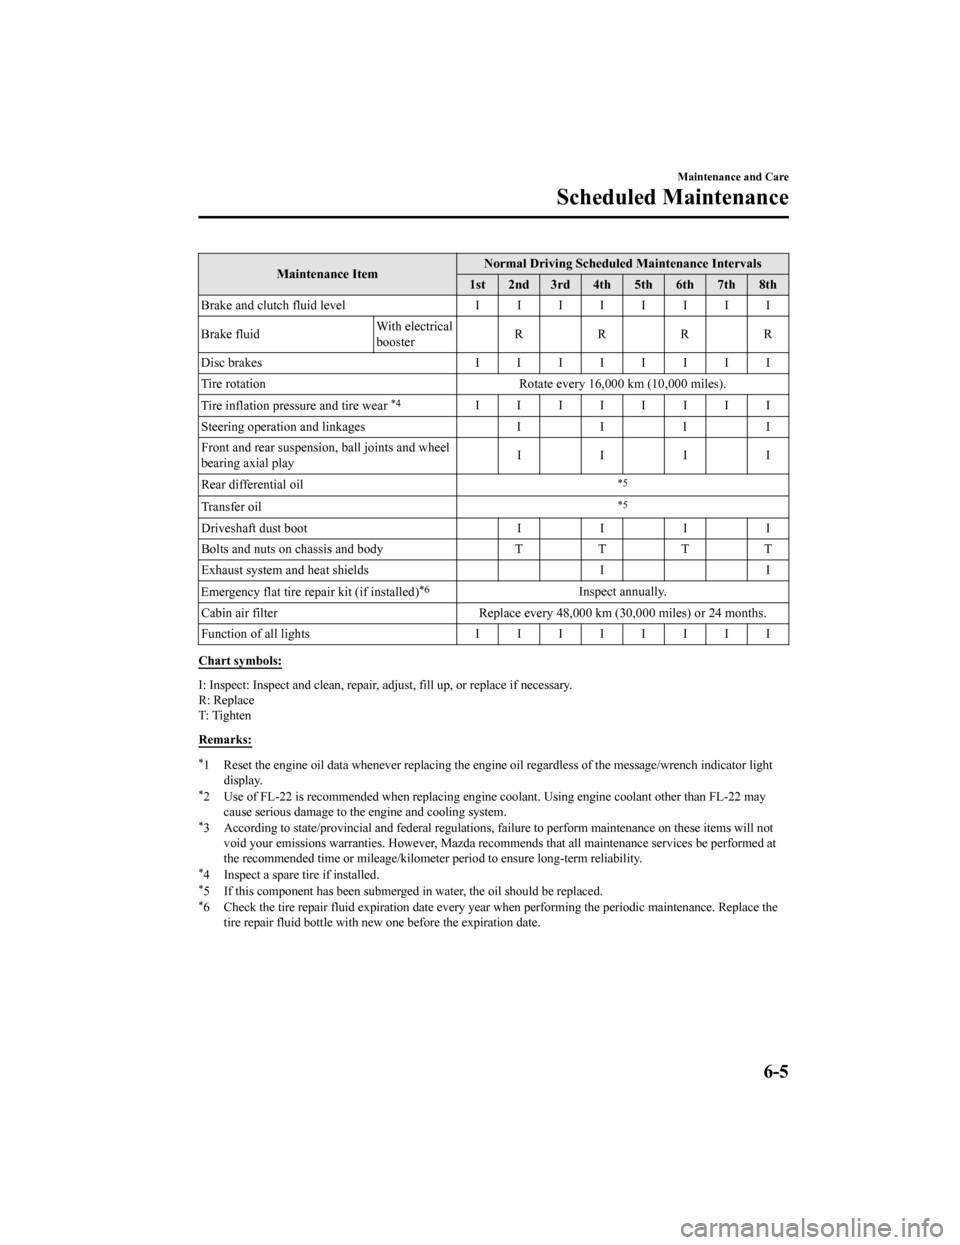
Maintenance ItemNormal Driving Scheduled Maintenance Intervals
1st 2nd 3rd 4th 5th 6th 7th 8th
Engine oil & filter
*1RRRRRRRR
Spark plug Replace every 12 0,000 km (75,000 miles).
Air filter RR
Drive belts IIIIIIII
Engine coolant level IIIIIIII
Engine coolant
*2Replace at first 192,000 km ( 120,000 miles) or 120 months;
after that, every 96,000 km (60,000 miles) or 60 months.
Fuel lines & hoses
*3IIII
Hoses and tubes for emission
*3II
Brake lines, hoses and connections I I I I
Vacuum brake booster and hose With vacuum
boosterIIII
Maintenance and Care
Scheduled Maintenance
6-4
Mazda3_8HZ1-EA-19G_Edition1_old
2019-5-17 13:49:03
Page 437 of 598

Maintenance ItemNormal Driving Scheduled Maintenance Intervals
1st 2nd 3rd 4th 5th 6th 7th 8th
Brake and clutch fluid level IIIIIIII
Brake fluid With electrical
boosterRRRR
Disc brakes IIIIIIII
Tire rotation Rotate every 16,000 km (10,000 miles).
Tire inflation pressure and tire wear
*4IIIIIIII
Steering operation and linkages I I I I
Front and rear suspension, ball joints and wheel
bearing axial play IIII
Rear differential oil
*5
Transfer oil*5
Driveshaft dust boot II II
Bolts and nuts on chassis and body TTTT
Exhaust system and heat shields II
Emergency flat tire repair kit (if installed)
*6Inspect annually.
Cabin air filter Replace every 48 ,000 km (30,000 miles) or 24 months.
Function of all lights IIIIIIII
Chart symbols:
I: Inspect: Inspect and clean, repair, adjust, fill up, or replace if necessary.
R: Replace
T: Ti g h t e n
Remarks:
*1 Reset the engine oil data whene ver replacing the engine oil regardless of the message/wrench indicator light
display.
*2 Use of FL-22 is recommended wh en replacing engine coolant. Using engine coolant other than FL-22 may
cause serious damage to the engine and cooling system.
*3 According to state/provincial and federal regulations, failure to perform maintenance on these items will not void your emissions warranties. However, Mazda recommends that all maintenance services be performed at
the recommended time or mileage/ kilometer period to ensure long-term reliability.
*4 Inspect a spare tire if installed.*5 If this component has been subm erged in water, the oil should be replaced.*6 Check the tire repair fluid exp iration date every year when performing the periodic maintenance. Replace the
tire repair fluid bottle with new one before the expiration date.
Maintenance and Care
Scheduled Maintenance
6-5
Mazda3_8HZ1-EA-19G_Edition1_old 2019-5-17 13:49:03
Page 441 of 598

4. Driving under extremely high temperature conditions.
5. Driving continuously in mountainous regions.
If you are following the Severe Driving Scheduled Maintenance (5,000 km or 3 months oil
replacement interval), set the v ehicle status monitor manually.
Refer to the Information section in the Mazda Connect Owner's M anual. Please contact an
Authorized Mazda Dealer if necessary.
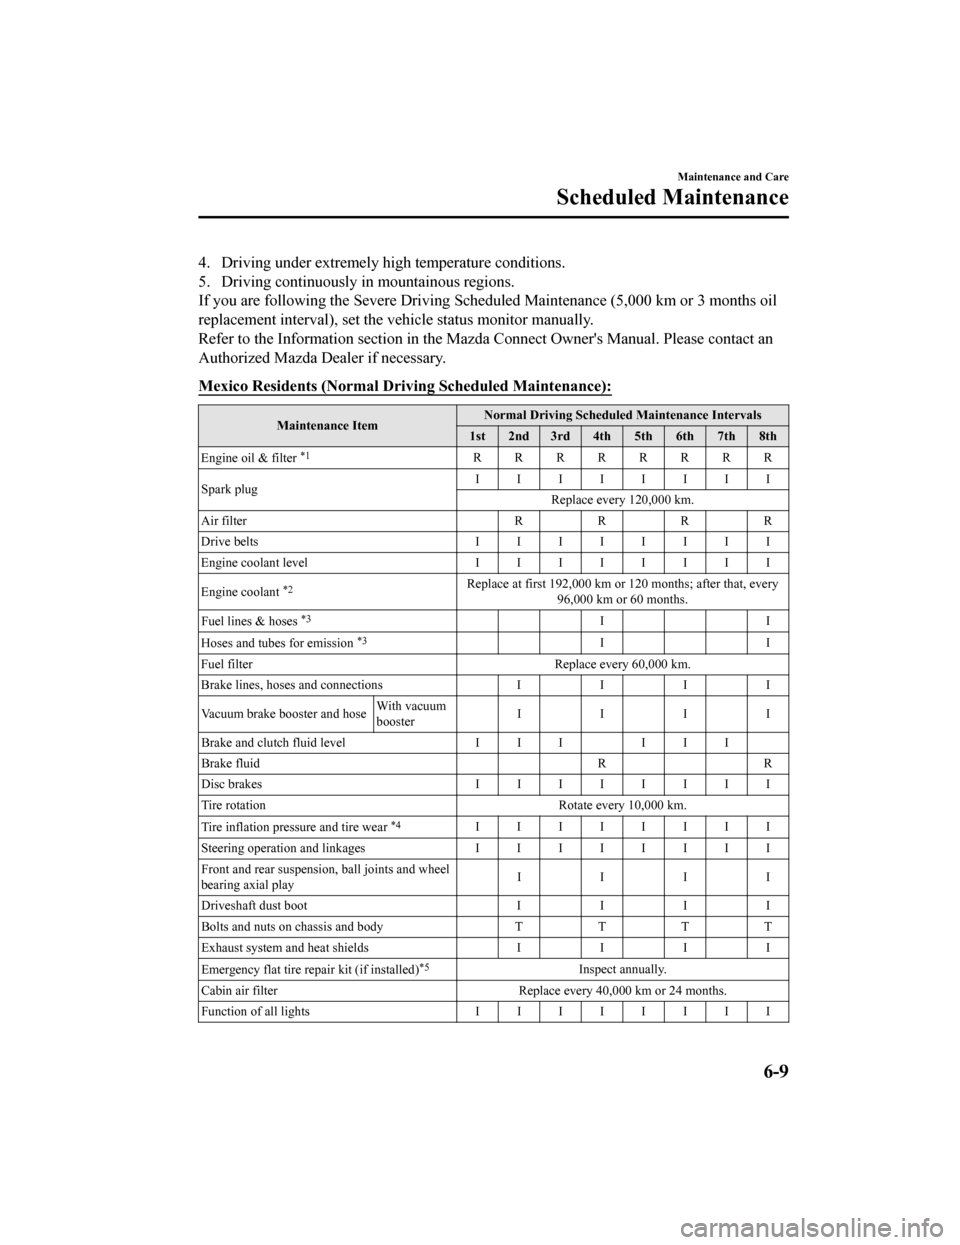
Mexico Residents (Normal Driving Scheduled Maintenance):
Maintenance ItemNormal Driving Scheduled Maintenance Intervals
1st 2nd 3rd 4th 5th 6th 7th 8th
Engine oil & filter
*1RRRRRRRR
Spark plug IIIIIIII
Replace every 120,000 km.
Air filter RRRR
Drive belts IIIIIIII
Engine coolant level IIIIIIII
Engine coolant
*2Replace at first 192,000 km or 12 0 months; after that, every
96,000 km or 60 months.
Fuel lines & hoses
*3II
Hoses and tubes for emission
*3II
Fuel filter Replace every 60,000 km.
Brake lines, hoses and connections II II
Vacuum brake booster and hose With vacuum
boosterIIII
Brake and clutch fluid level I I II I I
Brake fluid RR
Disc brakes IIIIIIII
Tire rotation Rotate every 10,000 km.
Tire inflation pressure and tire wear
*4IIIIIIII
Steering operation and linkages IIIIIIII
Front and rear suspension, ball joints and wheel
bearing axial play IIII
Driveshaft dust boot I I I I
Bolts and nuts on chassis and body T T T T
Exhaust system and heat shields I I I I
Emergency flat tire repair kit (if installed)
*5Inspect annually.
Cabin air filter Replace every 40,000 km or 24 months.
Function of all lights IIIIIIII
Maintenance and Care
Scheduled Maintenance
6-9
Mazda3_8HZ1-EA-19G_Edition1_old 2019-5-17 13:49:03
Page 467 of 598

Light Bulbs
▼Light Bulbs
Front
Ty p e A
1. Vanity mirror lights*
2. Overhead lights/ Front map lights
3. Side turn signal lights
*
4. Front side-marker lights
5. Parking lights
6. Headlights (High/Low beam)/ Daytime
running lights
7. Front turn signal lights
Ty p e B
1. Vanity mirror lights*
2. Overhead lights/ Front map lights
3. Side turn signal lights
*
4. Parking lights/Front side-marker lights
5. Headlights (High/Low beam)/ Daytime running lights
6. Front turn signal lights
Rear
4–Door
1. Trunk light
2. High-mount brake light
3. Overhead light (Rear)
4. Rear side-marker lights
5. Brake lights/Taillights
*
6. Rear turn signal lights
7. Brake lights/Taillights
8. Taillights
*
9. Reverse lights
10. License plate lights
5–Door
1. Luggage compartment light
2. High-mount brake light
3. Overhead light (Rear)
4. Rear side-marker lights
5. Rear turn signal lights
6. Brake lights/Taillights
7. Taillights
*
8. Reverse lights
9. License plate lights
Maintenance and Care
Owner Maintenance
*Some models.6-35
Mazda3_8HZ1-EA-19G_Edition1_old 2019-5-17 13:49:03
Page 468 of 598

CAUTION
When removing the lens or lamp unit using
a flathead screwdriver, make sure that the
flathead screwdriver does not contact the
interior terminal. If the flathead screwdriver
contacts the terminal, a short circuit may
occur.
NOTE
When replacing a bulb, contact an
Authorized Mazda Dealer if necessary.
Use the protective cover and carton for
the replacement bulb to dispose of the
old bulb promptly and out of the reach
of children.
For details regarding the installation
positions of the interior lights, refer to
the following:
Vanity mirror lights
Refer to Vanity Mirrors on page 5-34.
Overhead Lights/front map lights,
overhead light (rear), trunk light, and
luggage compartment light
Refer to Interior Lights on page 5-35.
▼ Replacing Exterior Light Bulbs
The exterior lights
have either LEDs or
normal bulbs.
Only the bulb for a parking lights/front
side-marker lights (type B) can be
replaced.
LED type
Headlights
Daytime running lights
Parking lights (Type A)
Front turn signal lights
Front side-marker lights (Type A)
Side turn signal lights*
High-mount brake light
Rear turn signal lights
Rear side-marker lights
Brake lights
Taillights
Reverse lights
License plate lights
The LED bulb cannot be replaced as a
single unit because it is an integrated unit.
The LED bulb has to be replaced with the
unit. We recommend an Authorized
Mazda Dealer when the replacement is
necessary.
Bulb type
Parking lights/Front side-marker lights
(Type B)
1. Make sure the ignition is switched off, and the headligh t switch is off.
2. If you are changing the left bulb, start
the engine, turn the steering wheel all
the way to the right, and turn off
engine. If you are changing the right
bulb, turn the steering wheel to the left.
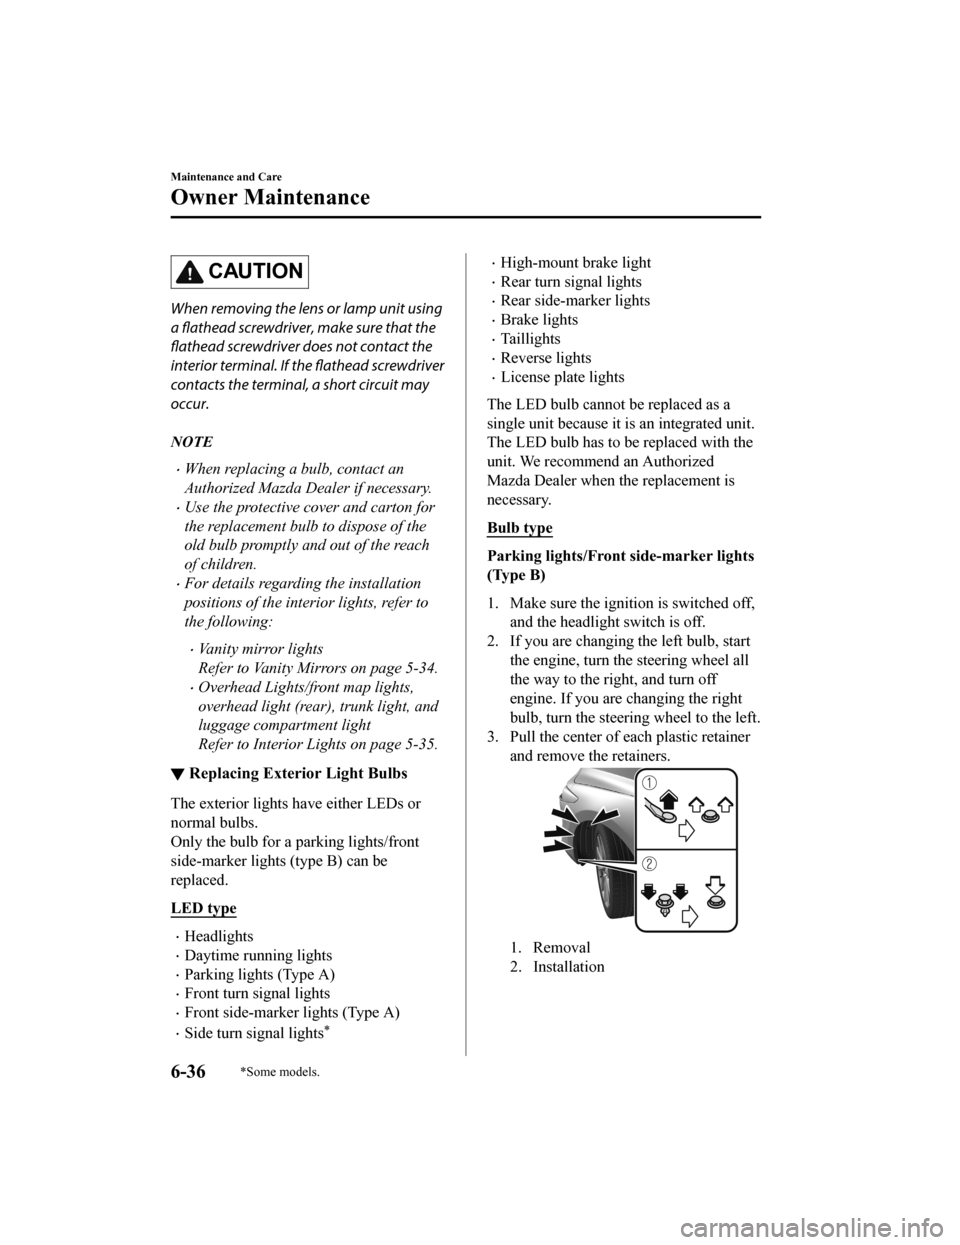
3. Pull the center of each plastic retainer
and remove the retainers.
1. Removal
2. Installation
Maintenance and Care
Owner Maintenance
6-36*Some models.
Mazda3_8HZ1-EA-19G_Edition1_old 2019-5-17 13:49:03