length MAZDA MODEL 3 HATCHBACK 2020 Owners Manual (in English)
[x] Cancel search | Manufacturer: MAZDA, Model Year: 2020, Model line: MODEL 3 HATCHBACK, Model: MAZDA MODEL 3 HATCHBACK 2020Pages: 598, PDF Size: 89.37 MB
Page 41 of 598

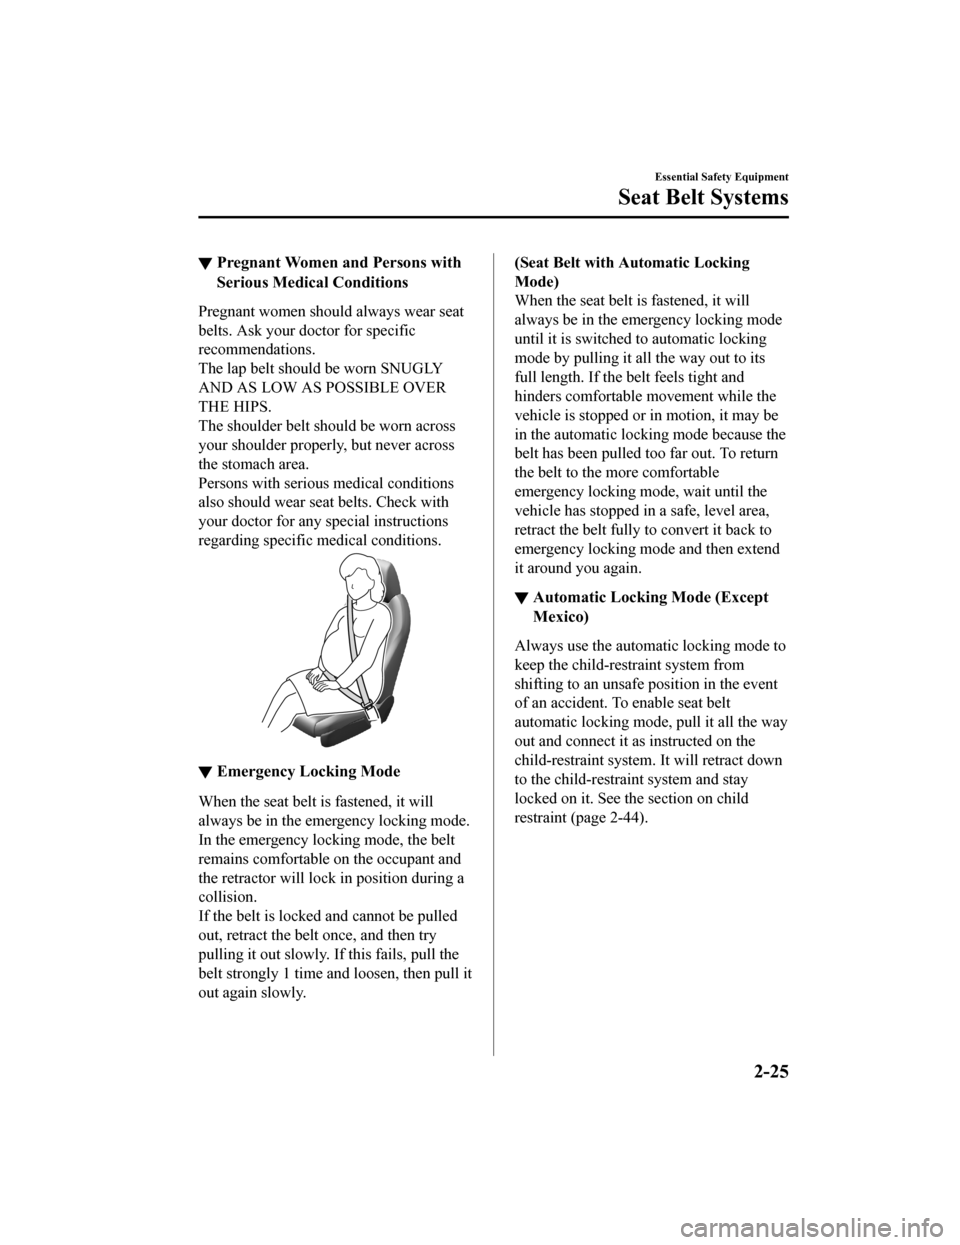
▼Pregnant Women and Persons with
Serious Medical Conditions
Pregnant women should always wear seat
belts. Ask your doctor for specific
recommendations.
The lap belt should be worn SNUGLY
AND AS LOW AS POSSIBLE OVER
THE HIPS.
The shoulder belt should be worn across
your shoulder properly, but never across
the stomach area.
Persons with serious medical conditions
also should wear seat belts. Check with
your doctor for any
special instructions
regarding specific medical conditions.
▼ Emergency Locking Mode
When the seat belt is fastened, it will
always be in the emergency locking mode.
In the emergency locking mode, the belt
remains comfortable on the occupant and
the retractor will lock in position during a
collision.
If the belt is locked a
nd cannot be pulled
out, retract the belt once, and then try
pulling it out slowly. If this fails, pull the
belt strongly 1 time and loosen, then pull it
out again slowly.
(Seat Belt with Automatic Locking
Mode)
When the seat belt is fastened, it will
always be in the emergency locking mode
until it is switched to automatic locking
mode by pulling it all the way out to its
full length. If the belt feels tight and
hinders comfortable movement while the
vehicle is stopped or in motion, it may be
in the automatic locking mode because the
belt has been pulled to o far out. To return
the belt to the more comfortable
emergency locking mode, wait until the
vehicle has stopped in a safe, level area,
retract the belt fully to convert it back to
emergency locking mode and then extend
it around you again.
▼ Automatic Lockin
g Mode (Except
Mexico)
Always use the automatic locking mode to
keep the child-restraint system from
shifting to an unsafe position in the event
of an accident. To enable seat belt
automatic locking mode, pull it all the way
out and connect it as instructed on the
child-restraint system . It will retract down
to the child-restraint system and stay
locked on it. See the section on child
restraint (page 2-44).
Essential Safety Equipment
Seat Belt Systems
2-25
Mazda3_8HZ1-EA-19G_Edition1_old 2019-5-17 13:49:03
Page 46 of 598

Seat Belt Extender
▼Seat Belt Extender
If your seat belt is not long enough, even
when fully extended, a seat belt extender
may be available to you at no charge from
your Authorized Mazda Dealer.
This extender will be only for you and for
the particular vehicle and seat. Even if it
plugs into other seat b
elts, it may not hold
in the critical mom ent of a crash.
When ordering an extender, only order one
that provides the necessary additional
length to fasten the seat belt properly.
Please contact your Authorized Mazda
Dealer for more information.
WA R N I N G
Do not use a seat belt extender unless it is
necessary:
Using a seat belt extender when not
necessary is dangerous. The seat belt will
be too long and not fit properly. In an
accident, the seat belt will not provide
adequate protection and you could be
seriously injured. Only use the extender
when it is required to fasten the seat belt
properly.
Do not use an improper extender:
Using a seat belt extender that is for
another person or a different vehicle or seat
is dangerous. The seat belt will not provide
adequate protection and the user could be
seriously injured in an accident. Only use
the extender provided for you and for the
particular vehicle and seat. NEVER use the
extender in a different vehicle or seat. If you
sell your Mazda, do not leave your seat belt
extender in the vehicle. It could be used
accidentally by the new owner of the
vehicle. After removing the seat belt
extender, discard it. Never use the seat belt
extender in any other vehicle you may own
in the future.
Do not use an extender that is too long:
Using an extender that is too long is
dangerous. The seat belt will not fit
properly. In an accident, the seat belt will
not provide adequate protection and you
could be seriously injured. Do not use the
extender or choose one shorter in length if
the distance between the extender's buckle
and the center of the user's body is less
than 15 cm (6 in).
Essential Safety Equipment
Seat Belt Systems
2-30
Mazda3_8HZ1-EA-19G_Edition1_old 2019-5-17 13:49:03
Page 61 of 598

4. To get the retractor into the automaticlocking mode, pull the shoulder belt
portion of the seat belt until the entire
length of the belt is out of the retractor.
5. Push the child-restraint system firmlyinto the vehicle seat. Be sure the belt
retracts as snugly as possible. A
clicking noise from the retractor will
be heard during retraction if the system
is in the automatic locking mode. If the
belt does not lock the seat down tight,
repeat this step.
NOTE
Inspect this function before each use
of the child-restraint system. You
should not be able to pull the
shoulder belt out of the retractor
while the system is in the automatic
locking mode. When you remove the
child-restraint system, be sure the
belt fully retracts to return the
system to emergency locking mode
before occupants use the seat belts.
6. If your child-restraint system requires the use of a tether strap, refer to the
manufacturer's instructions to hook
and tighten the tether strap.
WA R N I N G
Use the tether and tether anchor only for a
child-restraint system:
Using the tether or tether anchor to secure
anything but a child-restraint system is
dangerous. This could weaken or damage
the tether or tether anchor and result in
injury.
Always remove the head restraint and
install child-restraint system (except when
installing a backless booster seat):
Installing a child-restraint system without
removing the head restraint is dangerous.
The child-restraint system cannot be
installed correctly which may result in
death or injury to the child in a collision.
Essential Safety Equipment
Child Restraint
2-45
Mazda3_8HZ1-EA-19G_Edition1_old 2019-5-17 13:49:03
Page 64 of 598

Do not allow a child or anyone to lean over
or against the side window of a vehicle
with side and curtain air bags:
It is dangerous to allow anyone to lean
over or against the side window, the area
of the front passenger seat, the front and
rear window pillars and the roof edge
along both sides from which the side and
curtain air bags deploy, even if a
child-restraint system is used. The impact
of inflation from a side or curtain air bag
could cause serious injury or death to an
out of position child. Furthermore, leaning
over or against the front door could block
the side and curtain air bags and eliminate
the advantages of supplemental
protection. With the front air bag and the
additional side air bag that comes out of
the front seat, the rear seat is always a
better location for children. Take special
care not to allow a child to lean over or
against the side window, even if the child is
seated in a child-restraint system.
Always remove the head restraint and
install child-restraint system (except when
installing a backless booster seat):
Installing a child-restraint system without
removing the head restraint is dangerous.
The child-restraint system cannot be
installed correctly which may result in
death or injury to the child in a collision.Always install the head restraint and adjust
it to the appropriate position after
removing the child-restraint system:
Driving with the head restraint removed is
dangerous as impact to the occupant's
head cannot be prevented during
emergency braking or in a collision, which
could result in a serious accident, injury or
death.
Refer to Head Restraints on page 2-17.
Front Passenger's Seat Child-Restraint
System Installation (With Front
Passenger Occupant Classification
System)
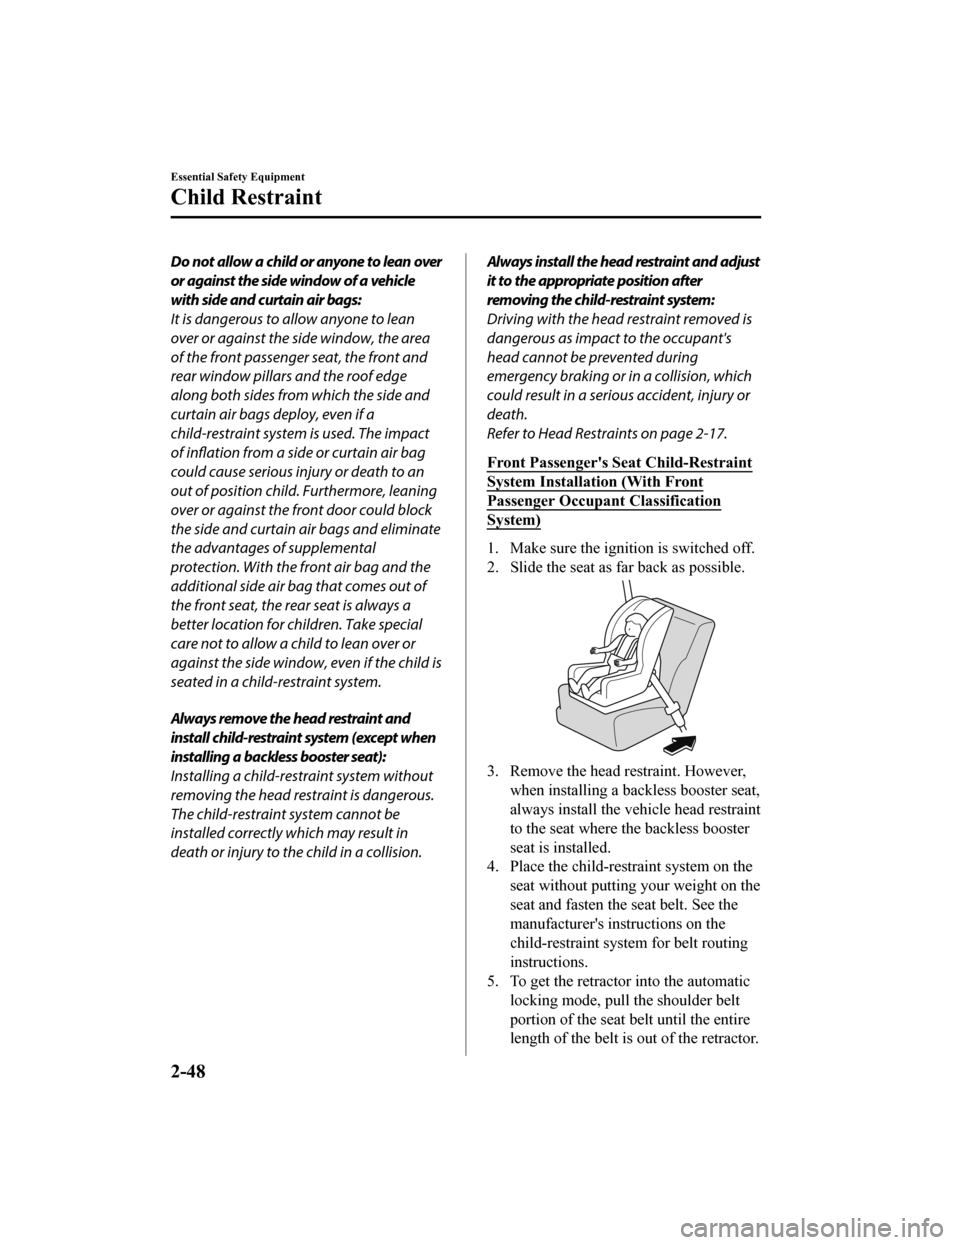
1. Make sure the ignition is switched off.
2. Slide the seat as fa r back as possible.
3. Remove the head restraint. However,
when installing a backless booster seat,
always install the vehicle head restraint
to the seat where the backless booster
seat is installed.
4. Place the child-restraint system on the
seat without putting your weight on the
seat and fasten the seat belt. See the
manufacturer's instructions on the
child-restraint syst em for belt routing
instructions.
5. To get the retractor into the automatic locking mode, pull the shoulder belt
portion of the seat belt until the entire
length of the belt is out of the retractor.
Essential Safety Equipment
Child Restraint
2-48
Mazda3_8HZ1-EA-19G_Edition1_old 2019-5-17 13:49:03
Page 196 of 598

Variable-speed intermittent wipers
Set the lever to the intermittent position
and choose the interval timing by rotating
the switch.
Rotate the switch upward (FAST
direction) to shorten the interval time of
the wiper operation, and rotate the switch
downward (SLOW direction) to lengthen
it.
1. Switch
With auto-wiper control
1. Indicator light
Switch Posi‐tion Wiper operation
MIST Operation while pulling up lever OFF Stop
AUTO
*1Auto control
LO Low speed HI High speed
*1 When the wiper lever is switched to the AUTO
position, the indicator light turns on.
Auto-wiper control*
When the wiper lever is in the AUTO
position, the rain sen sor senses the amount
of rainfall on the windshield and turns the
wipers on or off automatically
(off―intermittent ―low speed―high
speed).
The sensitivity of the rain sensor can be
adjusted by turning the switch on the
wiper lever.
From the center position (normal), rotate
the switch upward (+ direction) for higher
sensitivity (faster response) or rotate it
downward (- direction) for less sensitivity
(slower response).
1. Switch
2. Higher sensitivity
3. Center position
4. Less sensitivity
When Driving
Switches and Controls
4-52*Some models.
Mazda3_8HZ1-EA-19G_Edition1_old 2019-5-17 13:49:03
Page 280 of 598

▼Stop Hold Control
While in headway control using the
MRCC with Stop & Go function system,
your vehicle will stop when a vehicle
ahead stops. When the vehicle is stopped
and the stop hold control operates, the
MRCC with Stop & Go function indicator
light turns on.
NOTE
If the MRCC with Stop & Go function
system is canceled during stop hold
control, the vehicle is held in its stopped
position.
The parking brake is automatically
applied and the vehicle is held in its
stopped position when 10 minutes have
elapsed since the stop hold control
operated. At this time, the MRCC with
Stop & Go function system is canceled.
The brake lights turn on during stop
hold control.
To resume driving
After the vehicle ahead starts moving
while your vehicle is stopped under stop
hold control, press the RES switch or
depress the accelerator pedal to cancel the
stop hold control and resume driving.
NOTE
When you resume driving by pressing
the RES switch, your vehicle does not
start moving until the distance between
your vehicle and the vehicle ahead
lengthens to the sp ecified distance or
farther.
If the MRCC with St op & Go function is
temporarily canceled during stop hold
control, you cannot resume driving by
pressing the RES switch when there are
no vehicles in front of your vehicle.
Depress the accelerator pedal and
resume driving the vehicle.
If the vehicle ahead starts moving within
3 seconds after your vehicle is stopped
by the stop hold control, headway
control will resume even if you do not
resume driving your vehicle, such as by
depressing the accelerator pedal.
Resume driving information
If you do not resume driving within a few
seconds after the vehicle ahead starts
moving, the multi-in formation display
vehicle-ahead indication flashes to urge
the driver to resume driving. If you do not
resume driving after the indicator light
flashes, a sound is activated to urge you to
resume driving.
When Driving
i-ACTIVSENSE
4-136
Mazda3_8HZ1-EA-19G_Edition1_old 2019-5-17 13:49:03
Page 295 of 598

To resume driving
After the vehicle ahead starts moving
while your vehicle is stopped under stop
hold control, press the RE S switch or
depress the accelerator pedal to cancel the
stop hold control and start driving.
NOTE
When you resume driving by pressing
the RES switch, your vehicle does not
start moving until the distance between
your vehicle and the vehicle ahead
lengthens to the specified distance or
farther.
If the TJA is temporarily canceled,
depress the accelerator pedal and start
driving the vehicle. If the TJA is
temporarily canceled, you cannot
resume driving by pressing the RES
switch when there are no vehicles in
front of your vehicle.
If the vehicle ahead starts moving within
3 seconds after your vehicle is stopped
by the stop hold control, headway
control will continue even if you do not
resume driving your vehicle, such as by
depressing the accelerator pedal.
Vehicle departur e information
If you do not resume driving within a few
seconds after the vehicle ahead starts
moving during stop hold control, the
multi-information display vehicle-ahead
indication flashes to urge the driver to
resume driving. If you do not resume
driving after the indicator light flashes, a
sound is activated to urge you to resume
driving.
Lane-keep Assist System
(LAS)
*
▼Lane-keep Assist System (LAS)
The LAS provides steering assistance to
help the driver stay within the vehicle lane
if the vehicle might be deviating.
The forward sensing camera (FSC) detects
the white lines (ye
llow lines) of the
vehicle lane in which the vehicle is
traveling and if the system determines that
the vehicle may deviate from its lane, it
operates the electric power steering to
assist the driver’s steering operation. The
system also alerts the driver by displaying
an alert on the multi-information display
and the active driving display
*. Use the
system when you drive the vehicle on
roads with white (yellow) lines such as
expressways and highways.
1. Forward sensing camera (FSC)
WA R N I N G
Do not rely completely on the LAS:
The LAS is not an automated driving
system. In addition, the system is not
designed to compensate for a driver’s
lack of caution, and over-reliance on the
system could lead to an accident.
When Driving
i-ACTIVSENSE
*Some models.4-151
Mazda3_8HZ1-EA-19G_Edition1_old 2019-5-17 13:49:03
Page 498 of 598

(Vehicles with flat tire hold-down
bolt (excluding vehicles with
sub-woofer for 5-door))
1. Spread apart the tabs on the sparetire hold-down bolt that was
removed when removing the spare
tire and remove the bolt for
securing the spare tire.
1. Tabs
2. Bolt for securing spare tire
3. Spare tire hold-down bolt
2. Remove the bolt for securing the
flat tire from its stored position and
install it in place of the removed
spare tire hold-down bolt.
1. Bolt for securing the flat tire
2. Spare tire hold-down bolt
NOTE
The longer bolt is used as the bolt
for securing the flat tire, and the
shorter one is used as the bolt for
securing the spare tire. When
installing a bolt, check the bolt's
length.
3. Secure the damaged tire to the vehicle using the flat tire
hold-down bolt.
(Vehicles with flat tire hold-down
bolt and with sub-woofer for
5-door))
1. Remove the bolt for securing theflat tire from its stored position.
2. Secure the damaged tire to the vehicle using the flat tire
hold-down bolt.
1. Flat tire hold-down bolt
2. Sub-woofer
If Trouble Arises
Flat Tire
7-14
Mazda3_8HZ1-EA-19G_Edition1_old 2019-5-17 13:49:03
Page 584 of 598

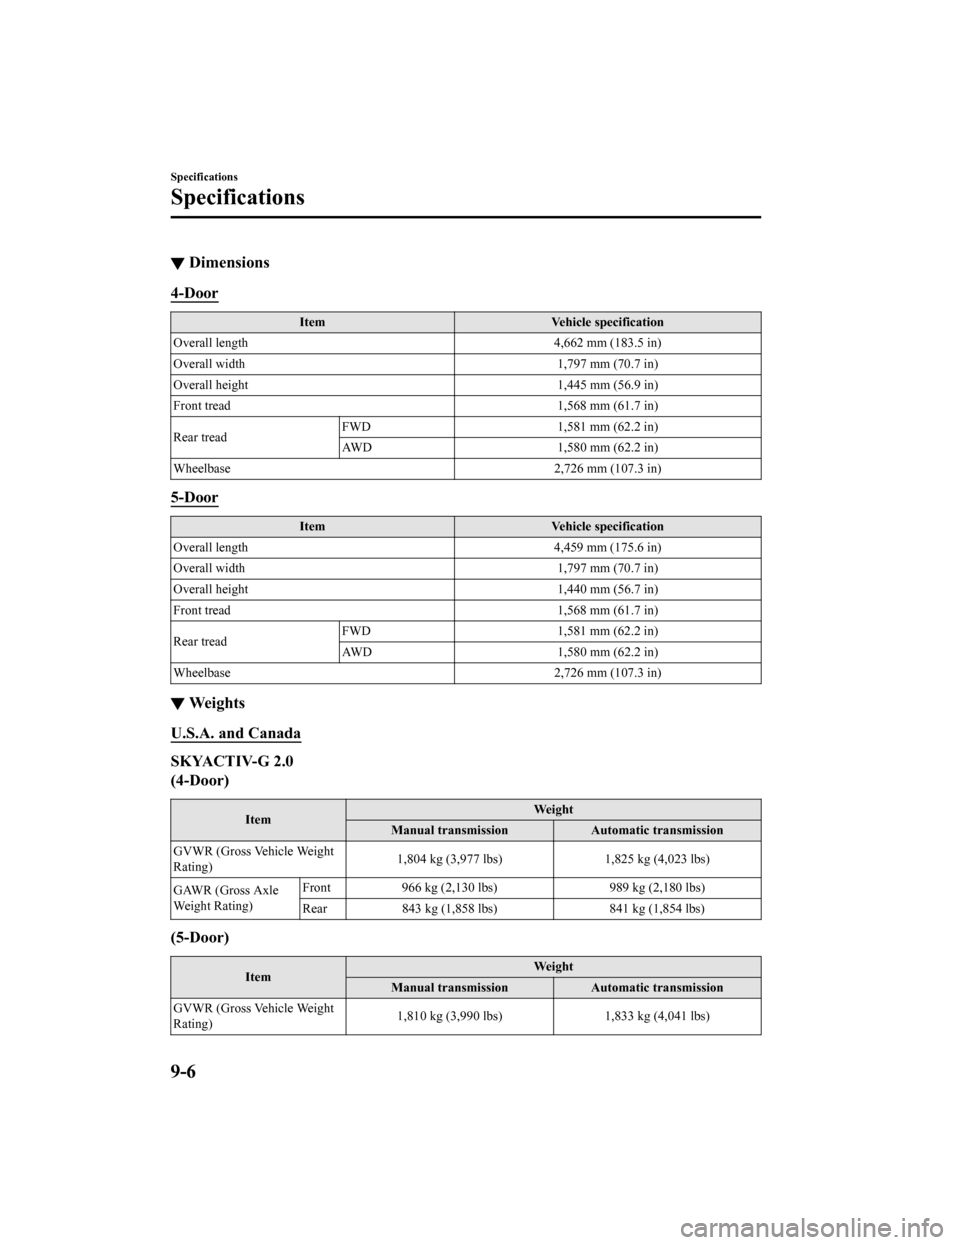
▼Dimensions
4-Door
Item
Vehicle specification
Overall length 4,662 mm (183.5 in)
Overall width 1,797 mm (70.7 in)
Overall height 1,445 mm (56.9 in)
Front tread 1,568 mm (61.7 in)
Rear tread FWD
1,581 mm (62.2 in)
AWD 1,580 mm (62.2 in)
Wheelbase 2,726 mm (107.3 in)
5-Door
ItemVehicle specification
Overall length 4,459 mm (175.6 in)
Overall width 1,797 mm (70.7 in)
Overall height 1,440 mm (56.7 in)
Front tread 1,568 mm (61.7 in)
Rear tread FWD
1,581 mm (62.2 in)
AWD 1,580 mm (62.2 in)
Wheelbase 2,726 mm (107.3 in)
▼We i g h t s
U.S.A. and Canada
SKYACTIV-G 2.0
(4-Door)
Item We i gh t
Manual transmission Automatic transmission
GVWR (Gross Vehicle Weight
Rating) 1,804 kg (3,977 lbs)
1,825 kg (4,023 lbs)
GAWR (Gross Axle
Weight Rating) Front
966 kg (2,130 lbs) 989 kg (2,180 lbs)
Rear 843 kg (1,858 lbs) 841 kg (1,854 lbs)
(5-Door)
Item We i gh t
Manual transmission Automatic transmission
GVWR (Gross Vehicle Weight
Rating) 1,810 kg (3,990 lbs)
1,833 kg (4,041 lbs)
Specifications
Specifications
9-6
Mazda3_8HZ1-EA-19G_Edition1_old 2019-5-17 13:49:03