warning lights MAZDA MODEL 6 2003 Quick Tips (in English)
[x] Cancel search | Manufacturer: MAZDA, Model Year: 2003, Model line: MODEL 6, Model: MAZDA MODEL 6 2003Pages: 10, PDF Size: 0.95 MB
Page 2 of 10

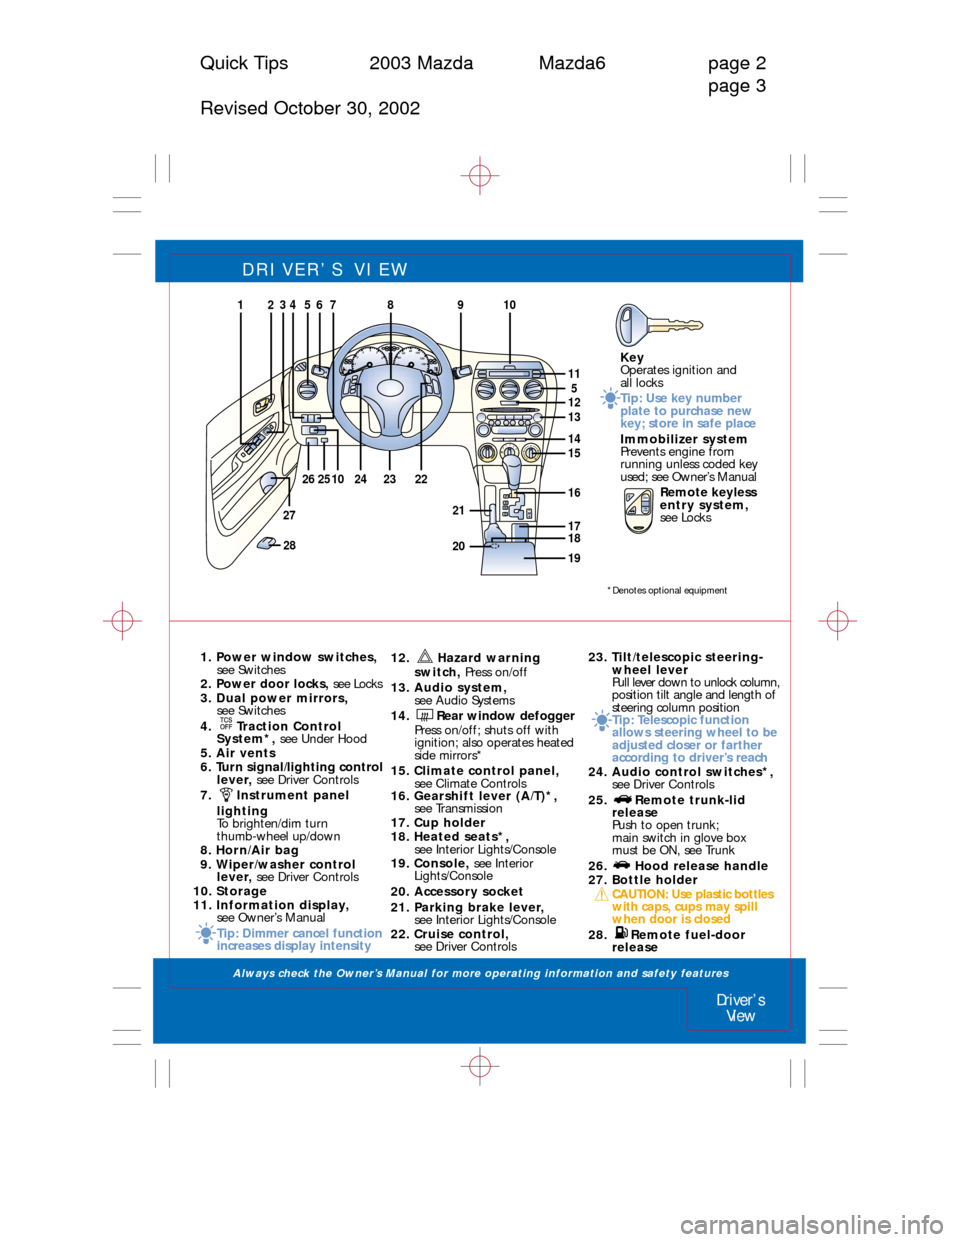
DRIVER’S VIEW
1. Power window switches,
see Switches
2. Power door locks, see Locks
3. Dual power mirrors,
see Switches
4. Traction Control
System*, see Under Hood
5. Air vents
6. Turn signal/lighting control
lever, see Driver Controls
7. Instrument panel
lighting
To brighten/dim turn
thumb-wheel up/down
8. Horn/Air bag
9. Wiper/washer control
lever, see Driver Controls
10. Storage
11. Information display,
see Owner’s Manual
Tip: Dimmer cancel function
increases display intensity12. Hazard warning
switch, Press on/off
13. Audio system,
see Audio Systems
14. Rear window defogger
Press on/off; shuts off with
ignition; also operates heated
side mirrors*
15. Climate control panel,
see Climate Controls
16. Gearshift lever (A/T)*,
see Transmission
17. Cup holder
18. Heated seats*,
see Interior Lights/Console
19. Console, see Interior
Lights/Console
20. Accessory socket
21. Parking brake lever,
see Interior Lights/Console
22. Cruise control,
see Driver Controls23. Tilt/telescopic steering-
wheel lever
Pull lever down to unlock column,
position tilt angle and length of
steering column position
Tip: Telescopic function
allows steering wheel to be
adjusted closer or farther
according to driver’s reach
24. Audio control switches*,
see Driver Controls
25. Remote trunk-lid
release
Push to open trunk;
main switch in glove box
must be ON, see Trunk
26. Hood release handle
27. Bottle holder
CAUTION: Use plastic bottles
with caps, cups may spill
when door is closed
28. Remote fuel-door
release
Driver’s
View
Quick Tips 2003 Mazda Mazda6 page 2
page 3
Revised October 30, 2002
Key
Operates ignition and
all locks
Tip: Use key number
plate to purchase new
key; store in safe place
Immobilizer system
Prevents engine from
running unless coded key
used; see Owner’s Manual
Remote keyless
entry system,
see LocksHF
E C20x1000rpm/m406080
100
120
140
1600 1234
5
6
7
8
PRNDM
012
3
4
9
13
14
125
15
17
26
27
25222423
86752431
1610
281920
21
10
11
18
LOCKUN
LOCK
*Denotes optional equipment
Always check the Owner’s Manual for more operating information and safety features
Page 3 of 10

INSTRUMENT CLUSTER
Always check the Owner’s Manual for more operating information and safety features
Instrument
Cluster
Instrument
Cluster
Quick Tips 2003 Mazda Mazda6 page 4
page 5
Revised October 30, 2002
HF
E C
20mph
406080
100
120
140
160P
R
N
D
M
2
121212141315 11
0 123x1000rpm/m
4
5
6
7
8
TRIPA8
O.O
2021232224261925564
10
8
7 9
16
3
18
17
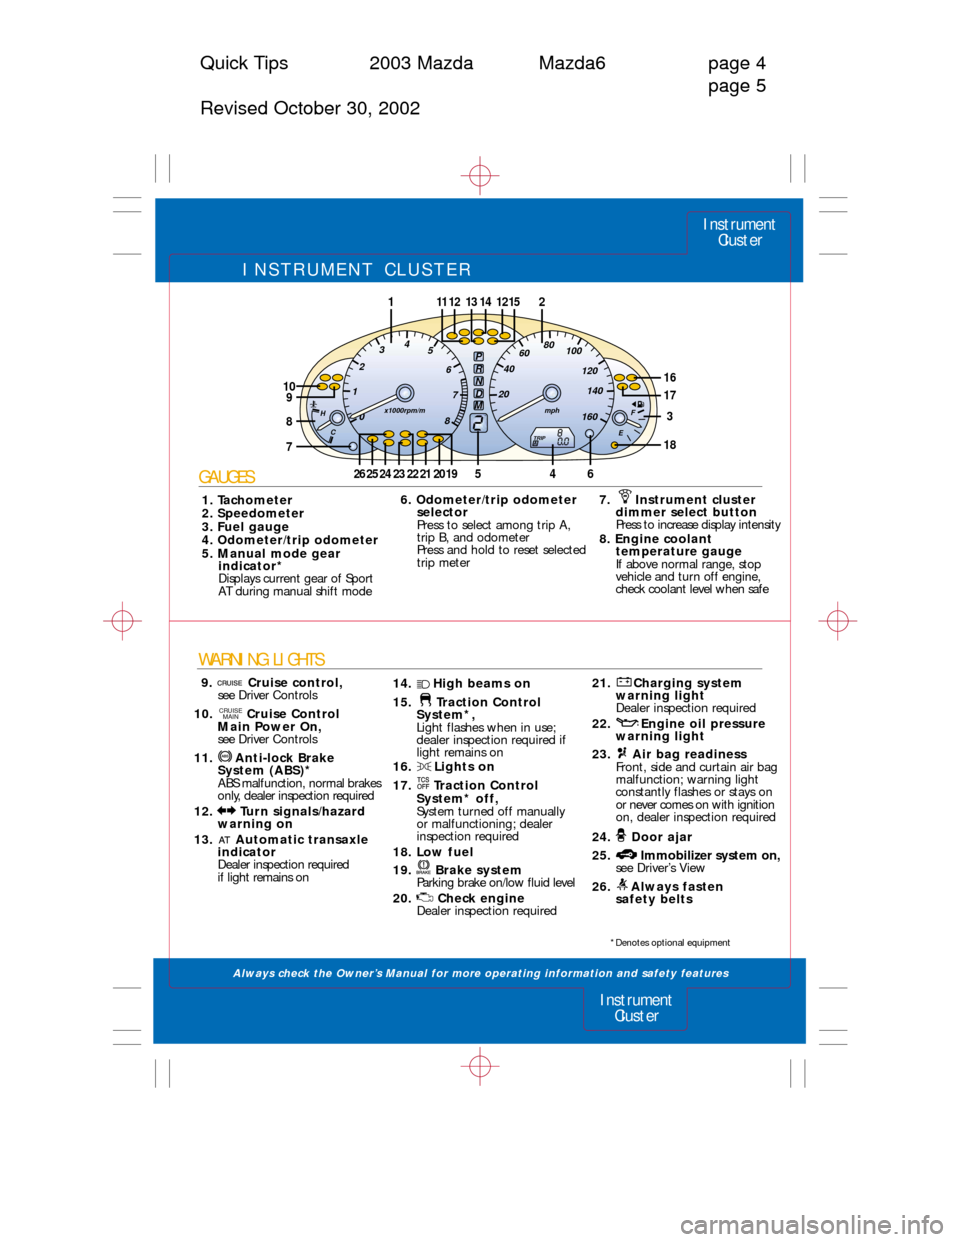
21. Charging system
warning light
Dealer inspection required
22. Engine oil pressure
warning light
23. Air bag readiness
Front, side and curtain air bag
malfunction; warning light
constantly flashes or stays on
or never comes on with ignition
on, dealer inspection required
24. Door ajar
25. Immobilizer system on,
see Driver’s View
26. Always fasten
safety belts
7. Instrument cluster
dimmer select button
Press to increase display intensity
8. Engine coolant
temperature gauge
If above normal range, stop
vehicle and turn off engine,
check coolant level when safe
14. High beams on
15. Traction Control
System*,
Light flashes when in use;
dealer inspection required if
light remains on
16. Lights on
17. Traction Control
System* off,
System turned off manually
or malfunctioning; dealer
inspection required
18. Low fuel
19. Brake system
Parking brake on/low fluid level
20. Check engine
Dealer inspection required
6. Odometer/trip odometer
selector
Press to select among trip A,
trip B, and odometer
Press and hold to reset selected
trip meter
WARNING LIGHTS
9. Cruise control,
see Driver Controls
10. Cruise Control
Main Power On,
see Driver Controls
11. Anti-lock Brake
System (ABS)*
ABS malfunction, normal brakes
only, dealer inspection required
12. Turn signals/hazard
warning on
13. Automatic transaxle
indicator
Dealer inspection required
if light remains on
CRUISE
MAIN
GAUGES
1. Tachometer
2. Speedometer
3. Fuel gauge
4. Odometer/trip odometer
5. Manual mode gear
indicator*
Displays current gear of Sport
AT during manual shift mode
*Denotes optional equipment
Page 6 of 10

INTERIOR LIGHTS/CONSOLE
Always check the Owner’s Manual for more operating information and safety features
Interior Lights/
Console
Transmission
Quick Tips 2003 Mazda Mazda6 page 10
page 11
Revised October 30, 2002
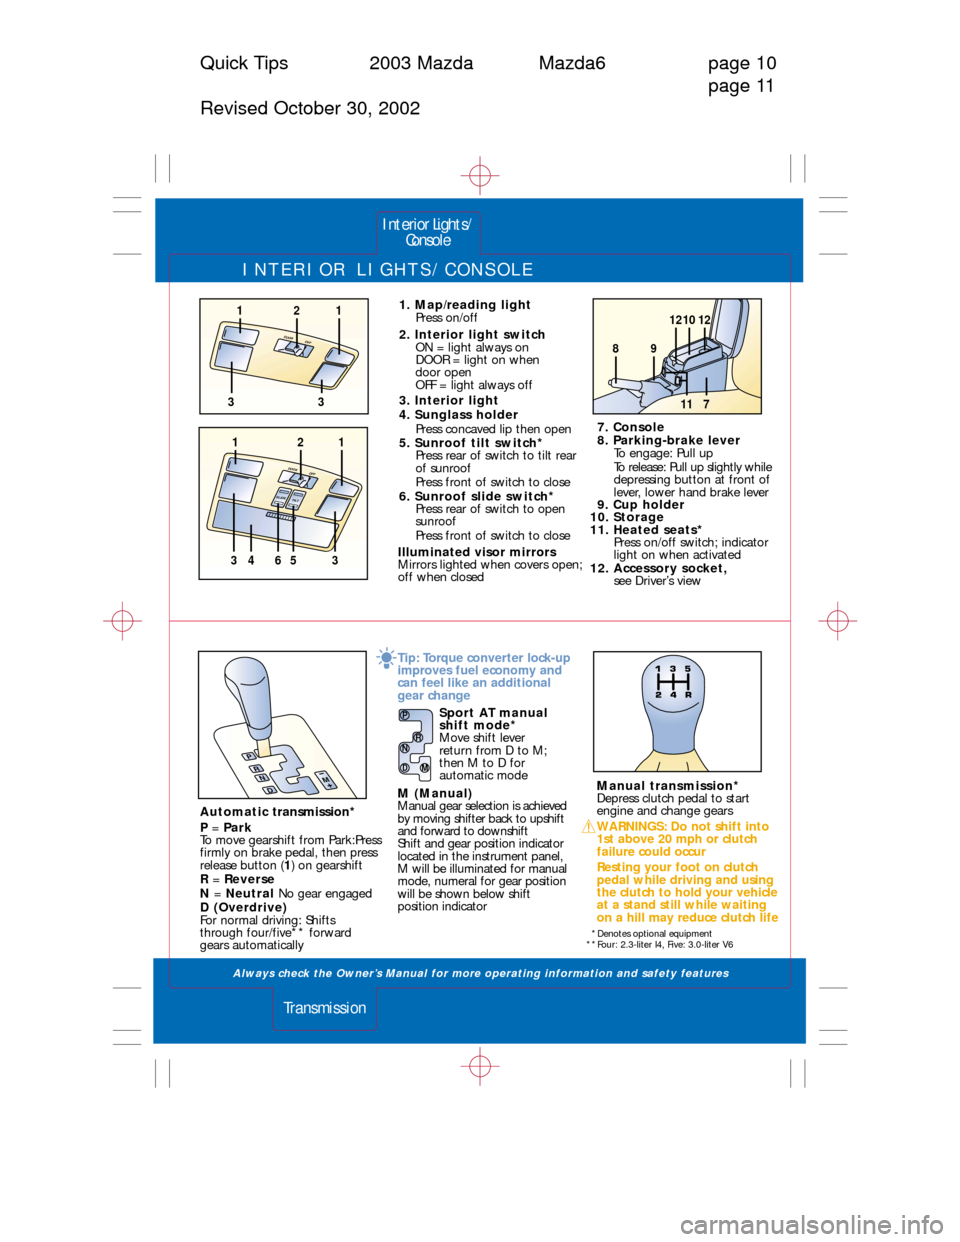
Automatic transmission*
P =Park
To move gearshift from Park:Press
firmly on brake pedal, then press
release button (1) on gearshift
R =Reverse
N =Neutral No gear engaged
D (Overdrive)
For normal driving: Shifts
through four/five** forward
gears automaticallyTip: Torque converter lock-up
improves fuel economy and
can feel like an additional
gear change
Sport AT manual
shift mode*
Move shift lever
return from D to M;
then M to D for
automatic mode
M (Manual)
Manual gear selection is achieved
by moving shifter back to upshift
and forward to downshift
Shift and gear position indicator
located in the instrument panel,
M will be illuminated for manual
mode, numeral for gear position
will be shown below shift
position indicatorManual transmission*
Depress clutch pedal to start
engine and change gears
WARNINGS: Do not shift into
1st above 20 mph or clutch
failure could occur
Resting your foot on clutch
pedal while driving and using
the clutch to hold your vehicle
at a stand still while waiting
on a hill may reduce clutch life
1. Map/reading light
Press on/off
2. Interior light switch
ON = light always on
DOOR = light on when
door open
OFF = light always off
3. Interior light
4. Sunglass holder
Press concaved lip then open
5. Sunroof tilt switch*
Press rear of switch to tilt rear
of sunroof
Press front of switch to close
6. Sunroof slide switch*
Press rear of switch to open
sunroof
Press front of switch to close
Illuminated visor mirrors
Mirrors lighted when covers open;
off when closed7. Console
8. Parking-brake lever
To engage: Pull up
To release: Pull up slightly while
depressing button at front of
lever, lower hand brake lever
9. Cup holder
10. Storage
11. Heated seats*
Press on/off switch; indicator
light on when activated
12. Accessory socket,
see Driver’s view
PRNDM
MD
P
NR
101212
89
711
OFFDOOR
33
211
OFFDOOR
T
IL
TS
L
ID
E
121
43356
*Denotes optional equipment
**Four: 2.3-liter I4, Five: 3.0-liter V6
Page 7 of 10

SEATS
Always check the Owner’s Manual for more operating information and safety features
Seats
Seats
Quick Tips 2003 Mazda Mazda6 page 12
page 13
Revised October 30, 2002
8
6
7
4
5
5
8
2
1
3
4
Dual locking mode
lap/shoulder belt retractor
(front passenger and rear
safety belts only)
Emergency locking mode: Belt
locksonly on hard braking/
cornering or impacts of about
5 mph or more
Automatic locking mode:
Must be used when installing
child-safety seat
To activate: Pull webbing until fully
extended from retractor until click
is heard; belt will only tighten
when released
To disengage: Unbuckle belt and
allow webbing to retract fully
Folding rear seatbacks,
see Trunk
Heated seats*,
see Interior Lights/Console Shoulder
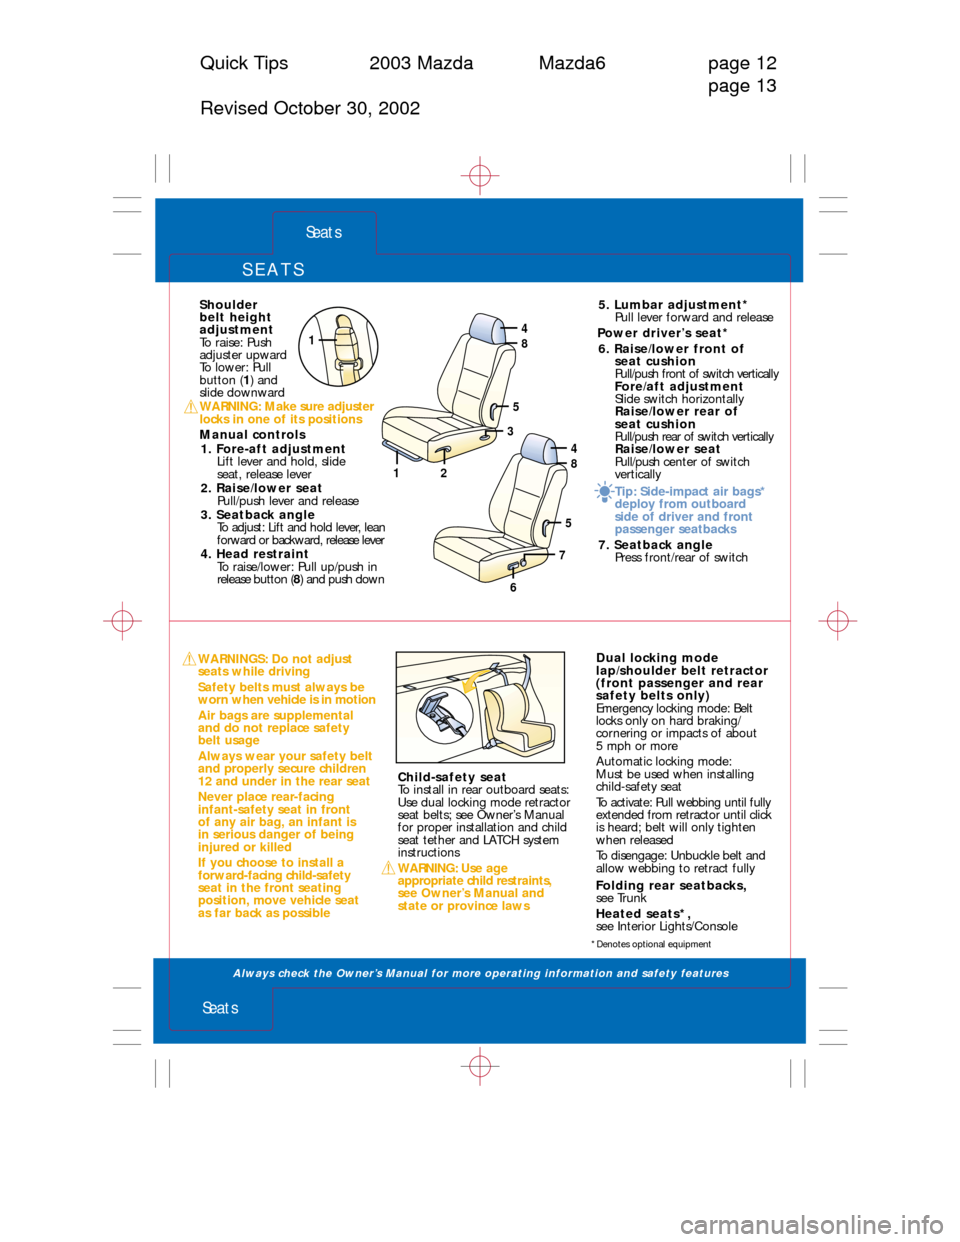
belt height
adjustment
To raise: Push
adjuster upward
To lower: Pull
button (1) and
slide downward
WARNING: Make sure adjuster
locks in one of its positions
Manual controls
1. Fore-aft adjustment
Lift lever and hold, slide
seat, release lever
2. Raise/lower seat
Pull/push lever and release
3. Seatback angle
To adjust: Lift and hold lever, lean
forward or backward, release lever
4. Head restraint
To raise/lower: Pull up/push in
release button (8) and push down
WARNINGS: Do not adjust
seats while driving
Safety belts must always be
worn when vehicle is in motion
Air bags are supplemental
and do not replace safety
belt usage
Always wear your safety belt
and properly secure children
12 and under in the rear seat
Never place rear-facing
infant-safety seat in front
of any air bag, an infant is
in serious danger of being
injured or killed
If you choose to install a
forward-facing child-safety
seat in the front seating
position, move vehicle seat
as far back as possible5. Lumbar adjustment*
Pull lever forward and release
Power driver’s seat*
6. Raise/lower front of
seat cushion
Pull/push front of switch vertically
Fore/aft adjustment
Slide switch horizontally
Raise/lower rear of
seat cushion
Pull/push rear of switch vertically
Raise/lower seat
Pull/pushcenter of switch
vertically
Tip: Side-impact air bags*
deploy from outboard
side of driver and front
passenger seatbacks
7. Seatback angle
Press front/rear of switch
Child-safety seat
To install in rear outboard seats:
Use dual locking mode retractor
seat belts; see Owner’s Manual
for proper installation and child
seat tether and LATCH system
instructions
WARNING: Use age
appropriate child restraints,
see Owner’s Manual and
state or province laws
*Denotes optional equipment
1