CD changer MAZDA MODEL 6 2012 Navigation Manual (in English)
[x] Cancel search | Manufacturer: MAZDA, Model Year: 2012, Model line: MODEL 6, Model: MAZDA MODEL 6 2012Pages: 140, PDF Size: 2.26 MB
Page 56 of 140
![MAZDA MODEL 6 2012 Navigation Manual (in English) 56
Before
UseGetting
started
Routing Address
Book
Voice Recognition
( ): Say any one of the commands separated by a / (slash) within this type of parentheses.
[]: Recognizes without saying the comm MAZDA MODEL 6 2012 Navigation Manual (in English) 56
Before
UseGetting
started
Routing Address
Book
Voice Recognition
( ): Say any one of the commands separated by a / (slash) within this type of parentheses.
[]: Recognizes without saying the comm](/img/28/13560/w960_13560-55.png)
56
Before
UseGetting
started
Routing Address
Book
Voice Recognition
( ): Say any one of the commands separated by a / (slash) within this type of parentheses.
[]: Recognizes without saying the command in “[]”
“/”: Recognizes when saying either commands before and after “/”
*Triple A stands for AAA. If the command is not spoken as indicated (Triple A), the system will
not recognize the command.
NEAREST POI DISPLAY COMMANDSNearest (Automobile Club / *Triple A)
Nearest Gas [Station]
Nearest (Car Park / Parking [Lot / Garage])Nearest Auto Service [and Maintenance]Nearest ATM
Nearest Bank
Nearest (Town Center / City Center)
Nearest (Exhibition / Convention) CenterNearest Court House
Nearest Government offices
Nearest (University / Higher
Education [Institute] / College)
Nearest Hospital
Nearest Library
Nearest (Park / Parks) and
Recreation [Facility]
Nearest Police Station
Nearest School
Nearest Amusement Park
Nearest Casino
Nearest Golf course
Nearest Historical Monument
Nearest Marina
Nearest Museum
Nearest (Ski resort / Skiing facility)
Nearest (Sports Complex / Stadium)
Nearest (Performing Arts [Venue] / Theater)Nearest Tourist attraction
Nearest Tourist information
Nearest Winery
Nearest Restaurant
Nearest American (Restaurant / Food)Nearest Chinese (Restaurant / Food)Nearest Continental (Restaurant / Food)Nearest Fast Food [Restaurant]
Nearest French (Restaurant / Food)
Nearest Italian (Restaurant / Food)
Nearest Japanese (Restaurant / Food)
Nearest Mexican (Restaurant / Food)
Nearest Seafood [Restaurant]
Nearest Thai (Restaurant / Food)
Nearest Other (Restaurant / Food)
Nearest Grocery Store
Nearest Shopping Mall
Nearest Airport
Nearest Bus station
Nearest Ferry Terminal
Nearest Hotel
Nearest Rental Car Agency
Nearest Rest Area
Nearest Train Station
Nearest Business Facility
Nearest Hamlet
AUDIO COMMANDS
radio
AM [radio]
FM [radio]
SIRIUS / Satellite
(Disc / CD / CD changer)
Audio [on / off]
AUX1 / Auxiliar y1
AUX2 / Auxiliar y2
Seek up
Seek down
Type up
Type down
Track up / Next track
Track down
Previous track
Folder up
Folder down
Disc up / Next disc
Disc down / Previous disc
TEL COMMANDS
(Phone / Telephone)
Page 73 of 140

73
Audio Operation
Contents
Audio System
nAudio OperationlOperating Tips for Audio system ................................................... 74(Radio Reception), (Operating Tips for In-Dash CD Changer),
(Operating tips for MP3), (Operating Tips for WMA), (CD-TEXT)
l
Operating Tips for Display ............................................................. 81lBeep sound and voice guidance restrictions while using Bluetooth
Hands-Free.................................................................................... 81lPower/Volume/Sound Controls ...................................................... 82(Power ON/OFF), (Volume adjustment), (Audio sound adjustment),
(Sound quality adjustment), (Volume balance adjustment),
(AudioPilot®2), (Centerpoint®)
l
Operating the Radio ...................................................................... 85(Radio ON), (Band selection), (Tuning), (Manual tuning),
(Seek tuning), (Scan tuning), (Switching between FM1 and FM2),
(Preset channel tuning), (PTY(Program-type information) tuning (FM1, FM2 Only)), (Auto memory tuning), (Audio Sound Adjustment)
lOperating the Satellite Radio ........................................................ 87(What is satellite radio?), (How to Activate Satellite Radio),
(Selecting SIRIUS Radio Mode), (Channel Selection),
(Scanning for Subscribed Channels), (Unsubscribed Channels),
(Invalid Channels), (Preset Channel Programming),
(Preset Channel Call-up), (Category Mode On/Off),
(Category Change), (Channel Selection Within a Category),
(Channel Number, Channel Name, Category, Artist, Song Titles and Info Display), (Programming Your Favorites into Memory), (Seek Alert), (Instant Replay), (Displaying the SIRIUS ID (ESN)), (Initialization of PIN Code), (Changing the PIN Code), (Individual Channel Locking),
(Lock Cancellation), (Master Code), (Error Signs)
l
Operating the Bluetooth Audio ...................................................... 99(What is Bluetooth Audio?), (Bluetooth audio device pairing),
(Deleting the link to a Bluetooth audio device),
(Changing paired Bluetooth device),
(How to use the Bluetooth Audio system), (Setting the Passcode),
(Setting the PIN code)
l
Operating the In-Dash CD Changer ............................................ 109(Inserting the CD), (During CD playback), (During MP3/WMA CD playback), (Normal insertion), (Inserting CDs into desired tray number), (Multiple insertion), (Normal ejection), (Ejecting CDs from desired tray number), (Multiple ejection), (Playing), (Fast-forward/Reverse), (Track search), (Disc search), (Folder search (during MP3/WMA CD playback)), (Music scan), (Repeat play), (Random play), (Audio sound adjustment)
Page 76 of 140

76
Before
UseGetting
started
Routing Address
Book
Vo i c e Recognition
Navigation
Set Up
RDM-TMC
Audio Operation
Navigation
Set Up
nOperating Tips for In-Dash CD
Changer
Condensation phenomenon
Immediately after turning on the heater
when the vehicle is cold, the CD or optical
components (prism and lens) in the In-dash
CD changer may become clouded with
condensation. At this time, the CD will eject
immediately when placed in the unit. A
clouded CD can be corrected simply by
wiping it with a soft cloth. Clouded optical
components will clear naturally in about an
hour. Wait for normal operation to return
before attempting to use the unit.
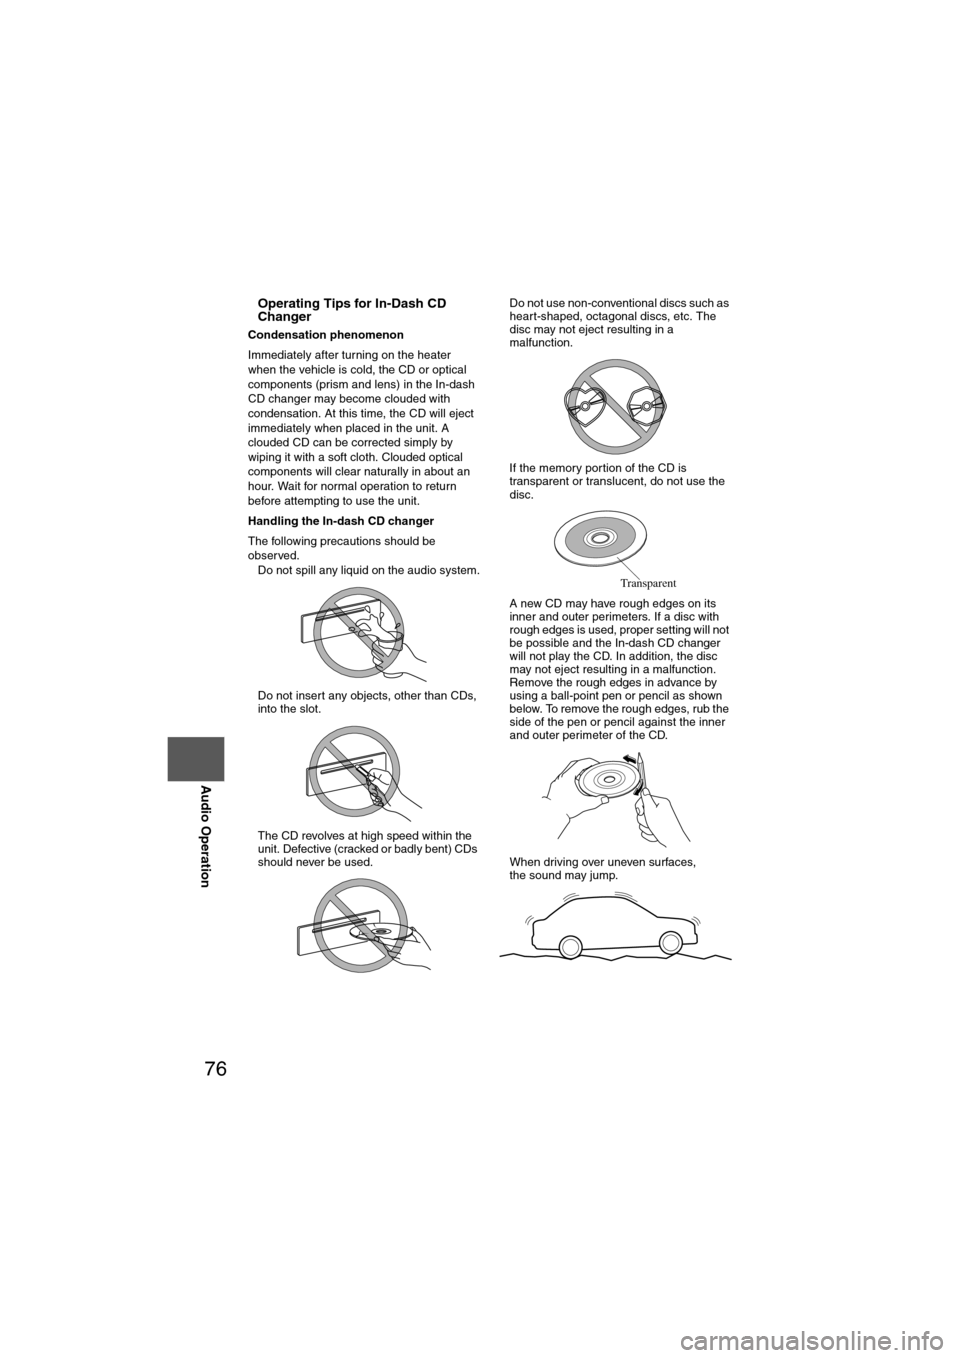
Handling the In-dash CD changer
The following precautions should be
observed.
l
Do not spill any liquid on the audio system.
l Do not insert any objects, other than CDs,
into the slot.
l The CD revolves at high speed within the
unit. Defective (cracked or badly bent) CDs
should never be used. l
Do not use non-conventional discs such as
heart-shaped, octagonal discs, etc. The
disc may not eject resulting in a
malfunction.
l If the memory portion of the CD is
transparent or translucent, do not use the
disc.
l A new CD may have rough edges on its
inner and outer perimeters. If a disc with
rough edges is used, proper setting will not
be possible and the In-dash CD changer
will not play the CD. In addition, the disc
may not eject resulting in a malfunction.
Remove the rough edges in advance by
using a ball-point pen or pencil as shown
below. To remove the rough edges, rub the
side of the pen or pencil against the inner
and outer perimeter of the CD.
l When driving over uneven surfaces,
the sound may jump.
Transparent
Page 77 of 140

77
Audio Operation
lUse discs that have been legitimately
produced. If illegally-copied discs such as
pirated discs are used, the system may not
operate properly.
l Be sure never to touch the signal surface
when handling the CDs. Pick up a CD by
grasping the outer edge or the edge of the
hole and the outer edge.
l Do not stick paper or tape on the CD.
Avoid scratching the reverse side (the side
without a label). The disc may not eject
resulting in a malfunction.
l Dust, finger smudges, and dirt can
decrease the amount of light reflected from
the signal surface, thus affecting sound
quality. If the CD should become soiled,
gently wipe it with a soft cloth from the
center of the CD to the edge.
l Do not use record sprays, antistatic
agents, or household spray cleaners.
Volatile chemicals such as benzine and
thinner can also damage the surface of the
CD and must not be used. Anything that
can damage, warp, or fog plastic should
never be used to clean CDs.
l Insert discs one by one. If two discs are
inserted at the same time, the system may
not operate properly.
l The In-dash CD changer ejects the CD if
the CD is inserted upside down. Also dirty
and/or defective CDs may be ejected.
l Do not insert any disc with a peel-off seal
affixed to it. Handling the In-dash CD changer
l
This unit may not be able to play certain
CD-R/CD-RWs made using a computer or
music CD recorder due to disc
characteristics, scratches, smudges, dirt,
etc., or due to dust or condensation on the
lens inside the unit.
l Storing CDs in the vehicle exposed to
direct sunlight or high temperature may
damage the CD-R/CD-RWs, and make
them unplayable.
l CD-R/CD-RW exceeding 700 MB cannot
be played.
l This unit may not be able to play certain
discs made using a computer due to the
application (writing software) setting used.
(For details, consult the store where the
application was purchased.)
l It is possible that certain text data, such as
titles, recorded on a CD-R/CD-RW may
not be displayed when musical data (CD-
DA) is playing.
l The period from when a CD-RW is
inserted to when it begins playing is longer
than a normal CD or CD-R.
l Completely read the instruction manual
and cautions for CD-R/CD-RWs.
l Do not use discs with cellophane tape
adhering, partially peeled off labels, or
adhesive material exuding from the edges
of the CD label. Also, do not use discs with
a commercially-available CD-R label
affixed. The disc may not eject resulting in
a malfunction.
Page 109 of 140

109
Audio Operation
nInserting the CDThe display must be open (lowered) to insert the CD.
The CD must be label-side up when inserting. The auto-loading mechanism will set the CD
and begin play. There will be a short lapse before play begins while the player reads the
digital signals on the CD.
nDuring CD playbackThe album title, the track title, and the artist name will be displayed.
nDuring MP3/WMA CD playbackThe album title, the track title, the folder name, the file number, and the artist name will be
displayed.
NoteThe CD will begin playback automatically after insertion. A CD cannot be inserted while the
display reads "WAIT".
Operating the In-Dash CD Changer
LOAD /
PUSHPOWERPUSHAUDIO
VOL
SOURCE
SCAN
SEEK
TRACK
MAP
DISP
MENU
VOICE RETURN
TUNE
Disc on-screen button
SEEK/TRACK down button SCAN button
SEEK/TRACK up button
Folder search on-screen button
on-screen button
RPTon-screen buttonRDM on-screen buttonSCAN
“IN” is displayed on a
CD that is inserted.
Page 136 of 140

136
Before
UseGetting
started
Routing Address
Book
Vo i c e Recognition
Navigation
Set Up
RDM-TMC
Steering Switch
Steering Switch
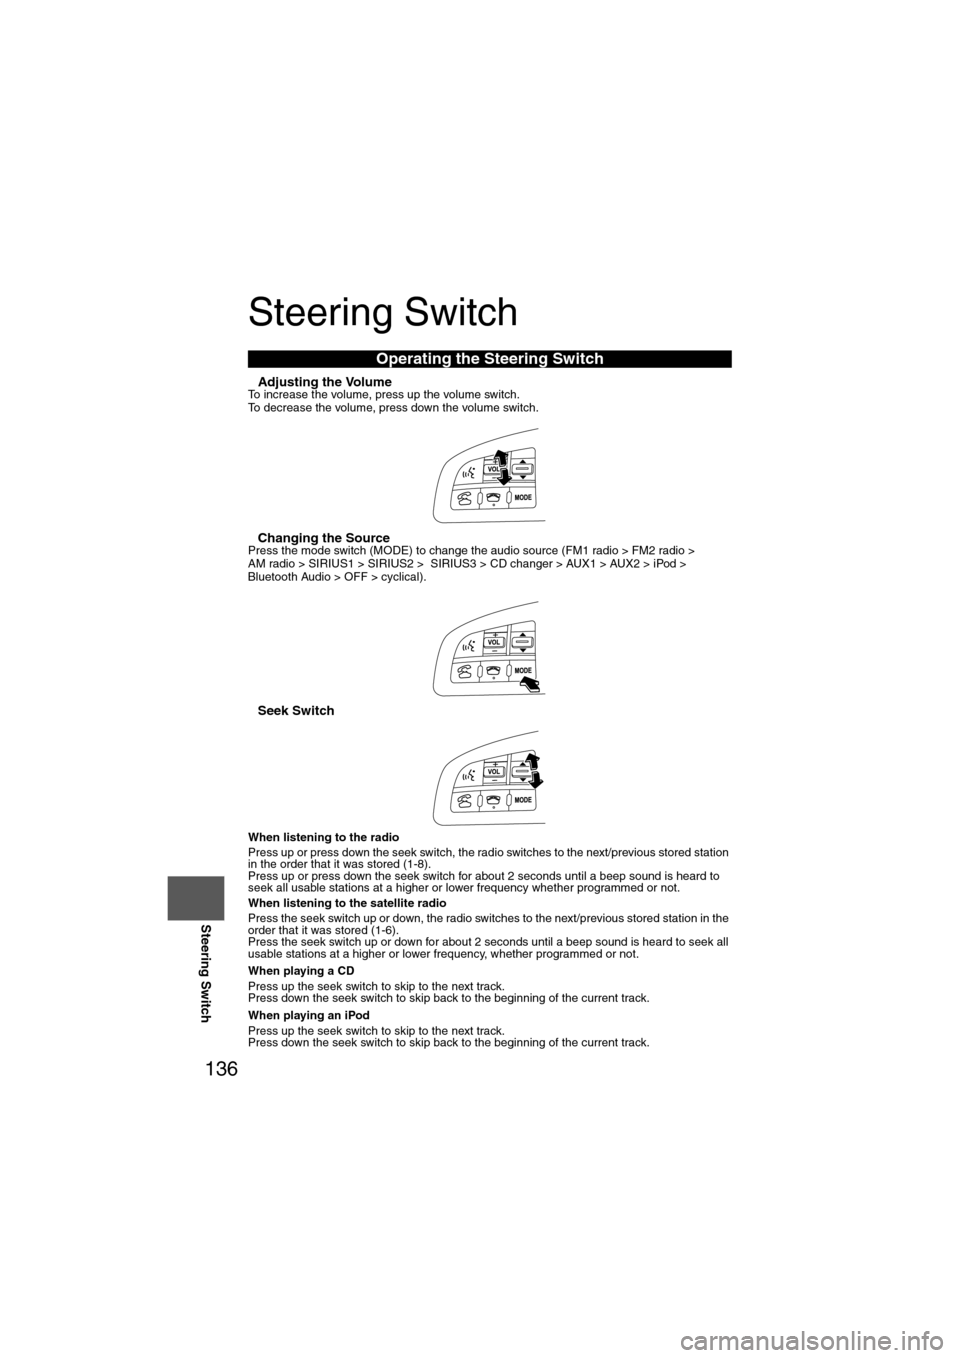
nAdjusting the VolumeTo increase the volume, press up the volume switch.
To decrease the volume, press down the volume switch.
nChanging the SourcePress the mode switch (MODE) to change the audio source (FM1 radio > FM2 radio >
AM radio > SIRIUS1 > SIRIUS2 > SIRIUS3 > CD changer > AUX1 > AUX2 > iPod >
Bluetooth Audio > OFF > cyclical).
nSeek Switch
When listening to the radio
Press up or press down the seek switch, the radio switches to the next/previous stored station
in the order that it was stored (1-8).
Press up or press down the seek switch for about 2 seconds until a beep sound is heard to
seek all usable stations at a higher or lower frequency whether programmed or not.
When listening to the satellite radio
Press the seek switch up or down, the radio switches to the next/previous stored station in the
order that it was stored (1-6).
Press the seek switch up or down for about 2 seconds until a beep sound is heard to seek all
usable stations at a higher or lower frequency, whether programmed or not.
When playing a CD
Press up the seek switch to skip to the next track.
Press down the seek switch to skip back to the beginning of the current track.
When playing an iPod
Press up the seek switch to skip to the next track.
Press down the seek switch to skip back to the beginning of the current track.
Operating the Steering Switch