bluetooth MAZDA MODEL 6 2013 Navigation Manual (in English)
[x] Cancel search | Manufacturer: MAZDA, Model Year: 2013, Model line: MODEL 6, Model: MAZDA MODEL 6 2013Pages: 140, PDF Size: 2.26 MB
Page 128 of 140
128
Before
UseGetting
started
Routing Address
Book
Vo i c e Recognition
Navigation
Set Up
RDM-TMC
Bluetooth Hands-Free
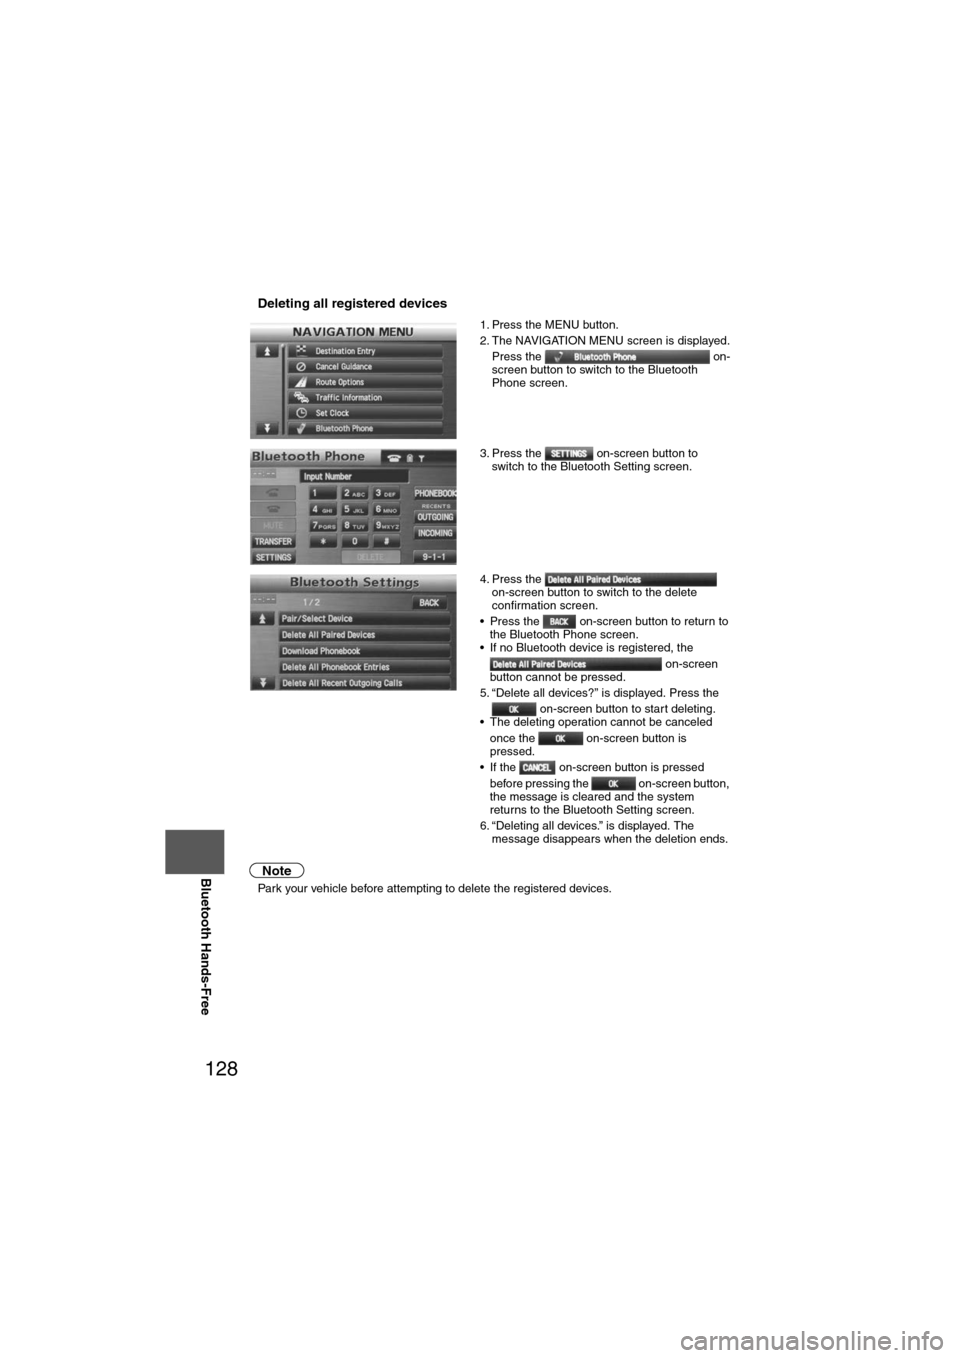
nDeleting all registered devices
Note
l
Park your vehicle before attempting to delete the registered devices. 1. Press the MENU button.
2. The NAVIGATION MENU screen is displayed.
Press the on-
screen button to switch to the Bluetooth
Phone screen.
3. Press the on-screen button to switch to the Bluetooth Setting screen.
4. Press the on-screen button to switch to the delete
confirmation screen.
• Press the on-screen button to return to the Bluetooth Phone screen.
• If no Bluetooth device is registered, the
on-screen
button cannot be pressed.
5. “Delete all devices?” is displayed. Press the on-screen button to start deleting.
• The deleting operation cannot be canceled
once the on-screen button is
pressed.
• If the on-screen button is pressed
before pressing the on-screen button,
the message is cleared and the system
returns to the Bluetooth Setting screen.
6. “Deleting all devices.” is displayed. The message disappears when the deletion ends.
Page 129 of 140
129
Before
UseGetting
started
Routing Address
Book
Vo i c e Recognition
Navigation
Set Up
Bluetooth Hands-Free
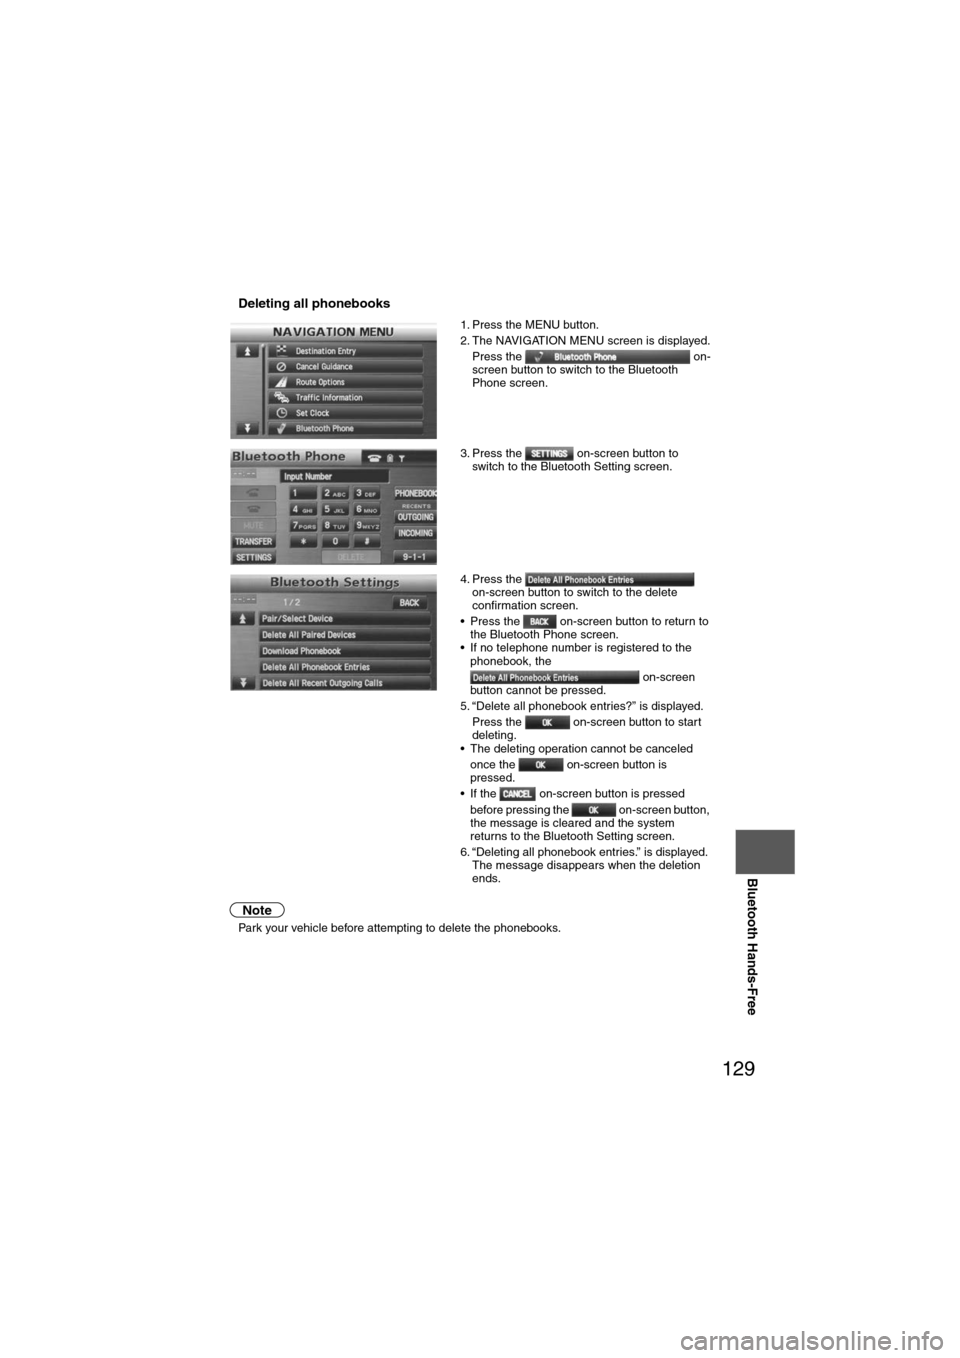
nDeleting all phonebooks
Note
l
Park your vehicle before attempting to delete the phonebooks. 1. Press the MENU button.
2. The NAVIGATION MENU screen is displayed.
Press the on-
screen button to switch to the Bluetooth
Phone screen.
3. Press the on-screen button to switch to the Bluetooth Setting screen.
4. Press the on-screen button to switch to the delete
confirmation screen.
• Press the on-screen button to return to the Bluetooth Phone screen.
• If no telephone number is registered to the
phonebook, the
on-screen
button cannot be pressed.
5. “Delete all phonebook entries?” is displayed. Press the on-screen button to start
deleting.
• The deleting operation cannot be canceled
once the on-screen button is
pressed.
• If the on-screen button is pressed before pressing the on-screen button,
the message is cleared and the system
returns to the Bluetooth Setting screen.
6. “Deleting all phonebook entries.” is displayed. The message disappears when the deletion
ends.
Page 130 of 140
130
Before
UseGetting
started
Routing Address
Book
Vo i c e Recognition
Navigation
Set Up
RDM-TMC
Bluetooth Hands-Free
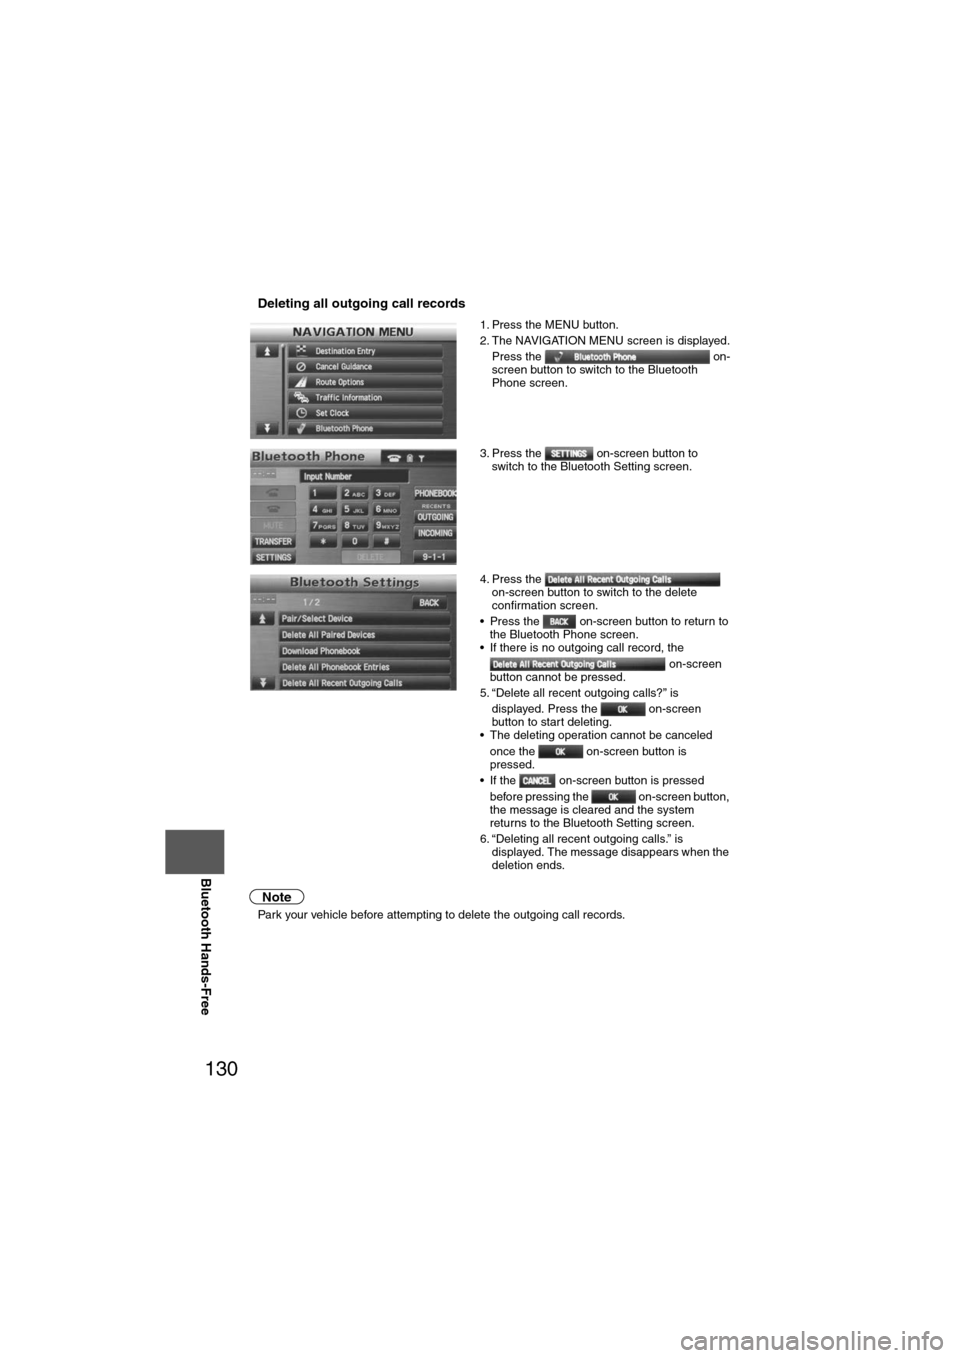
nDeleting all outgoing call records
Note
l
Park your vehicle before attempting to delete the outgoing call records. 1. Press the MENU button.
2. The NAVIGATION MENU screen is displayed.
Press the on-
screen button to switch to the Bluetooth
Phone screen.
3. Press the on-screen button to switch to the Bluetooth Setting screen.
4. Press the on-screen button to switch to the delete
confirmation screen.
• Press the on-screen button to return to the Bluetooth Phone screen.
• If there is no outgoing call record, the
on-screen
button cannot be pressed.
5. “Delete all recent outgoing calls?” is displayed. Press the on-screen
button to start deleting.
• The deleting operation cannot be canceled
once the on-screen button is
pressed.
• If the on-screen button is pressed
before pressing the on-screen button,
the message is cleared and the system
returns to the Bluetooth Setting screen.
6. “Deleting all recent outgoing calls.” is displayed. The message disappears when the
deletion ends.
Page 131 of 140
131
Before
UseGetting
started
Routing Address
Book
Vo i c e Recognition
Navigation
Set Up
Bluetooth Hands-Free
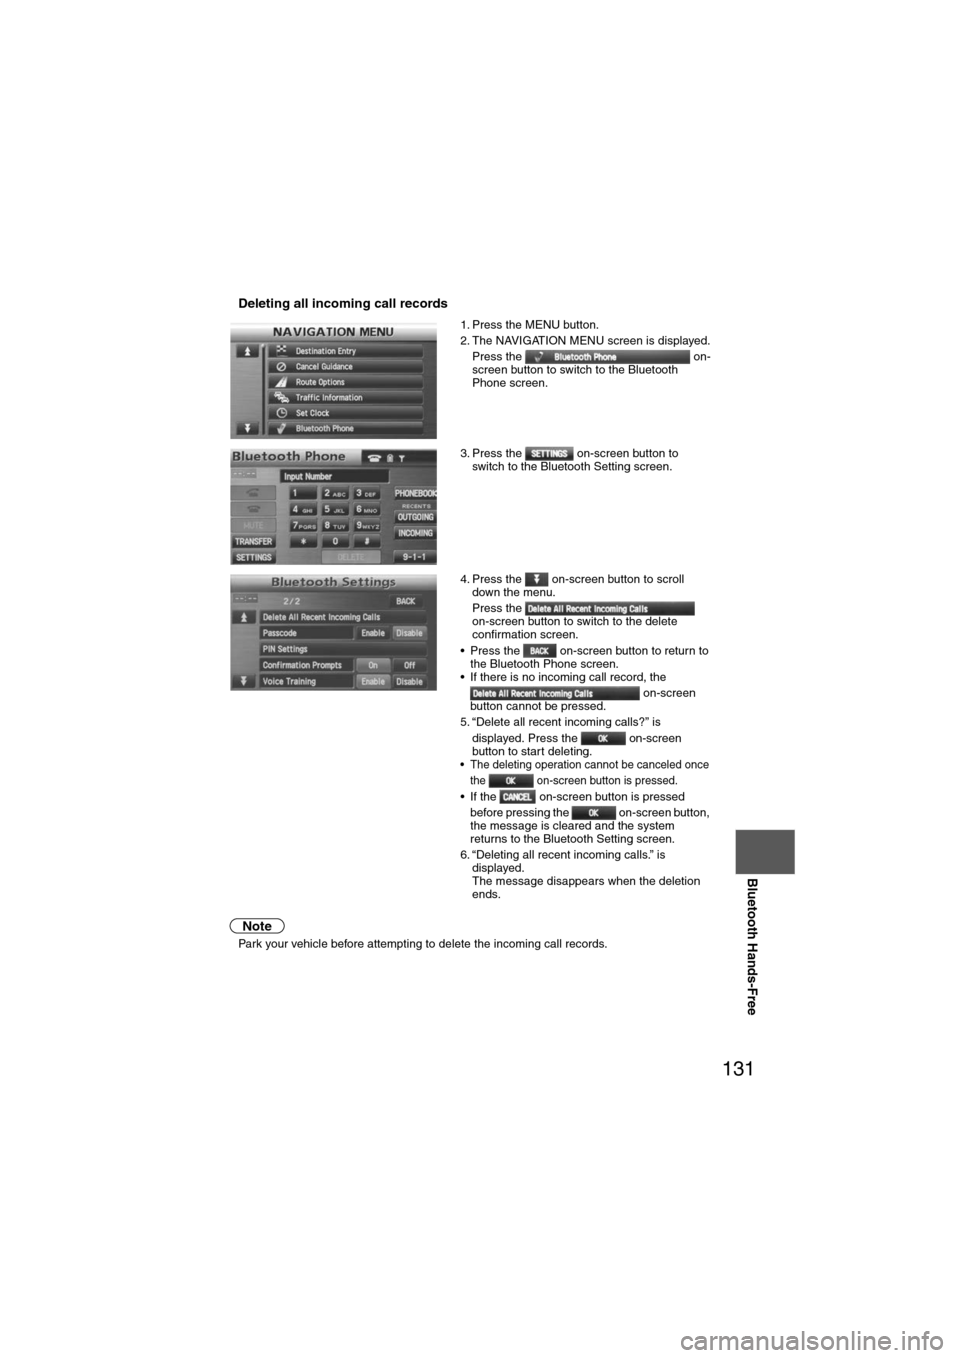
nDeleting all incoming call records
Note
l
Park your vehicle before attempting to delete the incoming call records. 1. Press the MENU button.
2. The NAVIGATION MENU screen is displayed.
Press the on-
screen button to switch to the Bluetooth
Phone screen.
3. Press the on-screen button to switch to the Bluetooth Setting screen.
4. Press the on-screen button to scroll down the menu.
Press the
on-screen button to switch to the delete
confirmation screen.
• Press the on-screen button to return to the Bluetooth Phone screen.
• If there is no incoming call record, the
on-screen
button cannot be pressed.
5. “Delete all recent incoming calls?” is
displayed. Press the on-screen
button to start deleting.
• The deleting operation cannot be canceled once the on-screen button is pressed.
• If the on-screen button is pressed before pressing the on-screen button,
the message is cleared and the system
returns to the Bluetooth Setting screen.
6. “Deleting all recent incoming calls.” is displayed.
The message disappears when the deletion
ends.
Page 132 of 140
132
Before
UseGetting
started
Routing Address
Book
Vo i c e Recognition
Navigation
Set Up
RDM-TMC
Bluetooth Hands-Free
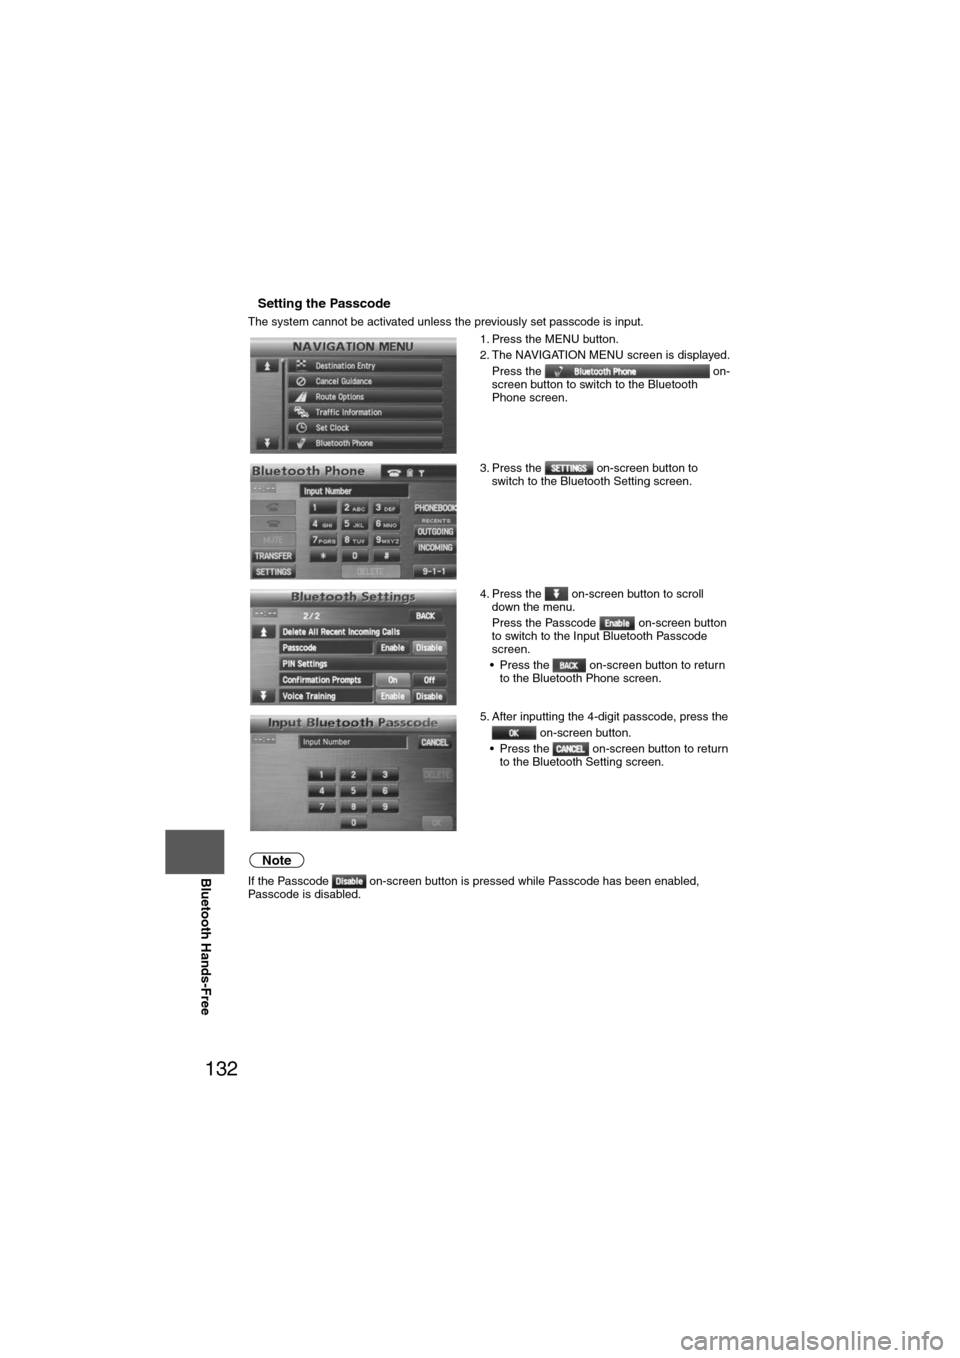
nSetting the Passcode
The system cannot be activated unless the previously set passcode is input.
Note
If the Passcode on-screen button is pressed while Passcode has been enabled,
Passcode is disabled. 1. Press the MENU button.
2. The NAVIGATION MENU screen is displayed.
Press the on-
screen button to switch to the Bluetooth
Phone screen.
3. Press the on-screen button to switch to the Bluetooth Setting screen.
4. Press the on-screen button to scroll down the menu.
Press the Passcode on-screen button
to switch to the Input Bluetooth Passcode
screen.
• Press the on-screen button to return to the Bluetooth Phone screen.
5. After inputting the 4-digit passcode, press the on-screen button.
• Press the on-screen button to return to the Bluetooth Setting screen.
Page 133 of 140
133
Before
UseGetting
started
Routing Address
Book
Vo i c e Recognition
Navigation
Set Up
Bluetooth Hands-Free
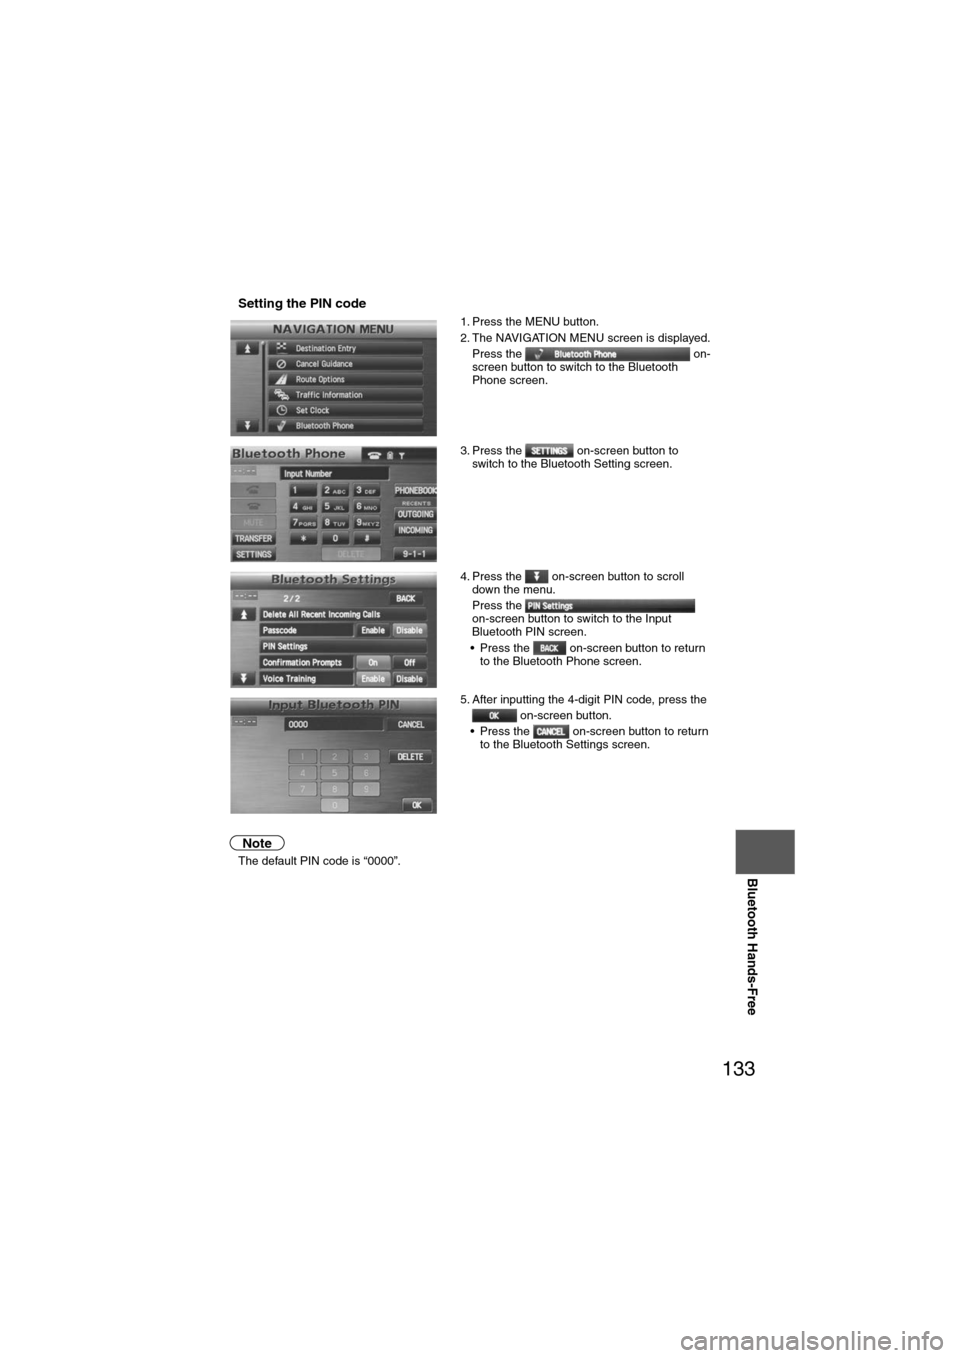
nSetting the PIN code
Note
l
The default PIN code is “0000”. 1. Press the MENU button.
2. The NAVIGATION MENU screen is displayed.
Press the on-
screen button to switch to the Bluetooth
Phone screen.
3. Press the on-screen button to switch to the Bluetooth Setting screen.
4. Press the on-screen button to scroll down the menu.
Press the
on-screen button to switch to the Input
Bluetooth PIN screen.
• Press the on-screen button to return to the Bluetooth Phone screen.
5. After inputting the 4-digit PIN code, press the on-screen button.
• Press the on-screen button to return to the Bluetooth Settings screen.
Page 134 of 140
134
Before
UseGetting
started
Routing Address
Book
Vo i c e Recognition
Navigation
Set Up
RDM-TMC
Bluetooth Hands-Free
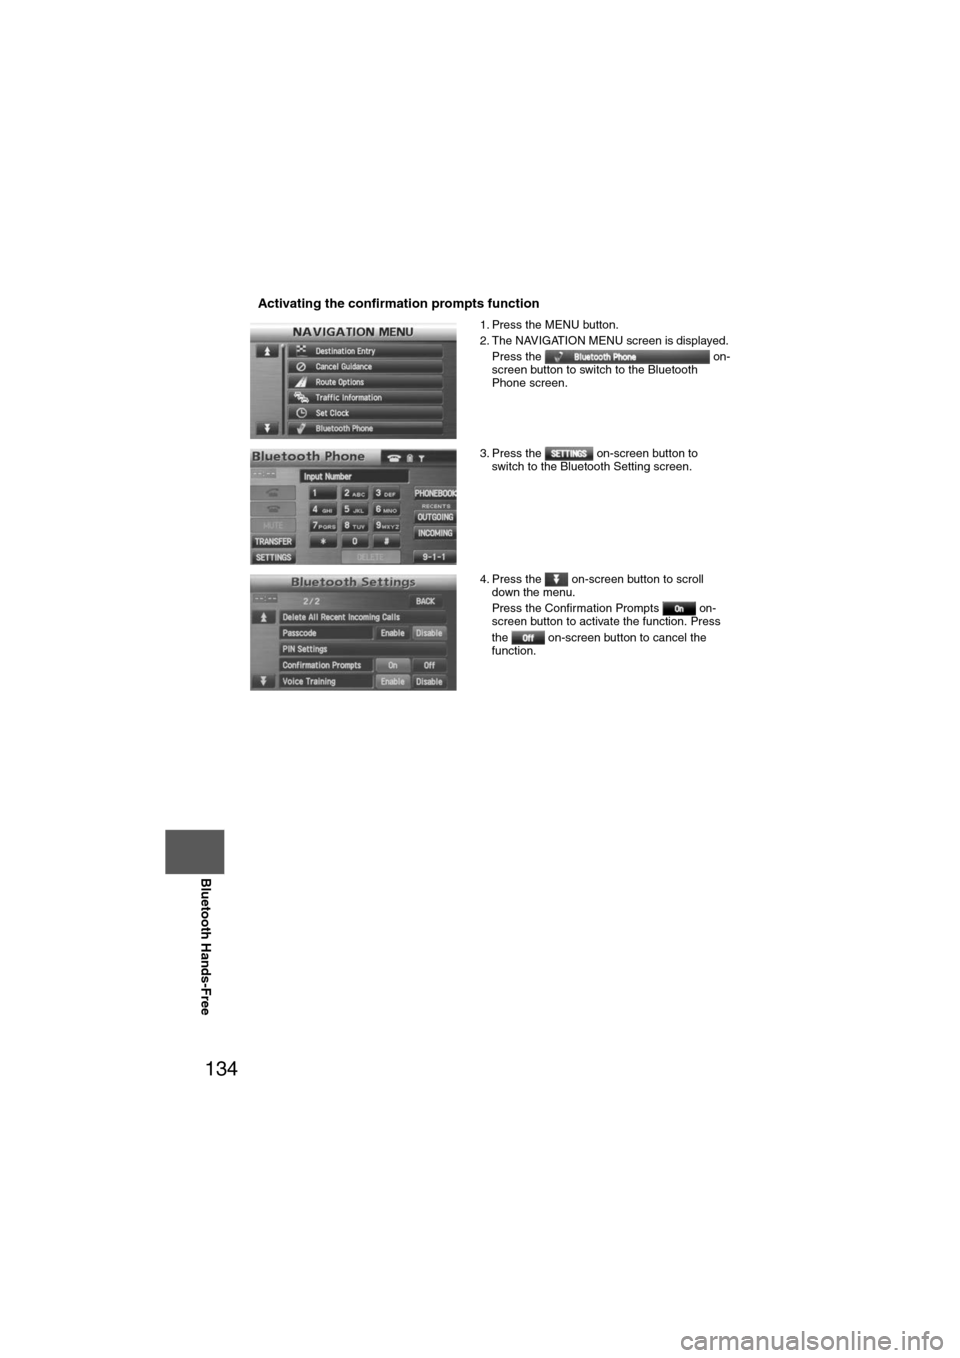
nActivating the confirmation prompts function
1. Press the MENU button.
2. The NAVIGATION MENU screen is displayed.
Press the on-
screen button to switch to the Bluetooth
Phone screen.
3. Press the on-screen button to switch to the Bluetooth Setting screen.
4. Press the on-screen button to scroll down the menu.
Press the Confirmation Prompts on-
screen button to activate the function. Press
the on-screen button to cancel the
function.
Page 135 of 140
135
Before
UseGetting
started
Routing Address
Book
Vo i c e Recognition
Navigation
Set Up
Bluetooth Hands-Free
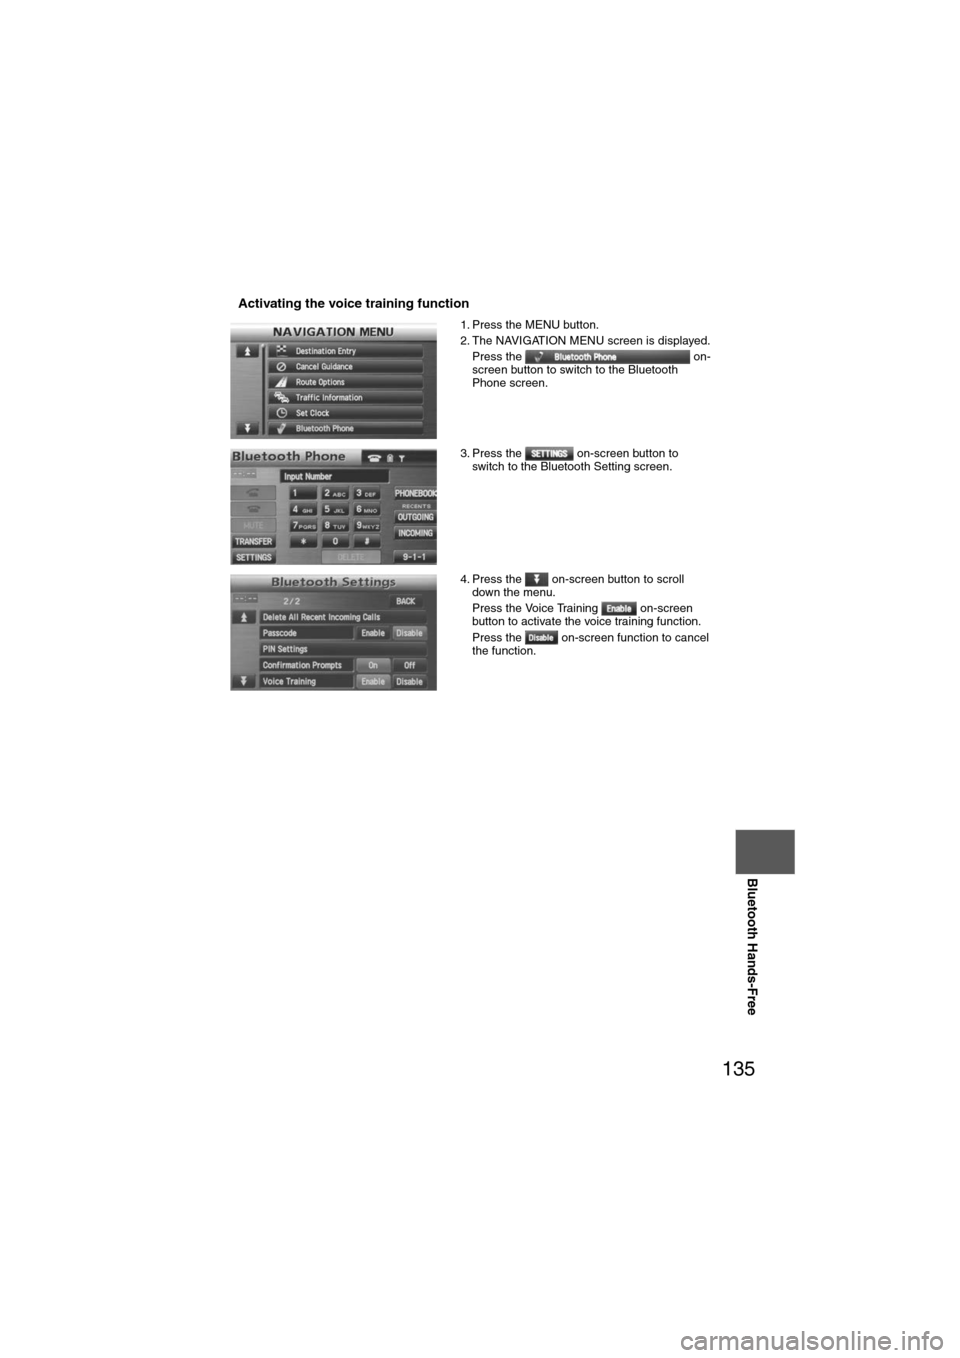
nActivating the voice training function
1. Press the MENU button.
2. The NAVIGATION MENU screen is displayed.
Press the on-
screen button to switch to the Bluetooth
Phone screen.
3. Press the on-screen button to switch to the Bluetooth Setting screen.
4. Press the on-screen button to scroll down the menu.
Press the Voice Training on-screen
button to activate the voice training function.
Press the on-screen function to cancel
the function.
Page 136 of 140
136
Before
UseGetting
started
Routing Address
Book
Vo i c e Recognition
Navigation
Set Up
RDM-TMC
Steering Switch
Steering Switch
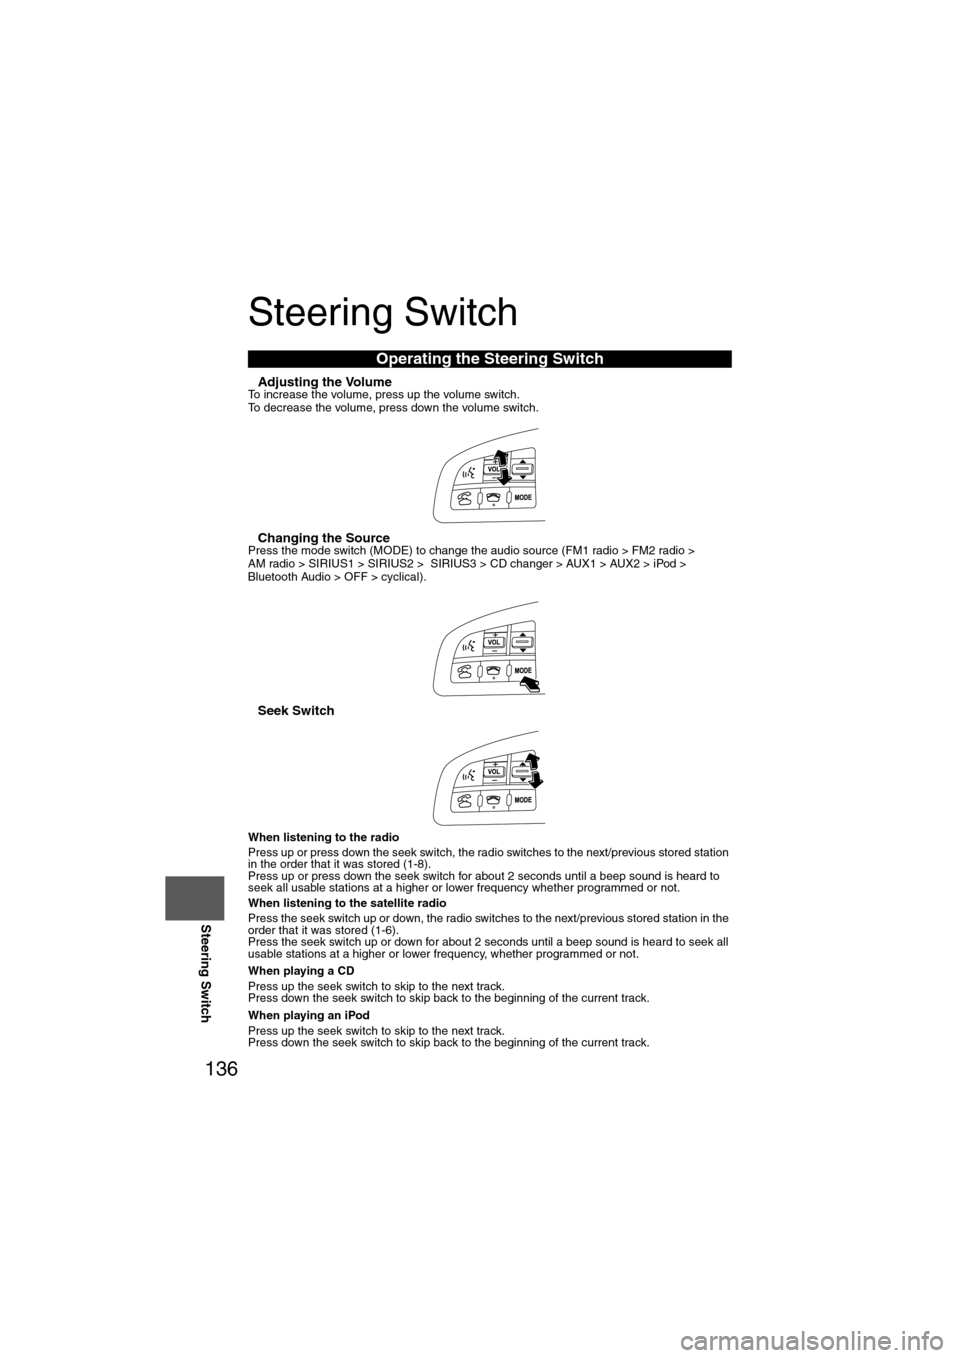
nAdjusting the VolumeTo increase the volume, press up the volume switch.
To decrease the volume, press down the volume switch.
nChanging the SourcePress the mode switch (MODE) to change the audio source (FM1 radio > FM2 radio >
AM radio > SIRIUS1 > SIRIUS2 > SIRIUS3 > CD changer > AUX1 > AUX2 > iPod >
Bluetooth Audio > OFF > cyclical).
nSeek Switch
When listening to the radio
Press up or press down the seek switch, the radio switches to the next/previous stored station
in the order that it was stored (1-8).
Press up or press down the seek switch for about 2 seconds until a beep sound is heard to
seek all usable stations at a higher or lower frequency whether programmed or not.
When listening to the satellite radio
Press the seek switch up or down, the radio switches to the next/previous stored station in the
order that it was stored (1-6).
Press the seek switch up or down for about 2 seconds until a beep sound is heard to seek all
usable stations at a higher or lower frequency, whether programmed or not.
When playing a CD
Press up the seek switch to skip to the next track.
Press down the seek switch to skip back to the beginning of the current track.
When playing an iPod
Press up the seek switch to skip to the next track.
Press down the seek switch to skip back to the beginning of the current track.
Operating the Steering Switch