ignition MAZDA MODEL 6 2013 Smart Start Guide (in English)
[x] Cancel search | Manufacturer: MAZDA, Model Year: 2013, Model line: MODEL 6, Model: MAZDA MODEL 6 2013Pages: 18, PDF Size: 5.1 MB
Page 3 of 18
4
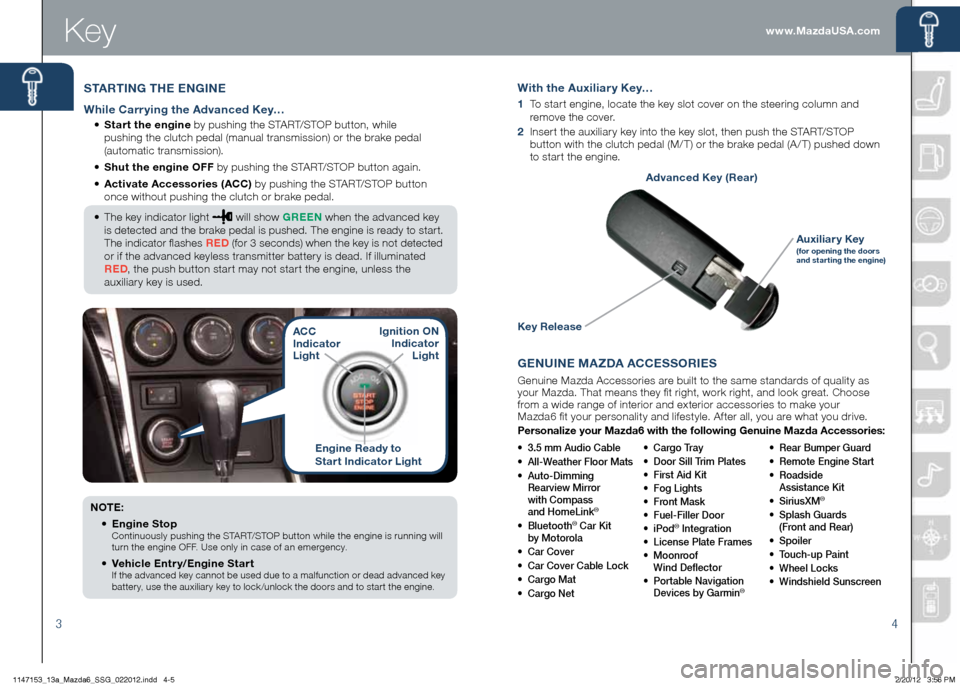
Engine Ready to
Start Indicator Light
ACC
Indicator
Light
Ignition ON
Indicator Light
www.MazdaUSA.comKey
3
Key
STARTING THE ENGINE
While Carrying the Advanced Key…
• Start the engine by pushing the START/STOP button, while
pushing the clutch pedal (manual transmission) or the brake pedal
(automatic transmission).
• Shut the engine OFF by pushing the START/STOP button again.
• Activate Accessories (ACC) by pushing the START/STOP button
once without pushing the clutch or brake pedal.
• The key indicator light
will show GREEN when the advanced key
is detected and the brake pedal is pushed. The engine is ready to start.
The indicator flashes RED (for 3 seconds) when the key is not detected
or if the advanced keyless transmitter battery is dead. If illuminated
RED , the push button start may not start the engine, unless the
auxiliary key is used.
NOTE:
•
Engine Stop
Continuously pushing the START/STOP button while the engine is running will
turn the engine OFF. Use only in case of an emergency.
•
Vehicle Entry/Engine Start If the advanced key cannot be used due to a malfunction or dead advanced key
battery, use the auxiliary key to lock /unlock the doors and to start the engine.
GENUINE MAzDA ACCESSORIES
Genuine Mazda Accessories are built to the same standards of quality as
your Mazda. That means they fit right, work right, and look great. Choose
from a wide range of interior and exterior accessories to make your
Mazda6 fit your personality and lifestyle. After all, you are what you drive.
Personalize your Mazda6 with the following Genuine Mazda Accessories:
• 3.5 mm Audio Cable
• All-Weather Floor Mats
• Auto-Dimming
Rearview Mirror
with Compass
and HomeLink
®
• Bluetooth® Car Kit
by Motorola
• Car Cover
• Car Cover Cable Lock
• Cargo Mat
• Cargo Net • Cargo Tray
• Door Sill Trim Plates
• First Aid Kit
• Fog Lights
• Front Mask
• Fuel-Filler Door
• iPod® Integration
• License Plate Frames
• Moonroof
Wind Deflector
• Portable Navigation
Devices by Garmin
®
• Rear Bumper Guard
• Remote Engine Start
• Roadside
Assistance Kit
• SiriusXM
®
• Splash Guards
(Front and Rear)
• Spoiler
• Touch-up Paint
• Wheel Locks
• Windshield Sunscreen
With the Auxiliary Key…
1 To start engine, locate the key slot cover on the steering column and
remove the cover.
2 Insert the auxiliary key into the key slot, then push the START/STOP
button with the clutch pedal (M/ T) or the brake pedal (A / T) pushed down
to start the engine.
Key Release
Auxiliary Key(for opening the doors
and star ting the engine)
Advanced Key (Rear)
1147153_13a_Mazda6_SSG_022012.indd 4-52/20/12 3:56 PM
Page 4 of 18
56
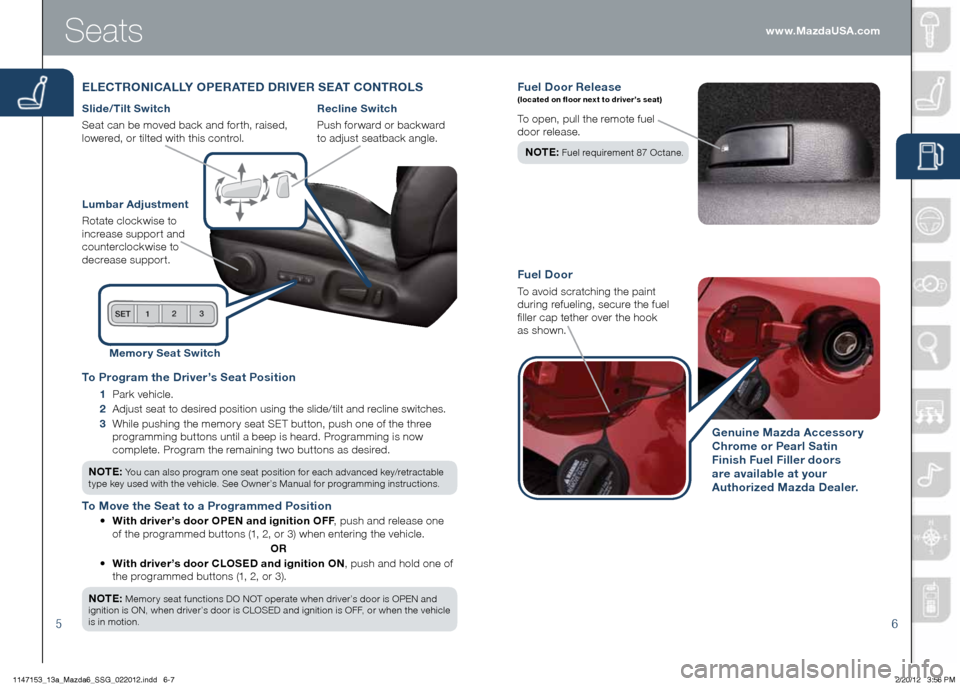
Fuel Door Rele ase (located on floor next to driver’s seat)
To open, pull the remote fuel
door release.
NOTE :
Fuel requirement 87 Octane.
Fuel Door
To avoid scratching the paint
during refueling, secure the fuel
filler cap tether over the hook
as shown.
Genuine Mazda Accessory
Chrome or Pearl Satin
Finish Fuel Filler doors
are available at your
Authorized Mazda Dealer.
Seats
ELECTRONICALLY OPERATED DRIVER SEAT CONTROLS
Slide/Tilt Switch
Seat can be moved back and forth, raised,
lowered, or tilted with this control.
Lumbar Adjustment
Rotate clockwise to
increase support and
counterclockwise to
decrease support.
Recline Switch
Push forward or backward
to adjust seatback angle.
Memor y Seat Switch
To Program the Driver’s Seat Position
1 Park vehicle.
2 Adjust seat to desired position using the slide/tilt and recline switches.
3 While pushing the memory seat SET button, push one of the three
programming buttons until a beep is heard. Programming is now
complete. Program the remaining two buttons as desired.
NOTE: You can also program one seat position for each advanced key/retractable
type key used with the vehicle. See Owner’s Manual for programming instructions.
To Move the Seat to a Programmed Position
• With driver’s door OPEN and ignition OFF , push and release one
of the programmed buttons (1, 2, or 3) when entering the vehicle.
OR
• With driver’s door CLOSED and ignition ON , push and hold one of
the programmed buttons (1, 2, or 3).
NOTE:
Memory seat functions DO NOT operate when driver’s door is OPEN and
ignition is ON, when driver’s door is CLOSED and ignition is OFF, or when the vehicle
is in motion.
www.MazdaUSA.com
1147153_13a_Mazda6_SSG_022012.indd 6-72/20/12 3:56 PM
Page 6 of 18
Instrument Cluster
910
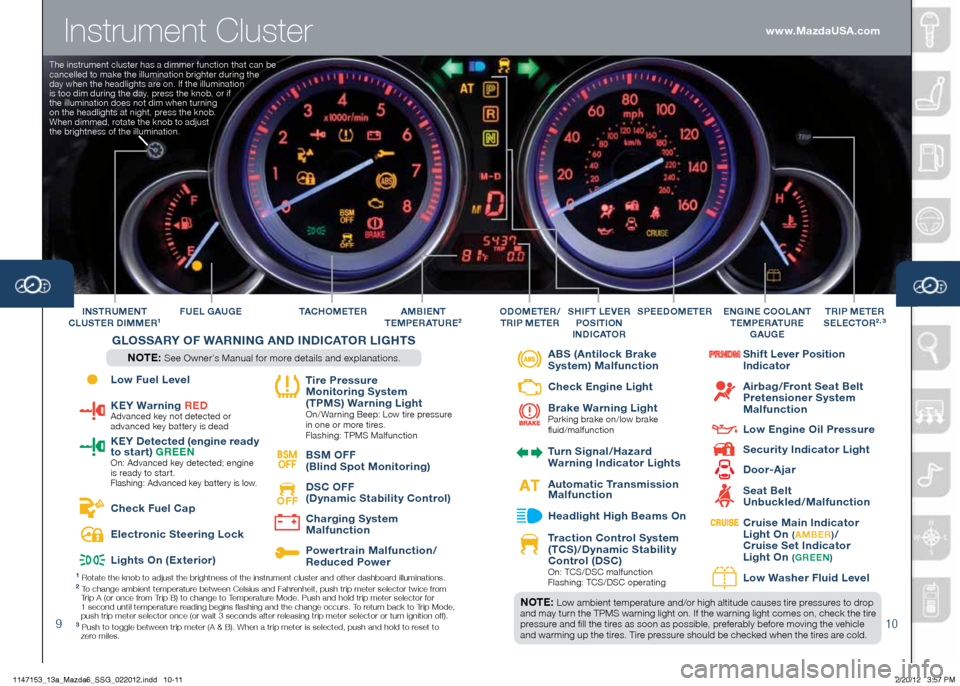
FUEL GAUGE TAC H O M E T E RINSTRUMENT
CLUSTER DIMMER1A MBIENT
TEMPERATURE2
G LOSSARY OF W ARNING AND INDICATOR LIGHTS
NOTE: See Owner’s Manual for more details and explanations. SPEEDOMETER
E
NGINE COOLANT
T EMPERATURE
GAUGETRIP METER
SELECTOR2 , 3ODOMETER /
TRIP METERSHIFT LEVER
POSITION
INDICATOR
1 Rotate the knob to adjust the brightness of the instrument cluster and \
other dashboard illuminations.2 To change ambient temperature between Celsius and Fahrenheit, push trip meter selector twice from
Trip A (or once from Trip B) to change to Temperature Mode. Push and hold trip meter selector for
1 second until temperature reading begins flashing and the change occurs. To return back to Trip Mode,
push trip meter selector once (or wait 3 seconds after releasing trip meter selector or turn ignition off).
3 Push to toggle between trip meter (A & B). When a trip meter is selec\
ted, push and hold to reset to
zero miles.
NOTE: Low ambient temperature and/or high altitude causes tire pressures to drop
and may turn the TPMS warning light on. If the warning light comes on, check the tire
pressure and fill the tires as soon as possible, preferably before moving the vehicle
and warming up the tires. Tire pressure should be checked when the tires are cold.
www.MazdaUSA.com
The instrument cluster has a dimmer function that can be
cancelled to make the illumination brighter during the
day when the headlights are on. If the illumination
is too dim during the day, press the knob, or if
the illumination does not dim when turning
on the headlights at night, press the knob.
When dimmed, rotate the knob to adjust
the brightness of the illumination.
Low Fuel Level
KEY Warning R
ED Advanced key not detected or
advanced key battery is dead
KEY Detected (engine ready
to start) G
REEN
On: Advanced key detected; engine
is ready to start.
Flashing: Advanced key battery is low.
Check Fuel Cap
Electronic Steering Lock
Lights On (Exterior)
Tire Pressure
Monitoring System
(TPMS) Warning Light
On/ Warning Beep: Low tire pressure
in one or more tires.
Flashing: TPMS Malfunction
BSM
OFF BSM OFF
(Blind Spot Monitoring)
OFF
DSC OFF
(Dynamic Stability Control)
Charging System
Malfunction
Powertrain Malfunction/
Reduced Power
ABS (Antilock Brake
System) Malfunction
Check Engine Light
Brake Warning Light
Parking brake on/low brake
fluid/malfunction
Turn Signal/Hazard
Warning Indicator Lights
Automatic Transmission
Malfunction
Headlight High Beams On
Traction Control System
(TCS)/Dynamic Stability
Control (DSC)
On: TCS/DSC malfunction
Flashing: TCS/DSC operating
Shift Lever Position
Indicator
Airbag/Front Seat Belt
Pretensioner System
Malfunction
Low Engine Oil Pressure
Security Indicator Light
Door-Ajar
Seat Belt
Unbuckled/Malfunction
Cruise Main Indicator
Light On ( A MBER )/
Cruise Set Indicator
Light On
( G REEN )
Low Wa
sher Fluid Level
1147153_13a_Mazda6_SSG_022012.indd 10-112/20/12 3:57 PM
Page 7 of 18
Feature Highlights
1112
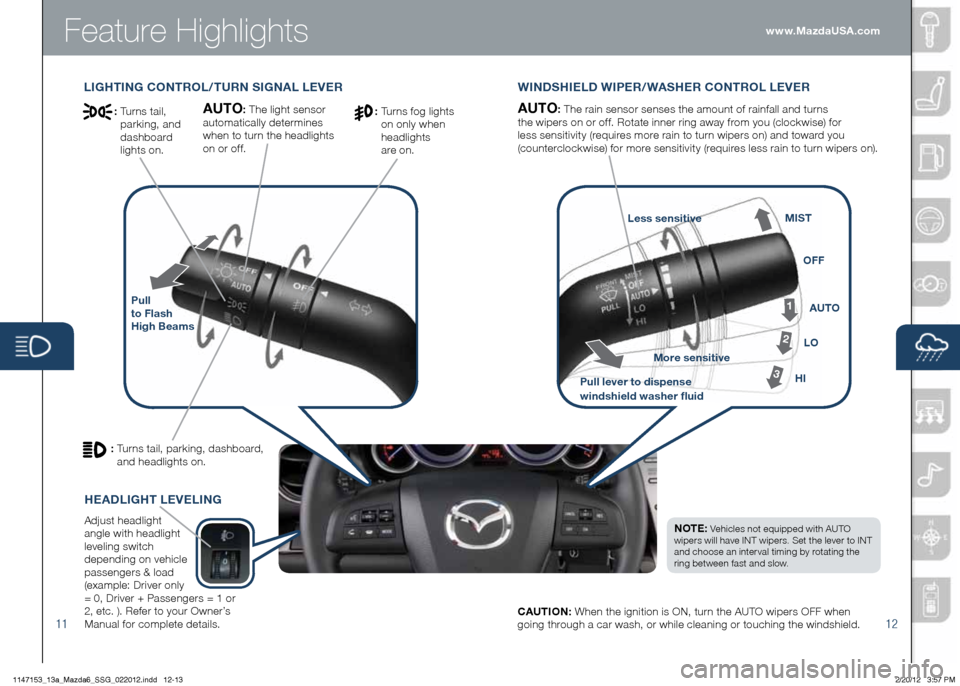
WINDSHIELD WIPER/WASHER CONTROL LEVER
Pull
to Flash
High Beams
AUTO: The rain sensor senses the amount of rainfall and turns
the wipers on or off. Rotate inner ring away from you (clockwise) for
less sensitivity (requires more rain to turn wipers on) and toward you
(counterclockwise) for more sensitivity (requires less rain to turn wipers on).
1
2
3HI LO
AUTO
OFF
MIST
CAUTION:
When the ignition is ON, turn the AUTO wipers OFF when
going through a car wash, or while cleaning or touching the windshield. www.MazdaUSA.com
NOTE: Vehicles not equipped with AUTO
wipers will have INT wipers. Set the lever to INT
and choose an interval timing by rotating the
ring between fast and slow.
Pull lever to dispense
windshield washer fluid More sensitive
Less sensitive
HEADLIGHT LEVELING
Adjust headlight
angle with headlight
leveling switch
depending on vehicle
passengers & load
(example: Driver only
= 0, Driver + Passengers = 1 or
2, etc. ). Refer to your Owner’s
Manual for complete details.
LIGHTING CONTROL/TURN SIGNAL LEVER
AUTO: The light sensor
automatically determines
when to turn the headlights
on or off.
: Turns tail, parking, dashboard,
and headlights on.
: Turns fog lights
on only when
headlights
are on.: Turns tail,
parking, and
dashboard
lights on.
1147153_13a_Mazda6_SSG_022012.indd 12-132/20/12 3:57 PM
Page 12 of 18
Audio Controls Without Navigation
2122
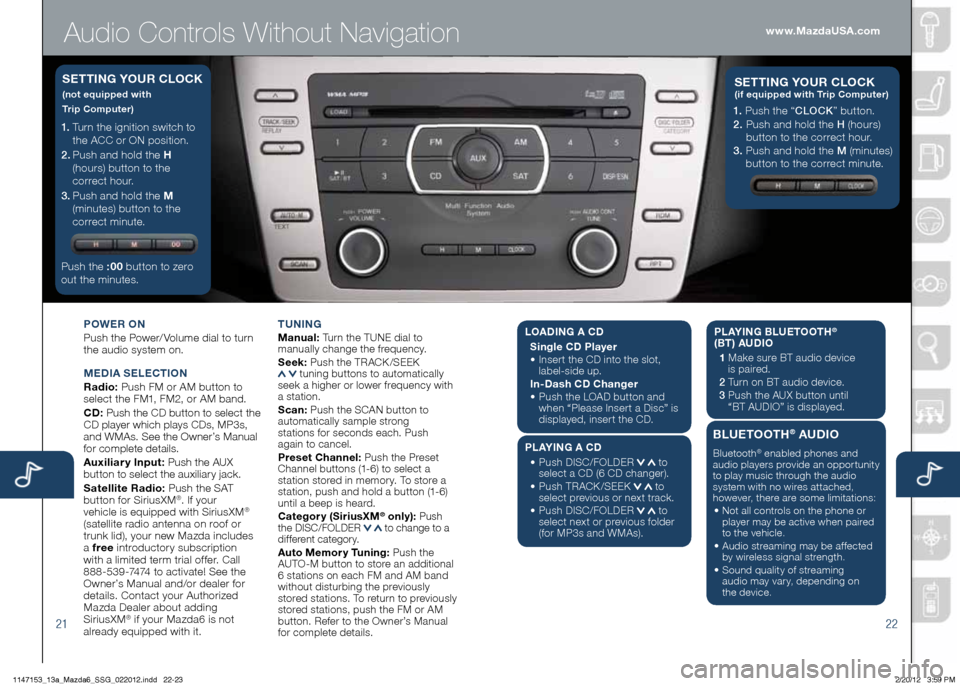
POWER ON
Push the Power/ Volume dial to turn
the audio system on.
M EDIA SELECTION
Radio: Push FM or AM button to
select the FM1, FM2, or AM band.
CD: Push the CD button to select the
CD player which plays CDs, MP3s,
and WMAs. See the Owner’s Manual
for complete details.
Auxiliary Input: Push the AUX
button to select the auxiliary jack.
Satellite Radio: Push the SAT
button for SiriusXM
®. If your
vehicle is equipped with SiriusXM®
(satellite radio antenna on roof or
trunk lid), your new Mazda includes
a free introductory subscription
with a limited term trial offer. Call
888-539-7474 to activate! See the
Owner’s Manual and/or dealer for
details. Contact your Authorized
Mazda Dealer about adding
SiriusXM
® if your Mazda6 is not
already equipped with it. T
UNING
Manual: Turn the TUNE dial to
manually change the frequency.
S eek: Push the TRACK /SEEK
tuning buttons to automatically
seek a higher or lower frequency with
a station.
S can: Push the SCAN button to
automatically sample strong
stations for seconds each. Push
again to cancel.
Preset Channel: Push the Preset
Channel buttons (1-6) to select a
station stored in memory. To store a
station, push and hold a button (1-6)
until a beep is heard.
Category (Sirius xM
® only): Push
the DISC/FOLDER to change to a
different category.
Auto Memory Tuning: Push the
AUTO-M button to store an additional
6 stations on each FM and AM band
without disturbing the previously
stored stations. To return to previously
stored stations, push the FM or AM
button. Refer to the Owner’s Manual
for complete details.
1. Turn the ignition switch to
the ACC or ON position.
2 . Push and hold the H
(hours) button to the
correct hour.
3 . Push and hold the M
(minutes) button to the
correct minute.
Push the :00 button to zero
out the minutes.
S ETTING YOUR CLOCK
(not equipped with
Trip Computer)
1. Push the “ CLOCK” button.
2. Push and hold the H (hours)
button to the correct hour.
3. Push and hold the M (minutes)
button to the correct minute.
S ETTING YOUR C LOCK (if equipped with Trip Computer)
www.MazdaUSA.com
LOADIN G A CD
Single CD Player
•
Insert the CD into the slot,
label-side up.
In-Dash CD Changer
•
Push the LOAD button and
when “Please Insert a Disc” is
displayed, insert the CD.
PLAYING A CD
•
Push DISC/FOLDER
to
select a CD (6 CD changer).
•
Push TRACK /SEEK
to
select previous or next track.
•
Push DISC/FOLDER
to
select next or previous folder
(for MP3s and WMAs). PLAYING BLUETOOTH
®
(BT) AUDIO
1 Make sure BT audio device
is paired.
2 Turn on BT audio device.
3 Push the AUX button until
“BT AUDIO” is displayed.
BLUETOOTH® AUDIO
Bluetooth® enabled phones and
audio players provide an opportunity
to play music through the audio
system with no wires attached,
however, there are some limitations:
• Not all controls on the phone or
player may be active when paired
to the vehicle.
• Audio streaming may be affected
by wireless signal strength.
• Sound quality of streaming
audio may vary, depending on
the device.
1147153_13a_Mazda6_SSG_022012.indd 22-232/20/12 3:59 PM
Page 17 of 18
Customer Delivery Checklist
DEALERSHIPDAT E
SALES CONSULTANT CUSTOMER’S NAME
VIN E-MAIL
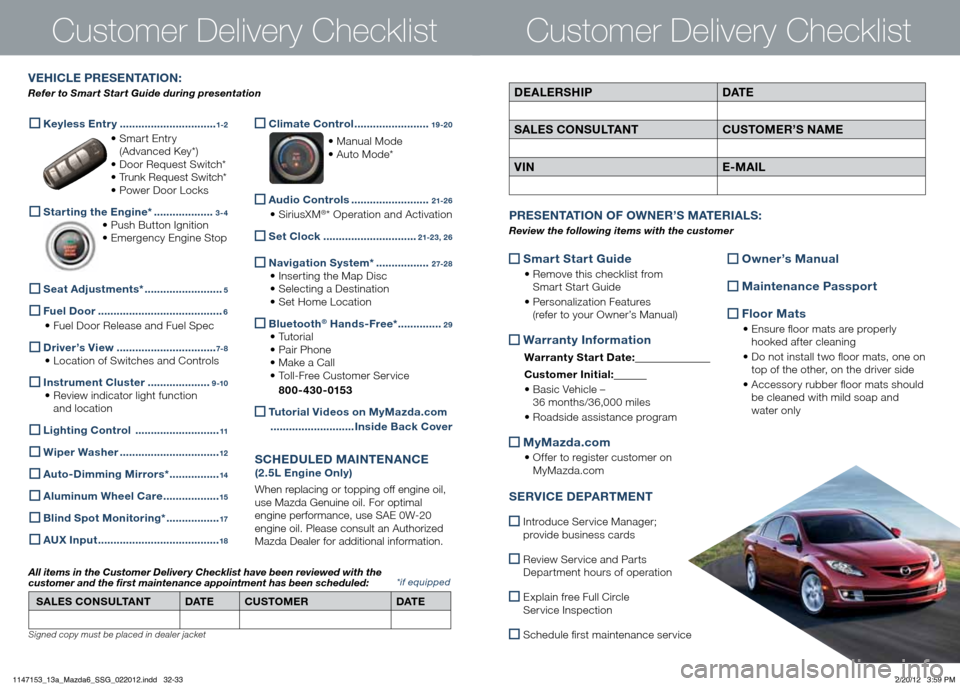
VEHICLE PRESENTATION :
Refer to Smart Start Guide during presentation
Customer Delivery Checklist
*if equipped
Keyless Entry
...............................1-2
• Smart Entry
(Advanced Key*)
• Door Request Switch*
• Trunk Request Switch*
• Power Door Locks
Starting the Engine* ...................3-4
• Push Button Ignition
• Emergency Engine Stop
Seat Adjustments*
.........................5
Fuel Door
........................................6
• Fuel Door Release and Fuel Spec
Driver’s View
................................7- 8
• Location of Switches and Controls
Instrument Cluster
....................9 -10
• Review indicator light function
and location
Lighting Control
...........................11
Wiper Washer
................................12
Auto-Dimming Mirrors*
................14
Aluminum Wheel Care
..................15
Blind Spot Monitoring*
.................17
A
Ux Input .......................................18
Climate Control
........................19 -20
• Manual Mode
• Auto Mode*
Audio Controls
.........................21-2 6
• SiriusXM®* Operation and Activation
Set Clock
..............................21-23, 2 6
Navigation System*
.................2 7-2 8
• Inserting the Map Disc
• Selecting a Destination
• Set Home Location
Bluetooth® Hands-Free*
..............29
• Tutorial
• Pair Phone
• Make a Call
• Toll-Free Customer Service
800-430-0153
Tutorial Videos on MyMazda.com
........................... Inside Back Cover
SCHEDULED MAINTENANCE
(2.5L Engine Only)
When replacing or topping off engine oil,
use Mazda Genuine oil. For optimal
engine performance, use SAE 0W-20
engine oil. Please consult an Authorized
Mazda Dealer for additional information.
SALES CONSULTANT DAT ECUSTOMER DAT E
All items in the Customer Deliver y Checklist have been reviewed with the
customer and the first maintenance appointment has been scheduled:
Signed copy must be placed in dealer jacket
Smart Start Guide
•
Remove this checklist from
Smart Start Guide
• Personalization Features
(refer to your Owner’s Manual)
Warranty Information
Warranty Start Date:
Customer Ini tial:
• Basic Vehicle –
36 months/36,000 miles
• Roadside assistance program
MyMazda.com
•
Offer to register customer on
MyMazda.com
Owner’s Manual
Maintenance Passport
Floor Mats
•
Ensure floor mats are properly
hooked after cleaning
• Do not install two floor mats, one on
top of the other, on the driver side
• Accessory rubber floor mats should
be cleaned with mild soap and
water only
P RESENTATION OF OWNER ’S M ATERIALS :
Review the following items with the customer
SERVICE DEPARTMENT
Introduce Service Manager;
provide business cards
Review Service and Parts
Department hours of operation
Explain free Full Circle
Service Inspection
Schedule first maintenance service
1147153_13a_Mazda6_SSG_022012.indd 32-332/20/12 3:59 PM