navigation system MAZDA MODEL 6 2013 Smart Start Guide (in English)
[x] Cancel search | Manufacturer: MAZDA, Model Year: 2013, Model line: MODEL 6, Model: MAZDA MODEL 6 2013Pages: 18, PDF Size: 5.1 MB
Page 5 of 18
Driver’s View (shown with optional
78
Navigation System)
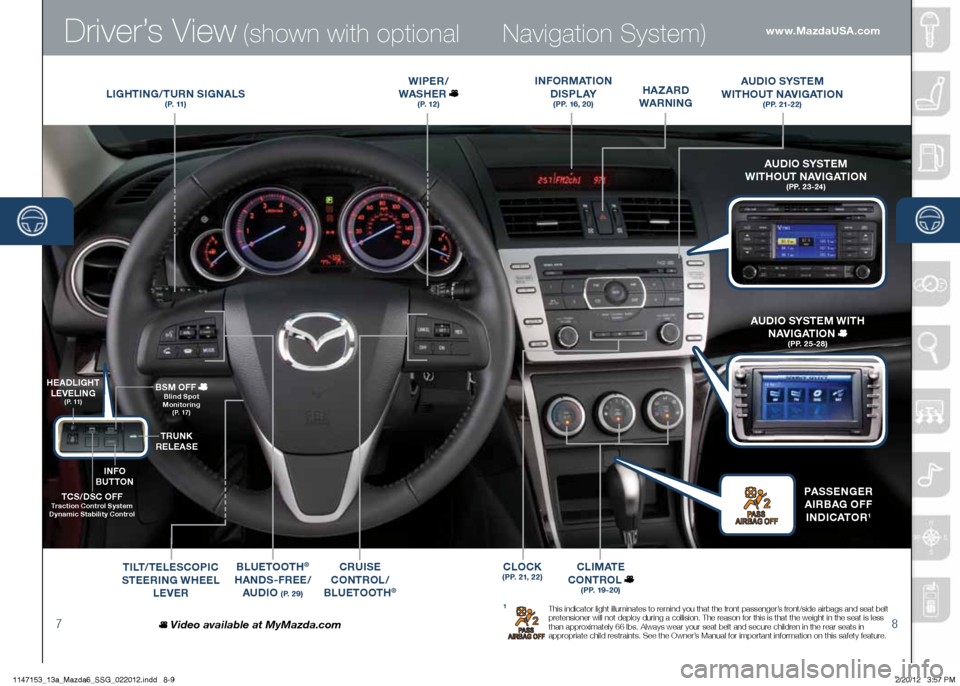
LIGHTING /TURN SIGNALS( P. 11 )
WIPER /
WASHER
( P. 1 2 )
BLUETOOTH®
HANDS-FREE/ AUDIO
( P. 2 9 )
CRUISE
CONTROL /
B LUETOOTH
®
TCS/DSC OFF Traction Control System
Dynamic Stability Control
H EADLIGHT
LEVELING
( P. 11 )
TRUNK
RELEASE
BSM OFF
Blind Spot
Monitoring
( P. 17 )
TILT /TELESCOPIC
STEERING WHEEL
LEVER
HA zARD
WARNING
INFORMATION
D I S P L AY
(PP. 16, 20)
AUDIO SYSTEM
WITHOUT NAVIGATION
( P P. 2 1 - 2 2 )
C L I M AT E
CONTROL
( P P. 1 9 - 2 0 )
Video available at MyMazda.com
A UDIO SYSTEM
WITHOUT NAVIGATION
( P P. 2 3 - 2 4 )
PASSENGER
A IRBAG OFF
INDICATOR
1
A UDIO SYSTEM WITH
NAVIGATION
( P P. 2 5 - 2 8 )
1 This indicator light illuminates to remind you that the front passenger’s front/side airbags and seat belt
pretensioner will not deploy during a collision. The reason for this is that the weight in the seat is less
than approximately 66 lbs. Always wear your seat belt and secure children in the rear seats in
appropriate child restraints. See the Owner’s Manual for important information on this safety feature.
www.MazdaUSA.com
INFO
BUTTON
CLOCK(PP. 21, 22)
1147153_13a_Mazda6_SSG_022012.indd 8-92/20/12 3:57 PM
Page 10 of 18
Feature Highlights
17
NOTE: Do not rely completely on the BSM system and be sure to look over
your shoulder before changing lanes:
• The BSM system can assist the driver in confirming the safety of the surroundings,
but is not a complete substitute.
• The driver is responsible for ensuring safe lane changes and other maneuvers.
• Always pay attention to the direction in which the vehicle is traveling and the
vehicle’s surroundings.
• The BSM system does not operate when the vehicle speed is lower than about
20 mph (32 km/h).
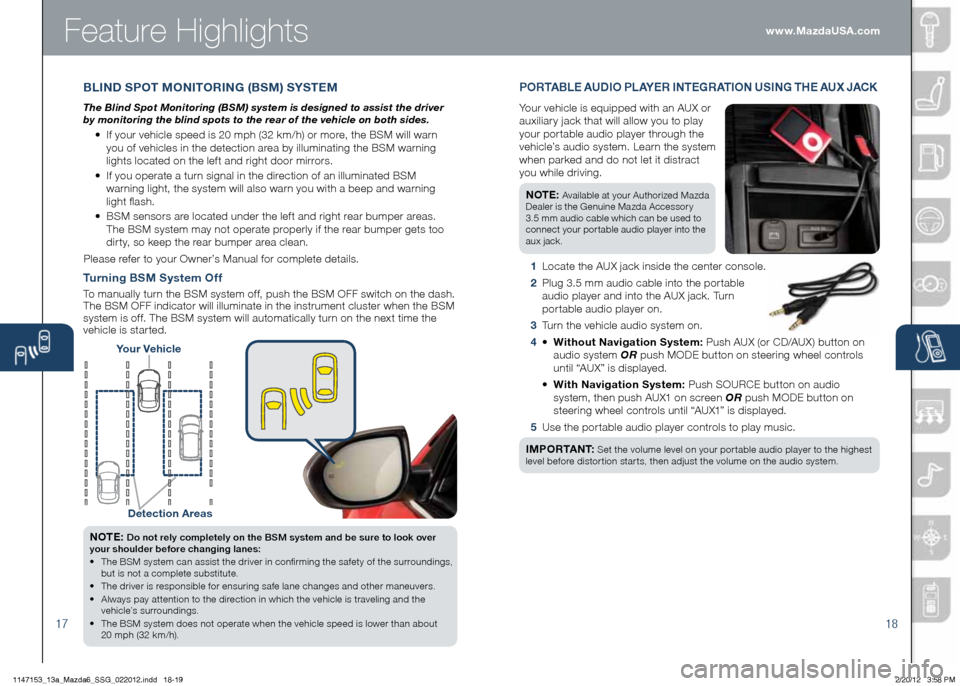
Turning BSM System Off
To manually turn the BSM system off, push the BSM OFF switch on the dash.
The BSM OFF indicator will illuminate in the instrument cluster when the BSM
system is off. The BSM system will automatically turn on the next time the
vehicle is started.
18
Your Vehicle
Detection Areas
P O R TA B L E AUDIO P L AY E R INTEGRATION USING THE AU x JACK
Your vehicle is equipped with an AUX or
auxiliary jack that will allow you to play
your portable audio player through the
vehicle’s audio system. Learn the system
when parked and do not let it distract
you while driving.
NOTE:
Available at your Authorized Mazda
Dealer is the Genuine Mazda Accessory
3.5 mm audio cable which can be used to
connect your portable audio player into the
aux jack.
1 Locate the AUX jack inside the center console.
2 Plug 3.5 mm audio cable into the portable
audio player and into the AUX jack. Turn
portable audio player on.
3 Turn the vehicle audio system on.
4 • Without Navigation System: Push AUX (or CD/AUX) button on
audio system OR push MODE button on steering wheel controls
until “AUX” is displayed.
• With Navigation System: Push SOURCE button on audio
system, then push AUX1 on screen OR push MODE button on
steering wheel controls until “AUX1” is displayed.
5 Use the portable audio player controls to play music.
I M P O R TA N T:
Set the volume level on your portable audio player to the highest
level before distortion starts, then adjust the volume on the audio system.
B LIND SPOT MONITORING (BSM) SYSTEM
The Blind Spot Monitoring (BSM) system is designed to assist the driver
by monitoring the blind spots to the rear of the vehicle on both sides.
• If your vehicle speed is 20 mph (32 km/h) or more, the BSM will warn
you of vehicles in the detection area by illuminating the BSM warning
lights located on the left and right door mirrors.
• If you operate a turn signal in the direction of an illuminated BSM
warning light, the system will also warn you with a beep and warning
light flash.
• BSM sensors are located under the left and right rear bumper areas.
The BSM system may not operate properly if the rear bumper gets too
dirty, so keep the rear bumper area clean.
Please refer to your Owner’s Manual for complete details. www.MazdaUSA.com
1147153_13a_Mazda6_SSG_022012.indd 18-192/20/12 3:58 PM
Page 12 of 18
Audio Controls Without Navigation
2122
POWER ON
Push the Power/ Volume dial to turn
the audio system on.
M EDIA SELECTION
Radio: Push FM or AM button to
select the FM1, FM2, or AM band.
CD: Push the CD button to select the
CD player which plays CDs, MP3s,
and WMAs. See the Owner’s Manual
for complete details.
Auxiliary Input: Push the AUX
button to select the auxiliary jack.
Satellite Radio: Push the SAT
button for SiriusXM
®. If your
vehicle is equipped with SiriusXM®
(satellite radio antenna on roof or
trunk lid), your new Mazda includes
a free introductory subscription
with a limited term trial offer. Call
888-539-7474 to activate! See the
Owner’s Manual and/or dealer for
details. Contact your Authorized
Mazda Dealer about adding
SiriusXM
® if your Mazda6 is not
already equipped with it. T
UNING
Manual: Turn the TUNE dial to
manually change the frequency.
S eek: Push the TRACK /SEEK
tuning buttons to automatically
seek a higher or lower frequency with
a station.
S can: Push the SCAN button to
automatically sample strong
stations for seconds each. Push
again to cancel.
Preset Channel: Push the Preset
Channel buttons (1-6) to select a
station stored in memory. To store a
station, push and hold a button (1-6)
until a beep is heard.
Category (Sirius xM
® only): Push
the DISC/FOLDER to change to a
different category.
Auto Memory Tuning: Push the
AUTO-M button to store an additional
6 stations on each FM and AM band
without disturbing the previously
stored stations. To return to previously
stored stations, push the FM or AM
button. Refer to the Owner’s Manual
for complete details.
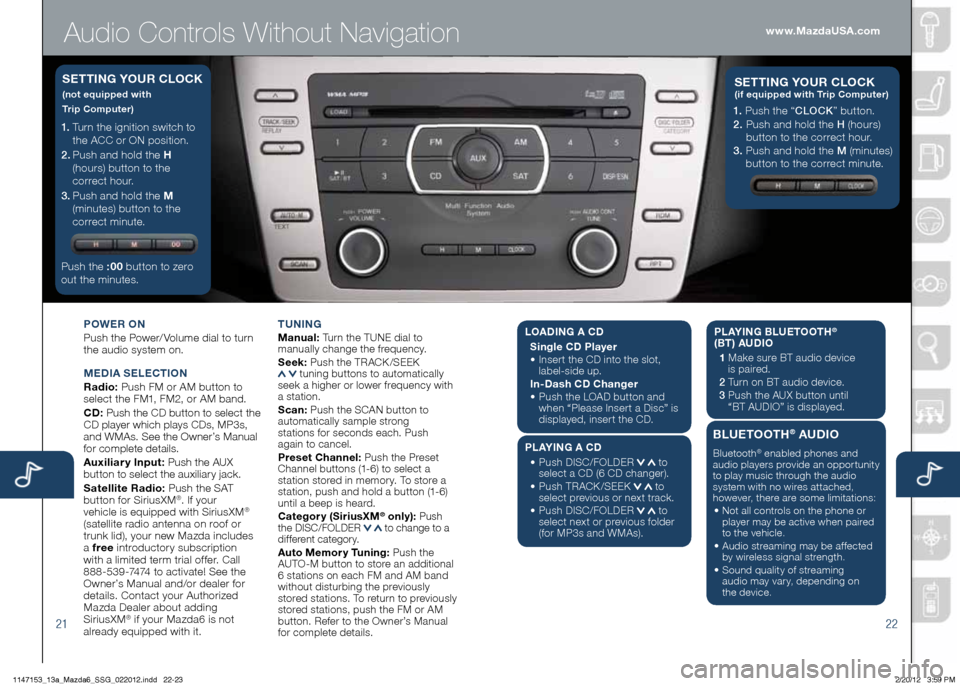
1. Turn the ignition switch to
the ACC or ON position.
2 . Push and hold the H
(hours) button to the
correct hour.
3 . Push and hold the M
(minutes) button to the
correct minute.
Push the :00 button to zero
out the minutes.
S ETTING YOUR CLOCK
(not equipped with
Trip Computer)
1. Push the “ CLOCK” button.
2. Push and hold the H (hours)
button to the correct hour.
3. Push and hold the M (minutes)
button to the correct minute.
S ETTING YOUR C LOCK (if equipped with Trip Computer)
www.MazdaUSA.com
LOADIN G A CD
Single CD Player
•
Insert the CD into the slot,
label-side up.
In-Dash CD Changer
•
Push the LOAD button and
when “Please Insert a Disc” is
displayed, insert the CD.
PLAYING A CD
•
Push DISC/FOLDER
to
select a CD (6 CD changer).
•
Push TRACK /SEEK
to
select previous or next track.
•
Push DISC/FOLDER
to
select next or previous folder
(for MP3s and WMAs). PLAYING BLUETOOTH
®
(BT) AUDIO
1 Make sure BT audio device
is paired.
2 Turn on BT audio device.
3 Push the AUX button until
“BT AUDIO” is displayed.
BLUETOOTH® AUDIO
Bluetooth® enabled phones and
audio players provide an opportunity
to play music through the audio
system with no wires attached,
however, there are some limitations:
• Not all controls on the phone or
player may be active when paired
to the vehicle.
• Audio streaming may be affected
by wireless signal strength.
• Sound quality of streaming
audio may vary, depending on
the device.
1147153_13a_Mazda6_SSG_022012.indd 22-232/20/12 3:59 PM
Page 13 of 18
Audio Controls Without Navigation
2324
POWER ON
Push the Power/ Volume dial to turn
the audio system on.
M EDIA SELECTION
Radio: Push FM/AM button to select
the FM1, FM2, or AM band.
CD: Push the CD/AUX button to
select the CD player which plays
CDs, MP3s, and WMAs. See the
Owner’s Manual for complete details.
Auxiliary Input: Push the CD/AUX
button to se lect the auxiliary jack.
Satellite Radio: Push the SIRIUS
button for SiriusXM
®. If your
vehicle is equipped with SiriusXM®
(satellite radio antenna on roof or
trunk lid), your new Mazda includes
a free introductory subscription
with a limited term trial offer. Call
888-539-7474 to activate! See the
Owner’s Manual and/or dealer for
details. Contact your Authorized
Mazda Dealer about adding
SiriusXM
® if your Mazda6 is not
already equipped with it. T
UNING
Manual: Turn the TUNE dial to
manually change the frequency.
S eek: Push the SEEK
or TRACK tuning buttons to automatically
seek a higher or lower frequency
with a station.
S can: Push the SCAN button to
automatically sample strong stations for
seconds each. Push again to cancel.
Preset Channel: Push Selection
Button 2, 3, 4, 6, 7, or 8 to select
a station stored in memory. To store
a station, push and hold Selection
Button 2, 3, 4, 6, 7, or 8 until
station is displayed.
Category (Sirius xM® only): Push the
C AT or FOLDER to change to a
different category.
Auto Memory Tuning: Push and
hold the AUTO-M button to store
an additional 6 stations on each FM
and AM band without disturbing the
previously stored stations. To return
to previously stored stations, push
the FM or AM button. Refer to the
Owner’s Manual for complete details.
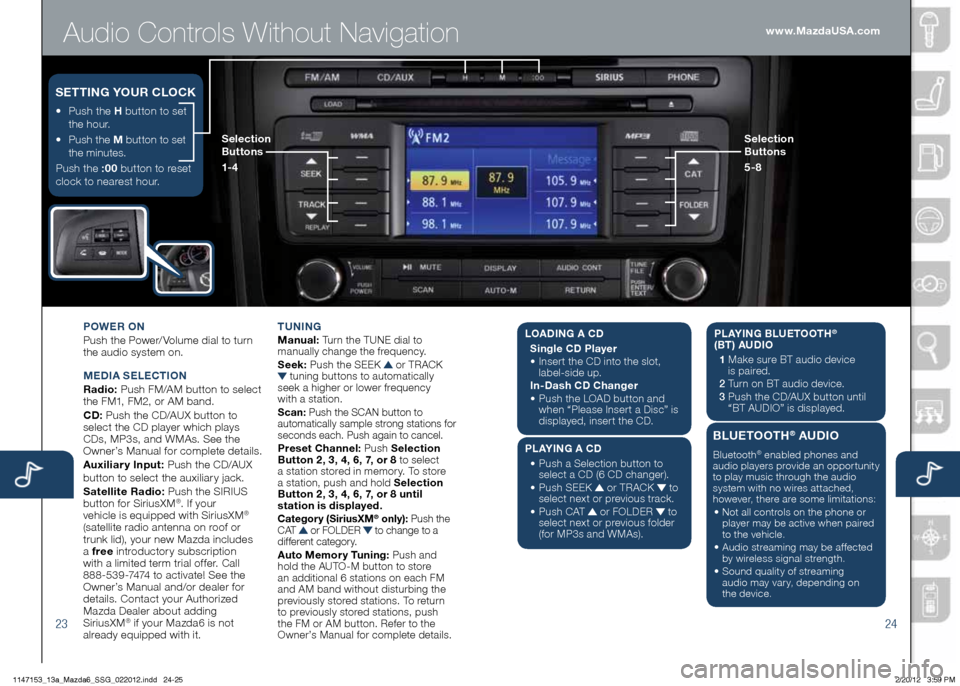
• Push the H button to set
the hour.
•
Push the M button to set
the minutes.
Push the :00 button to reset
clock to nearest hour.
S ETTING YOUR CLOCK
Selection
Buttons
1- 4 Selection
Buttons
5-8www.MazdaUSA.com
L
OADING A CD
Single CD Player
•
Insert the CD into the slot,
label-side up.
In-Dash CD Changer
•
Push the LOAD button and
when “Please Insert a Disc” is
displayed, insert the CD.
PLAYING A CD
•
Push a Selection button to
select a CD (6 CD changer).
•
Push SEEK
or TRACK to
select next or previous track.
•
Push CAT
or FOLDER to
select next or previous folder
(for MP3s and WMAs). PLAYING BLUETOOTH
®
(BT) AUDIO
1 Make sure BT audio device
is paired.
2 Turn on BT audio device.
3 Push the CD/AUX button until
“BT AUDIO” is disp layed.
BLUETOOTH® AUDIO
Bluetooth® enabled phones and
audio players provide an opportunity
to play music through the audio
system with no wires attached,
however, there are some limitations:
• Not all controls on the phone or
player may be active when paired
to the vehicle.
• Audio streaming may be affected
by wireless signal strength.
• Sound quality of streaming
audio may vary, depending on
the device.
1147153_13a_Mazda6_SSG_022012.indd 24-252/20/12 3:59 PM
Page 14 of 18
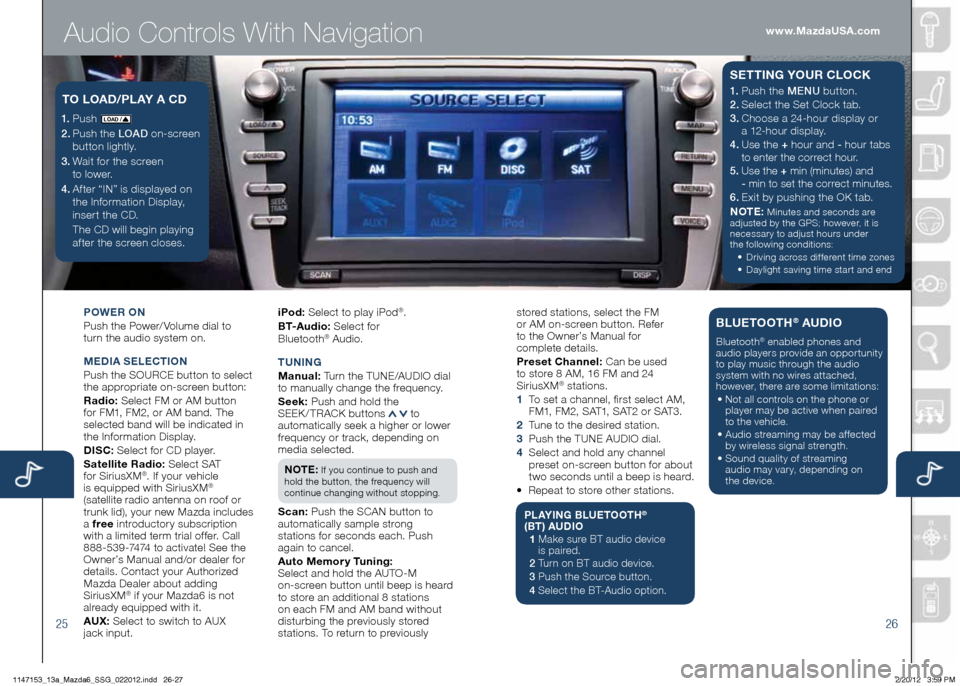
Audio Controls With Navigation
2526
POWER ON
Push the Power/ Volume dial to
turn the audio system on.
M EDIA SELECTION
Push the SOURCE button to select
the appropriate on-screen button:
Radio: Select FM or AM button
for FM1, FM2, or AM band. The
selected band will be indicated in
the Information Display.
DISC: Select for CD player.
Satellite Radio: Select SAT
for SiriusXM
®. If your vehicle
is equipped with SiriusXM®
(satellite radio antenna on roof or
trunk lid), your new Mazda includes
a free introductory subscription
with a limited term trial offer. Call
888-539-7474 to activate! See the
Owner’s Manual and/or dealer for
details. Contact your Authorized
Mazda Dealer about adding
SiriusXM
® if your Mazda6 is not
already equipped with it.
AU x: Select to switch to AUX
jack input. iPod:
Select to play iPod
®.
B T- A u d i o : Select for
Blueto oth
® Audio.
T UNING
M anual: Turn the TUNE/AUDIO dial
to manually change the frequency.
S eek: Push and hold the
SEEK / TRACK buttons
to
automatically seek a higher or lower
frequency or track, depending on
media selected.
NOTE:
If you continue to push and
hold the button, the frequency will
continue changing without stopping.
S can: Push the SCAN button to
automatically sample strong
stations for seconds each. Push
again to cancel.
Auto Memory Tuning:
Select and hold the AUTO-M
on-screen button until beep is heard
to store an additional 8 stations
on each FM and AM band without
disturbing the previously stored
stations. To return to previously
1. Push LO AD /
2. Push the LOAD on-screen
button lightly.
3. Wait for the screen
to lower.
4 . After “IN” is displayed on
the Information Display,
insert the CD.
The CD will begin playing
after the screen closes.
TO LOAD /PLAY A CD1. Push the MENU button.
2. Select the Set Clock tab.
3.
Choose a 24-hour display or
a 12-hour display.
4. Use the + hour and - hour
tabs
to enter the correct hour.
5. Use the + min (minutes) and
- min to set the correct minutes.
6.
Exit by pushing the OK tab.
NOTE:
Minutes and seconds are
adjusted by the GPS; however, it is
necessary to adjust hours under
the following conditions:
•
Driving across different time zones
•
Daylight saving time start and end
SETTING YOUR CLOCK
stored stations, select the FM
or AM on-screen button. Refer
to the Owner’s Manual for
complete details.
Preset Channel: Can be used
to store 8 AM, 16 FM and 24
SiriusXM
® stations.
1 To set a channel, first select AM,
FM1, FM2, SAT1, SAT2 or SAT3.
2 Tune to the desired station.
3 Push the TUNE AUDIO dial.
4 Select and hold any channel
preset on-screen button for about
two seconds until a beep is heard.
• Repeat to store other stations.
PLAYING BLUETOOTH®
(BT) AUDIO
1 Make sure BT audio device
is paired.
2 Turn on BT audio device.
3 Push the Source button.
4 Select the BT-Audio option.
BLUETOOTH® AUDIO
Bluetooth® enabled phones and
audio players provide an opportunity
to play music through the audio
system with no wires attached,
however, there are some limitations:
• Not all controls on the phone or
player may be active when paired
to the vehicle.
• Audio streaming may be affected
by wireless signal strength.
• Sound quality of streaming
audio may vary, depending on
the device.
www.MazdaUSA.com
1147153_13a_Mazda6_SSG_022012.indd 26-272/20/12 3:59 PM
Page 15 of 18
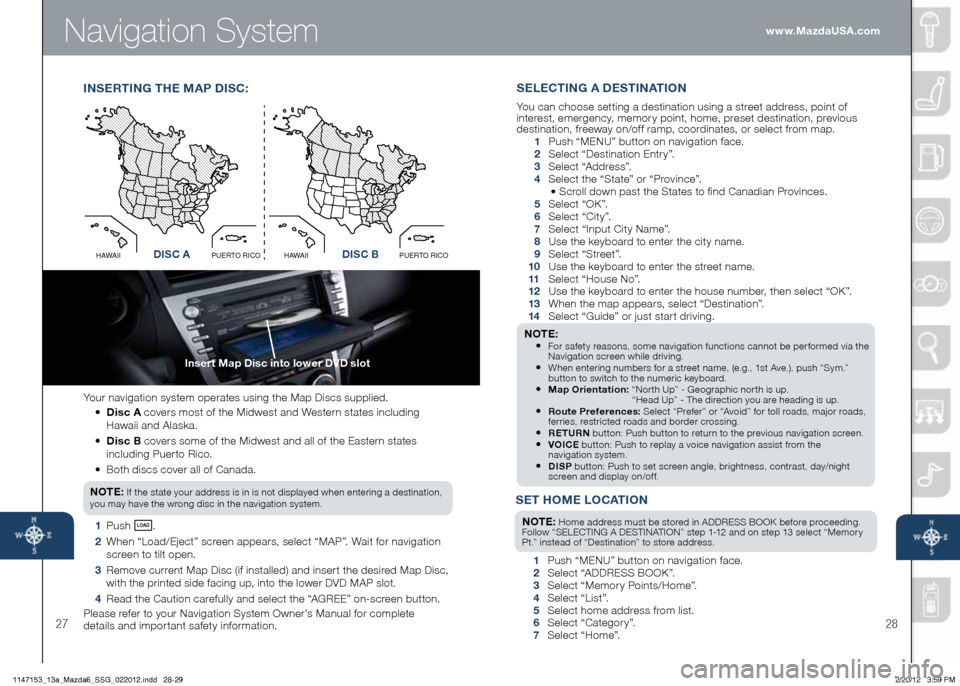
Navigation System
27
Insert Map Disc into lower DVD slot
28
Your navigation system operates using the Map Discs supplied.
• Disc A covers most of the Midwest and Western states including
Hawaii and Alaska.
•
Disc B covers some of the Midwest and all of the Eastern states
including Puerto Rico.
• Both discs cover all of Canada.
NO TE:
If the state your address is in is not displayed when entering a destination,
you may have the wrong disc in the navigation system.
1 Push LO AD .
2 When “Load/Eject” screen appears, select “MAP”. Wait for navigation
screen to tilt open.
3 Remove current Map Disc (if installed) and insert the desired Map Disc,
with the printed side facing up, into the lower DVD MAP slot.
4 Read the Caution carefully and select the “AGREE” on-screen button.
Please refer to your Navigation System Owner’s Manual for complete
details and important safety information.
I NSERTING THE M AP DISC:
Disc AO
C
I
R
O
T
R
E
U
P
I
I
A
W
A
HDisc B
O
C
I
R
O
T
R
E
U
P
I
I
A
W
A
HDISC ADISC B
SET HOME LOCATION
NOTE: Home address must be stored in ADDRESS BOOK before proceeding.
Follow “SELECTING A DESTINATION” step 1-12 and on step 13 select “Memory
Pt.” instead of “Destination” to store address.
1 Push “MENU” button on navigation face.
2 Select “ADDRESS BOOK”.
3 Select “Memory Points/Home”.
4 Select “List”.
5 Select home address from list.
6 Select “Category”.
7 Select “Home”.
SELECTING A DESTINATION
You can choose setting a destination using a street address, point of
interest, emergency, memory point, home, preset destination, previous
destination, freeway on/off ramp, coordinates, or select from map.
1 Push “ MENU ” button on navigation face.
2 Select “Destination Entry”.
3 Select “Address”.
4 Select the “State” or “Province”.
• Scroll down past the States to find Canadian Provinces.
5 Select “OK”.
6 Select “City”.
7 Select “Input City Name”.
8 Use the keyboard to enter the city name.
9 Select “Street”.
10 Use the keyboard to enter the street name.
11 Select “House No”.
12 Use the keyboard to enter the house number, then select “OK”.
13 When the map appears, select “Destination”.
14 Select “Guide” or just start driving.
NOTE: • For safety reasons, some navigation functions cannot be performed via the
Navigation screen while driving.
• When entering numbers for a street name, (e.g., 1st Ave.), push “Sym.”
button to switch to the numeric keyboard.
• Map Orientation: “North Up” - Geographic north is up.
“Head Up” - The direction you are heading is up.
• Route Preferences: Select “Prefer” or “Avoid” for toll roads, major roads,
ferries, restricted roads and border crossing.
• RETURN button: Push button to return to the previous navigation screen.• VOICE button: Push to replay a voice navigation assist from the
navigation system.
• DISP button: Push to set screen angle, brightness, contrast, day/night
screen and display on/off.
www.MazdaUSA.com
1147153_13a_Mazda6_SSG_022012.indd 28-292/20/12 3:59 PM
Page 16 of 18
Bluetooth
®www.MazdaUSA.com
MAzDA MOBILE
The following apps are available for iPhone® and Android smartphones:
•
Mazda Assist app (Available for iPhone® and Android) - Provides
roadside assistance 24 hours a day, 365 days a year. Toll free number
1-800-866-1998 can also be used for roadside assistance.
•
MyMazda app (Available for iPhone
®) - Provides the following
vehicle information:
Maintenance schedule Recall information Service coupons Parked car locator Promotional alerts Mazda Dealer locator Service history
The apps can be downloaded, free of charge, from the App store for the iPhone®
and Android Market for Android powered devices. After downloading app,
customer name, email, smartphone number and VIN are required.
Free MyMazda iPhone app
(Android Coming Soon)Free Mazda Assist
iPhone app
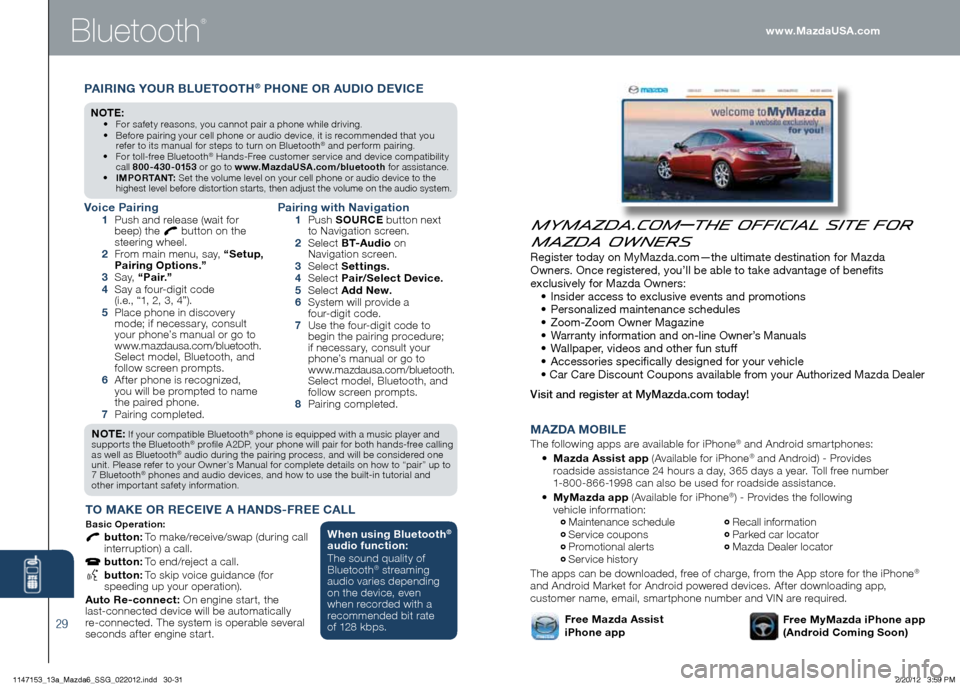
MyMazda.com—The Official Site for
Mazda Owners
Register today on MyMazda.com—the ultimate destination for Mazda
Owners. Once registered, you’ll be able to take advantage of benefits
exclusively for Mazda Owners:
•
Insider access to exclusive events and promotions
• Personalized maintenance schedules
• Zoom-Zoom Owner Magazine
•
Warranty information and on-line Owner’s Manuals
• Wallpaper, videos and other fun stuff
• Accessories specifically designed for your vehicle
• Car Care Discount Coupons available from your Authorized Mazda Dealer
Visit and register at MyMazda.com today!
29
NOTE: If your compatible Bluetooth® phone is equipped with a music player and
supports the Bluetooth® profile A2DP, your phone will pair for both hands-free calling
as well as Bluetooth® audio during the pairing process, and will be considered one
unit. Please refer to your Owner’s Manual for complete details on how to “pair” up to
7 Bluetooth
® phones and audio devices, and how to use the built-in tutorial and
other important safety information.
T O MAKE OR RECEIVE A HANDS -FREE CALL
Basic Oper ation:
button: To make/receive/swap (during call
interruption) a call.
button: To end/reject a call.
button: To skip voice guidance (for
speeding up your operation).
Auto Re-connect: On engine start, the
last-connected device will be automatically
re-connected. The system is operable several
seconds after engine start.
Voice Pairing 1 Push and release (wait for
beep) the button on the
steering wheel.
2 From main menu, say, “Setup,
Pairing Options.”
3 S a y, “Pair.”
4 Say a four-digit code
(i.e., “1, 2, 3, 4”).
5 Place phone in discovery
mode; if necessary, consult
your phone’s manual or go to
www.mazdausa.com/bluetooth.
Select model, Bluetooth, and
follow screen prompts.
6 After phone is recognized,
you will be prompted to name
the paired phone.
7 Pairing completed.
Pairing with Navigation 1 Push SOURCE button next
to Navigation screen.
2 Select B T- A u d i o on
Navigation screen.
3 Select Settings.
4 Select Pair/Select Device.
5 Select Add New.
6 System will provide a
four-digit code.
7 Use the four-digit code to
begin the pairing procedure;
if necessary, consult your
phone’s manual or go to
www.mazdausa.com/bluetooth.
Select model, Bluetooth, and
follow screen prompts.
8 Pairing completed.
PAIRING YOUR BLUETOOTH® PHONE OR AUDIO DEVICE
NO TE: • For safety reasons, you cannot pair a phone while driving.
• Before pairing your cell phone or audio device, it is recommended that you
refer to its manual for steps to turn on Bluetooth
® and perform pairing.
• For toll-free Bluetooth® Hands-Free customer service and device compatibility
call 800-430-0153 or go to www.MazdaUSA.com/bluetooth for assistance.
• IMPORTANT: Set the volume level on your cell phone or audio device to the
highest level before distortion starts, then adjust the volume on the audio system.
When using Bluetooth®
audio function:
The sound quality of
Bluetooth
® streaming
audio varies depending
on the device, even
when recorded with a
recommended bit rate
of 128 kbps.
1147153_13a_Mazda6_SSG_022012.indd 30-312/20/12 3:59 PM
Page 17 of 18
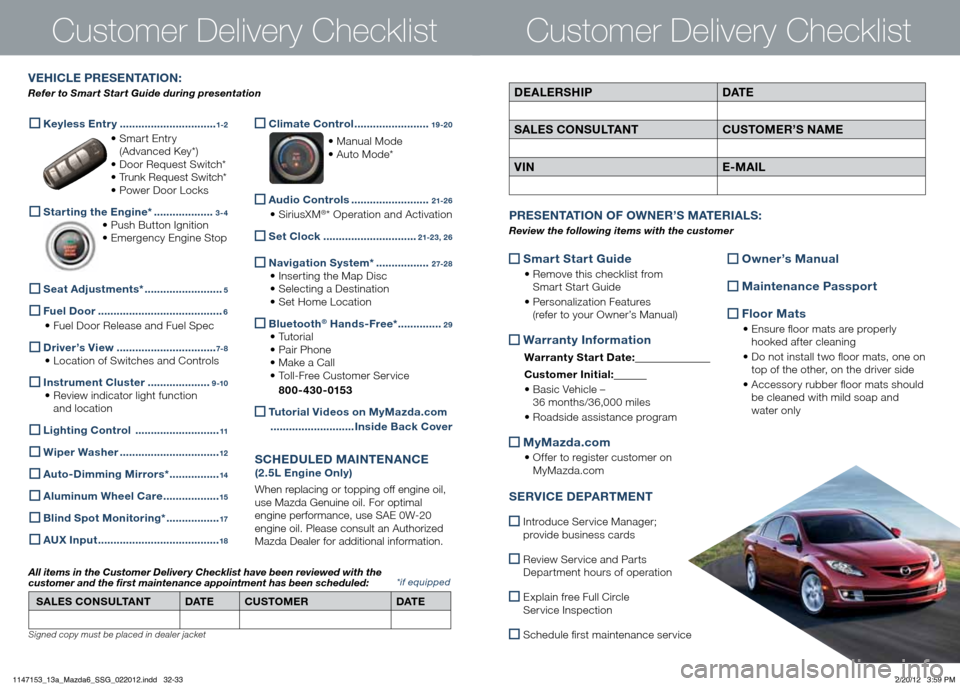
Customer Delivery Checklist
DEALERSHIPDAT E
SALES CONSULTANT CUSTOMER’S NAME
VIN E-MAIL
VEHICLE PRESENTATION :
Refer to Smart Start Guide during presentation
Customer Delivery Checklist
*if equipped
Keyless Entry
...............................1-2
• Smart Entry
(Advanced Key*)
• Door Request Switch*
• Trunk Request Switch*
• Power Door Locks
Starting the Engine* ...................3-4
• Push Button Ignition
• Emergency Engine Stop
Seat Adjustments*
.........................5
Fuel Door
........................................6
• Fuel Door Release and Fuel Spec
Driver’s View
................................7- 8
• Location of Switches and Controls
Instrument Cluster
....................9 -10
• Review indicator light function
and location
Lighting Control
...........................11
Wiper Washer
................................12
Auto-Dimming Mirrors*
................14
Aluminum Wheel Care
..................15
Blind Spot Monitoring*
.................17
A
Ux Input .......................................18
Climate Control
........................19 -20
• Manual Mode
• Auto Mode*
Audio Controls
.........................21-2 6
• SiriusXM®* Operation and Activation
Set Clock
..............................21-23, 2 6
Navigation System*
.................2 7-2 8
• Inserting the Map Disc
• Selecting a Destination
• Set Home Location
Bluetooth® Hands-Free*
..............29
• Tutorial
• Pair Phone
• Make a Call
• Toll-Free Customer Service
800-430-0153
Tutorial Videos on MyMazda.com
........................... Inside Back Cover
SCHEDULED MAINTENANCE
(2.5L Engine Only)
When replacing or topping off engine oil,
use Mazda Genuine oil. For optimal
engine performance, use SAE 0W-20
engine oil. Please consult an Authorized
Mazda Dealer for additional information.
SALES CONSULTANT DAT ECUSTOMER DAT E
All items in the Customer Deliver y Checklist have been reviewed with the
customer and the first maintenance appointment has been scheduled:
Signed copy must be placed in dealer jacket
Smart Start Guide
•
Remove this checklist from
Smart Start Guide
• Personalization Features
(refer to your Owner’s Manual)
Warranty Information
Warranty Start Date:
Customer Ini tial:
• Basic Vehicle –
36 months/36,000 miles
• Roadside assistance program
MyMazda.com
•
Offer to register customer on
MyMazda.com
Owner’s Manual
Maintenance Passport
Floor Mats
•
Ensure floor mats are properly
hooked after cleaning
• Do not install two floor mats, one on
top of the other, on the driver side
• Accessory rubber floor mats should
be cleaned with mild soap and
water only
P RESENTATION OF OWNER ’S M ATERIALS :
Review the following items with the customer
SERVICE DEPARTMENT
Introduce Service Manager;
provide business cards
Review Service and Parts
Department hours of operation
Explain free Full Circle
Service Inspection
Schedule first maintenance service
1147153_13a_Mazda6_SSG_022012.indd 32-332/20/12 3:59 PM