turn signal MAZDA MODEL 6 2013 Smart Start Guide (in English)
[x] Cancel search | Manufacturer: MAZDA, Model Year: 2013, Model line: MODEL 6, Model: MAZDA MODEL 6 2013Pages: 18, PDF Size: 5.1 MB
Page 5 of 18
Driver’s View (shown with optional
78
Navigation System)
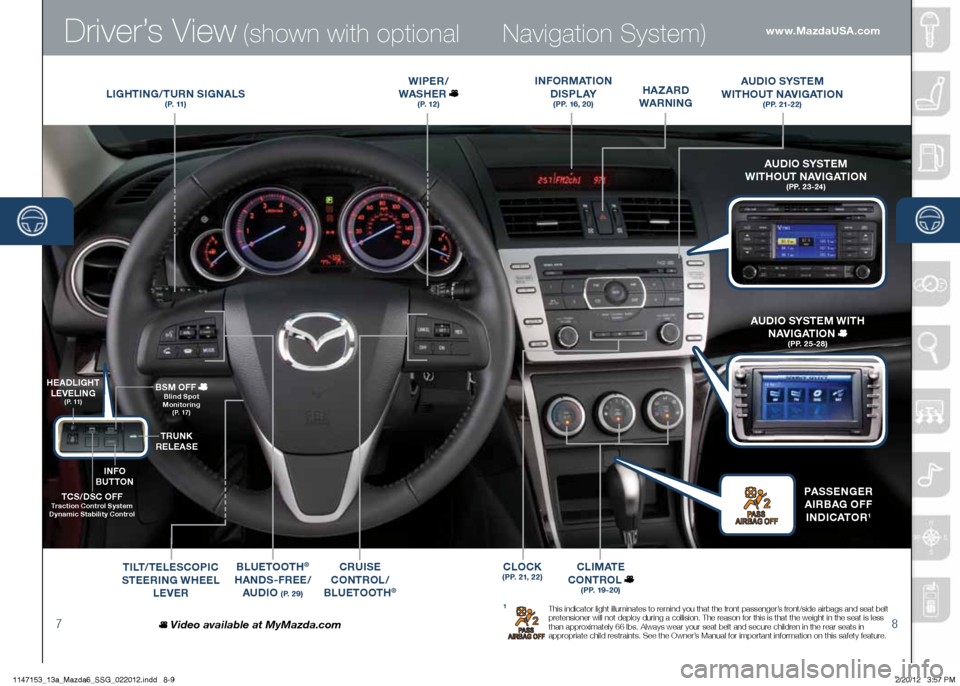
LIGHTING /TURN SIGNALS( P. 11 )
WIPER /
WASHER
( P. 1 2 )
BLUETOOTH®
HANDS-FREE/ AUDIO
( P. 2 9 )
CRUISE
CONTROL /
B LUETOOTH
®
TCS/DSC OFF Traction Control System
Dynamic Stability Control
H EADLIGHT
LEVELING
( P. 11 )
TRUNK
RELEASE
BSM OFF
Blind Spot
Monitoring
( P. 17 )
TILT /TELESCOPIC
STEERING WHEEL
LEVER
HA zARD
WARNING
INFORMATION
D I S P L AY
(PP. 16, 20)
AUDIO SYSTEM
WITHOUT NAVIGATION
( P P. 2 1 - 2 2 )
C L I M AT E
CONTROL
( P P. 1 9 - 2 0 )
Video available at MyMazda.com
A UDIO SYSTEM
WITHOUT NAVIGATION
( P P. 2 3 - 2 4 )
PASSENGER
A IRBAG OFF
INDICATOR
1
A UDIO SYSTEM WITH
NAVIGATION
( P P. 2 5 - 2 8 )
1 This indicator light illuminates to remind you that the front passenger’s front/side airbags and seat belt
pretensioner will not deploy during a collision. The reason for this is that the weight in the seat is less
than approximately 66 lbs. Always wear your seat belt and secure children in the rear seats in
appropriate child restraints. See the Owner’s Manual for important information on this safety feature.
www.MazdaUSA.com
INFO
BUTTON
CLOCK(PP. 21, 22)
1147153_13a_Mazda6_SSG_022012.indd 8-92/20/12 3:57 PM
Page 6 of 18
Instrument Cluster
910
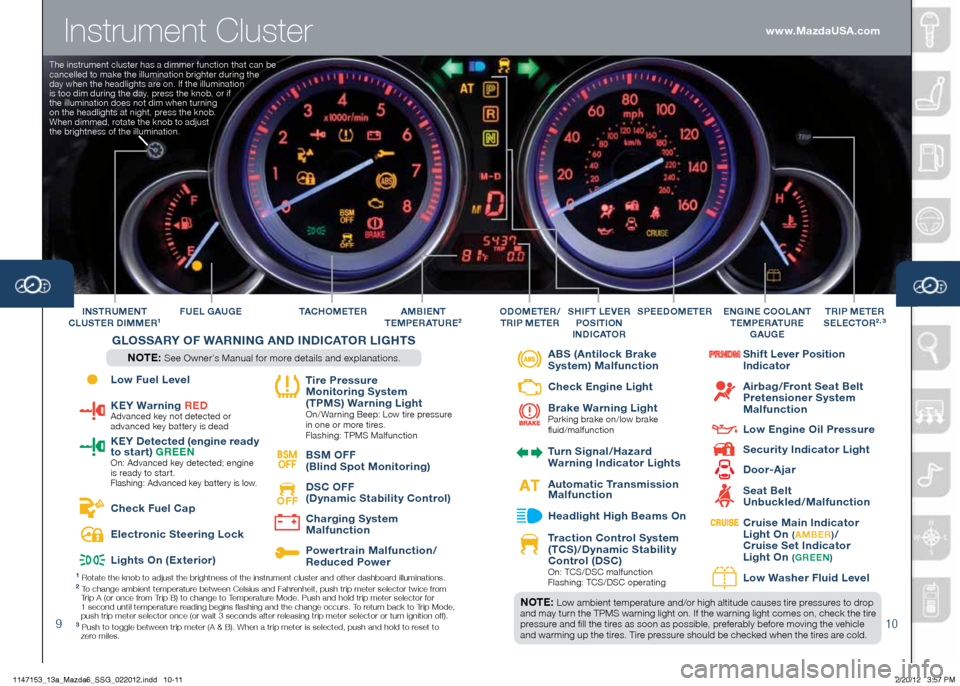
FUEL GAUGE TAC H O M E T E RINSTRUMENT
CLUSTER DIMMER1A MBIENT
TEMPERATURE2
G LOSSARY OF W ARNING AND INDICATOR LIGHTS
NOTE: See Owner’s Manual for more details and explanations. SPEEDOMETER
E
NGINE COOLANT
T EMPERATURE
GAUGETRIP METER
SELECTOR2 , 3ODOMETER /
TRIP METERSHIFT LEVER
POSITION
INDICATOR
1 Rotate the knob to adjust the brightness of the instrument cluster and \
other dashboard illuminations.2 To change ambient temperature between Celsius and Fahrenheit, push trip meter selector twice from
Trip A (or once from Trip B) to change to Temperature Mode. Push and hold trip meter selector for
1 second until temperature reading begins flashing and the change occurs. To return back to Trip Mode,
push trip meter selector once (or wait 3 seconds after releasing trip meter selector or turn ignition off).
3 Push to toggle between trip meter (A & B). When a trip meter is selec\
ted, push and hold to reset to
zero miles.
NOTE: Low ambient temperature and/or high altitude causes tire pressures to drop
and may turn the TPMS warning light on. If the warning light comes on, check the tire
pressure and fill the tires as soon as possible, preferably before moving the vehicle
and warming up the tires. Tire pressure should be checked when the tires are cold.
www.MazdaUSA.com
The instrument cluster has a dimmer function that can be
cancelled to make the illumination brighter during the
day when the headlights are on. If the illumination
is too dim during the day, press the knob, or if
the illumination does not dim when turning
on the headlights at night, press the knob.
When dimmed, rotate the knob to adjust
the brightness of the illumination.
Low Fuel Level
KEY Warning R
ED Advanced key not detected or
advanced key battery is dead
KEY Detected (engine ready
to start) G
REEN
On: Advanced key detected; engine
is ready to start.
Flashing: Advanced key battery is low.
Check Fuel Cap
Electronic Steering Lock
Lights On (Exterior)
Tire Pressure
Monitoring System
(TPMS) Warning Light
On/ Warning Beep: Low tire pressure
in one or more tires.
Flashing: TPMS Malfunction
BSM
OFF BSM OFF
(Blind Spot Monitoring)
OFF
DSC OFF
(Dynamic Stability Control)
Charging System
Malfunction
Powertrain Malfunction/
Reduced Power
ABS (Antilock Brake
System) Malfunction
Check Engine Light
Brake Warning Light
Parking brake on/low brake
fluid/malfunction
Turn Signal/Hazard
Warning Indicator Lights
Automatic Transmission
Malfunction
Headlight High Beams On
Traction Control System
(TCS)/Dynamic Stability
Control (DSC)
On: TCS/DSC malfunction
Flashing: TCS/DSC operating
Shift Lever Position
Indicator
Airbag/Front Seat Belt
Pretensioner System
Malfunction
Low Engine Oil Pressure
Security Indicator Light
Door-Ajar
Seat Belt
Unbuckled/Malfunction
Cruise Main Indicator
Light On ( A MBER )/
Cruise Set Indicator
Light On
( G REEN )
Low Wa
sher Fluid Level
1147153_13a_Mazda6_SSG_022012.indd 10-112/20/12 3:57 PM
Page 7 of 18
Feature Highlights
1112
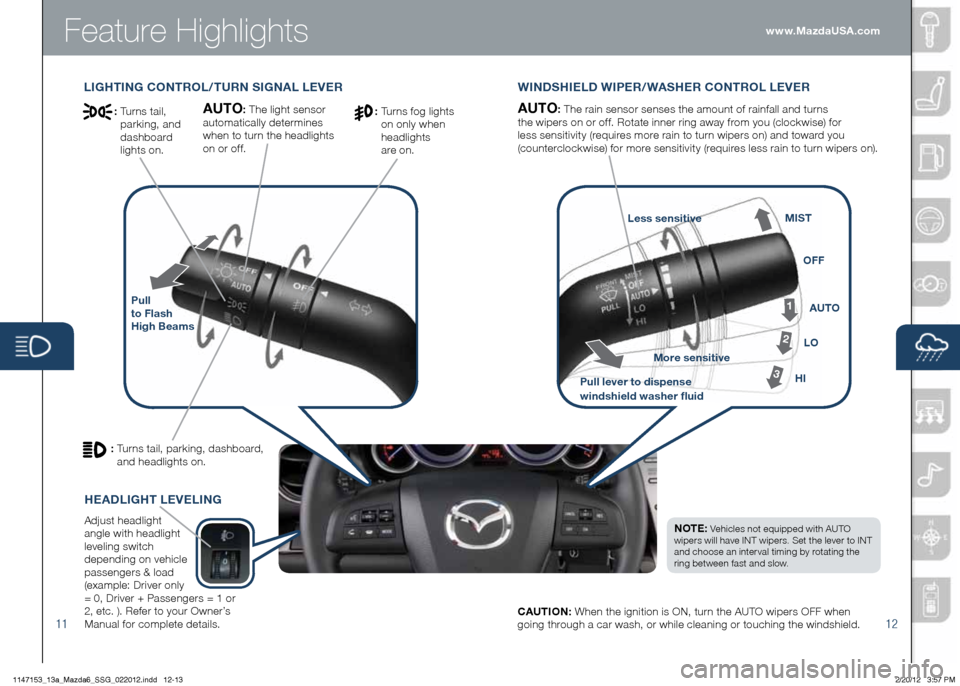
WINDSHIELD WIPER/WASHER CONTROL LEVER
Pull
to Flash
High Beams
AUTO: The rain sensor senses the amount of rainfall and turns
the wipers on or off. Rotate inner ring away from you (clockwise) for
less sensitivity (requires more rain to turn wipers on) and toward you
(counterclockwise) for more sensitivity (requires less rain to turn wipers on).
1
2
3HI LO
AUTO
OFF
MIST
CAUTION:
When the ignition is ON, turn the AUTO wipers OFF when
going through a car wash, or while cleaning or touching the windshield. www.MazdaUSA.com
NOTE: Vehicles not equipped with AUTO
wipers will have INT wipers. Set the lever to INT
and choose an interval timing by rotating the
ring between fast and slow.
Pull lever to dispense
windshield washer fluid More sensitive
Less sensitive
HEADLIGHT LEVELING
Adjust headlight
angle with headlight
leveling switch
depending on vehicle
passengers & load
(example: Driver only
= 0, Driver + Passengers = 1 or
2, etc. ). Refer to your Owner’s
Manual for complete details.
LIGHTING CONTROL/TURN SIGNAL LEVER
AUTO: The light sensor
automatically determines
when to turn the headlights
on or off.
: Turns tail, parking, dashboard,
and headlights on.
: Turns fog lights
on only when
headlights
are on.: Turns tail,
parking, and
dashboard
lights on.
1147153_13a_Mazda6_SSG_022012.indd 12-132/20/12 3:57 PM
Page 10 of 18
Feature Highlights
17
NOTE: Do not rely completely on the BSM system and be sure to look over
your shoulder before changing lanes:
• The BSM system can assist the driver in confirming the safety of the surroundings,
but is not a complete substitute.
• The driver is responsible for ensuring safe lane changes and other maneuvers.
• Always pay attention to the direction in which the vehicle is traveling and the
vehicle’s surroundings.
• The BSM system does not operate when the vehicle speed is lower than about
20 mph (32 km/h).
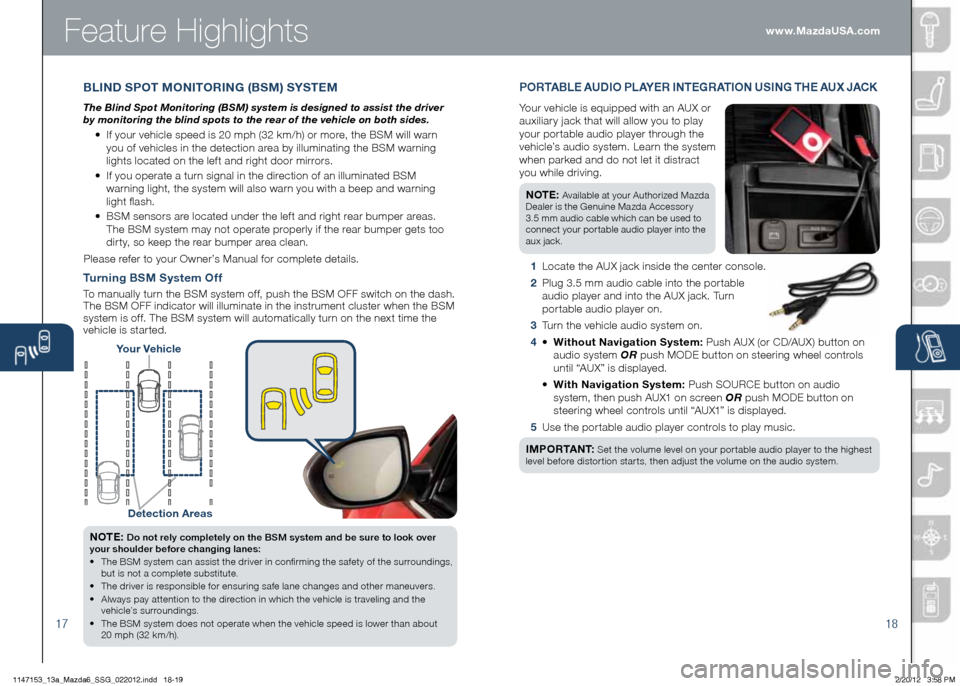
Turning BSM System Off
To manually turn the BSM system off, push the BSM OFF switch on the dash.
The BSM OFF indicator will illuminate in the instrument cluster when the BSM
system is off. The BSM system will automatically turn on the next time the
vehicle is started.
18
Your Vehicle
Detection Areas
P O R TA B L E AUDIO P L AY E R INTEGRATION USING THE AU x JACK
Your vehicle is equipped with an AUX or
auxiliary jack that will allow you to play
your portable audio player through the
vehicle’s audio system. Learn the system
when parked and do not let it distract
you while driving.
NOTE:
Available at your Authorized Mazda
Dealer is the Genuine Mazda Accessory
3.5 mm audio cable which can be used to
connect your portable audio player into the
aux jack.
1 Locate the AUX jack inside the center console.
2 Plug 3.5 mm audio cable into the portable
audio player and into the AUX jack. Turn
portable audio player on.
3 Turn the vehicle audio system on.
4 • Without Navigation System: Push AUX (or CD/AUX) button on
audio system OR push MODE button on steering wheel controls
until “AUX” is displayed.
• With Navigation System: Push SOURCE button on audio
system, then push AUX1 on screen OR push MODE button on
steering wheel controls until “AUX1” is displayed.
5 Use the portable audio player controls to play music.
I M P O R TA N T:
Set the volume level on your portable audio player to the highest
level before distortion starts, then adjust the volume on the audio system.
B LIND SPOT MONITORING (BSM) SYSTEM
The Blind Spot Monitoring (BSM) system is designed to assist the driver
by monitoring the blind spots to the rear of the vehicle on both sides.
• If your vehicle speed is 20 mph (32 km/h) or more, the BSM will warn
you of vehicles in the detection area by illuminating the BSM warning
lights located on the left and right door mirrors.
• If you operate a turn signal in the direction of an illuminated BSM
warning light, the system will also warn you with a beep and warning
light flash.
• BSM sensors are located under the left and right rear bumper areas.
The BSM system may not operate properly if the rear bumper gets too
dirty, so keep the rear bumper area clean.
Please refer to your Owner’s Manual for complete details. www.MazdaUSA.com
1147153_13a_Mazda6_SSG_022012.indd 18-192/20/12 3:58 PM
Page 12 of 18
Audio Controls Without Navigation
2122
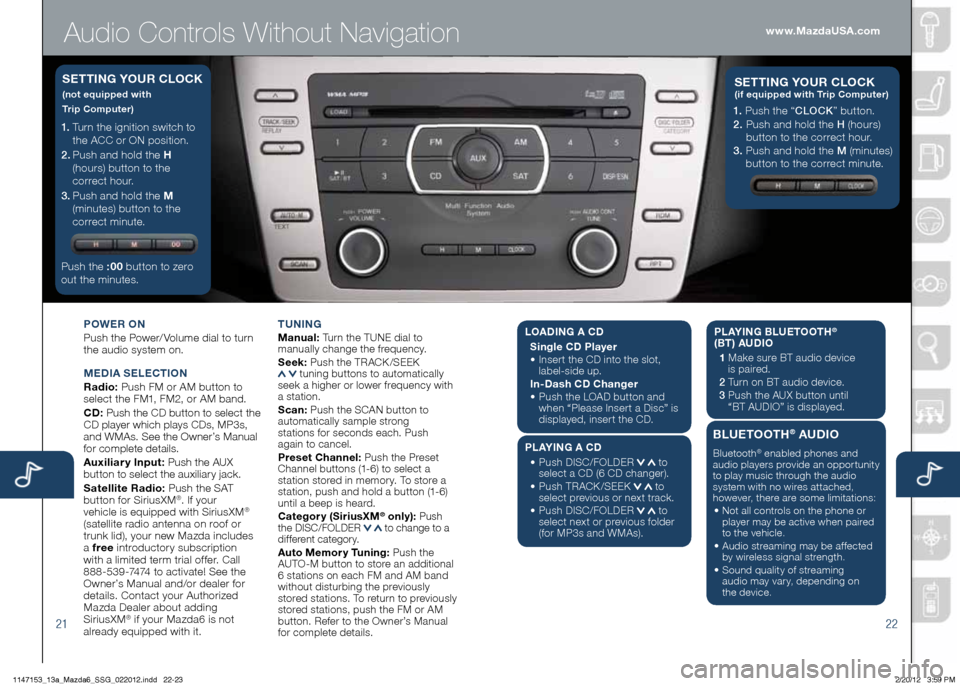
POWER ON
Push the Power/ Volume dial to turn
the audio system on.
M EDIA SELECTION
Radio: Push FM or AM button to
select the FM1, FM2, or AM band.
CD: Push the CD button to select the
CD player which plays CDs, MP3s,
and WMAs. See the Owner’s Manual
for complete details.
Auxiliary Input: Push the AUX
button to select the auxiliary jack.
Satellite Radio: Push the SAT
button for SiriusXM
®. If your
vehicle is equipped with SiriusXM®
(satellite radio antenna on roof or
trunk lid), your new Mazda includes
a free introductory subscription
with a limited term trial offer. Call
888-539-7474 to activate! See the
Owner’s Manual and/or dealer for
details. Contact your Authorized
Mazda Dealer about adding
SiriusXM
® if your Mazda6 is not
already equipped with it. T
UNING
Manual: Turn the TUNE dial to
manually change the frequency.
S eek: Push the TRACK /SEEK
tuning buttons to automatically
seek a higher or lower frequency with
a station.
S can: Push the SCAN button to
automatically sample strong
stations for seconds each. Push
again to cancel.
Preset Channel: Push the Preset
Channel buttons (1-6) to select a
station stored in memory. To store a
station, push and hold a button (1-6)
until a beep is heard.
Category (Sirius xM
® only): Push
the DISC/FOLDER to change to a
different category.
Auto Memory Tuning: Push the
AUTO-M button to store an additional
6 stations on each FM and AM band
without disturbing the previously
stored stations. To return to previously
stored stations, push the FM or AM
button. Refer to the Owner’s Manual
for complete details.
1. Turn the ignition switch to
the ACC or ON position.
2 . Push and hold the H
(hours) button to the
correct hour.
3 . Push and hold the M
(minutes) button to the
correct minute.
Push the :00 button to zero
out the minutes.
S ETTING YOUR CLOCK
(not equipped with
Trip Computer)
1. Push the “ CLOCK” button.
2. Push and hold the H (hours)
button to the correct hour.
3. Push and hold the M (minutes)
button to the correct minute.
S ETTING YOUR C LOCK (if equipped with Trip Computer)
www.MazdaUSA.com
LOADIN G A CD
Single CD Player
•
Insert the CD into the slot,
label-side up.
In-Dash CD Changer
•
Push the LOAD button and
when “Please Insert a Disc” is
displayed, insert the CD.
PLAYING A CD
•
Push DISC/FOLDER
to
select a CD (6 CD changer).
•
Push TRACK /SEEK
to
select previous or next track.
•
Push DISC/FOLDER
to
select next or previous folder
(for MP3s and WMAs). PLAYING BLUETOOTH
®
(BT) AUDIO
1 Make sure BT audio device
is paired.
2 Turn on BT audio device.
3 Push the AUX button until
“BT AUDIO” is displayed.
BLUETOOTH® AUDIO
Bluetooth® enabled phones and
audio players provide an opportunity
to play music through the audio
system with no wires attached,
however, there are some limitations:
• Not all controls on the phone or
player may be active when paired
to the vehicle.
• Audio streaming may be affected
by wireless signal strength.
• Sound quality of streaming
audio may vary, depending on
the device.
1147153_13a_Mazda6_SSG_022012.indd 22-232/20/12 3:59 PM
Page 13 of 18
Audio Controls Without Navigation
2324
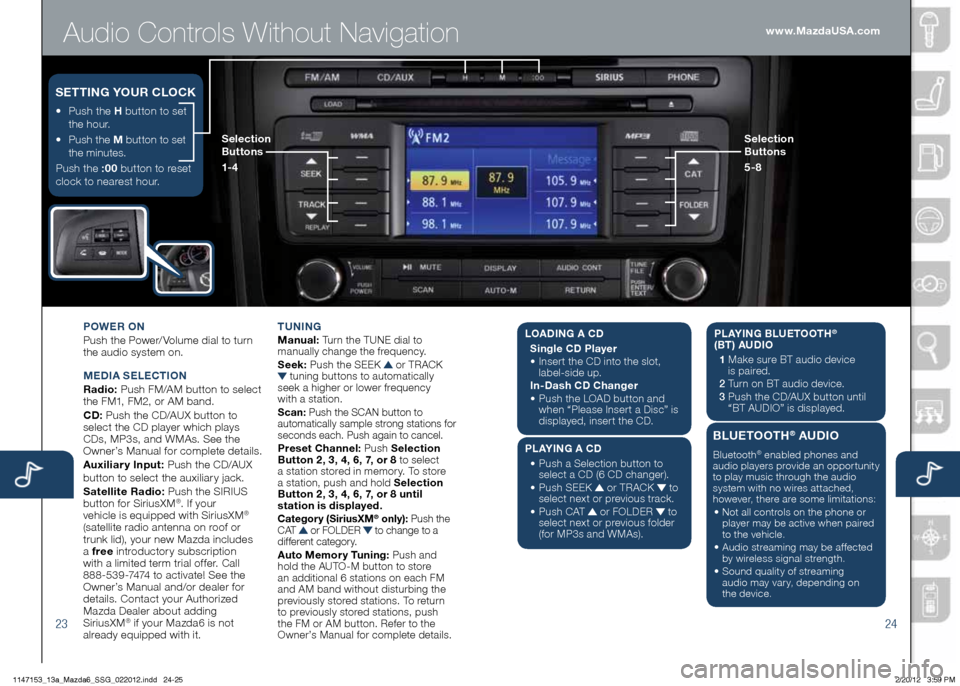
POWER ON
Push the Power/ Volume dial to turn
the audio system on.
M EDIA SELECTION
Radio: Push FM/AM button to select
the FM1, FM2, or AM band.
CD: Push the CD/AUX button to
select the CD player which plays
CDs, MP3s, and WMAs. See the
Owner’s Manual for complete details.
Auxiliary Input: Push the CD/AUX
button to se lect the auxiliary jack.
Satellite Radio: Push the SIRIUS
button for SiriusXM
®. If your
vehicle is equipped with SiriusXM®
(satellite radio antenna on roof or
trunk lid), your new Mazda includes
a free introductory subscription
with a limited term trial offer. Call
888-539-7474 to activate! See the
Owner’s Manual and/or dealer for
details. Contact your Authorized
Mazda Dealer about adding
SiriusXM
® if your Mazda6 is not
already equipped with it. T
UNING
Manual: Turn the TUNE dial to
manually change the frequency.
S eek: Push the SEEK
or TRACK tuning buttons to automatically
seek a higher or lower frequency
with a station.
S can: Push the SCAN button to
automatically sample strong stations for
seconds each. Push again to cancel.
Preset Channel: Push Selection
Button 2, 3, 4, 6, 7, or 8 to select
a station stored in memory. To store
a station, push and hold Selection
Button 2, 3, 4, 6, 7, or 8 until
station is displayed.
Category (Sirius xM® only): Push the
C AT or FOLDER to change to a
different category.
Auto Memory Tuning: Push and
hold the AUTO-M button to store
an additional 6 stations on each FM
and AM band without disturbing the
previously stored stations. To return
to previously stored stations, push
the FM or AM button. Refer to the
Owner’s Manual for complete details.
• Push the H button to set
the hour.
•
Push the M button to set
the minutes.
Push the :00 button to reset
clock to nearest hour.
S ETTING YOUR CLOCK
Selection
Buttons
1- 4 Selection
Buttons
5-8www.MazdaUSA.com
L
OADING A CD
Single CD Player
•
Insert the CD into the slot,
label-side up.
In-Dash CD Changer
•
Push the LOAD button and
when “Please Insert a Disc” is
displayed, insert the CD.
PLAYING A CD
•
Push a Selection button to
select a CD (6 CD changer).
•
Push SEEK
or TRACK to
select next or previous track.
•
Push CAT
or FOLDER to
select next or previous folder
(for MP3s and WMAs). PLAYING BLUETOOTH
®
(BT) AUDIO
1 Make sure BT audio device
is paired.
2 Turn on BT audio device.
3 Push the CD/AUX button until
“BT AUDIO” is disp layed.
BLUETOOTH® AUDIO
Bluetooth® enabled phones and
audio players provide an opportunity
to play music through the audio
system with no wires attached,
however, there are some limitations:
• Not all controls on the phone or
player may be active when paired
to the vehicle.
• Audio streaming may be affected
by wireless signal strength.
• Sound quality of streaming
audio may vary, depending on
the device.
1147153_13a_Mazda6_SSG_022012.indd 24-252/20/12 3:59 PM
Page 14 of 18
Audio Controls With Navigation
2526
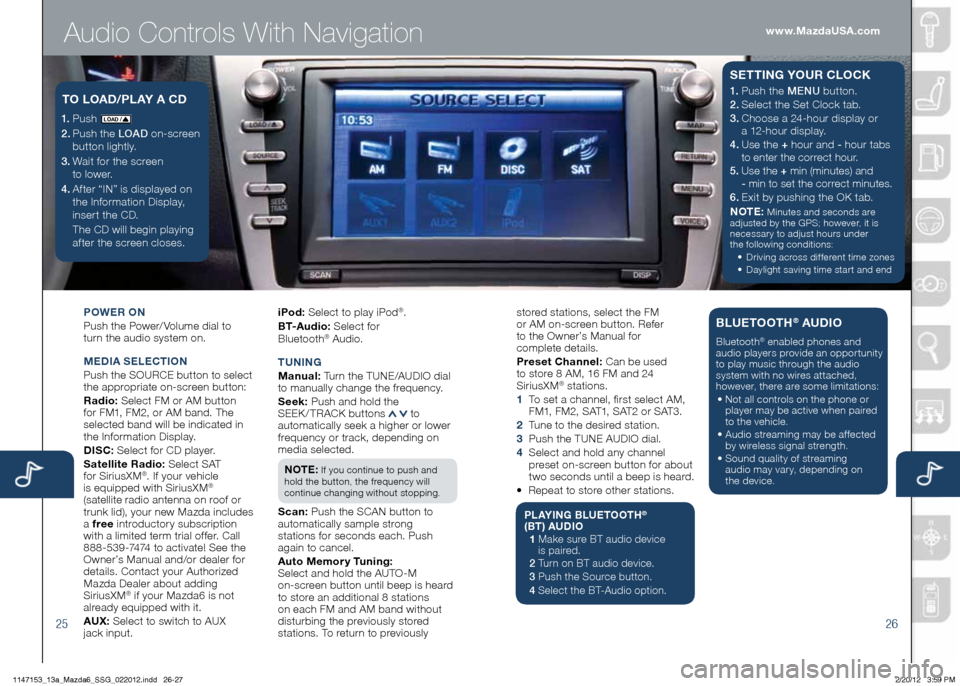
POWER ON
Push the Power/ Volume dial to
turn the audio system on.
M EDIA SELECTION
Push the SOURCE button to select
the appropriate on-screen button:
Radio: Select FM or AM button
for FM1, FM2, or AM band. The
selected band will be indicated in
the Information Display.
DISC: Select for CD player.
Satellite Radio: Select SAT
for SiriusXM
®. If your vehicle
is equipped with SiriusXM®
(satellite radio antenna on roof or
trunk lid), your new Mazda includes
a free introductory subscription
with a limited term trial offer. Call
888-539-7474 to activate! See the
Owner’s Manual and/or dealer for
details. Contact your Authorized
Mazda Dealer about adding
SiriusXM
® if your Mazda6 is not
already equipped with it.
AU x: Select to switch to AUX
jack input. iPod:
Select to play iPod
®.
B T- A u d i o : Select for
Blueto oth
® Audio.
T UNING
M anual: Turn the TUNE/AUDIO dial
to manually change the frequency.
S eek: Push and hold the
SEEK / TRACK buttons
to
automatically seek a higher or lower
frequency or track, depending on
media selected.
NOTE:
If you continue to push and
hold the button, the frequency will
continue changing without stopping.
S can: Push the SCAN button to
automatically sample strong
stations for seconds each. Push
again to cancel.
Auto Memory Tuning:
Select and hold the AUTO-M
on-screen button until beep is heard
to store an additional 8 stations
on each FM and AM band without
disturbing the previously stored
stations. To return to previously
1. Push LO AD /
2. Push the LOAD on-screen
button lightly.
3. Wait for the screen
to lower.
4 . After “IN” is displayed on
the Information Display,
insert the CD.
The CD will begin playing
after the screen closes.
TO LOAD /PLAY A CD1. Push the MENU button.
2. Select the Set Clock tab.
3.
Choose a 24-hour display or
a 12-hour display.
4. Use the + hour and - hour
tabs
to enter the correct hour.
5. Use the + min (minutes) and
- min to set the correct minutes.
6.
Exit by pushing the OK tab.
NOTE:
Minutes and seconds are
adjusted by the GPS; however, it is
necessary to adjust hours under
the following conditions:
•
Driving across different time zones
•
Daylight saving time start and end
SETTING YOUR CLOCK
stored stations, select the FM
or AM on-screen button. Refer
to the Owner’s Manual for
complete details.
Preset Channel: Can be used
to store 8 AM, 16 FM and 24
SiriusXM
® stations.
1 To set a channel, first select AM,
FM1, FM2, SAT1, SAT2 or SAT3.
2 Tune to the desired station.
3 Push the TUNE AUDIO dial.
4 Select and hold any channel
preset on-screen button for about
two seconds until a beep is heard.
• Repeat to store other stations.
PLAYING BLUETOOTH®
(BT) AUDIO
1 Make sure BT audio device
is paired.
2 Turn on BT audio device.
3 Push the Source button.
4 Select the BT-Audio option.
BLUETOOTH® AUDIO
Bluetooth® enabled phones and
audio players provide an opportunity
to play music through the audio
system with no wires attached,
however, there are some limitations:
• Not all controls on the phone or
player may be active when paired
to the vehicle.
• Audio streaming may be affected
by wireless signal strength.
• Sound quality of streaming
audio may vary, depending on
the device.
www.MazdaUSA.com
1147153_13a_Mazda6_SSG_022012.indd 26-272/20/12 3:59 PM