headlights MAZDA MODEL 6 HATCHBACK 2005 Owners Manual (in English)
[x] Cancel search | Manufacturer: MAZDA, Model Year: 2005, Model line: MODEL 6 HATCHBACK, Model: MAZDA MODEL 6 HATCHBACK 2005Pages: 340, PDF Size: 3.08 MB
Page 111 of 340

After adjusting the mirror, lock the control
by placing the selector switch in the
middle position.
Mirror defrosterí
To turn on the mirror defrosters, turn the
ignition switch to the ON position and
push the rear window defroster switch
(page 5-42).
qRearview Mirror
WARNING
Blocked View:
Cargo stacked higher than the
seatbacks is dangerous. It can block
your view in the rearview mirror,
which might cause you to hit another
car when changing lanes. Don't stack
things higher than the seatbacks.
Rearview mirror adjustment
Before driving, adjust the rearview mirror
to center on the scene through the rear
window.
NOTE
For the manual day/night mirror,
perform the adjustment with the day/
night lever in the day position.
Reducing glare from headlights
Manual day/night mirror
Push the day/night lever forward for day
driving. Pull it back to reduce glare of
headlights from cars at the rear.
Night
Day Day/Night lever
Auto-dimming mirror
The auto-dimming mirror automatically
reduces glare of headlights from cars at
the rear when the ignition switch is in the
ON position.
Press the OFF button (
) to cancel the
automatic dimming function. The
indicator light will go off.
To reactivate the automatic dimming
function, press the ON button (
). The
indicator light will illuminate.
Indicator lightOFF button
ON button
Knowing Your Mazda
Steering Wheel and Mirrors
3-35íSome models.
Page 158 of 340

CAUTION
If the automatic transaxle warning light
illuminates, the transaxle has an
electrical problem. Continuing to drive
your Mazda in this condition could
cause damage to your transaxle.
Consult an Authorized Mazda Dealer as
soon as possible.
qSecurity Indicator Light
This indicator light starts flashing every 2
seconds when the ignition switch is turned
from the ON to the ACC position and the
immobilizer system is armed.
The light stops flashing when the ignition
switch is turned to the ON position with
the correct ignition key.
At this time, the immobilizer system is
disarmed and the light illuminates for
about 3 seconds and then goes out.
If the engine doesn't start with the correct
ignition key, and the security indicator
light keeps illuminating or flashing, the
system may have a malfunction. Consult
an Authorized Mazda Dealer.
q Headlight High-Beam Indicator
Light
This light indicates one of two things:
lThe high-beam headlights are on.
lThe turn signal lever is in the flash-to-
pass position.
qShift Position Indicator Light
(Automatic Transaxle)
This indicates the selected shift position
when the ignition switch is in the ON
position.
Gear position indicator
5-34
Driving Your Mazda
Warning/Indicator Lights and Beep Sounds
Page 162 of 340

Lighting Control
qHeadlights
To turn on the lights, turn the headlight
switch on the end of the control lever.
Switch Position
Headlights Off Off On
Taillights
Parking lights
License lights Off On On
NOTE
lIf the light switch is left on, the lights
will automatically switch off 30
seconds after turning the ignition
switch to the LOCK position or
removing the key.
The lights will automatically switch
back on when the ignition switch is
turned to the ACC or ON position.
lTo prevent discharging the battery,
don't leave the lights on while the
engine is off.
q
Lights-On Reminder
If lights are on and the key is removed
from the ignition switch, a beep sound
will be heard when the driver's door is
opened.
qHeadlight High-Low Beam
Push the lever forward for high beam.
Pull it back for low.
High beam
Low beam
q Flashing the Headlights
To flash the headlights, pull the lever fully
toward you. The headlight switch need
not be on, and the lever will return to the
normal position when released.
5-38
Driving Your Mazda
Switches and Controls
Page 163 of 340

qDaytime Running Lights
(Canada)
In Canada, vehicles must be driven with
the headlights on during daytime
operation.
For that reason, the daytime running lights
automatically turn on when the ignition
switch is turned to the ON position.
NOTE
The Daytime Running Lights turn off
when the parking brake is applied.
Turn and Lane-Change
Signals
q Turn Signal
Move the signal lever down (for a left
turn) or up (for a right turn) to the stop
position. The signal will self-cancel after
the turn is completed.
If the indicator light continues to flash
after a turn, manually return the lever to
its original position.
Right turn
Left turn OFF
Right lane
change
Left lane
change
Green indicators on the dashboard show
which signal is working.
Lane-change signals
Move the lever slightly toward the
direction of the change ―until the
indicator flashes ―and hold it there. It
will return to the off position when
released.
NOTE
If an indicator light stays on without
flashing or if it flashes abnormally, the
turn signal bulb may be burned out.
Driving Your Mazda
Switches and Controls
5-39
Page 164 of 340

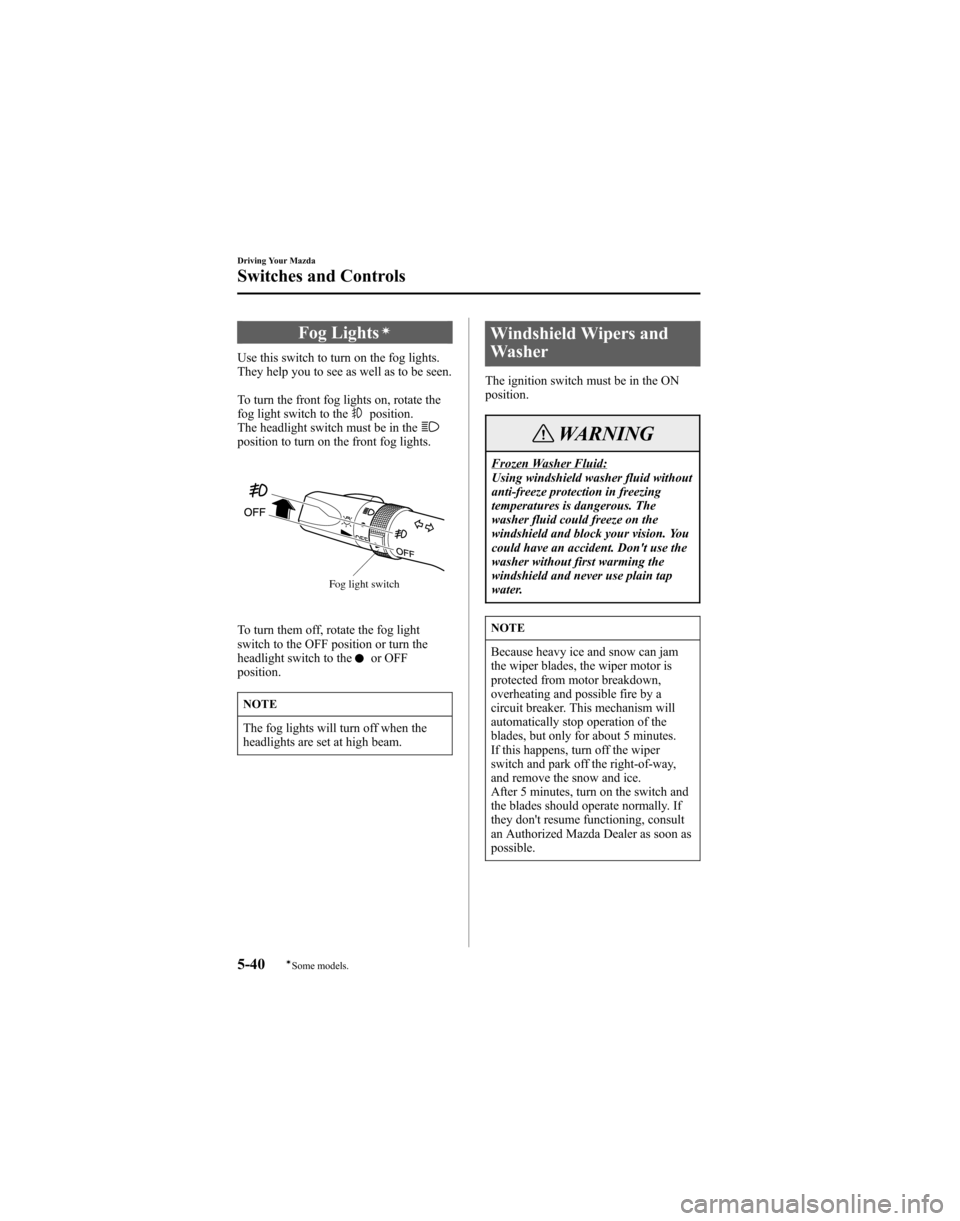
Fog Lightsí
Use this switch to turn on the fog lights.
They help you to see as well as to be seen.
To turn the front fog lights on, rotate the
fog light switch to the
position.
The headlight switch must be in the
position to turn on the front fog lights.
Fog light switch
To turn them off, rotate the fog light
switch to the OFF position or turn the
headlight switch to the
or OFF
position.
NOTE
The fog lights will turn off when the
headlights are set at high beam.
Windshield Wipers and
Washer
The ignition switch must be in the ON
position.
WARNING
Frozen Washer Fluid:
Using windshield washer fluid without
anti-freeze protection in freezing
temperatures is dangerous. The
washer fluid could freeze on the
windshield and block your vision. You
could have an accident. Don't use the
washer without first warming the
windshield and never use plain tap
water.
NOTE
Because heavy ice and snow can jam
the wiper blades, the wiper motor is
protected from motor breakdown,
overheating and possible fire by a
circuit breaker. This mechanism will
automatically stop operation of the
blades, but only for about 5 minutes.
If this happens, turn off the wiper
switch and park off the right-of-way,
and remove the snow and ice.
After 5 minutes, turn on the switch and
the blades should operate normally. If
they don't resume functioning, consult
an Authorized Mazda Dealer as soon as
possible.
5-40
Driving Your Mazda
íSome models.
Switches and Controls
Page 283 of 340

Light Bulbs
Luggage compartment
light (Hatchback)
High-mount brake light
(Sedan)
Headlights
(High beam) Headlights
(Low beam)
Overhead light/
Map lights
Luggage compartment light
Sport Wagon
Taillights
Side-marker lights License plate lights Courtesy lights
Front turn signal lights Parking lights
Reverse lights
Rear turn signal lights
Brake lights/Taillights
High-mount brake light
Fog lights
Sedan/5-Door
Taillights
Side-marker lights
License plate lights
Courtesy lights
Front turn signal lights Parking lights
Reverse lights
Rear turn signal lights
Brake lights/Taillights Trunk light
Fog lights
High-mount brake light (Hatchback) Headlights
(High beam) (Low beam)
Headlights Map lights
Overhead light/
Maintenance and Care
Owner Maintenance
8-33
Page 284 of 340

Your Mazda's headlights and fog lights
have replaceable halogen bulbs.
WARNING
Handling Halogen Bulbs:
When a halogen bulb breaks, it is
dangerous. These bulbs contain
pressurized gas. If one is broken, it
will explode and serious injuries could
be caused by the flying glass.
If the glass portion is touched with
bare hands, body oil could cause the
bulb to overheat and explode when lit.
Never touch the glass portion of the
bulb with your bare hands and always
wear eye protection when handling or
working around halogen bulbs.
Children and Halogen Bulbs:
Playing with a halogen bulb is
dangerous. Serious injuries could be
caused by dropping a halogen bulb or
breaking it some other way.
Always keep halogen bulbs out of the
reach of children.
qReplacing Exterior Light Bulbs
Replacing the headlight, fog light andparking light bulbs
Due to the complexity and difficulty of
the procedure, the bulbs should be
replaced by an Authorized Mazda Dealer.
Front turn signal lights
1. Turn the socket and bulb assembly
counterclockwise and remove it. 2. Remove the bulb by pushing it in
slightly and turning it
counterclockwise.
3. Install the new bulb in the reverse orderof removal.
Side-marker lights
1. Turn the screw counterclockwise and
remove it, then partially peel back the
mudguard.
2. Turn the socket and bulb assemblycounterclockwise and remove it.
8-34
Maintenance and Care
Owner Maintenance
Page 293 of 340

Replacing the fuses under the hood
If the headlights or other electrical
components don't work and the fuses in
the cabin are OK, inspect the fuse block
under the hood. If a fuse is blown, it must
be replaced. Follow these steps:
1. Turn off the ignition switch and allother switches.
2. Remove the fuse block cover.
3. If a fuse is blown, replace it with a new one of the same amperage rating .
Normal
Blown
NOTE
To replace the MAIN fuse, contact an
Authorized Mazda Dealer (page 8-44).
Maintenance and Care
Owner Maintenance
8-43
Page 330 of 340

qWeights
Item Weight
GVWR (Gross Vehicle Weight Rating) Sedan 1,956 kg (4,312 lb)
5-Door/Sport Wagon 2,037 kg (4,491 lb)
GAWR (Gross Axle Weight Rating) Sedan
Front 1,071 kg (2,361 lb)
Rear 888 kg (1,958 lb)
5-Door/Sport Wagon Front 1,076 kg (2,372 lb)
Rear 961 kg (2,119 lb)
q
Air Conditioner
Gas complies with SAE J639 Maximum operating charge
HFC134a (R-134a) 0.5 kg (17.6 oz)
q Light Bulbs
Exterior light
Light bulb Category
Wattage ECE R SAE
Headlights High beam 55 H1
―
Low beam 55 H1 ―
Front turn signal lights 28
*1― #2357A
Parking lights 5 W5W ―
Fog lights
í55 H3 ―
Side-marker lights 5 W5W ―
High-mount brake light Sedan/Sport Wagon 18.4 W16W #921
5-Door 21
――
Rear turn signal lights 21 WY21W ―
Brake lights/Taillights 21/5 W21/5W #7443
Taillights 5
*2W21/5W #7443
Reverse lights 18.4 W16W #921
License plate lights 5 W5W ―
*1 Use a 28/7W type bulb.
*2 Use a 21/5W type bulb.
10-6íSome models.
Specifications
Page 335 of 340

D
Dashboard Illumination .................... 5-26
Daytime Running Lights ................... 5-39
DefrosterRear window .............................. 5-42
Dimensions ....................................... 10-5
Door Locks ......................................... 3-7
Driving In Flooded Area ................... 4-10
Driving Tips ........................................ 4-7 Automatic transaxle ................... 5-15
Break-in period ............................ 4-7
Driving in flooded area .............. 4-10
Hazardous driving ........................ 4-8
Money-saving suggestions ........... 4-7
Rocking the vehicle ...................... 4-8
Winter driving .............................. 4-9
E
Emergency Starting ........................... 7-16Flooded engine ........................... 7-16
Jump-starting .............................. 7-17
Push-starting .............................. 7-19
Emergency Towing ........................... 7-20
Emission Control System .................... 4-3
Engine Coolant ....................................... 8-13
Exhaust gas .................................. 4-5
Hood release .............................. 3-26
Oil .............................................. 8-10
Overheating ................................ 7-14
Starting ......................................... 5-3
Engine Compartment Overview .......... 8-9
Engine Coolant Overheating ................................ 7-14
Engine Coolant Temperature
Gauge ................................................ 5-25
Exhaust Gas ........................................ 4-5
Exterior Care ..................................... 8-49
F
Flasher Hazard warning .......................... 5-44
Headlights .................................. 5-38
Flat Tire ............................................... 7-3
Changing ...................................... 7-8
Spare tire and tool storage ............ 7-3
Fluids
Classification .............................. 10-4
Owner maintenance ..................... 8-7
Fog Lights ......................................... 5-40
Foot Brake .......................................... 5-4
Front Seats
(Electrically Operated Seats) ............... 2-5
Front Seats
(Manually Operated Seats) ................. 2-2
Fuel
Filler lid and cap ........................ 3-24
Gauge ......................................... 5-26
Requirements ............................... 4-2
Tank capacity ............................. 10-5
Fuses ................................................. 8-42 Panel description ........................ 8-44
Replacement ............................... 8-42
G
Glove Box ......................................... 6-52
H
Hatch ................................................. 3-10Luggage compartment cover ...... 3-11
Luggage strap ............................. 3-11
Hazard Warning Flasher .................... 5-44
Hazardous Driving .............................. 4-8
Index
11-3