dashboard MAZDA MODEL 6 HATCHBACK 2005 (in English) User Guide
[x] Cancel search | Manufacturer: MAZDA, Model Year: 2005, Model line: MODEL 6 HATCHBACK, Model: MAZDA MODEL 6 HATCHBACK 2005Pages: 340, PDF Size: 3.08 MB
Page 150 of 340

qFuel Gauge
The fuel gauge shows approximately how
much fuel is in the tank. We recommend
keeping the tank over 1/4 full. When the
low fuel warning light illuminates or
when the needle is near E, refuel as soon
as possible.
Low fuel
warning light
qDashboard Illumination
Rotate the thumb wheel to adjust the
brightness of the instrument cluster and
other illuminations in the dashboard.
NOTE
lThe brightness of dashboard
illuminations (except instrument
cluster) can be adjusted when the
headlight switch is in the
orposition.
l(Black-out meter)
The brightness of the instrument
cluster illumination can be adjusted
when the headlight switch is in any
position.
Dim
Bright
Canceling the illumination dimmer(Black-out meter and dashboardilluminations)
When the headlight switch is in the
orposition, the illumination of the
instrument cluster and the information
display dims.
When driving on snowy or foggy roads,
or in other situations when the instrument
cluster or information display's visibility
is reduced due to glare from surrounding
brightness, cancel the illumination
dimmer and increase the illumination
intensity.
To cancel the illumination dimmer, rotate
the thumb wheel upward fully. You may
hear a click sound and the illumination
dimmer will be canceled.
NOTE
If the dashboard illumination switch is
kept at the illumination dimmer cancel
position, the instrument cluster and the
information display will not dim when
the headlight switch is turned to the
orposition again.
5-26
Driving Your Mazda
Instrument Cluster and Indicators
Page 163 of 340

qDaytime Running Lights
(Canada)
In Canada, vehicles must be driven with
the headlights on during daytime
operation.
For that reason, the daytime running lights
automatically turn on when the ignition
switch is turned to the ON position.
NOTE
The Daytime Running Lights turn off
when the parking brake is applied.
Turn and Lane-Change
Signals
q Turn Signal
Move the signal lever down (for a left
turn) or up (for a right turn) to the stop
position. The signal will self-cancel after
the turn is completed.
If the indicator light continues to flash
after a turn, manually return the lever to
its original position.
Right turn
Left turn OFF
Right lane
change
Left lane
change
Green indicators on the dashboard show
which signal is working.
Lane-change signals
Move the lever slightly toward the
direction of the change ―until the
indicator flashes ―and hold it there. It
will return to the off position when
released.
NOTE
If an indicator light stays on without
flashing or if it flashes abnormally, the
turn signal bulb may be burned out.
Driving Your Mazda
Switches and Controls
5-39
Page 176 of 340

qSelecting the Airflow Mode
Defroster and Floor Vents
Dashboard Vents
Floor Vents Defroster Vents
Dashboard and Floor Vents
6-4
Interior Comfort
Climate Control System
Page 212 of 340

Audio Control Switch
Operation (Steering
Wheel)
í
NOTE
Mazda installed this system to help you
avoid being too distracted using audio
controls on the dashboard. Always
make safe driving your first priority.
qAdjusting the Volume
To increase the volume, press volume
button ().
To decrease the volume, press volume
button (
).
q Changing the Source
Press the mode switch () to change
the audio source (FM1 radio> FM2 radio>
AM radio> CD player or CD changer>
Cassette tape player or MD player>
SIRIUS1> SIRIUS2> SIRIUS3>
cyclical).
NOTE
Cassette tape, MD, CD, CD changer
and SIRIUS digital satellite radio
modes cannot be selected in the
following cases:
lA cassette deck, MD, CD, CD
changer, or SIRIUS digital satellite
radio unit is not equipped on the
audio system.
lA cassette tape, MD or CD has not
been inserted.
6-40
Interior Comfort
íSome models.
Audio System
Page 295 of 340

DESCRIPTION FUSE RATING PROTECTED COMPONENT
17 ENG+B 7.5A PCM, TCM
18 FUEL PUMP 15A Fuel pump
19 IG KEY 40A Windshield wiper and washer, Engine control unit, Lighter
20 P.WIND 30A Power window
21 ―― ―
22 ―― ―
23 IG KEY2 30A Rear wiper motor
í, Heater control unit
24 BLOWER 40A Blower motor
25 BTN 40A Overhead light, Power door lock
26 ―― ―
27 DEFOG 40A Rear window defroster
28 ABS 60A ABS
í
29 AD FAN*130A Cooling fan
FAN2*2
30 FA N*130A Cooling fan
FAN1*2
31 TAIL 10A Taillights, License plate lights, Parking lights
32 ILLUMI 10A Dashboard illumination
33 MAG 10A Magnet clutch
34 AUDIO 15A Audio system
35 P.SEAT 30A Power seat
í
36 OPENER 7.5A Trunk opener motorí
37 ―― ―
38 IG1*215A CAT SSR
39 FOG 15A Fog lightsí
40 MAIN 100A*1For protection of all circuits
120A*2
*1 2.3-liter engine
*2 3.0-liter engine
Maintenance and Care
Owner Maintenance
8-45íSome models.
Page 302 of 340

Interior Care
qDashboard Precautions
Prevent caustic solutions such as perfume
and cosmetic oils from contacting the
dashboard. They'll damage and discolor it.
If these solutions get on the dashboard,
wipe them off immediately.
CAUTION
Do not use glazing agents.
Glazing agents contain ingredients
which may cause discoloration,
wrinkling, cracks and peeling.
qCleaning the Upholstery and
Interior Trim
Vinyl
Remove dust and loose dirt from vinyl
with a whisk broom or vacuum cleaner.
Clean vinyl with a leather-and-vinyl
cleaner.
Leatherí
Real leather isn't uniform and may have
scars, scratches, and wrinkles. Clean it
with a leather cleaner or mild soap.
Wipe it with a dampsoft cloth; then dry
and buff it with a drysoft cloth.
Fabricí
Remove dust and loose dirt from fabric
with a whisk broom or vacuum cleaner.
Clean it with a mild soap solution good
for upholstery and carpets. Remove fresh
spots immediately with a fabric spot
cleaner. To keep the fabric looking clean and
fresh, take care of it. Otherwise its color
will be affected, it can be stained easily,
and its fire-resistance may be reduced.
CAUTION
Use only recommended cleaners and
procedures. Others may affect
appearance and fire-resistance.
q
Cleaning the Lap/Shoulder Belt
Webbing
Clean the webbing with a mild soap
solution recommended for upholstery or
carpets. Follow instructions. Don't bleach
or dye the webbing; this may weaken it.
After cleaning the belts, thoroughly dry
the belt webbing and make sure there is
no remaining moisture before retracting
them.
WARNING
Damaged Seat Belt:
Using damaged seat belts is
dangerous. In a collision, damaged
belts cannot provide adequate
protection. Have an Authorized Mazda
Dealer replace damaged belts
immediately.
8-52
Maintenance and Care
íSome models.
Appearance Care
Page 326 of 340

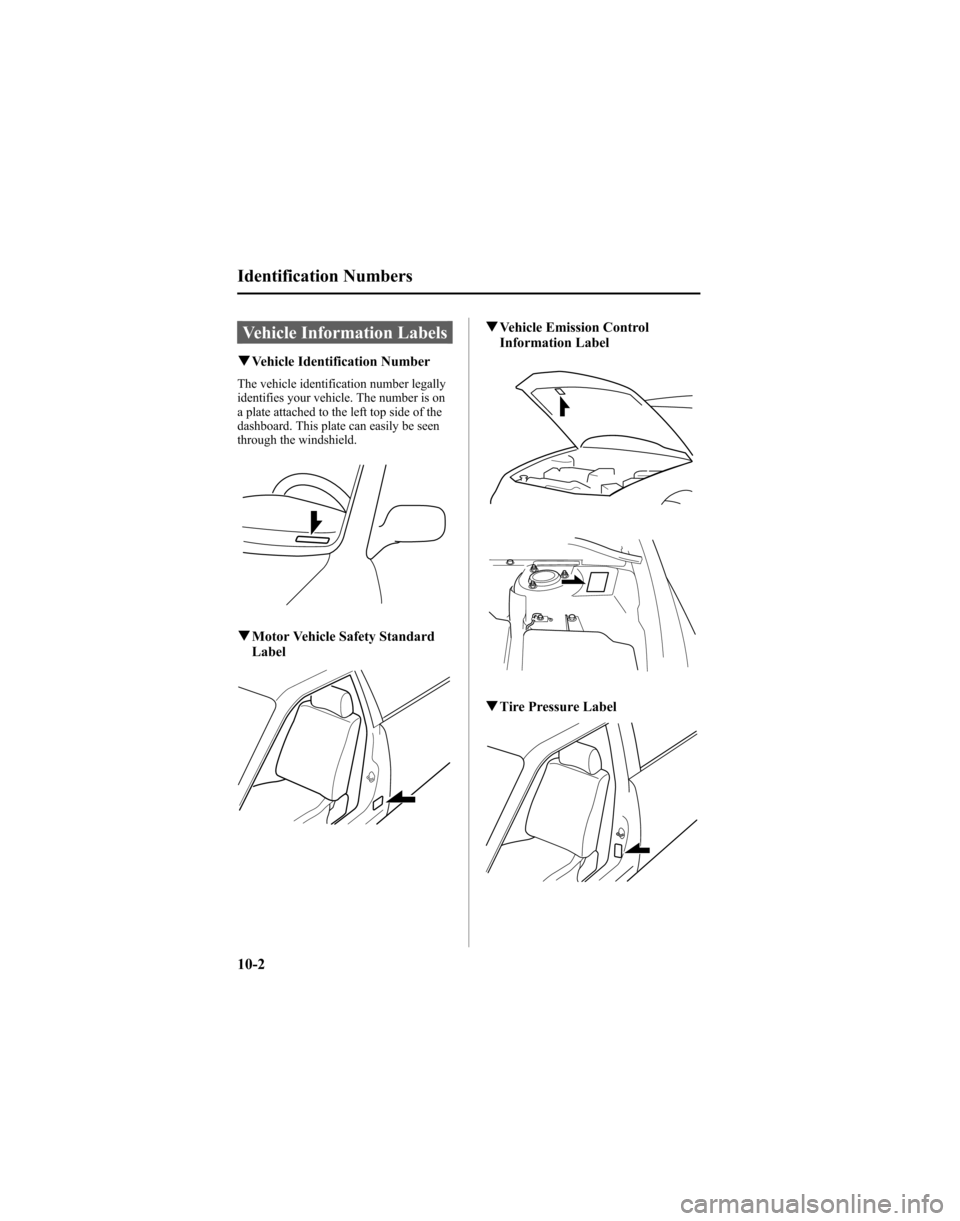
Vehicle Information Labels
qVehicle Identification Number
The vehicle identification number legally
identifies your vehicle. The number is on
a plate attached to the left top side of the
dashboard. This plate can easily be seen
through the windshield.
qMotor Vehicle Safety Standard
Label
q Vehicle Emission Control
Information Label
qTire Pressure Label
10-2
Identification Numbers
Page 335 of 340

D
Dashboard Illumination .................... 5-26
Daytime Running Lights ................... 5-39
DefrosterRear window .............................. 5-42
Dimensions ....................................... 10-5
Door Locks ......................................... 3-7
Driving In Flooded Area ................... 4-10
Driving Tips ........................................ 4-7 Automatic transaxle ................... 5-15
Break-in period ............................ 4-7
Driving in flooded area .............. 4-10
Hazardous driving ........................ 4-8
Money-saving suggestions ........... 4-7
Rocking the vehicle ...................... 4-8
Winter driving .............................. 4-9
E
Emergency Starting ........................... 7-16Flooded engine ........................... 7-16
Jump-starting .............................. 7-17
Push-starting .............................. 7-19
Emergency Towing ........................... 7-20
Emission Control System .................... 4-3
Engine Coolant ....................................... 8-13
Exhaust gas .................................. 4-5
Hood release .............................. 3-26
Oil .............................................. 8-10
Overheating ................................ 7-14
Starting ......................................... 5-3
Engine Compartment Overview .......... 8-9
Engine Coolant Overheating ................................ 7-14
Engine Coolant Temperature
Gauge ................................................ 5-25
Exhaust Gas ........................................ 4-5
Exterior Care ..................................... 8-49
F
Flasher Hazard warning .......................... 5-44
Headlights .................................. 5-38
Flat Tire ............................................... 7-3
Changing ...................................... 7-8
Spare tire and tool storage ............ 7-3
Fluids
Classification .............................. 10-4
Owner maintenance ..................... 8-7
Fog Lights ......................................... 5-40
Foot Brake .......................................... 5-4
Front Seats
(Electrically Operated Seats) ............... 2-5
Front Seats
(Manually Operated Seats) ................. 2-2
Fuel
Filler lid and cap ........................ 3-24
Gauge ......................................... 5-26
Requirements ............................... 4-2
Tank capacity ............................. 10-5
Fuses ................................................. 8-42 Panel description ........................ 8-44
Replacement ............................... 8-42
G
Glove Box ......................................... 6-52
H
Hatch ................................................. 3-10Luggage compartment cover ...... 3-11
Luggage strap ............................. 3-11
Hazard Warning Flasher .................... 5-44
Hazardous Driving .............................. 4-8
Index
11-3