seat adjustment MAZDA MODEL 6 HATCHBACK 2005 Owners Manual (in English)
[x] Cancel search | Manufacturer: MAZDA, Model Year: 2005, Model line: MODEL 6 HATCHBACK, Model: MAZDA MODEL 6 HATCHBACK 2005Pages: 340, PDF Size: 3.08 MB
Page 5 of 340
Table of Contents
Your Vehicle at a Glance
Interior, exterior views and part identification of your Mazda.1
Essential Safety Equipment
Use of safety equipment, including seats, seat belt system, SRS air bags and
child-restraint systems.2
Knowing Your Mazda
Explanation of basic operations and controls; opening/closing and adjustment
of various parts.3
Before Driving Your Mazda
Important information about driving your Mazda.4
Driving Your Mazda
Explanation of instruments and controls.5
Interior Comfort
Use of various features for drive comfort, including air-conditioning and audio
system.6
In Case of an Emergency
Helpful information on what to do in an emergency.7
Maintenance and Care
How to keep your Mazda in top condition.8
Customer Information and Reporting Safety Defects
Important consumer information including warranties and add-on equipment.9
Specifications
Technical information about your Mazda.10
Index11
Page 16 of 340
Front Seats (Manually
Operated Seats)
WARNING
Modification of the Front Seats:
Modifying or replacing the front seats
such as replacing the upholstery or
loosening any bolts is dangerous. The
front seats contain air bag
components essential to the
supplemental restraint system. Such
modifications could damage the
supplemental restraint system and
result in serious injury. Consult an
Authorized Mazda Dealer if there is
any need to remove or reinstall the
front seats.
Damaged Front Seats:
Driving with damaged front seats is
dangerous. A collision, even one not
strong enough to inflate the air bags,
could damage the front seats which
contain essential air bag components.
If there was a subsequent collision, the
air bag may not deploy which could
lead to injuries. Always have an
Authorized Mazda Dealer inspect the
front seats, front seat belt
pretensioners and air bags after a
collision.
WARNING
Securing the Seats:
Adjustable seats and seatbacks that
are not securely locked are dangerous.
In a sudden stop or collision, the seat
or seatback could move, causing
injury. Make sure the adjustable
components of the seat are locked in
place by attempting to slide the seat
forward and backward and rocking
the seatback.
qSeat Slide
WARNING
Driver's Seat Adjustment:
Adjusting the driver's seat while the
vehicle is moving is dangerous. The
driver could lose control of the vehicle
and have an accident. Adjust the
driver's seat only when the vehicle is
stopped.
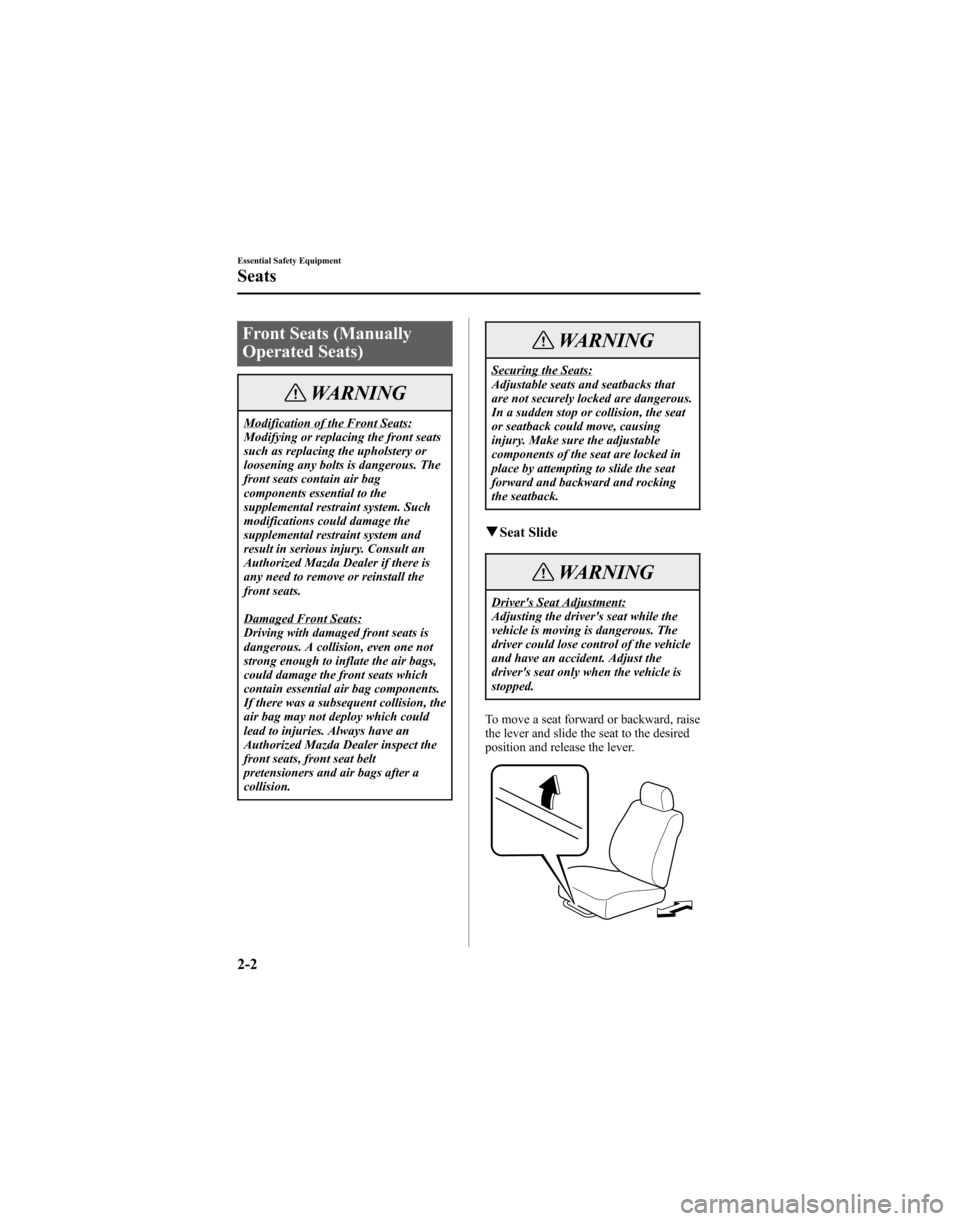
To move a seat forward or backward, raise
the lever and slide the seat to the desired
position and release the lever.
2-2
Essential Safety Equipment
Seats
Page 18 of 340
qHeight Adjustment (Driver's
Seat)
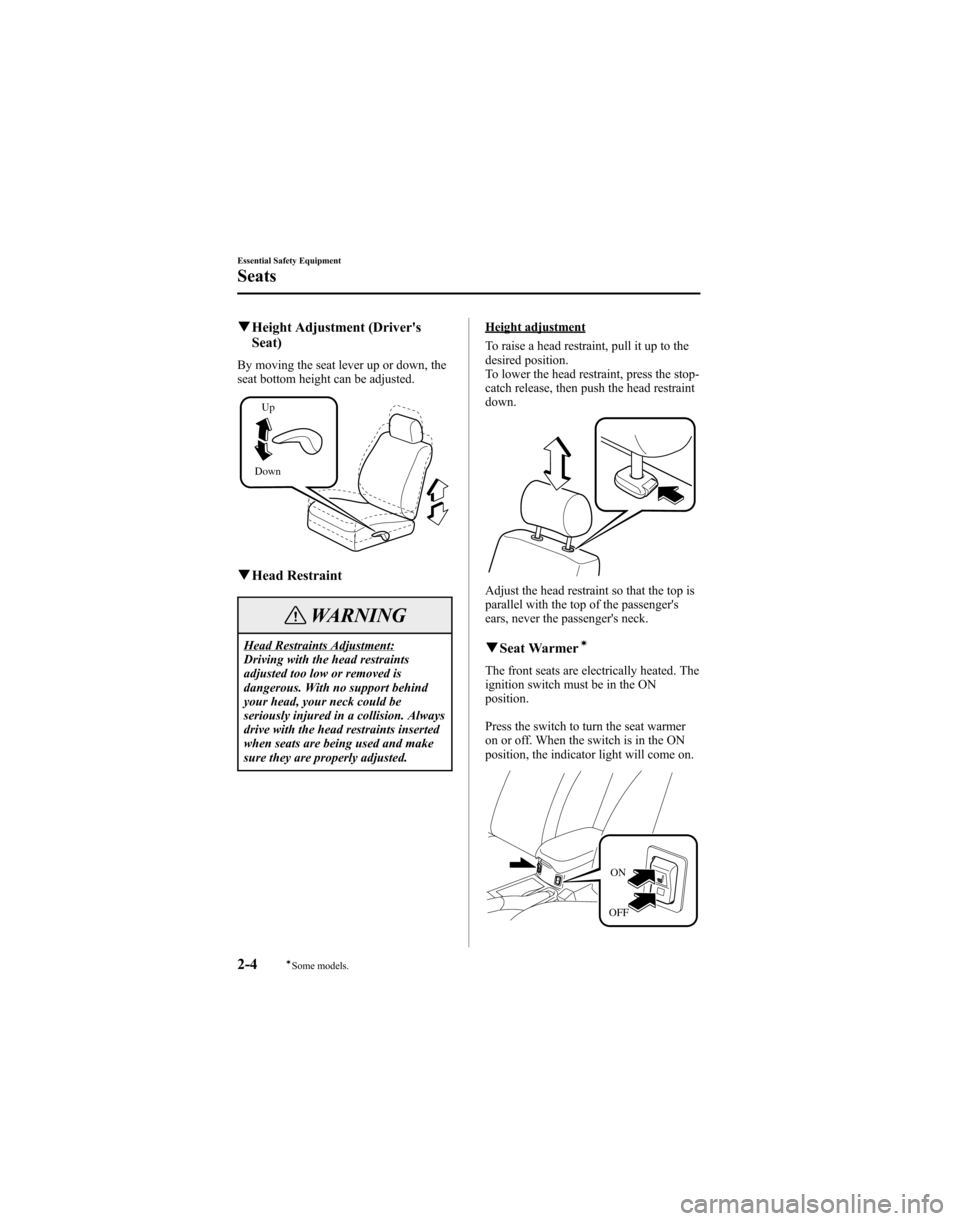
By moving the seat lever up or down, the
seat bottom height can be adjusted.
DownUp
q
Head Restraint
WARNING
Head Restraints Adjustment:
Driving with the head restraints
adjusted too low or removed is
dangerous. With no support behind
your head, your neck could be
seriously injured in a collision. Always
drive with the head restraints inserted
when seats are being used and make
sure they are properly adjusted.
Height adjustment
To raise a head restraint, pull it up to the
desired position.
To lower the head restraint, press the stop-
catch release, then push the head restraint
down.
Adjust the head restraint so that the top is
parallel with the top of the passenger's
ears, never the passenger's neck.
q Seat Warmerí
The front seats are electrically heated. The
ignition switch must be in the ON
position.
Press the switch to turn the seat warmer
on or off. When the switch is in the ON
position, the indicator light will come on.
ON
OFF
2-4
Essential Safety Equipment
íSome models.
Seats
Page 20 of 340
CAUTION
lThe seat-bottom power adjustment is
operated by motors. Avoid extended
operation because excessive use can
damage the motors.
lTo prevent the battery from running
down, avoid using the power
adjustment when the engine is
stopped. The adjuster uses a large
amount of electric power.
lDon't use the switch to make more
than one adjustment at a time.
qSeat Slide (Driver's Seat)
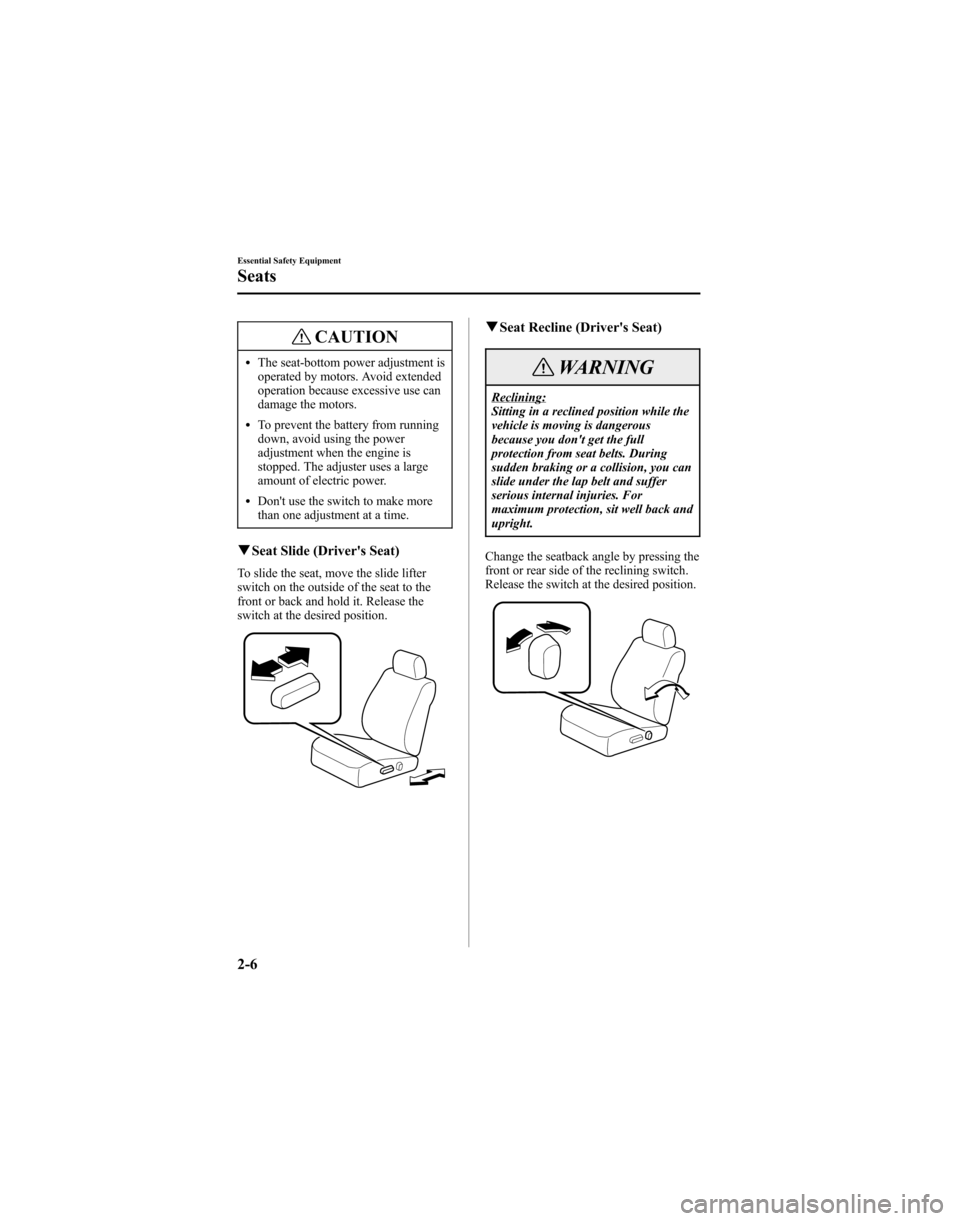
To slide the seat, move the slide lifter
switch on the outside of the seat to the
front or back and hold it. Release the
switch at the desired position.
q Seat Recline (Driver's Seat)
WARNING
Reclining:
Sitting in a reclined position while the
vehicle is moving is dangerous
because you don't get the full
protection from seat belts. During
sudden braking or a collision, you can
slide under the lap belt and suffer
serious internal injuries. For
maximum protection, sit well back and
upright.
Change the seatback angle by pressing the
front or rear side of the reclining switch.
Release the switch at the desired position.
2-6
Essential Safety Equipment
Seats
Page 21 of 340

qHeight Adjustment (Driver's
Seat)
Front height adjustment
To adjust the front height of the seat-
bottom, raise or lower the front of the
slide lifter switch on the left side of the
seat.
Rear height adjustment
Raise or lower the back of the switch to
adjust the rear height of the seat-bottom.
Height adjustment
Raise the seat-bottom by pulling up on the
center of the switch. Release the switch at
the desired position. Lower the seat-bottom by pressing down
on the center of the switch. Release the
switch at the desired position.
q
Lumbar Support Adjustment
(Driver's Seat)
To adjust the lumbar support, pull the
lever forward.
Essential Safety Equipment
Seats
2-7
Page 22 of 340
qHead Restraint
WARNING
Head Restraints Adjustment:
Driving with the head restraints
adjusted too low or removed is
dangerous. With no support behind
your head, your neck could be
seriously injured in a collision. Always
drive with the head restraints inserted
when seats are being used and make
sure they are properly adjusted.
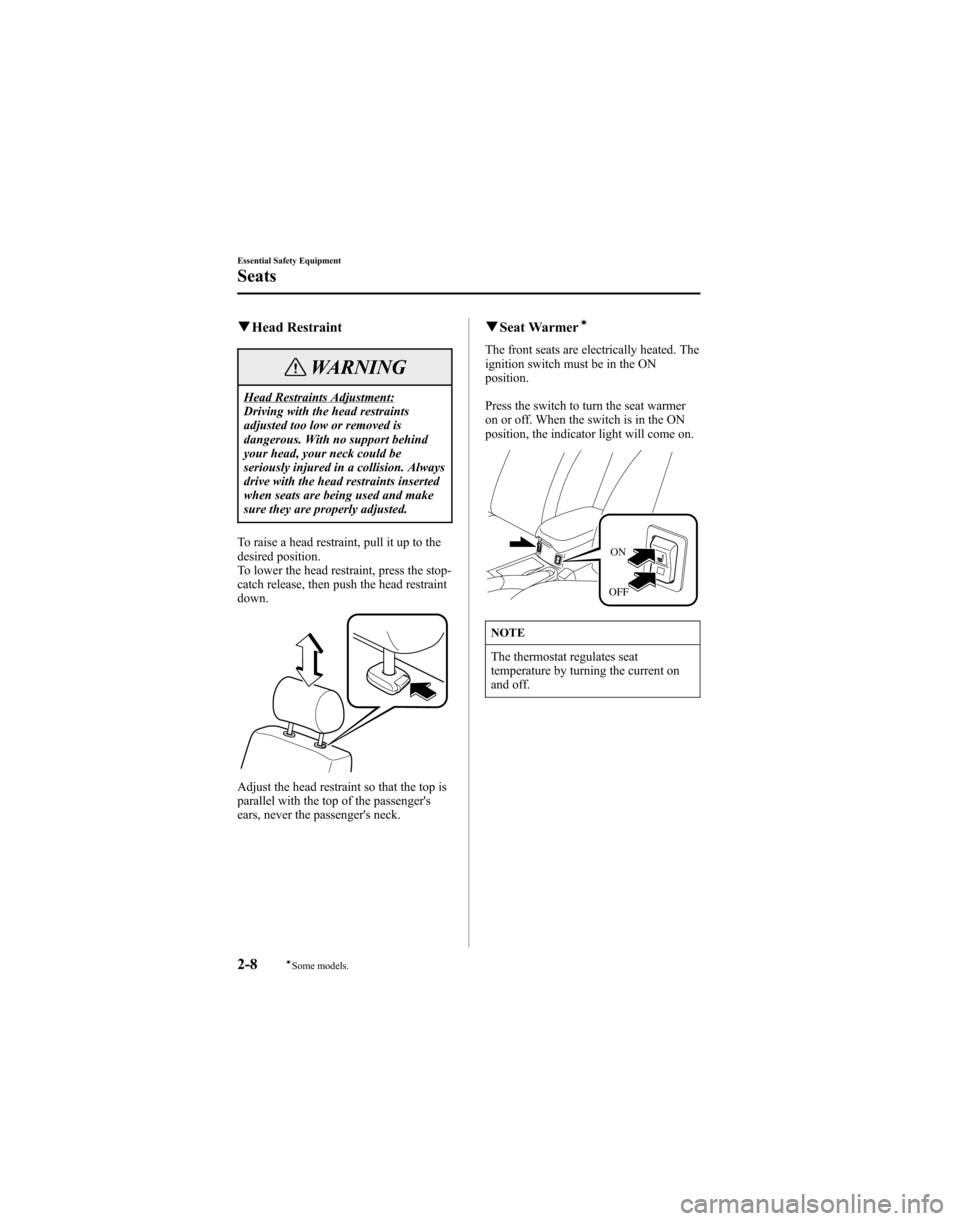
To raise a head restraint, pull it up to the
desired position.
To lower the head restraint, press the stop-
catch release, then push the head restraint
down.
Adjust the head restraint so that the top is
parallel with the top of the passenger's
ears, never the passenger's neck.
q Seat Warmerí
The front seats are electrically heated. The
ignition switch must be in the ON
position.
Press the switch to turn the seat warmer
on or off. When the switch is in the ON
position, the indicator light will come on.
ON
OFF
NOTE
The thermostat regulates seat
temperature by turning the current on
and off.
2-8
Essential Safety Equipment
íSome models.
Seats
Page 28 of 340

WARNING
Seat Belts Caught Under Seatbacks:
A seat belt caught under a seatback
after the seatback is returned to its
upright position is dangerous. In a
collision or sudden stop, the seat belt
cannot provide adequate protection.
Always make sure the seat belts are
fully pulled out from under the
seatbacks.
Returning Rear Seatbacks to theUpright Position:
A rear seatback not fully returned and
locked in the upright position is
dangerous. Sudden stops or
maneuvering could cause a seatback
to flip forward suddenly resulting in
injury. If the red indicator is visible on
the back of the rear seatback knob, the
seatback is not locked in the upright
position. When returning the seatback
to the upright position, make sure
there is no red indication.
Unlocked positionLocked position
q
Head Restraint (5-Door/Sport
Wagon)
WARNING
Head Restraints Adjustment:
Driving with the head restraints
adjusted too low or removed is
dangerous. With no support behind
your head, your neck could be
seriously injured in a collision. Always
drive with the head restraints inserted
when seats are being used and make
sure they are properly adjusted.
Height adjustment
To raise a head restraint, pull it up to the
desired position.
To lower the head restraint, press the stop-
catch release, then push the head restraint
down.
Adjust the head restraint so that the top is
parallel with the top of the passenger's
ears, never the passenger's neck.
2-14
Essential Safety Equipment
Seats
Page 61 of 340
WARNING
Hot Air Bag Inflators:
Hot air bag inflators are dangerous. Immediately after inflation, the inflators in the
steering wheel, dashboard, seatbacks, or the front and rear window pillars and along
the roof edge are very hot. You could get burned. Don't touch the internal components
of the air bag modules after the bags have inflated.
Installation of Front-End Equipment:
Installation of front-end equipment, such as frontal protection bar (kangaroo bar, bull
bar, push bar, etc.), snowplow, or winches, is dangerous. The air bag crash sensor
system could be affected. This could cause air bags to inflate unexpectedly, or it could
prevent the air bags from inflating during an accident. Front occupants could be
seriously injured. Never install any front-end equipment to your vehicle.
Suspension Adjustment:
Adjusting the vehicle suspension is dangerous. If the vehicle's height or the
suspension is changed, the vehicle will be unable to accurately detect a collision
resulting in incorrect or unexpected air bag deployment and the possibility of serious
injuries.
Modification of the Supplemental Restraint System:
Modifying the components or wiring of the supplemental restraint system is
dangerous. You could accidentally activate it or make it inoperable. Don't make any
modifications to the supplemental restraint system. This includes installing trim,
badges, or anything else over the air bag modules. It also includes installing extra
electrical equipment on or near system components or wiring. An Authorized Mazda
Dealer can provide the special care needed in the removal and installation of front
seats. It is important to protect the side and curtain air bag wiring and connections to
assure that the bags do not accidentally deploy and that the seats retain an
undamaged air bag connection.
CAUTION
To prevent damage to the side and curtain air bag wiring, don't place luggage or other
objects under the front seats.
Essential Safety Equipment
SRS Air Bags
2-47
Page 111 of 340

After adjusting the mirror, lock the control
by placing the selector switch in the
middle position.
Mirror defrosterí
To turn on the mirror defrosters, turn the
ignition switch to the ON position and
push the rear window defroster switch
(page 5-42).
qRearview Mirror
WARNING
Blocked View:
Cargo stacked higher than the
seatbacks is dangerous. It can block
your view in the rearview mirror,
which might cause you to hit another
car when changing lanes. Don't stack
things higher than the seatbacks.
Rearview mirror adjustment
Before driving, adjust the rearview mirror
to center on the scene through the rear
window.
NOTE
For the manual day/night mirror,
perform the adjustment with the day/
night lever in the day position.
Reducing glare from headlights
Manual day/night mirror
Push the day/night lever forward for day
driving. Pull it back to reduce glare of
headlights from cars at the rear.
Night
Day Day/Night lever
Auto-dimming mirror
The auto-dimming mirror automatically
reduces glare of headlights from cars at
the rear when the ignition switch is in the
ON position.
Press the OFF button (
) to cancel the
automatic dimming function. The
indicator light will go off.
To reactivate the automatic dimming
function, press the ON button (
). The
indicator light will illuminate.
Indicator lightOFF button
ON button
Knowing Your Mazda
Steering Wheel and Mirrors
3-35íSome models.