fuse MAZDA MODEL 6 HATCHBACK 2007 Quick Tips (in English)
[x] Cancel search | Manufacturer: MAZDA, Model Year: 2007, Model line: MODEL 6 HATCHBACK, Model: MAZDA MODEL 6 HATCHBACK 2007Pages: 12, PDF Size: 1.27 MB
Page 5 of 12

DRIVER CONTROLS
Always check the Owner’s Manual for more operating information and safety features
Driver
Controls
Switches
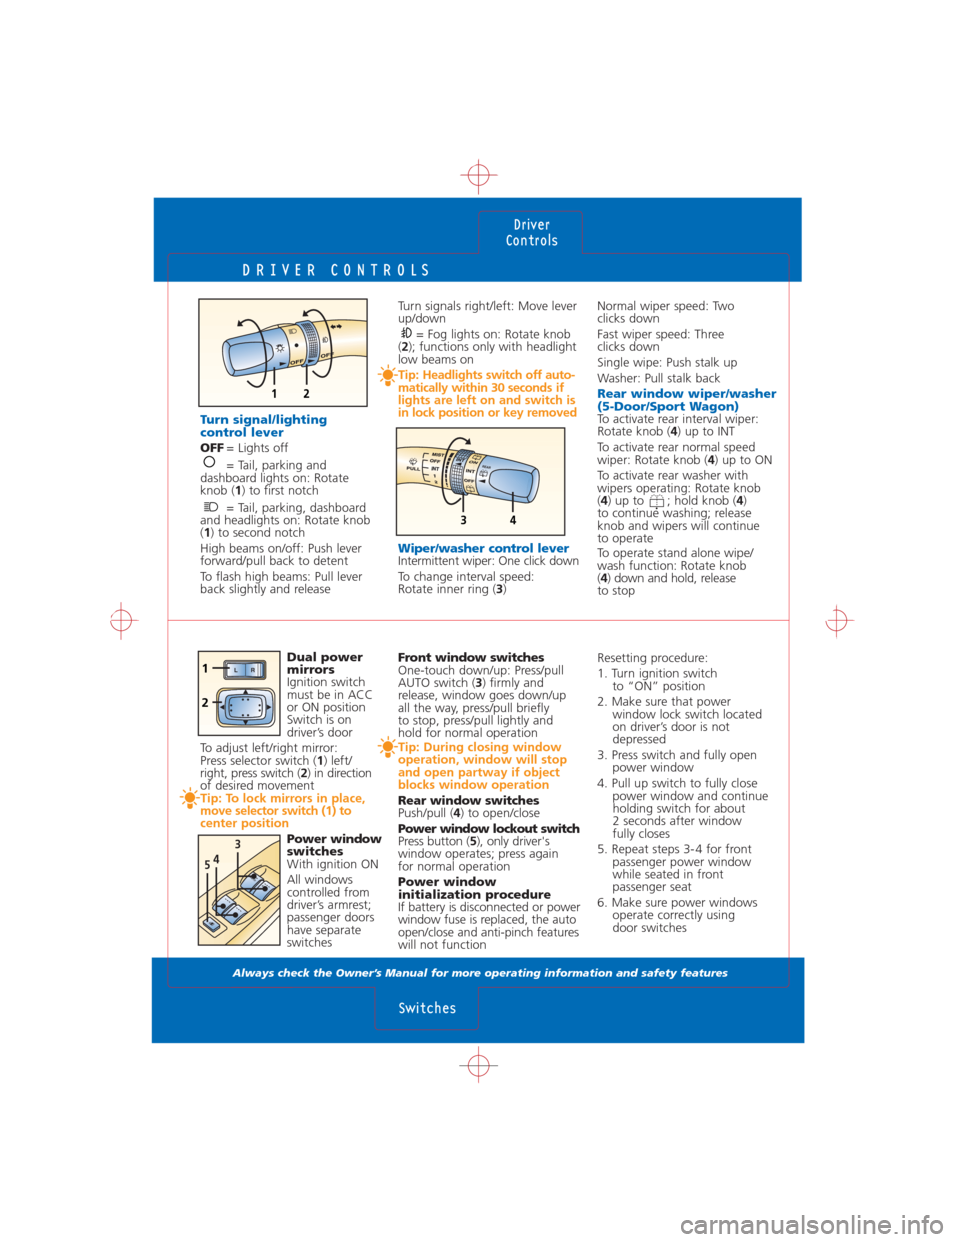
12
Turn signals right/left: Move lever
up/down
= Fog lights on: Rotate knob
(2); functions only with headlight
low beams on
Tip: Headlights switch off auto-
matically within 30 seconds if
lights are left on and switch is
in lock position or key removed
Wiper/washer control lever
Intermittent wiper: One click down
To change interval speed:
Rotate inner ring (3)
Normal wiper speed: Two
clicks down
Fast wiper speed: Three
clicks down
Single wipe: Push stalk up
Washer: Pull stalk back
Rear window wiper/washer
(5-Door/Sport Wagon)
To activate rear interval wiper:
Rotate knob (4) up to INT
To activate rear normal speed
wiper: Rotate knob (4) up to ON
To activate rear washer with
wipers operating: Rotate knob
(4) up to ; hold knob (4)
to continue washing; release
knob and wipers will continue
to operate
To operate stand alone wipe/
wash function: Rotate knob
(4) down and hold, release
to stop
Front window switches
One-touch down/up: Press/pull
AUTO switch (3) firmly and
release, window goes down/up
all the way, press/pull briefly
to stop, press/pull lightly and
hold for normal operation
Tip: During closing window
operation, window will stop
and open partway if object
blocks window operation
Rear window switches
Push/pull (4) to open/close
Power window lockout switch
Press button (5), only driver's
window operates; press again
for normal operation
Power window
initialization procedure
If battery is disconnected or power
window fuse is replaced, the auto
open/close and anti-pinch features
will not functionResetting procedure:
1. Turn ignition switch
to “ON” position
2. Make sure that power
window lock switch located
on driver’s door is not
depressed
3. Press switch and fully open
power window
4. Pull up switch to fully close
power window and continue
holding switch for about
2 seconds after window
fully closes
5. Repeat steps 3- 4 for front
passenger power window
while seated in front
passenger seat
6. Make sure power windows
operate correctly using
door switches
Dual power
mirrors
Ignition switch
must be in ACC
or ON position
Switch is on
driver’s door
To adjust left/right mirror:
Press selector switch (1) left/
right, press switch (2) in direction
of desired movement
Tip: To lock mirrors in place,
move selector switch (1) to
center position
Power window
switches
With ignition ON
All windows
controlled from
driver’s armrest;
passenger doors
have separate
switches
Turn signal/lighting
control lever
OFF= Lights off
= Tail, parking and
dashboard lights on: Rotate
knob (1) to first notch
= Tail, parking, dashboard
and headlights on: Rotate knob
(1) to second notch
High beams on/off: Push lever
forward/pull back to detent
To flash high beams: Pull lever
back slightly and release
34
R
E
A
R
543
AU
TOA
U
TO
LR
2
1
Page 12 of 12

UNDER HOOD
Always check the Owner’s Manual for more operating information and safety features
Under Hood
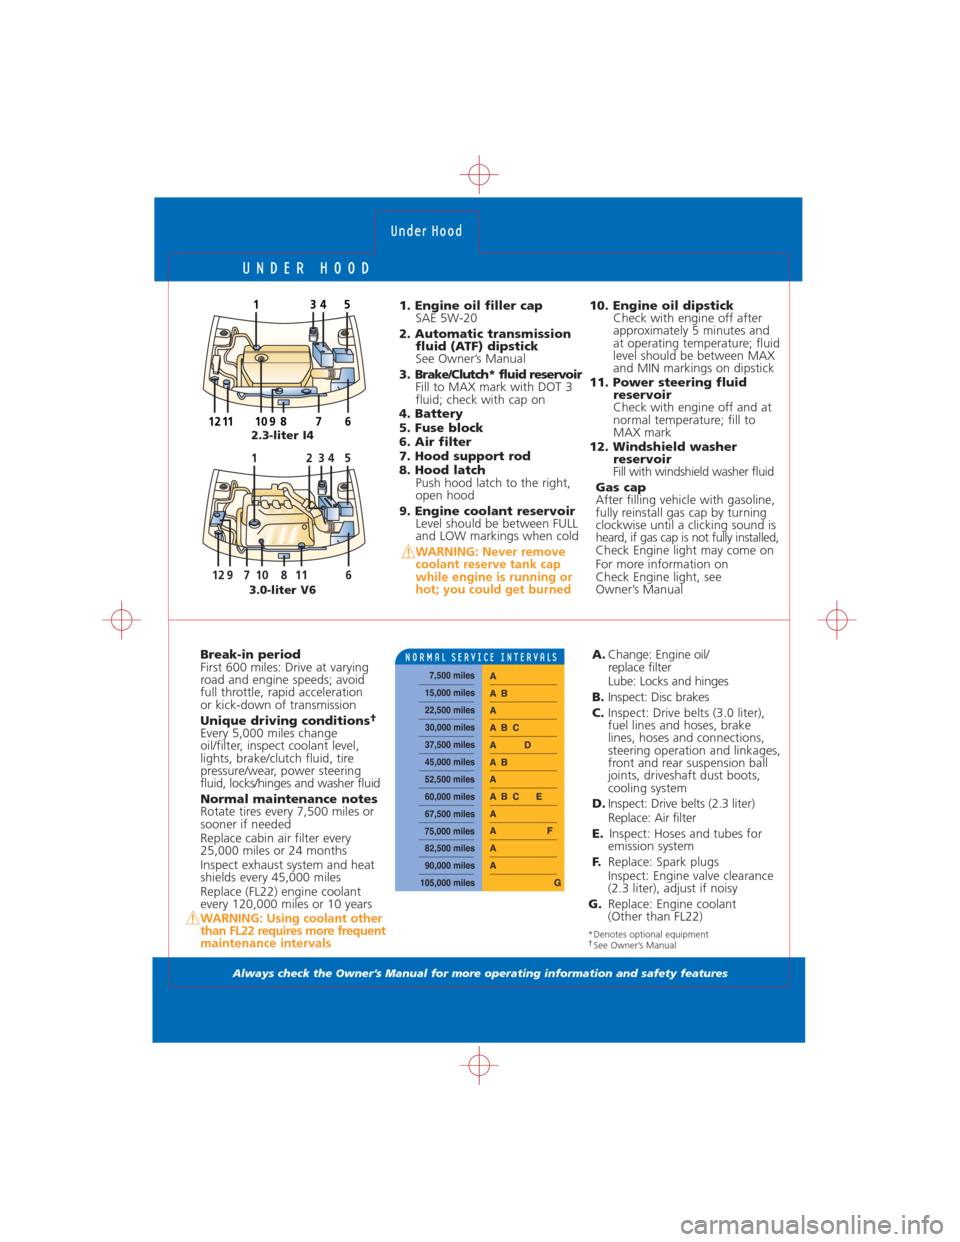
1. Engine oil filler cap
SAE 5W-20
2. Automatic transmission
fluid (ATF) dipstick
See Owner’s Manual
3 . Brake/Clutch* fluid reservoir
Fill to MAX mark with DOT 3
fluid; check with cap on
4. Battery
5. Fuse block
6. Air filter
7. Hood support rod
8. Hood latch
Push hood latch to the right,
open hood
9. Engine coolant reservoir
Level should be between FULL
and LOW markings when cold
WARNING: Never remove
coolant reserve tank cap
while engine is running or
hot; you could get burned
10. Engine oil dipstick
Check with engine off after
approximately 5 minutes and
at operating temperature; fluid
level should be between MAX
and MIN markings on dipstick
11. Power steering fluid
reservoir
Check with engine off and at
normal temperature; fill to
MAX mark
12. Windshield washer
reservoir
Fill with windshield washer fluid
Gas cap
After filling vehicle with gasoline,
fully reinstall gas cap by turning
clockwise until a clicking sound is
heard, if gas cap is not fully installed,
Check Engine light may come on
For more information on
Check Engine light, see
Owner’s Manual
Break-in period
First 600 miles: Drive at varying
road and engine speeds; avoid
full throttle, rapid acceleration
or kick-down of transmission
Unique driving conditions
†Every 5,000 miles change
oil/filter, inspect coolant level,
lights, brake/clutch fluid, tire
pressure/wear, power steering
fluid, locks/hinges and washer fluid
Normal maintenance notes
Rotate tires every 7,500 miles or
sooner if needed
Replace cabin air filter every
25,000 miles or 24 months
Inspect exhaust system and heat
shields every 45,000 miles
Replace (FL22) engine coolant
every 120,000 miles or 10 years
WARNING: Using coolant other
than FL22 requires more frequent
maintenance intervals
A.Change: Engine oil/
replace filter
Lube: Locks and hinges
B.Inspect: Disc brakes
C.Inspect: Drive belts (3.0 liter),
fuel lines and hoses, brake
lines, hoses and connections,
steering operation and linkages,
front and rear suspension ball
joints, driveshaft dust boots,
cooling system
D.Inspect: Drive belts (2.3 liter)
Replace: Air filter
E.Inspect: Hoses and tubes for
emission system
F. Replace: Spark plugs
Inspect: Engine valve clearance
(2.3 liter), adjust if noisy
G. Replace: Engine coolant
(Other than FL22)
3.0-liter V62.3-liter I4
*Denotes optional equipment†See Owner’s Manual
1197126
5143
810
101179126
51243
8
7,500 miles
15,000 miles
22,500 miles
30,000 miles
37,500 miles
45,000 miles
52,500 miles
60,000 miles
67,500 miles
75,000 miles
82,500 miles
90,000 miles
A A A
F A A
B C E A A
B A D A
BC A
A B A
105,000 miles G