headlights MAZDA MODEL 6 HATCHBACK 2007 Quick Tips (in English)
[x] Cancel search | Manufacturer: MAZDA, Model Year: 2007, Model line: MODEL 6 HATCHBACK, Model: MAZDA MODEL 6 HATCHBACK 2007Pages: 12, PDF Size: 1.27 MB
Page 3 of 12

GETTING STARTED
Always check the Owner’s Manual for more operating information and safety features
Getting
Started
Getting
Started
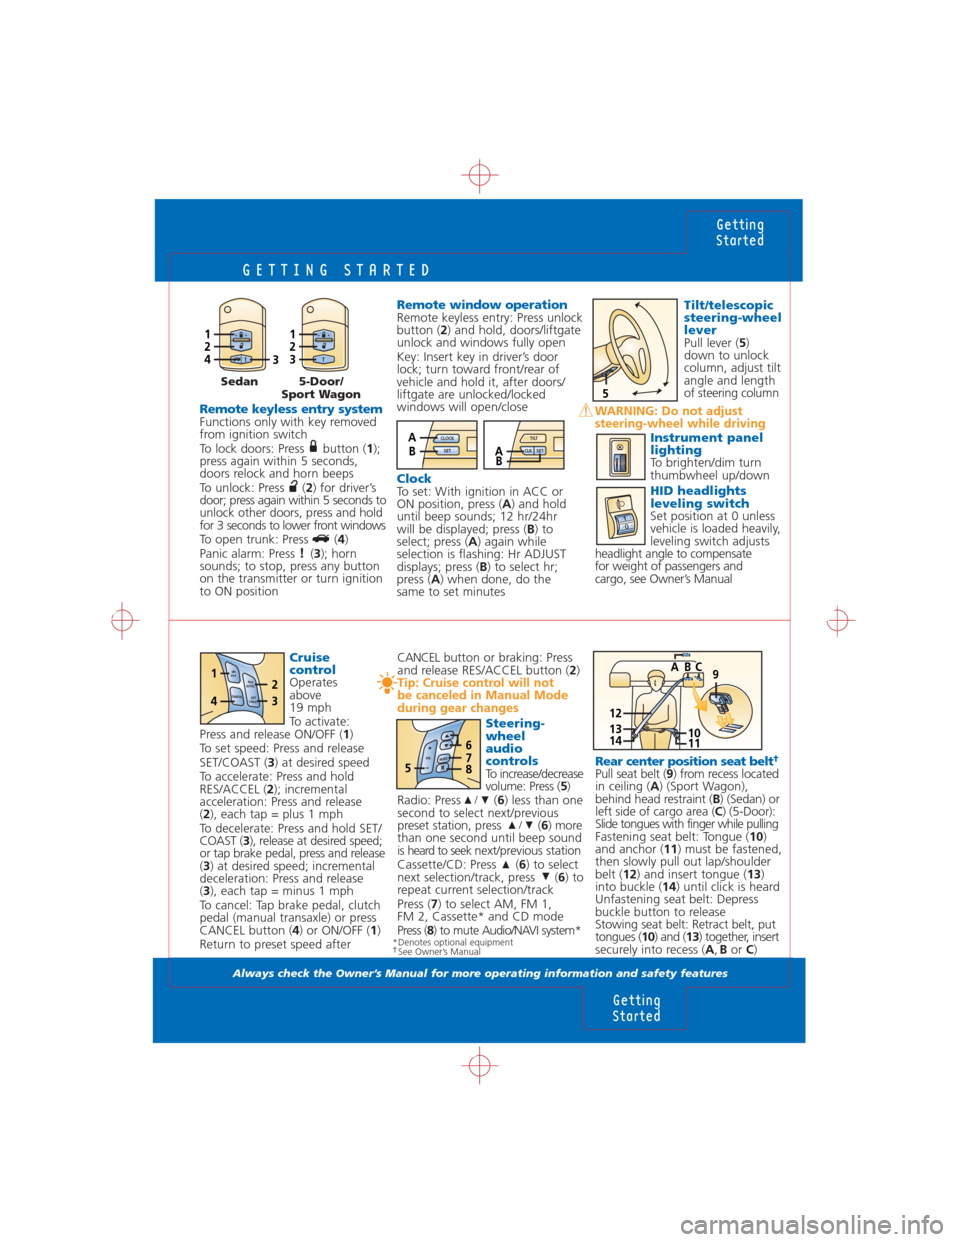
Cruise
control
Operates
above
19 mph
To activate:
Press and release ON/OFF (1)
To set speed: Press and release
SET/COAST (3) at desired speed
To accelerate: Press and hold
RES/ACCEL (2); incremental
acceleration: Press and release
(2), each tap = plus 1 mph
To decelerate: Press and hold SET/
COAST (3), release at desired speed;
or tap brake pedal, press and release
(3) at desired speed; incremental
deceleration: Press and release
(3), each tap = minus 1 mph
To cancel: Tap brake pedal, clutch
pedal (manual transaxle) or press
CANCEL button (4) or ON/OFF (1)
Return to preset speed after
Remote keyless entry systemFunctions only with key removed
from ignition switch
To lock doors: Press button (1);
press again within 5 seconds,
doors relock and horn beeps
To unlock: Press (2) for driver’s
door; press again within 5 seconds to
unlock other doors, press and hold
for 3 seconds to lower front windows
To open trunk: Press (4)
Panic alarm: Press (3); horn
sounds; to stop, press any button
on the transmitter or turn ignition
to ON position
Tilt/telescopic
steering-wheel
lever
Pull lever (5)
down to unlock
column, adjust tilt
angle and length
of steering column
WARNING: Do not adjust
steering-wheel while driving
Instrument panel
lighting
To brighten/dim turn
thumbwheel up/down
HID headlights
leveling switch
Set position at 0 unless
vehicle is loaded heavily,
leveling switch adjusts
headlight angle to compensate
for weight of passengers and
cargo, see Owner’s Manual
Remote window operationRemote keyless entry: Press unlock
button (2) and hold, doors/liftgate
unlock and windows fully open
Key: Insert key in driver’s door
lock; turn toward front/rear of
vehicle and hold it, after doors/
liftgate are unlocked/locked
windows will open/close
ClockTo set: With ignition in ACC or
ON position, press (A) and hold
until beep sounds; 12 hr/24hr
will be displayed; press (B) to
select; press (A) again while
selection is flashing: Hr ADJUST
displays; press (B) to select hr;
press (A) when done, do the
same to set minutes
1243
123
5
10111413
9B AC
12
Sedan 5-Door/
Sport Wagon
10
Rear center position seat belt†
Pull seat belt (9) from recess located
in ceiling (A) (Sport Wagon),
behind head restraint (B) (Sedan) or
left side of cargo area (C) (5-Door):
Slide tongues with finger while pulling
Fastening seat belt: Tongue (10)
and anchor (11) must be fastened,
then slowly pull out lap/shoulder
belt (12) and insert tongue (13)
into buckle (14) until click is heard
Unfastening seat belt: Depress
buckle button to release
Stowing seat belt: Retract belt, put
tongues (10) and (13) together, insert
securely into recess (A,Bor C) CANCELbutton or braking: Press
and release RES/ACCEL button (2)
Tip: Cruise control will not
be canceled in Manual Mode
during gear changes
Steering-
wheel
audio
controls
To increase/decrease
volume: Press (5)
Radio: Press (6) less than one
second to select next/previous
preset station, press (6) more
than one second until beep sound
is heard to seek next/previous station
Cassette/CD: Press (6) to select
next selection/track, press (6) to
repeat current selection/track
Press (7) to select AM, FM 1,
FM 2, Cassette* and CD mode
Press (8) to mute Audio/NAVI system*
/
/
M
O
D
EV
O
L5
678
RES
ACCEL ON
OFF
CANCELSET
COAST43
12
*Denotes optional equipment†See Owner’s Manual
CLOCK
SETABTILT
SET CLKAB
Page 5 of 12

DRIVER CONTROLS
Always check the Owner’s Manual for more operating information and safety features
Driver
Controls
Switches
12
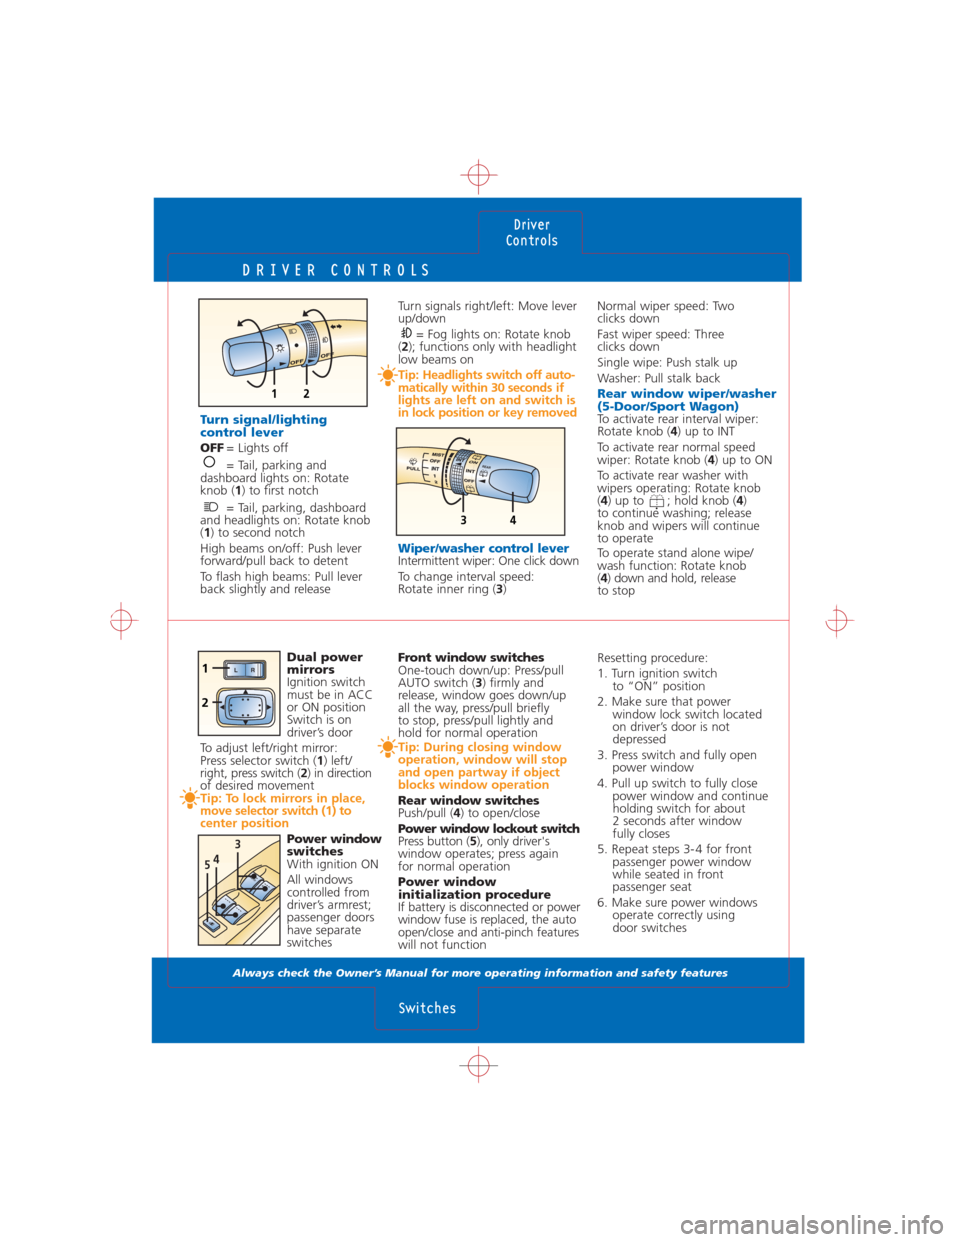
Turn signals right/left: Move lever
up/down
= Fog lights on: Rotate knob
(2); functions only with headlight
low beams on
Tip: Headlights switch off auto-
matically within 30 seconds if
lights are left on and switch is
in lock position or key removed
Wiper/washer control lever
Intermittent wiper: One click down
To change interval speed:
Rotate inner ring (3)
Normal wiper speed: Two
clicks down
Fast wiper speed: Three
clicks down
Single wipe: Push stalk up
Washer: Pull stalk back
Rear window wiper/washer
(5-Door/Sport Wagon)
To activate rear interval wiper:
Rotate knob (4) up to INT
To activate rear normal speed
wiper: Rotate knob (4) up to ON
To activate rear washer with
wipers operating: Rotate knob
(4) up to ; hold knob (4)
to continue washing; release
knob and wipers will continue
to operate
To operate stand alone wipe/
wash function: Rotate knob
(4) down and hold, release
to stop
Front window switches
One-touch down/up: Press/pull
AUTO switch (3) firmly and
release, window goes down/up
all the way, press/pull briefly
to stop, press/pull lightly and
hold for normal operation
Tip: During closing window
operation, window will stop
and open partway if object
blocks window operation
Rear window switches
Push/pull (4) to open/close
Power window lockout switch
Press button (5), only driver's
window operates; press again
for normal operation
Power window
initialization procedure
If battery is disconnected or power
window fuse is replaced, the auto
open/close and anti-pinch features
will not functionResetting procedure:
1. Turn ignition switch
to “ON” position
2. Make sure that power
window lock switch located
on driver’s door is not
depressed
3. Press switch and fully open
power window
4. Pull up switch to fully close
power window and continue
holding switch for about
2 seconds after window
fully closes
5. Repeat steps 3- 4 for front
passenger power window
while seated in front
passenger seat
6. Make sure power windows
operate correctly using
door switches
Dual power
mirrors
Ignition switch
must be in ACC
or ON position
Switch is on
driver’s door
To adjust left/right mirror:
Press selector switch (1) left/
right, press switch (2) in direction
of desired movement
Tip: To lock mirrors in place,
move selector switch (1) to
center position
Power window
switches
With ignition ON
All windows
controlled from
driver’s armrest;
passenger doors
have separate
switches
Turn signal/lighting
control lever
OFF= Lights off
= Tail, parking and
dashboard lights on: Rotate
knob (1) to first notch
= Tail, parking, dashboard
and headlights on: Rotate knob
(1) to second notch
High beams on/off: Push lever
forward/pull back to detent
To flash high beams: Pull lever
back slightly and release
34
R
E
A
R
543
AU
TOA
U
TO
LR
2
1
Page 10 of 12

HOMELINK®
Always check the Owner’s Manual for more operating information and safety features
HomeLink®
Interior
Lights
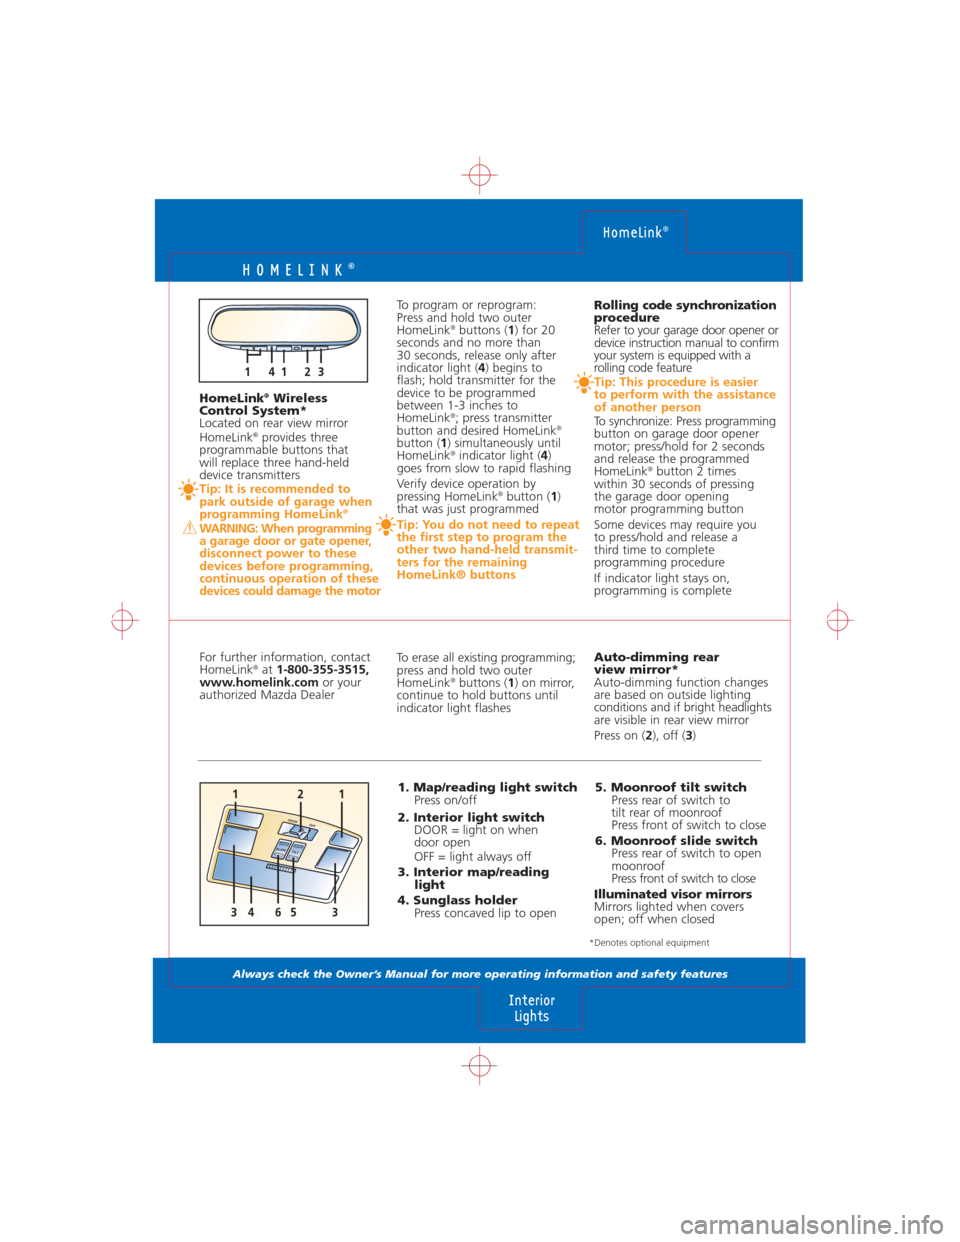
Auto-dimming rear
view mirror*
Auto-dimming function changes
are based on outside lighting
conditions and if bright headlights
are visible in rear view mirror
Press on (2), off (3)
5. Moonroof tilt switch
Press rear of switch to
tilt rear of moonroof
Press front of switch to close
6. Moonroof slide switch
Press rear of switch to open
moonroof
Press front of switch to close
Illuminated visor mirrors
Mirrors lighted when covers
open; off when closed Rolling code synchronization
procedure
Refer to your garage door opener or
device instruction manual to confirm
your system is equipped with a
rolling code feature
Tip: This procedure is easier
to perform with the assistance
of another person
To synchronize: Press programming
button on garage door opener
motor; press/hold for 2 seconds
and release the programmed
HomeLink
®button 2 times
within 30 seconds of pressing
the garage door opening
motor programming button
Some devices may require you
to press/hold and release a
third time to complete
programming procedure
If indicator light stays on,
programming is complete
To erase all existing programming;
press and hold two outer
HomeLink
®buttons (1) on mirror,
continue to hold buttons until
indicator light flashes
1. Map/reading light switch
Press on/off
2. Interior light switch
DOOR = light on when
door open
OFF = light always off
3. Interior map/reading
light
4. Sunglass holder
Press concaved lip to open
To program or reprogram:
Press and hold two outer
HomeLink
®buttons (1) for 20
seconds and no more than
30 seconds, release only after
indicator light (4) begins to
flash; hold transmitter for the
device to be programmed
between 1-3 inches to
HomeLink
®; press transmitter
button and desired HomeLink®
button (1) simultaneously until
HomeLink®indicator light (4)
goes from slow to rapid flashing
Verify device operation by
pressing HomeLink
®button (1)
that was just programmed
Tip: You do not need to repeat
the first step to program the
other two hand-held transmit-
ters for the remaining
HomeLink® buttons
For further information, contact
HomeLink
®at 1-800-355-3515,
www.homelink.comor your
authorized Mazda Dealer HomeLink
®Wireless
Control System*
Located on rear view mirror
HomeLink
®provides three
programmable buttons that
will replace three hand-held
device transmitters
Tip: It is recommended to
park outside of garage when
programming HomeLink
®
WARNING: When programming
a garage door or gate opener,
disconnect power to these
devices before programming,
continuous operation of these
devices could damage the motor
*Denotes optional equipment
11423
T
I
L
TSL
ID
E
121
43356
OFFDOO
R