automatic transmission MAZDA MODEL B-SERIES 2002 (in English) User Guide
[x] Cancel search | Manufacturer: MAZDA, Model Year: 2002, Model line: MODEL B-SERIES, Model: MAZDA MODEL B-SERIES 2002Pages: 287, PDF Size: 2.47 MB
Page 166 of 287

4. Move the 4WD control to the
2WD position.
Shifting between 4X4 HIGH (4WD high) and 4X4 LOW (4WD low)
1. Bring the vehicle to a stop.
2. Depress the brake.
3. Place the gearshift in N (Neutral) (automatic transmission) or
depress the clutch (manual transmission).
4. Move the 4WD control to the
4X4 HIGH or 4X4 LOW position.
Driving off-road with 4WD
Your vehicle is specially equipped for driving on sand, snow, mud and
rough terrain and has operating characteristics that are somewhat
different from conventional vehicles, both on and off the road.
Maintain steering wheel control at all times, especially in rough terrain.
Since sudden changes in terrain can result in abrupt steering wheel
motion, make sure you grip the steering wheel from the outside. Do not
grip the spokes.
Drive cautiously to avoid vehicle damage from concealed objects such as
rocks and stumps.
4X4
HIGH
2WD4X4
LOW
2WD4X4
LOW4X4
HIGH
Driving
166
Page 168 of 287

Water intrusion into the transmission may damage the
transmission.
Replace rear axle lubricant any time the axle has been submerged in
water. The rear axle does not normally require a lubricant change for the
life of the vehicle. Rear axle lubricant quantities are not to be checked or
changed unless a leak is suspected or repair is required.
Driving on hilly or sloping terrain
When driving on a hill, avoid driving crosswise or turning on steep
slopes. You could lose traction and slip sideways. Drive straight up,
straight down or avoid the hill completely. Know the conditions on the
other side of a hill before driving over the crest.
When climbing a steep hill, start in a lower gear rather than downshifting
to a lower gear from a higher gear once the ascent has started. This
reduces strain on the engine and the possibility of stalling.
When descending a steep hill, avoid sudden braking. Shift to a lower gear
when added engine braking is desired.
When speed control is on and you are driving uphill, your vehicle speed
may drop considerably, especially if you are carrying a heavy load.
If vehicle speed drops more than 16 km/h (10 mph), the speed control
will cancel automatically. Resume speed with accelerator pedal.
If speed control cancels after climbing the hill, reset speed by pressing
and holding the SET ACCEL button (to resume speeds over 50 km/h
[30 mph]).
Automatic transmissions may shift frequently while driving up steep
grades. Eliminate frequent shifting by shifting out of
(Overdrive) into
a lower gear.
Driving on snow and ice
A 4WD vehicle has advantages over 2WD vehicles in snow and ice but
can skid like any other vehicle.
Avoid sudden applications of power and quick changes of direction on
snow and ice. Apply the accelerator slowly and steadily when starting
from a full stop.
When braking, apply the brakes as you normally would. In order to allow
the anti-lock brake system (ABS) to operate properly, keep steady
pressure on the brake pedal.
Driving
168
Page 173 of 287

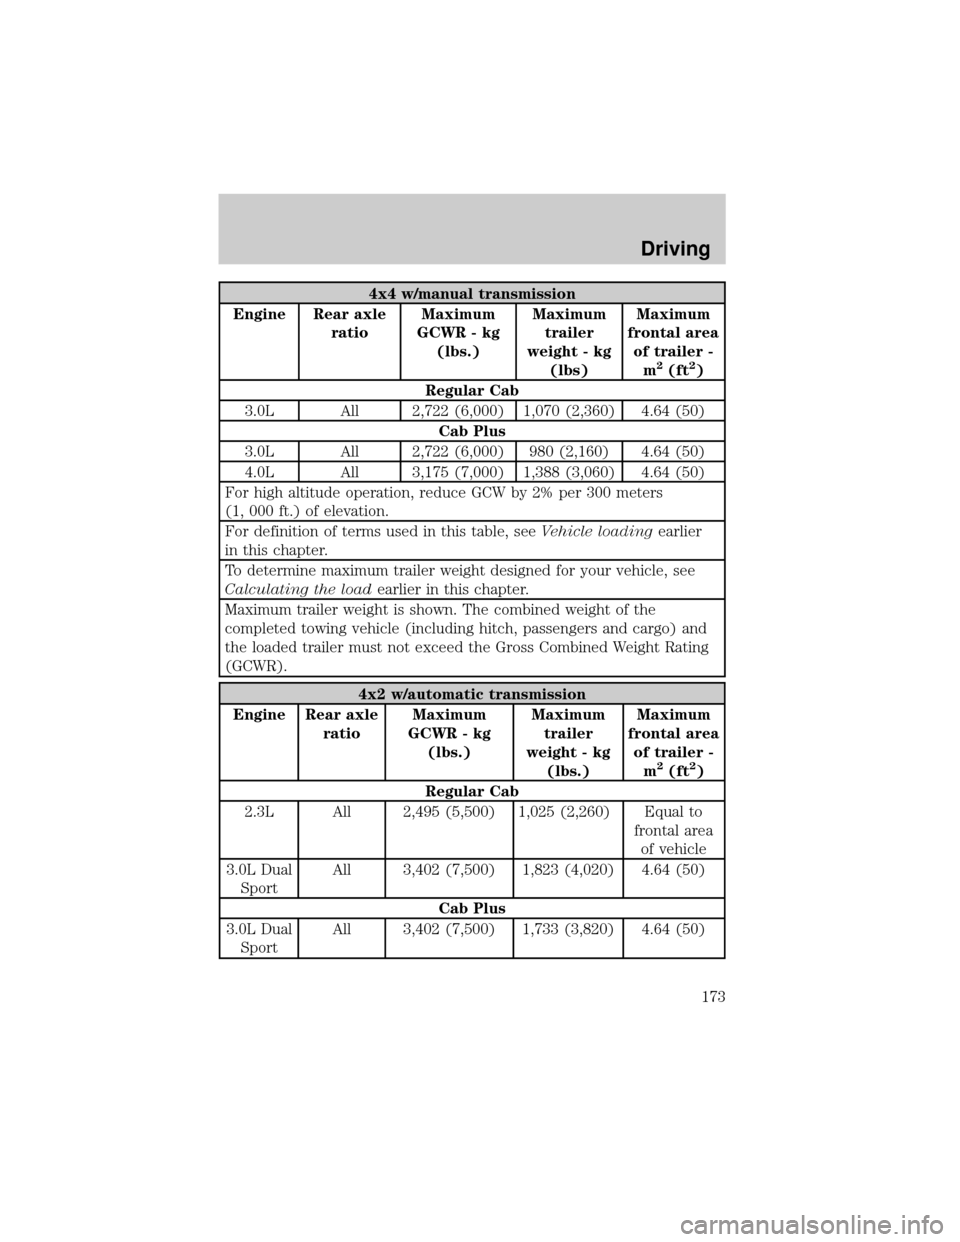
4x4 w/manual transmission
Engine Rear axle
ratioMaximum
GCWR - kg
(lbs.)Maximum
trailer
weight - kg
(lbs)Maximum
frontal area
of trailer -
m
2(ft2)
Regular Cab
3.0L All 2,722 (6,000) 1,070 (2,360) 4.64 (50)
Cab Plus
3.0L All 2,722 (6,000) 980 (2,160) 4.64 (50)
4.0L All 3,175 (7,000) 1,388 (3,060) 4.64 (50)
For high altitude operation, reduce GCW by 2% per 300 meters
(1, 000 ft.) of elevation.
For definition of terms used in this table, seeVehicle loadingearlier
in this chapter.
To determine maximum trailer weight designed for your vehicle, see
Calculating the loadearlier in this chapter.
Maximum trailer weight is shown. The combined weight of the
completed towing vehicle (including hitch, passengers and cargo) and
the loaded trailer must not exceed the Gross Combined Weight Rating
(GCWR).
4x2 w/automatic transmission
Engine Rear axle
ratioMaximum
GCWR - kg
(lbs.)Maximum
trailer
weight - kg
(lbs.)Maximum
frontal area
of trailer -
m
2(ft2)
Regular Cab
2.3L All 2,495 (5,500) 1,025 (2,260) Equal to
frontal area
of vehicle
3.0L Dual
SportAll 3,402 (7,500) 1,823 (4,020) 4.64 (50)
Cab Plus
3.0L Dual
SportAll 3,402 (7,500) 1,733 (3,820) 4.64 (50)
Driving
173
Page 174 of 287

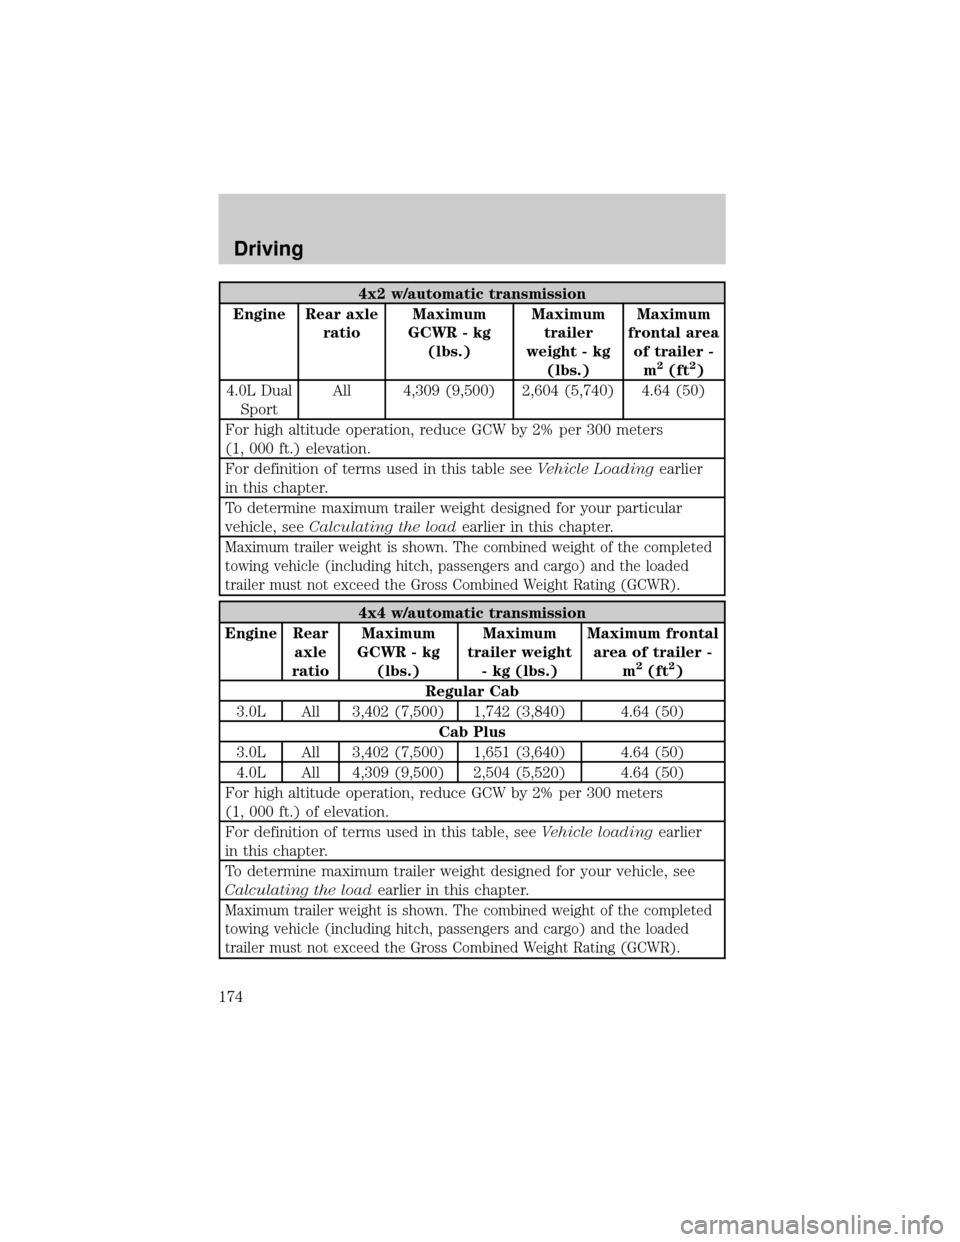
4x2 w/automatic transmission
Engine Rear axle
ratioMaximum
GCWR - kg
(lbs.)Maximum
trailer
weight - kg
(lbs.)Maximum
frontal area
of trailer -
m
2(ft2)
4.0L Dual
SportAll 4,309 (9,500) 2,604 (5,740) 4.64 (50)
For high altitude operation, reduce GCW by 2% per 300 meters
(1, 000 ft.) elevation.
For definition of terms used in this table seeVehicle Loadingearlier
in this chapter.
To determine maximum trailer weight designed for your particular
vehicle, seeCalculating the loadearlier in this chapter.
Maximum trailer weight is shown. The combined weight of the completed
towing vehicle (including hitch, passengers and cargo) and the loaded
trailer must not exceed the Gross Combined Weight Rating (GCWR).
4x4 w/automatic transmission
Engine Rear
axle
ratioMaximum
GCWR - kg
(lbs.)Maximum
trailer weight
- kg (lbs.)Maximum frontal
area of trailer -
m
2(ft2)
Regular Cab
3.0L All 3,402 (7,500) 1,742 (3,840) 4.64 (50)
Cab Plus
3.0L All 3,402 (7,500) 1,651 (3,640) 4.64 (50)
4.0L All 4,309 (9,500) 2,504 (5,520) 4.64 (50)
For high altitude operation, reduce GCW by 2% per 300 meters
(1, 000 ft.) of elevation.
For definition of terms used in this table, seeVehicle loadingearlier
in this chapter.
To determine maximum trailer weight designed for your vehicle, see
Calculating the loadearlier in this chapter.
Maximum trailer weight is shown. The combined weight of the completed
towing vehicle (including hitch, passengers and cargo) and the loaded
trailer must not exceed the Gross Combined Weight Rating (GCWR).
Driving
174
Page 175 of 287

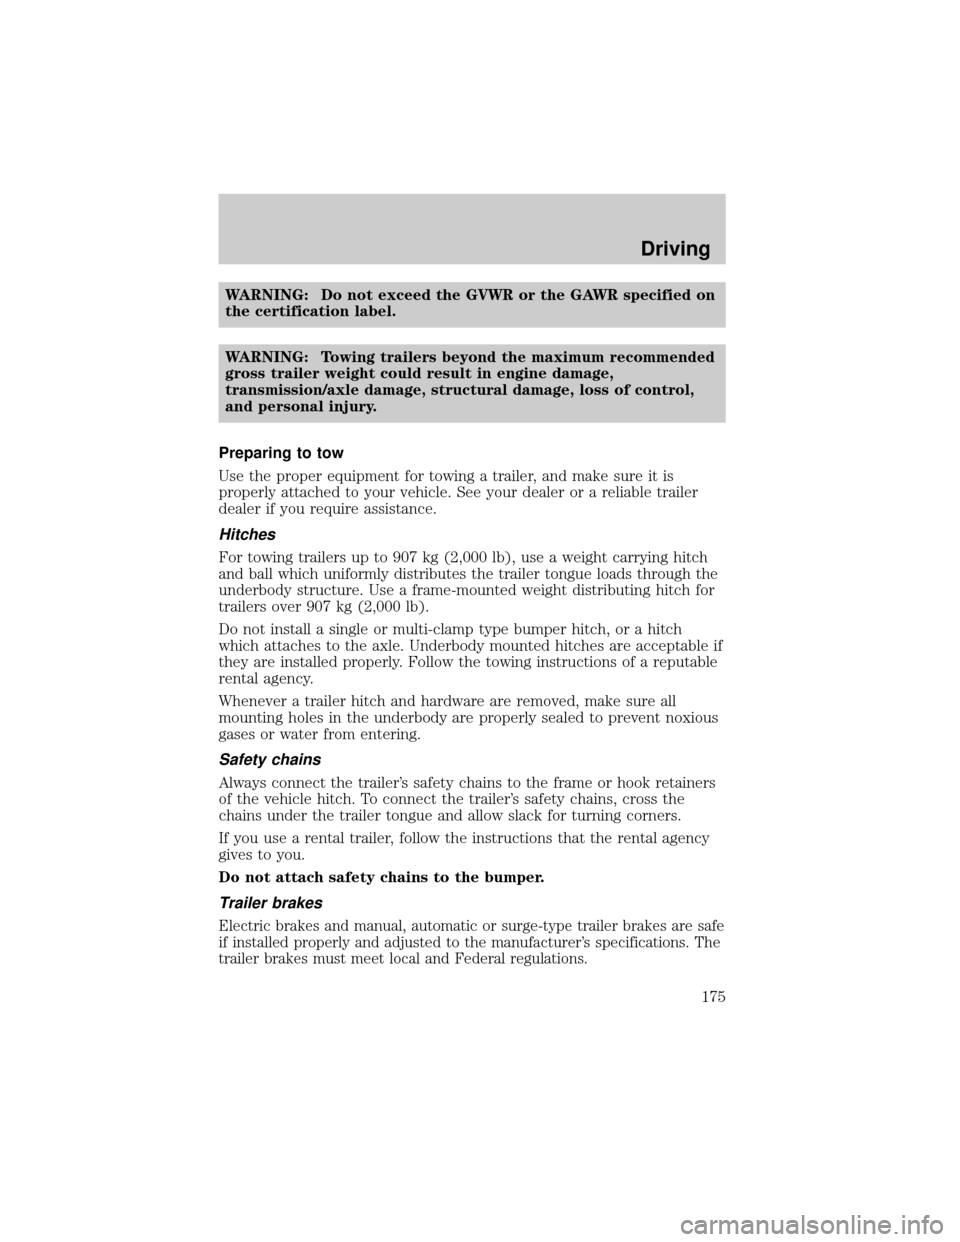
WARNING: Do not exceed the GVWR or the GAWR specified on
the certification label.
WARNING: Towing trailers beyond the maximum recommended
gross trailer weight could result in engine damage,
transmission/axle damage, structural damage, loss of control,
and personal injury.
Preparing to tow
Use the proper equipment for towing a trailer, and make sure it is
properly attached to your vehicle. See your dealer or a reliable trailer
dealer if you require assistance.
Hitches
For towing trailers up to 907 kg (2,000 lb), use a weight carrying hitch
and ball which uniformly distributes the trailer tongue loads through the
underbody structure. Use a frame-mounted weight distributing hitch for
trailers over 907 kg (2,000 lb).
Do not install a single or multi-clamp type bumper hitch, or a hitch
which attaches to the axle. Underbody mounted hitches are acceptable if
they are installed properly. Follow the towing instructions of a reputable
rental agency.
Whenever a trailer hitch and hardware are removed, make sure all
mounting holes in the underbody are properly sealed to prevent noxious
gases or water from entering.
Safety chains
Always connect the trailer's safety chains to the frame or hook retainers
of the vehicle hitch. To connect the trailer's safety chains, cross the
chains under the trailer tongue and allow slack for turning corners.
If you use a rental trailer, follow the instructions that the rental agency
gives to you.
Do not attach safety chains to the bumper.
Trailer brakes
Electric brakes and manual, automatic or surge-type trailer brakes are safe
if installed properly and adjusted to the manufacturer's specifications. The
trailer brakes must meet local and Federal regulations.
Driving
175
Page 177 of 287

Refer to the following chart for information regarding the
factory-equipped trailer tow connector:
Trailer tow connector
Color Function Comment
1. Dark Green Trailer right-hand
turn signalCircuit activated when brake
pedal is depressed or when
ignition is on and right-hand
turn signal is applied.
2. Yellow Trailer left-hand turn
signalCircuit activated when brake
pedal is depressed or when
ignition is on and left-hand
turn signal is applied.
3. Tan/White Tail lamp Relay controlled circuit
activated when the park
lamps/headlamps are on.
4. White Ground Matching vehicle circuit
returns to battery's negative
ground.
Driving while you tow
When towing a trailer:
²Ensure that you turn off your speed control. The speed control may
shut off automatically when you are towing on long, steep grades.
²Consult your local motor vehicle speed regulations for towing a trailer.
²Use a lower gear when towing up or down steep hills. This will
eliminate excessive downshifting and upshifting for optimum fuel
economy and transmission cooling.
²Anticipate stops and brake gradually.
Exceeding the GCWR rating may cause internal transmission
damage and void your warranty coverage.
Servicing after towing
If you tow a trailer for long distances, your vehicle will require more
frequent service intervals. Refer to your service maintenance section for
more information.
Driving
177
Page 178 of 287

Trailer towing tips
²Practice turning, stopping and backing up before starting on a trip to
get the feel of the vehicle trailer combination. When turning, make
wider turns so the trailer wheels will clear curbs and other obstacles.
²Allow more distance for stopping with a trailer attached.
²The trailer tongue weight should be no more than 10±15% of the
loaded trailer weight.
²After you have traveled 80 km (50 miles), thoroughly check your
hitch, electrical connections and trailer wheel lug nuts.
²When stopped in traffic for long periods of time in hot weather, place
the gearshift in P (Park) (automatic transmissions) or N (Neutral)
(manual transmissions). This aids engine cooling and air conditioner
efficiency.
²Vehicles with trailers should not be parked on a grade. If you must
park on a grade, place wheel chocks under the trailer's wheels.
Launching or retrieving a boat
When backing down a ramp during boat launching or retrieval:
²do not allow the static water level to rise above the bottom edge of
the rear bumper.
²do not allow waves to break higher than 15 cm (6 inches) above the
bottom edge of the rear bumper.
Exceeding these limits may allow water to enter critical vehicle
components, adversely affecting driveability, emissions, reliability and
causing internal transmission damage.
Replace the rear axle lubricant any time the axle has been submerged in
water. Rear axle lubricant quantities are not to be checked or changed
unless a leak is suspected or repair required.
Disconnect the wiring to the trailer before backing the trailer into the
water. Reconnect the wiring to the trailer after the trailer is removed
from the water.
RECREATIONAL TOWING
Follow these guidelines if you have a need for recreational towing. An
example of recreational towing would be towing your vehicle behind a
motorhome. These guidelines are designed to ensure that your
transmission is not damaged.
Driving
178
Page 179 of 287

4X2 AND 4X4 VEHICLES EQUIPPED WITH MANUAL
TRANSMISSIONS
Before you have your vehicle towed:
²Release the parking brake.
²Move the gearshift to N (Neutral).
²Turn the key in the ignition to the OFF/UNLOCKED position.
²The maximum recommended speed is 88 km/h (55 mph).
²The maximum recommended distance is unlimited.
In addition, it is recommended that you follow the instructions
provided by the after market manufacturer of the towing
apparatus if one has been installed.
4X2 AND 4X4 VEHICLES EQUIPPED WITH AUTOMATIC
TRANSMISSIONS
4x2 vehicles with automatic transmissions or 4x4 vehicles with manual
transfer cases and automatic transmissions, follow these guidelines for
recreational towing:
²Release the parking brake.
²Turn the key in the ignition to the OFF/UNLOCKED position.
²Place the transmission in N (Neutral).
²Do not exceed a distance of 80 km (50 miles).
²Do not exceed 56 km/h (35 mph) vehicle speed.
If a distance of 80 km (50 miles) or a speed of 56 km/h (35 mph) must
be exceeded, you must disconnect the driveshaft. Mazda recommends
the driveshaft be removed/installed only by a qualified technician. See
your local dealer for driveshaft removal/installation.
Improper removal/installation of the driveshaft can cause
transmission fluid loss, damage to the driveshaft and internal
transmission components.
CAMPER BODIES
Your pickup is not recommended for slide±in camper bodies.
Driving
179
Page 198 of 287

full size tire should be stowed and tied down in the pickup box bed
until it can be repaired.
5. If removed, install the spare tire carrier lock on the access hole
above the bumper.
Tire change procedure
WARNING:
When one of the front wheels is off the ground, the
transmission alone will not prevent the vehicle from moving or
slipping off the jack, even if the vehicle is in P (Park)
(automatic transmission) or R (Reverse) (manual transmission).
WARNING: To prevent the vehicle from moving when you
change a tire, be sure the parking brake is set, then block (in
both directions) the wheel that is diagonally opposite (other
side and end of the vehicle) to the tire being changed.
WARNING: If the vehicle slips off the jack, you or someone
else could be seriously injured.
1. Park on a level surface, activate
hazard flashers and place
gearshift lever in P (Park)
(automatic transmission) or 1
(First) (manual transmission).
2. Set the parking brake and turn
engine OFF.
3. Block the diagonally opposite
wheel.
Roadside Emergencies
198
Page 201 of 287

JUMP STARTING YOUR VEHICLE
WARNING: The gases around the battery can explode if
exposed to flames, sparks, or lit cigarettes. An explosion could
result in injury or vehicle damage.
WARNING: Batteries contain sulfuric acid which can burn skin,
eyes, and clothing, if contacted.
Do not attempt to push-start your vehicle. Automatic
transmissions do not have push-start capability; also, the
catalytic conveter may become damaged.
Preparing your vehicle
When the battery is disconnected or a new battery is installed, the
transmission must relearn its adaptive strategy. As a result of this, the
transmission may shift firmly. This operation is considered normal and
will not affect function or durability of the transmission. Over time, the
adaptive learning process will fully update transmission operation to its
optimum shift feel.
1.Use only a 12±volt supply to start your vehicle.
2. Do not disconnect the battery of the disabled vehicle as this could
damage the vehicle's electrical system.
3. Park the booster vehicle close to the hood of the disabled vehicle
making sure the two vehiclesdo nottouch. Set the parking brake on
both vehicles and stay clear of the engine cooling fan and other
moving parts.
4. Check all battery terminals and remove any excessive corrosion
before you attach the battery cables. Ensure that vent caps are tight
and level.
5. Turn the heater fan on in both vehicles to protect any electrical
surges. Turn all other accessories off.
Roadside Emergencies
201