clock MAZDA MODEL B-SERIES 2002 (in English) User Guide
[x] Cancel search | Manufacturer: MAZDA, Model Year: 2002, Model line: MODEL B-SERIES, Model: MAZDA MODEL B-SERIES 2002Pages: 287, PDF Size: 2.47 MB
Page 81 of 287

Replacing headlamp bulbs
To remove the headlamp bulb:
1. Make sure headlamp switch is in
OFF position, then open the
hood.
2. At the back of the headlamp,
pry up the two retainer pins to
release the headlamp assembly
from the vehicle and pull
headlamp forward.
3. Remove the bulb retaining ring
by rotating it counterclockwise
(when viewed from the rear) to
free it from the bulb socket, and
slide the ring off the plastic
base. Keep the ring to retain the
new bulb.
4. Without turning, remove the old
bulb by gently pulling it straight
back out of the lamp assembly.
To install the new bulb:
Handle a halogen headlamp bulb carefully and keep out of
children's reach. Grasp the bulb only by its plastic base and do
not touch the glass. The oil from your hands could cause the bulb
to break the next time the headlamps are operated.
NOTE: If the bulb is accidentally touched, it should be cleaned with
rubbing alcohol before being used.
1. With the flat side of the bulb's plastic base facing upward, insert the
glass end of the bulb into the lamp assembly. You may need to turn
the bulb left or right to align the grooves in the plastic base with the
tabs in the lamp assembly. When the grooves are aligned, push the
bulb into the lamp assembly until the plastic base contacts the rear
of the lamp assembly.
Lights
81
Page 82 of 287

2. Install the bulb retaining ring over the plastic base until it contacts
the rear of the socket by rotating clockwise until you feel a ªstop.º
3. Install the electrical connector into the plastic base until it snaps,
locking it into position.
4. Install the headlamp on vehicle, push rearward and secure with two
retainer pins.
5. Turn the headlamps on and make sure they work properly. If the
headlamp was correctly aligned before you changed the bulb, you
should not need to align it again.
Replacing front side marker bulbs
1. Open the hood.
2. At the back of the headlamp,
pry up the two retainer pins to
release the headlamp assembly
from the vehicle and pull
headlamp forward.
3. Remove screw(s) from lamp
assembly.
4. Disengage lamp assembly (it has
a snap fit).
Lights
82
Page 83 of 287

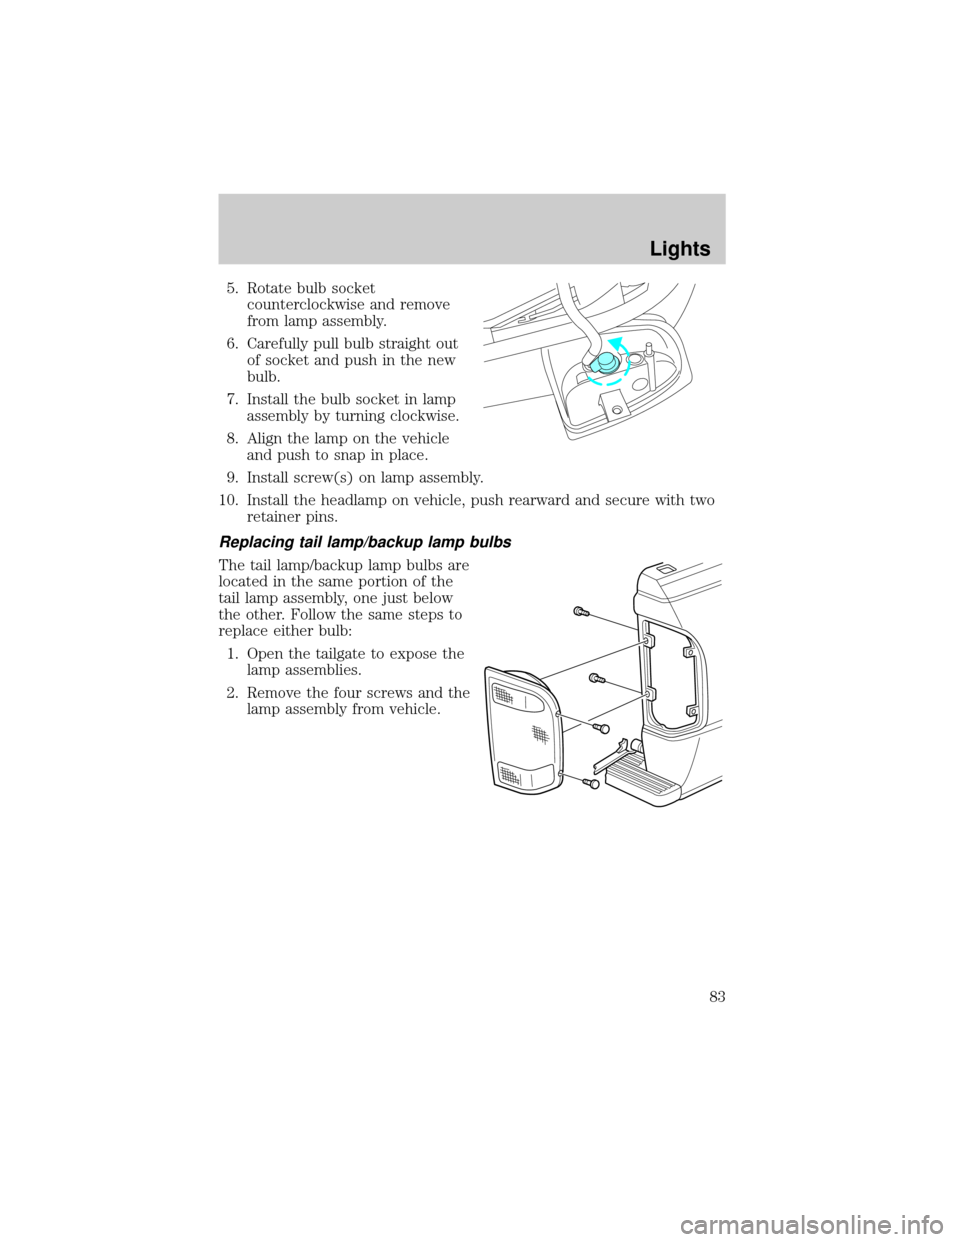
5. Rotate bulb socket
counterclockwise and remove
from lamp assembly.
6. Carefully pull bulb straight out
of socket and push in the new
bulb.
7. Install the bulb socket in lamp
assembly by turning clockwise.
8. Align the lamp on the vehicle
and push to snap in place.
9. Install screw(s) on lamp assembly.
10. Install the headlamp on vehicle, push rearward and secure with two
retainer pins.
Replacing tail lamp/backup lamp bulbs
The tail lamp/backup lamp bulbs are
located in the same portion of the
tail lamp assembly, one just below
the other. Follow the same steps to
replace either bulb:
1. Open the tailgate to expose the
lamp assemblies.
2. Remove the four screws and the
lamp assembly from vehicle.
Lights
83
Page 84 of 287

3. Rotate bulb socket
counterclockwise turn and
remove from lamp assembly.
4. Carefully pull the bulb straight
out of the socket and push in
the new bulb.
5. Install the bulb socket in lamp
assembly by turning clockwise.
6. Install the lamp assembly and
secure with four screws.
Replacing fog lamp bulbs
1. Remove the bulb socket from
the fog lamp by turning
counterclockwise.
2. Disconnect the electrical
connector from the fog lamp
bulb.
3. Connect the electrical connector to the new fog lamp bulb.
4. Install the bulb socket in the fog lamp turning clockwise.
Replacing high-mount brake lamp and cargo lamp bulbs
The replacement of the high-mount brake lamp bulb and cargo lamp bulb
is basically the same. This procedure covers the high-mount brake lamp
bulb.
Lights
84
Page 85 of 287

To remove the brake lamp assembly:
1. Remove the two screws and
lamp assembly from vehicle.
2. Remove the bulb socket from
lamp assembly by rotating it
counterclockwise.
3. Carefully pull bulb straight out
of socket and push in the new
bulb.
To install the brake lamp assembly:
1. Install the bulb socket into the
lamp assembly by rotating
clockwise.
2. Install the lamp assembly on the vehicle and secure with two screws.
Replacing license plate lamp bulbs
The license plate bulbs are located
behind the rear bumper. To change
the license plate lamp bulbs:
1. Reach behind the rear bumper
to locate the bulb socket.
2. Twist the socket
counterclockwise and remove.
3. Pull out the old bulb from
socket and push in the new
bulb.
4. Install the bulb socket in lamp assembly by turning it clockwise.
Lights
85
Page 100 of 287

4. Evenly push down on the
extender and push the round
knobs in on each side locking it
in place.
Green markings on the shaft
indicate the locked position. The
locking clip screws below the middle
bar can be tightened
counterclockwise for extra security.
To stow the bed extender, follow
steps one through four in reverse
order.
The bed extender may be used to
secure a load of up to 46 kg
(100 lbs.) on the tailgate.
The bed extender should always
be kept in the stowed position
with the tailgate closed when
not in use.
Driver Controls
100
Page 112 of 287

Pull lever up to adjust seatback.
Using the manual lumbar support (if equipped)
Turn the lumbar support control
clockwise to increase firmness.
Turn the lumbar support control
counterclockwise to increase
softness.
REAR SEATS
Center facing jump seat (2 door SuperCab) (if equipped)
To open, pull inboard and down on the seat handle.
To stow the seat, pull seat bottom back to the fully upright position.
WARNING: Do not install a child seat in a center facing jump
seat.
Seating and Safety Restraints
112
Page 197 of 287

2. If equipped, unlock and remove
the spare tire carrier lock from
the rear access hole located just
above the rear bumper and
below the tailgate.
3. Insert the straight end of the
jack handle into the rear access
hole located just above the rear
bumper and below the tailgate.
Forward motion will stop and
resistance to turning will be felt
when properly engaged.
4. Turn the handle
counterclockwise until tire is
lowered to the ground and the cable is slightly slack.
5. Remove the retainer from the spare tire.
Stowing the spare tire
1. Lay the tire on the ground with the valve stem facing up.
2. Install the retainer through the
wheel center and slide the
wheel under the vehicle.
3. Turn the spare handle clockwise
until the tire is raised to its
original position underneath the
vehicle. The spare handle
ratchets when the tire is raised
to the stowed position. It will
not allow you to overtighten.
4. If your vehicle is equipped with P265/75 R15 AT tires, do not stow a
flat or inflated full size spare tire in the spare tire carrier. The flat
Roadside Emergencies
197
Page 199 of 287

4. Insert tapered end of the lug
wrench behind hub caps and
twist them off.
5. Loosen each wheel lug nut
one-half turn counterclockwise
but do not remove them until
the wheel is raised off the
ground.
6. Position the jack according to
the following guides and turn
the jack handle clockwise until the tire is a maximum of 25 mm (1
inch) off the ground.
²Front
²Rear
Roadside Emergencies
199
Page 200 of 287

WARNING: To lessen the risk
of personal injury, do not put
any part of your body under
the vehicle while changing a
tire. Do not start the engine
when your vehicle is on the
jack. The jack is only meant
for changing the tire.
Never use the differential as a jacking point. It is too easy for the
vehicle to tilt or fall and you can be injured.
7. Remove the wheel lug nuts with the lug wrench.
8. Replace the flat tire with the spare tire, making sure the valve stem
is facing outward. Reinstall the lug nuts until the wheel is snug
against the hub. Do not fully tighten the lug nuts until the wheel has
been lowered.
9. Lower the wheel by turning the jack handle counterclockwise.
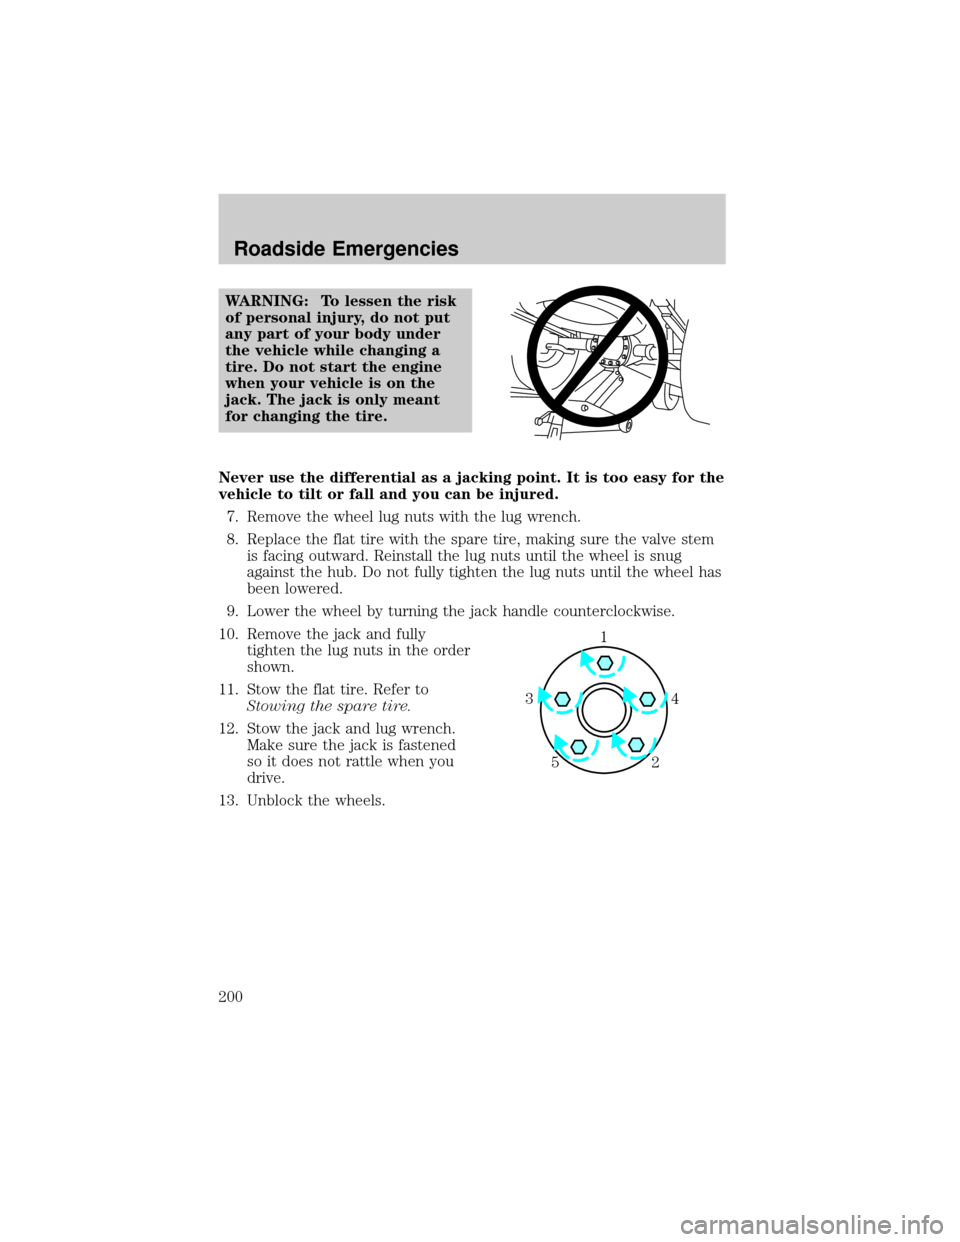
10. Remove the jack and fully
tighten the lug nuts in the order
shown.
11. Stow the flat tire. Refer to
Stowing the spare tire.
12. Stow the jack and lug wrench.
Make sure the jack is fastened
so it does not rattle when you
drive.
13. Unblock the wheels.
1
4 3
2 5
Roadside Emergencies
200