automatic transmission MAZDA MODEL B-SERIES 2003 (in English) Owner's Manual
[x] Cancel search | Manufacturer: MAZDA, Model Year: 2003, Model line: MODEL B-SERIES, Model: MAZDA MODEL B-SERIES 2003Pages: 245, PDF Size: 2.33 MB
Page 189 of 245

While operating your vehicle
²Note any changes in the sound of the exhaust or any smell or exhaust
fumes in the vehicle.
²Check for vibrations in the steering wheel. Notice any increased
steering effort or looseness in the steering wheel, or change in this
straight ahead position.
²Notice if your vehicle constantly turns slightly or ªpullsº to one side
when traveling on a smooth, level road.
²When stopping, listen and check for strange sounds, pulling to one
side, increased brake pedal travel or ªhard to pushº brake pedal.
²If any slipping or changes in the operation of your transmission occur,
check the transmission fluid level.
²Check automatic transmission Park function.
²Check parking brake.
At least monthly
²Check function of all interior and exterior lights.
²Check tires for wear and proper air pressure.
²Check engine oil level.
²Check coolant level in the coolant reservoir.
²Check washer fluid level.
At least twice a year (for example, every spring and fall)
²Check power steering fluid level.
²Check clutch fluid level (if equipped).
²Check and clean body and door drain holes.
²Check and lubricate all hinges, latches, and outside locks.
²Check and lubricate door rubber weather strips.
²Check parking brake for proper operation.
²Check lap/shoulder belts and seat latches for wear and function.
²Check air pressure in spare tire.
²Check windshield washer spray and wiper operation. Clean wiper
blades with clean cloth dampened with washer fluid.
²Check safety warning lamps (brake, ABS, air bag, safety belt) for
operation.
Maintenance and Specifications
189
Page 190 of 245

²Check cooling system fluid level and coolant strength.
²Check battery water level (non-maintenance free).
²Check battery connections and clean if necessary.
SERVICE RECOMMENDATIONS
To help you service your vehicle:
²We highlight do-it-yourself items in the engine compartment for easy
location.
²We provide a Scheduled Maintenance section which makes tracking
routine service easy.
If your vehicle requires professional service, your dealership can provide
necessary parts and service. Check your ªWarranty Informationº to find
out which parts and services are covered.
Use only recommended fuels, lubricants, fluids and service parts
conforming to specifications. Genuine Mazda parts are designed and built
to provide the best performance in your vehicle.
PRECAUTIONS WHEN SERVICING YOUR VEHICLE
²Do not work on a hot engine.
²Make sure that nothing gets caught in moving parts.
²Do not work on a vehicle with the engine running in an enclosed
space, unless you are sure you have enough ventilation.
²Keep all open flames and other lit material away from the battery and
all fuel related parts.
Working with the engine off
²Automatic transmission:
1. Set the parking brake and shift to P (Park).
2. Turn off the engine and remove the key.
3. Block the wheels.
²Manual transmission:
1. Set the parking brake, depress the clutch and place the gearshift in 1
(First).
2. Turn off the engine and remove the key.
3. Block the wheels.
Maintenance and Specifications
190
Page 191 of 245

Working with the engine on
²Automatic transmission:
1. Set the parking brake and shift to P (Park).
2. Block the wheels.
²Manual transmission:
1. Set the parking brake, depress the clutch and place the gearshift in
N (Neutral).
2. Block the wheels.
Note:Do not start your engine with the air cleaner removed and do not
remove it while the engine is running.
OPENING THE HOOD
1. Inside the vehicle, pull the hood
release handle located under
the bottom of the instrument
panel near the steering column.
2. Go to the front of the vehicle
and release the auxiliary latch
that is located under the front
center of the hood.
3. Lift the hood and support it
with the prop rod.
Maintenance and Specifications
191
Page 192 of 245

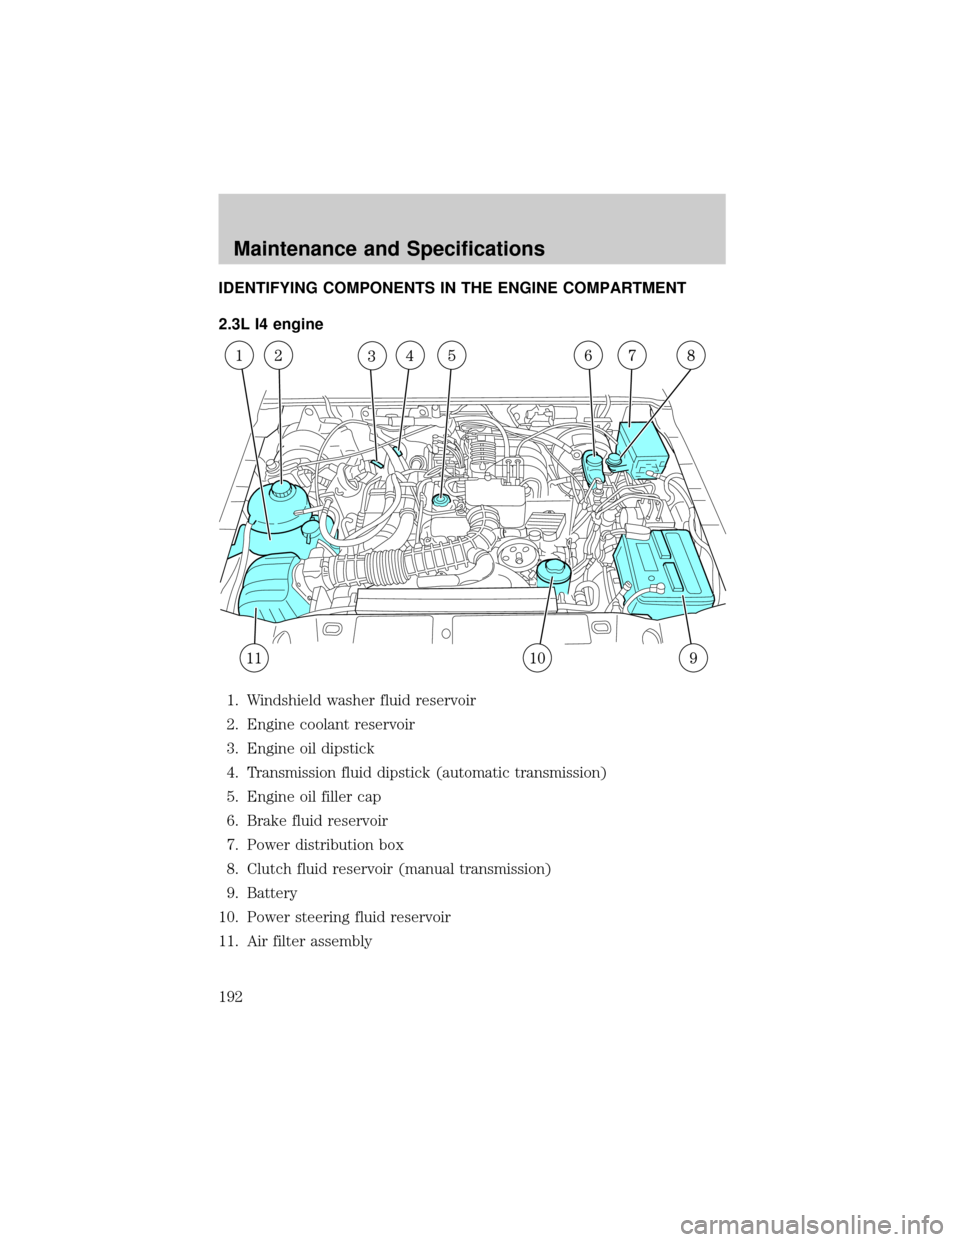
IDENTIFYING COMPONENTS IN THE ENGINE COMPARTMENT
2.3L I4 engine
1. Windshield washer fluid reservoir
2. Engine coolant reservoir
3. Engine oil dipstick
4. Transmission fluid dipstick (automatic transmission)
5. Engine oil filler cap
6. Brake fluid reservoir
7. Power distribution box
8. Clutch fluid reservoir (manual transmission)
9. Battery
10. Power steering fluid reservoir
11. Air filter assembly
Maintenance and Specifications
192
Page 193 of 245

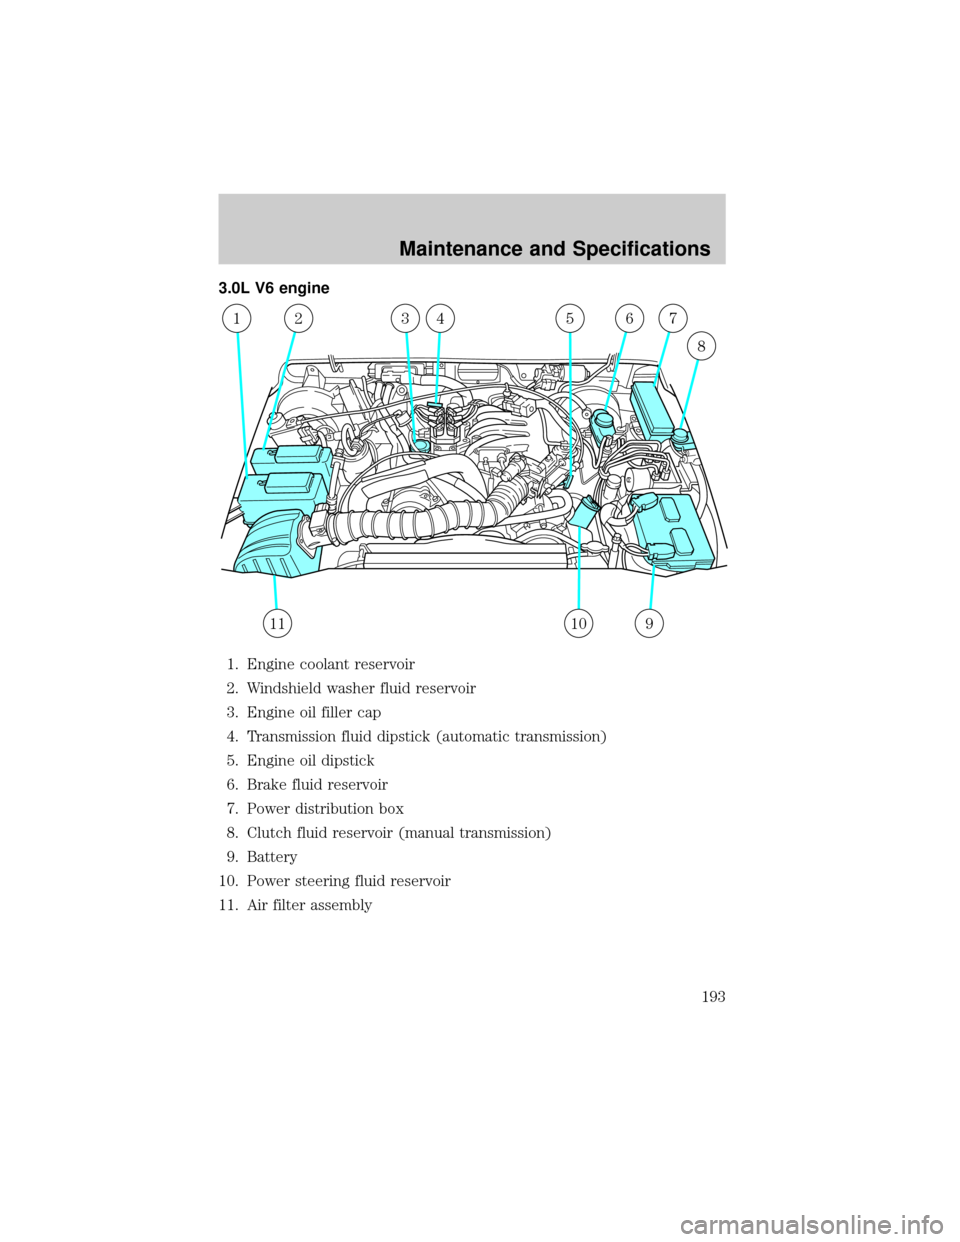
3.0L V6 engine
1. Engine coolant reservoir
2. Windshield washer fluid reservoir
3. Engine oil filler cap
4. Transmission fluid dipstick (automatic transmission)
5. Engine oil dipstick
6. Brake fluid reservoir
7. Power distribution box
8. Clutch fluid reservoir (manual transmission)
9. Battery
10. Power steering fluid reservoir
11. Air filter assembly
11109
1234567
8
Maintenance and Specifications
193
Page 194 of 245

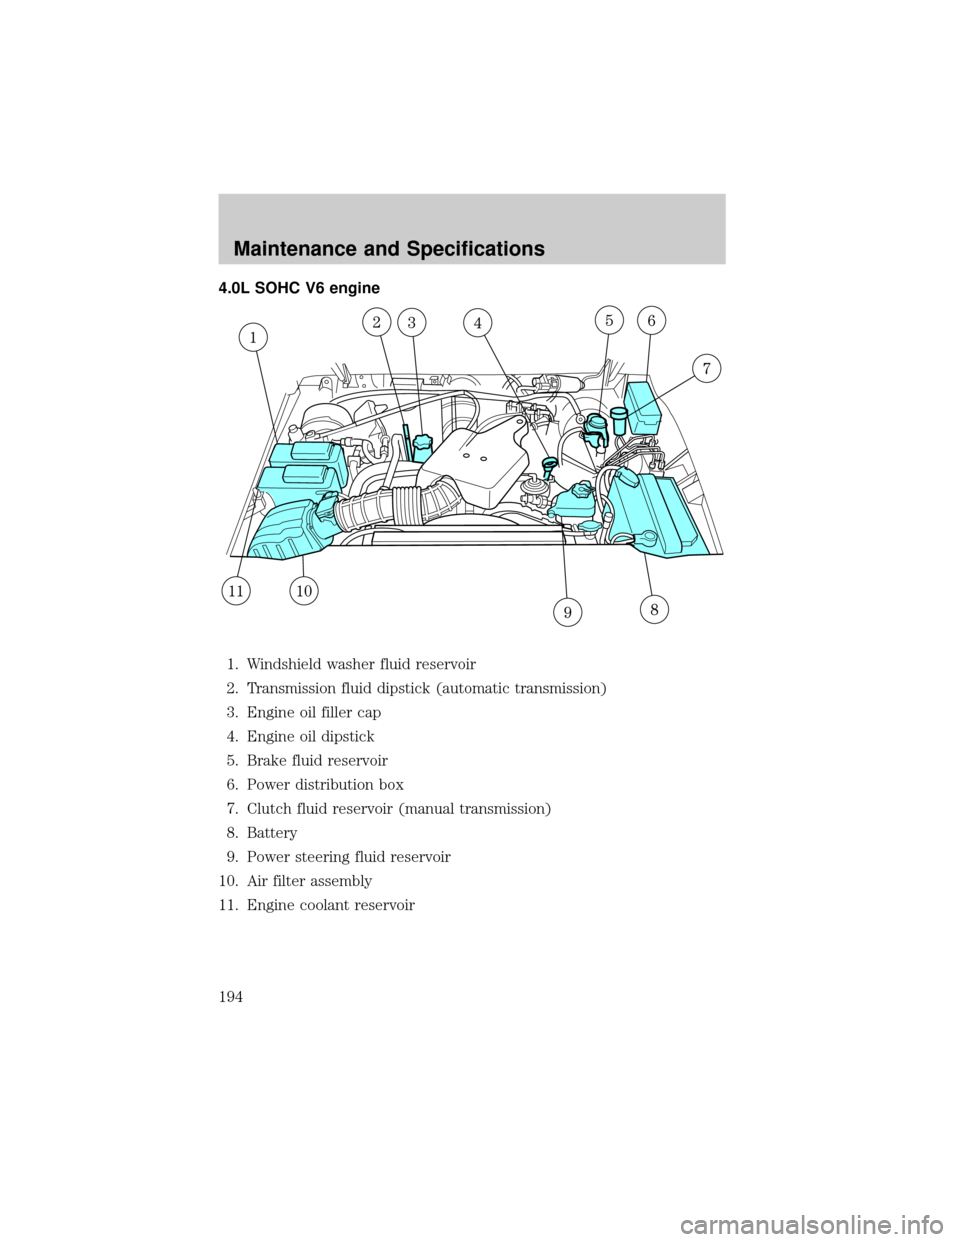
4.0L SOHC V6 engine
1. Windshield washer fluid reservoir
2. Transmission fluid dipstick (automatic transmission)
3. Engine oil filler cap
4. Engine oil dipstick
5. Brake fluid reservoir
6. Power distribution box
7. Clutch fluid reservoir (manual transmission)
8. Battery
9. Power steering fluid reservoir
10. Air filter assembly
11. Engine coolant reservoir
Maintenance and Specifications
194
Page 196 of 245

ENGINE OIL
Checking the engine oil
Refer to the service maintenance section for the appropriate intervals for
checking the engine oil.
1. Make sure the vehicle is on level ground.
2. Turn the engine off and wait a few minutes for the oil to drain into
the oil pan.
3. Set the parking brake and ensure the gearshift is securely latched in
P (Park) (automatic transmission) or 1 (First) (manual
transmission).
4. Open the hood. Protect yourself from engine heat.
5. Locate and carefully remove the engine oil level indicator (dipstick).
²2.3L I4 engine
Maintenance and Specifications
196
Page 223 of 245

1. Clean the reservoir cap before
removal to prevent dirt and
water from entering the
reservoir.
2. Remove cap and rubber
diaphragm from reservoir.
3. Add fluid until the level reaches
the step in the reservoir.
4. Reinstall rubber diaphragm and
cap onto reservoir.
TRANSMISSION FLUID
Checking automatic transmission fluid (if equipped)
Refer to your service maintenance section for scheduled intervals for
fluid checks and changes. Your transmission does not consume fluid.
However, the fluid level should be checked if the transmission is not
working properly, i.e., if the transmission slips or shifts slowly or if you
notice some sign of fluid leakage.
Automatic transmission fluid expands when warmed. To obtain an
accurate fluid check, drive the vehicle until it is at normal operating
temperature (approximately 30 km [20 miles]). If your vehicle has been
operated for an extended period at high speeds, in city traffic during hot
weather or pulling a trailer, the vehicle should be turned off for about 30
minutes to allow fluid to cool before checking.
1. Drive the vehicle 30 km (20 miles) or until it reaches normal
operating temperature.
2. Park the vehicle on a level surface and engage the parking brake.
3. With the parking brake engaged and your foot on the brake pedal,
start the engine and move the gearshift lever through all of the gear
ranges. Allow sufficient time for each gear to engage.
4. Latch the gearshift lever in P (Park) and leave the engine running.
5. Remove the dipstick, wiping it clean with a clean, dry lint free rag. If
necessary, refer toIdentifying components in the engine
compartmentin this chapter for the location of the dipstick.
Maintenance and Specifications
223
Page 224 of 245

6. Install the dipstick making sure it is fully seated in the filler tube.
7. Remove the dipstick and inspect the fluid level. The fluid should be
in the designated area for normal operating temperature or ambient
temperature.
Low fluid level
Do not drive the vehicle if the fluid
level is at the bottom of the dipstick
and the ambient temperature is
above 10ÉC (50ÉF).
Correct fluid level
The transmission fluid should be checked at normal operating
temperature 66ÉC-77ÉC (150ÉF-170ÉF) on a level surface. The normal
operating temperature can be reached after approximately 30 km (20
miles) of driving.
You can check the fluid without driving if the ambient temperature is
above 10ÉC (50ÉF). However, if fluid is added at this time, an overfill
condition could result when the vehicle reaches normal operating
temperature.
The transmission fluid should be in
this range if at normal operating
temperature (66ÉC-77ÉC
[150ÉF-170ÉF]).
The transmission fluid should be in
this range if at ambient temperature
(10ÉC-35ÉC [50ÉF-95ÉF]).
High fluid level
Fluid levels above the safe range
may result in transmission failure.
An overfill condition of transmission
fluid may cause shift and/or
engagement concerns and/or
possible damage.
High fluid levels can be caused by an overheating condition.
Adjusting automatic transmission fluid levels
Before adding any fluid, make sure the correct type is used. The type of
fluid used is normally indicated on the dipstick and also in the
Lubricant specificationssection in this chapter.
Maintenance and Specifications
224
Page 225 of 245

Use of a non-approved automatic transmission fluid may cause
internal transmission component damage.
If necessary, add fluid in 250 ml (1/2 pint) increments through the filler
tube until the level is correct.
If an overfill occurs, excess fluid
should be removed by a qualified
technician.
An overfill condition of
transmission fluid may cause
shift and/or engagement concerns and/or possible damage.
Do not use supplemental transmission fluid additives, treatments or
cleaning agents. The use of these materials may affect transmission
operation and result in damage to internal transmission components.
Checking and adding manual transmission fluid (if equipped)
1. Park the vehicle on a level
surface.
2. Engage the parking brake fully ±
put in first gear.
3. Assure the vehicle cannot move.
4. Clean the filler plug.
5. Remove the filler plug and
inspect the fluid level.
Maintenance and Specifications
225