wheel MAZDA MODEL B3000 TRUCK 2006 Repair Manual
[x] Cancel search | Manufacturer: MAZDA, Model Year: 2006, Model line: MODEL B3000 TRUCK, Model: MAZDA MODEL B3000 TRUCK 2006Pages: 266, PDF Size: 2.11 MB
Page 176 of 266
JOBNAME: No Job Name PAGE: 176 SESS: 1 OUTPUT: Thu Sep 15 08:22:27 2005
/ford_pdm/ford/own2002/mbs/og
ToolLocation
Spare tire Under the vehicle, just forward of the rear bumper
Jack, jack handle, wheel nut wrench Regular Cab: behind seats and
underneath the jack and tools
cover
Cab Plus: stowed in the passenger
side rear cab under the plastic tray
inside the storage bin or behind
the jump seat in a separate tool
bag
Cab Plus 4±Door: stowed behind
the front seats, between jump
seats and underneath jack and
tools cover.
Key, spare tire lock (if equipped) In the glove box
Removing the spare tire
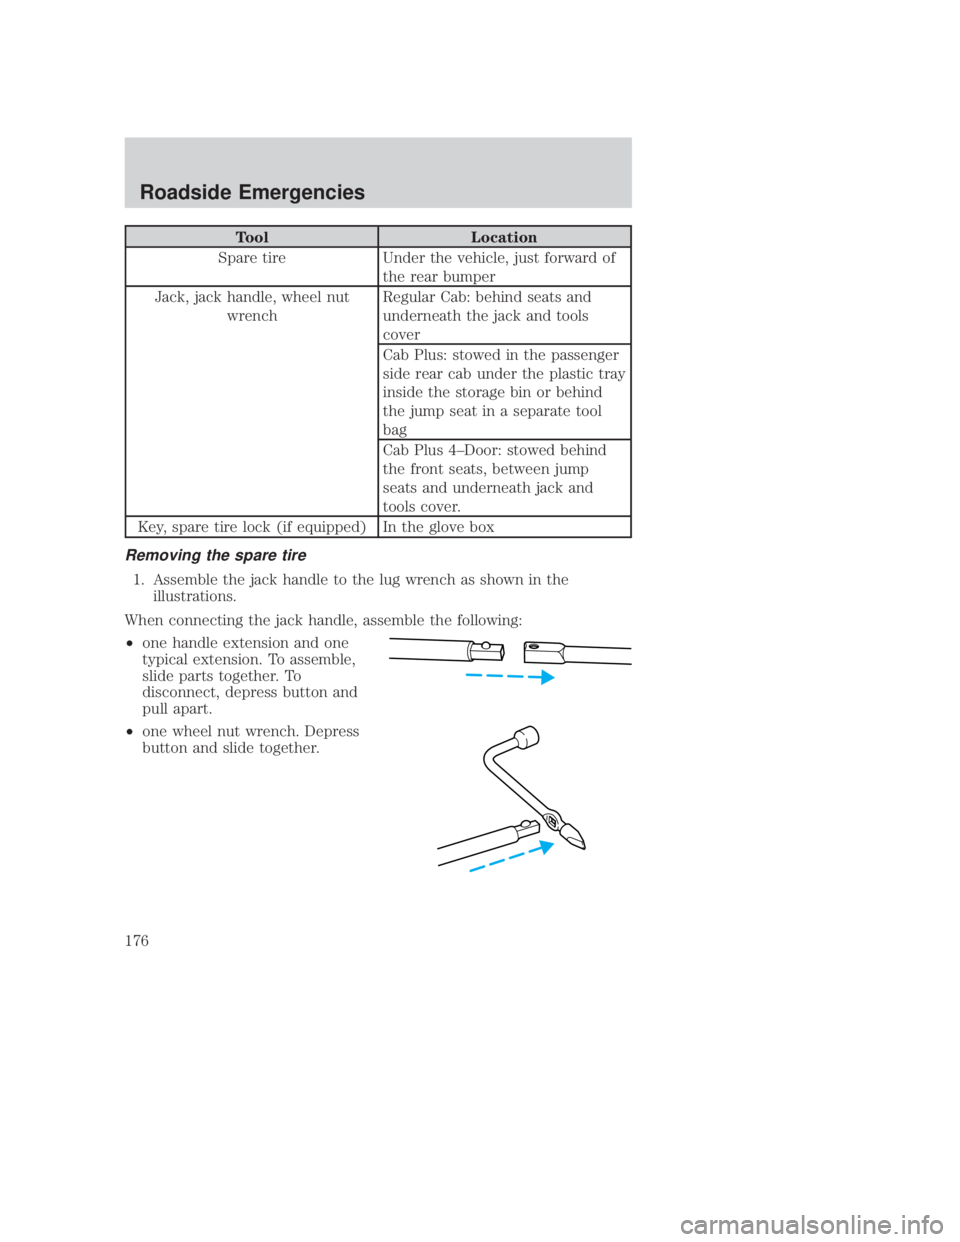
1. Assemble the jack handle to the lug wrench as shown in the illustrations.
When connecting the jack handle, assemble the following:
² one handle extension and one
typical extension. To assemble,
slide parts together. To
disconnect, depress button and
pull apart.
² one wheel nut wrench. Depress
button and slide together.
art=raner301_a
art=raner302_a
REVIEW COPY ÐÐ
2006 B-Series (mbs), Owners Guide (post-2002-fmt) (own2002),Market:USA(fus)
PAGE: 176OP:root EDIT SESSION: 1DATE: SEPT 15 2005 at 8:22JOB:@ibm2/ford_pdm/CLS_ford/GRP_own2002/JOB_mbs/DIV_og
Roadside Emergencies
176
Page 177 of 266
JOBNAME: No Job Name PAGE: 177 SESS: 1 OUTPUT: Thu Sep 15 08:22:27 2005
/ford_pdm/ford/own2002/mbs/og
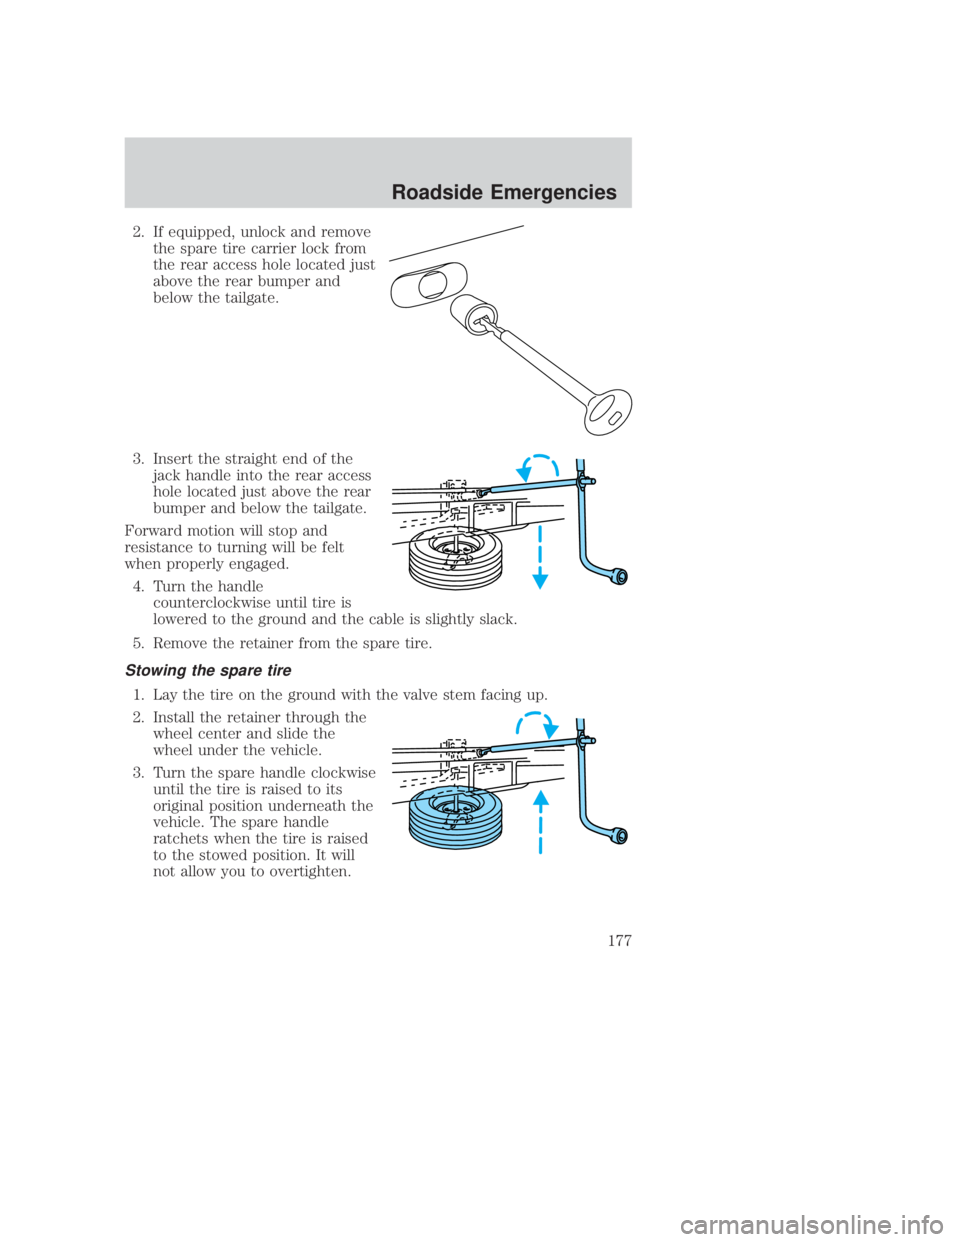
2. If equipped, unlock and removethe spare tire carrier lock from
the rear access hole located just
above the rear bumper and
below the tailgate.
3. Insert the straight end of the jack handle into the rear access
hole located just above the rear
bumper and below the tailgate.
Forward motion will stop and
resistance to turning will be felt
when properly engaged. 4. Turn the handle counterclockwise until tire is
lowered to the ground and the cable is slightly slack.
5. Remove the retainer from the spare tire.
Stowing the spare tire
1. Lay the tire on the ground with the valve stem facing up.
2. Install the retainer through the wheel center and slide the
wheel under the vehicle.
3. Turn the spare handle clockwise until the tire is raised to its
original position underneath the
vehicle. The spare handle
ratchets when the tire is raised
to the stowed position. It will
not allow you to overtighten.
art=raner303_a
art=unoer300_a
art=unoer303_a
REVIEW COPY ÐÐ
2006 B-Series (mbs), Owners Guide (post-2002-fmt) (own2002),Market:USA(fus)
PAGE: 177OP:root EDIT SESSION: 1DATE: SEPT 15 2005 at 8:22JOB:@ibm2/ford_pdm/CLS_ford/GRP_own2002/JOB_mbs/DIV_og
Roadside Emergencies
177
Page 178 of 266
JOBNAME: No Job Name PAGE: 178 SESS: 1 OUTPUT: Thu Sep 15 08:22:27 2005
/ford_pdm/ford/own2002/mbs/og
4. If your vehicle is equipped with P265/75 R15 AT tires, do not stow aflat or inflated full size spare tire in the spare tire carrier. The flat
full size tire should be stowed and tied down in the pickup box bed
until it can be repaired.
5. If removed, install the spare tire carrier lock on the access hole above the bumper.
Tire change procedure WARNING: When one of the front wheels is off the ground, the
transmission alone will not prevent the vehicle from moving or
slipping off the jack, even if the vehicle is in P (Park)
(automatic transmission) or R (Reverse) (manual
transmission).
WARNING: To help prevent the vehicle from moving when you
change a tire, be sure the parking brake is set, then block (in
both directions) the wheel that is diagonally opposite (other
side and end of the vehicle) to the tire being changed.
WARNING: If the vehicle slips off the jack, you or someone
else could be seriously injured.
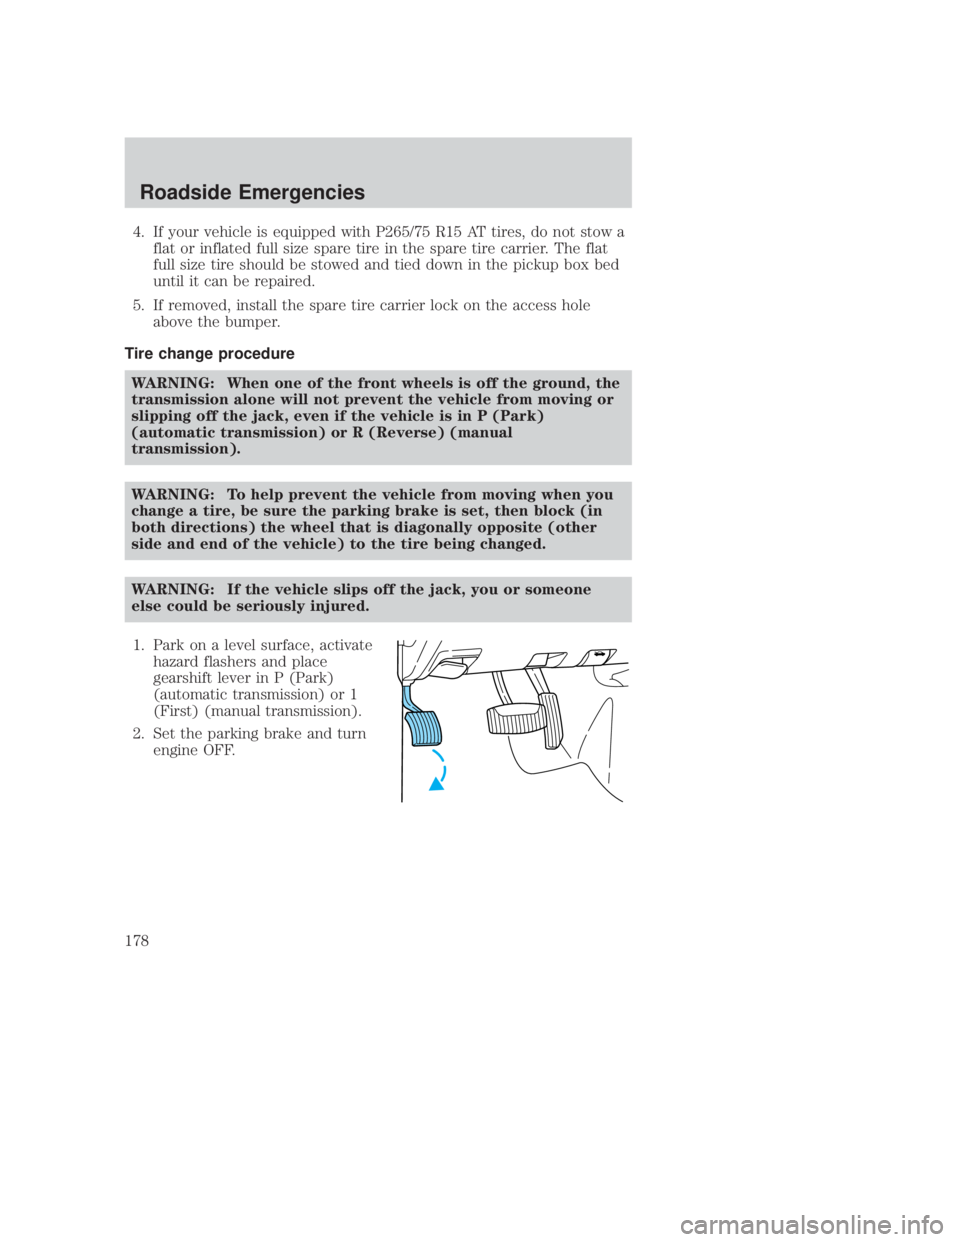
1. Park on a level surface, activate hazard flashers and place
gearshift lever in P (Park)
(automatic transmission) or 1
(First) (manual transmission).
2. Set the parking brake and turn engine OFF.
CIMS #684806
com_change_proc.mbs itdseq=221
art=unogf300_b
REVIEW COPY ÐÐ
2006 B-Series (mbs), Owners Guide (post-2002-fmt) (own2002),Market:USA(fus)
PAGE: 178OP:root EDIT SESSION: 1DATE: SEPT 15 2005 at 8:22JOB:@ibm2/ford_pdm/CLS_ford/GRP_own2002/JOB_mbs/DIV_og
Roadside Emergencies
178
Page 179 of 266
JOBNAME: No Job Name PAGE: 179 SESS: 1 OUTPUT: Thu Sep 15 08:22:27 2005
/ford_pdm/ford/own2002/mbs/og
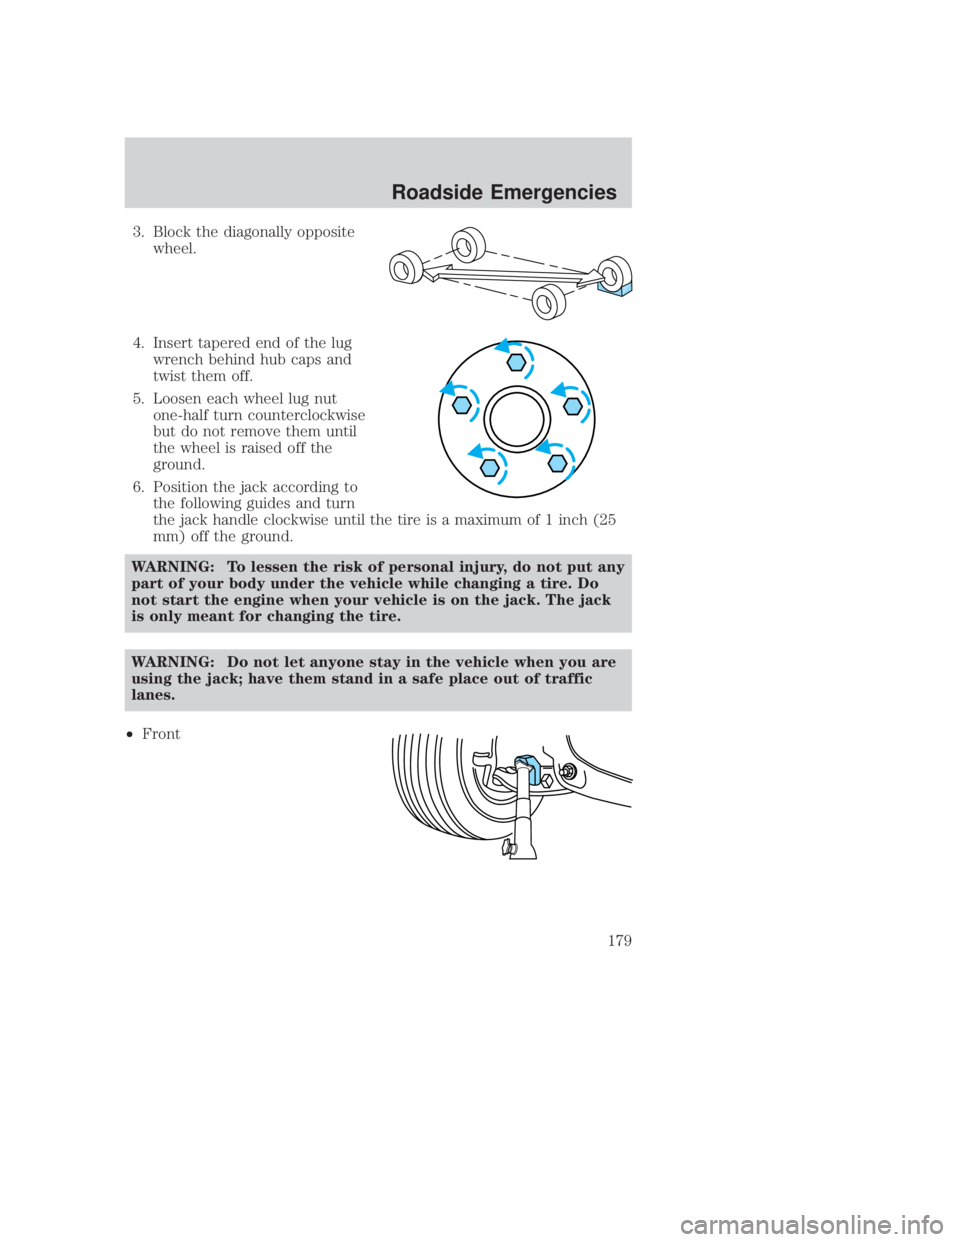
3. Block the diagonally oppositewheel.
4. Insert tapered end of the lug wrench behind hub caps and
twist them off.
5. Loosen each wheel lug nut one-half turn counterclockwise
but do not remove them until
the wheel is raised off the
ground.
6. Position the jack according to the following guides and turn
the jack handle clockwise until the tire is a maximum of 1 inch (25
mm) off the ground.
WARNING: To lessen the risk of personal injury, do not put any
part of your body under the vehicle while changing a tire. Do
not start the engine when your vehicle is on the jack. The jack
is only meant for changing the tire.
WARNING: Do not let anyone stay in the vehicle when you are
using the jack; have them stand in a safe place out of traffic
lanes.
² Front
art=naver301_b
art=viler304_a
art=raner520_a
REVIEW COPY ÐÐ
2006 B-Series (mbs), Owners Guide (post-2002-fmt) (own2002),Market:USA(fus)
PAGE: 179OP:root EDIT SESSION: 1DATE: SEPT 15 2005 at 8:22JOB:@ibm2/ford_pdm/CLS_ford/GRP_own2002/JOB_mbs/DIV_og
Roadside Emergencies
179
Page 180 of 266
JOBNAME: No Job Name PAGE: 180 SESS: 1 OUTPUT: Thu Sep 15 08:22:27 2005
/ford_pdm/ford/own2002/mbs/og
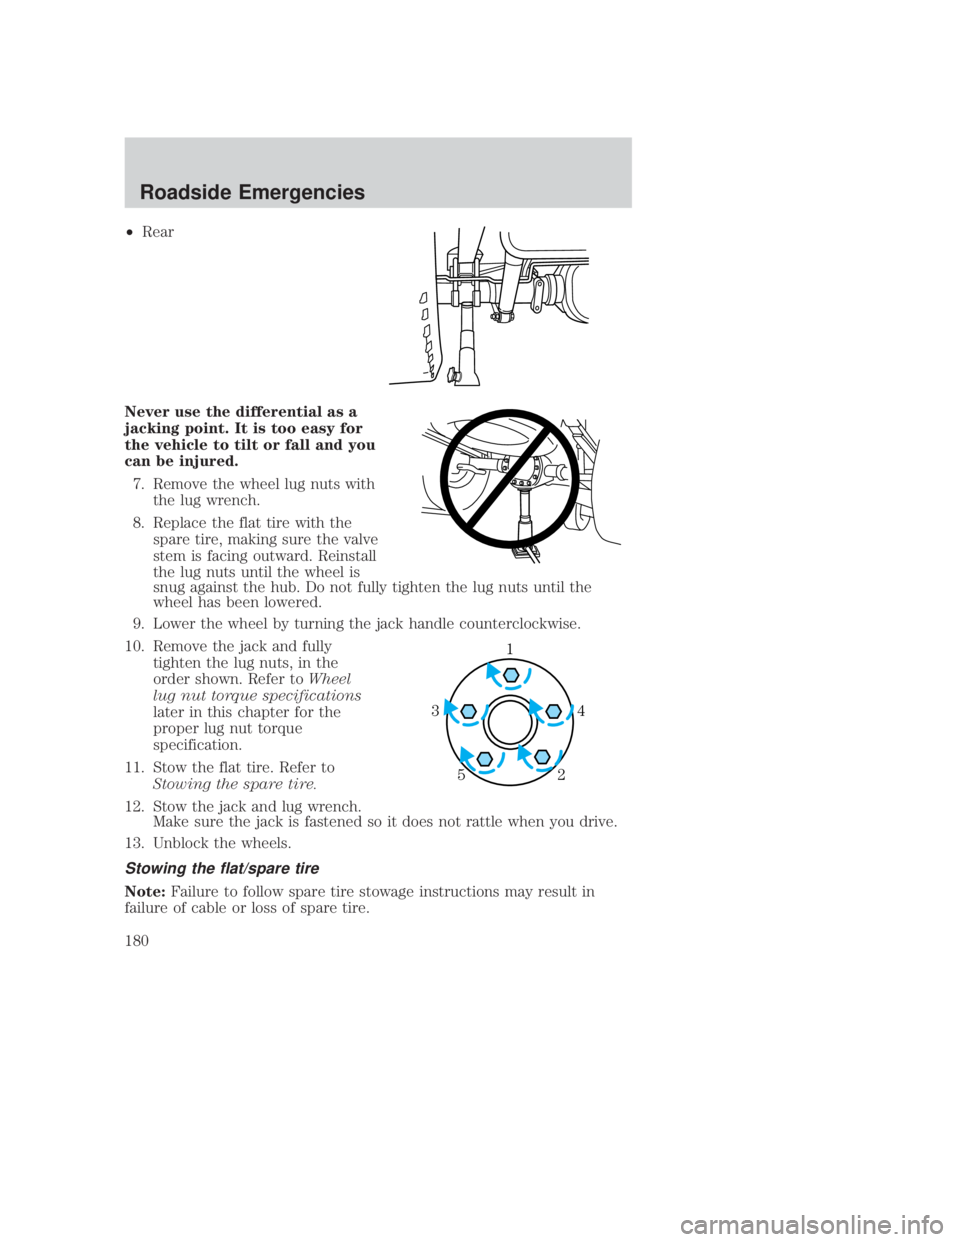
²Rear
Never use the differential as a
jacking point. It is too easy for
the vehicle to tilt or fall and you
can be injured. 7. Remove the wheel lug nuts with the lug wrench.
8. Replace the flat tire with the spare tire, making sure the valve
stem is facing outward. Reinstall
the lug nuts until the wheel is
snug against the hub. Do not fully tighten the lug nuts until the
wheel has been lowered.
9. Lower the wheel by turning the jack handle counterclockwise.
10. Remove the jack and fully tighten the lug nuts, in the
order shown. Refer to Wheel
lug nut torque specifications
later in this chapter for the
proper lug nut torque
specification.
11. Stow the flat tire. Refer to Stowing the spare tire.
12. Stow the jack and lug wrench. Make sure the jack is fastened so it does not rattle when you drive.
13. Unblock the wheels.
Stowing the flat/spare tire
Note: Failure to follow spare tire stowage instructions may result in
failure of cable or loss of spare tire.
1
4
3
2
5
CIMS #1112962
com_stow-tire.ran
itdseq=222
art=raner521_a
art=mbser300_a
art=viler305_a
REVIEW COPY ÐÐ
2006 B-Series (mbs), Owners Guide (post-2002-fmt) (own2002),Market:USA(fus)
PAGE: 180OP:root EDIT SESSION: 1DATE: SEPT 15 2005 at 8:22JOB:@ibm2/ford_pdm/CLS_ford/GRP_own2002/JOB_mbs/DIV_og
Roadside Emergencies
180
Page 181 of 266
JOBNAME: No Job Name PAGE: 181 SESS: 1 OUTPUT: Thu Sep 15 08:22:27 2005
/ford_pdm/ford/own2002/mbs/og
1. Lay the tire on the ground with the valve stem facing up.
2. Slide the wheel partially under the vehicle and install the wire andretainer through the center of the wheel.
3. Turn the jack handle clockwise until the tire is raised to its original position underneath the vehicle. The effort to turn the jack handle
increases significantly as the tire contacts the frame. The spare tire
carrier will ratchet when the tire is in the fully stowed position. The
spare tire carrier has a built-in ratchet feature that will not allow you
to overtighten. If the spare tire carrier ratchets with very little effort,
take the vehicle to your authorized dealer for assistance at your
earliest convenience.
4. Check that the tire lies flat against the frame assembly. Push against the tire to make sure it is tightly seated under the vehicle. Loosen
and retighten, if necessary. Failure to properly stow the spare tire
may result in failure of the winch cable and loss of the spare tire.
5. Repeat this tightness check procedure when servicing the spare tire pressure (every six months, per Service Maintenance Section), or
at any time that the spare tire is disturbed through service of other
components.
6. Install the spare tire lock (if equipped) into the access hole above the rear bumper with the spare tire lock key (if equipped) and jack
handle.
WHEEL LUG NUT TORQUE SPECIFICATIONS
Retighten the lug nuts to the specified torque at 50±100 miles (80±160
km) after any wheel disturbance (rotation, flat tire, wheel removal, etc.).
Lug nut socket size/Bolt size Wheel lug nut torque*
lb.ft. N ²m
Lug nut socket size:
3¤4º (19 mm) hex
Bolt size:1¤2x20 100 135
* Torque specifications are for nut and bolt threads free of dirt and
rust. Use only Mazda recommended replacement fasteners.
CIMS #1244586
com_lug-nut-torque.p150 itdseq=223
REVIEW COPY ÐÐ
2006 B-Series (mbs), Owners Guide (post-2002-fmt) (own2002),Market:USA(fus)
PAGE: 181OP:root EDIT SESSION: 1DATE: SEPT 15 2005 at 8:22JOB:@ibm2/ford_pdm/CLS_ford/GRP_own2002/JOB_mbs/DIV_og
Roadside Emergencies
181
Page 182 of 266
JOBNAME: No Job Name PAGE: 182 SESS: 1 OUTPUT: Thu Sep 15 08:22:27 2005
/ford_pdm/ford/own2002/mbs/og
WARNING: When a wheel is installed, always remove any
corrosion, dirt or foreign materials present on the mounting
surfaces of the wheel or the surface of the wheel hub, brake
drum or brake disc that contacts the wheel. Ensure that any
fasteners that attach the rotor to the hub are secured so they
do not interfere with the mounting surfaces of the wheel.
Installing wheels without correct metal-to-metal contact at the
wheel mounting surfaces can cause the wheel nuts to loosen
and the wheel to come off while the vehicle is in motion,
resulting in loss of control.
Note: If there is corrosion on the area where the wheel contacts the
hub, apply a thin film of grease or anti-seize compound on that area.
OVERHEATING
If the temperature gauge indicates overheating and you experience
power loss, you hear a loud knocking or pinging noise, the engine is
probably too hot.
If this happens:
1. Drive safely to the side of the road and park off the right-of-way.
2. Shift the automatic transmission into P (Park) or the manual transmission into the neutral position, and apply the parking brake.
3. Turn off the air conditioner.
WARNING: Steam from an overheated engine is dangerous. The
escaping steam could seriously burn you. Open the hood ONLY
after steam is no longer escaping from the engine.
4. Check whether coolant or steam is escaping from under the hood or from the engine compartment.
² If steam is coming from the engine compartment: do not go near
the front of the vehicle. Stop the engine, then turn the ignition switch
to the ON position without starting the engine. The radiator cooling
fans will start to cool the engine.
² If neither coolant nor steam is escaping: open the hood and idle
the engine until it cools. If this does not lower the temperature, stop
the engine and let it cool.
5. Check the coolant level. If it is low, look for leaks in the radiator hoses and connections, heater hoses and connections, radiator and
water pump.
CIMS #1137423
com_overheating-mazdas itdseq=224
REVIEW COPY ÐÐ
2006 B-Series (mbs), Owners Guide (post-2002-fmt) (own2002),Market:USA(fus)
PAGE: 182OP:root EDIT SESSION: 1DATE: SEPT 15 2005 at 8:22JOB:@ibm2/ford_pdm/CLS_ford/GRP_own2002/JOB_mbs/DIV_og
Roadside Emergencies
182
Page 188 of 266
JOBNAME: No Job Name PAGE: 188 SESS: 1 OUTPUT: Thu Sep 15 08:22:27 2005
/ford_pdm/ford/own2002/mbs/og
WRECKER TOWING
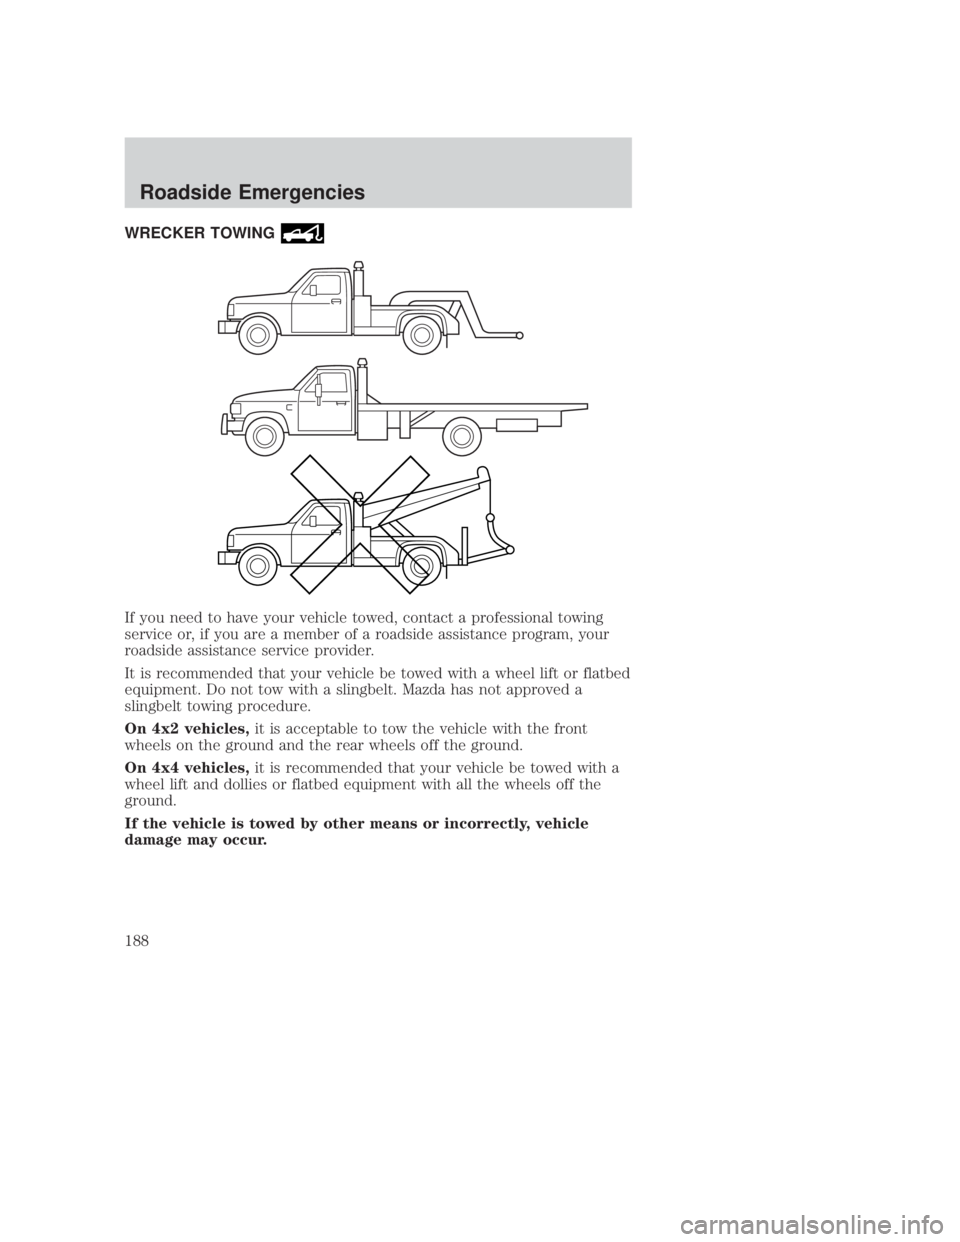
If you need to have your vehicle towed, contact a professional towing
service or, if you are a member of a roadside assistance program, your
roadside assistance service provider.
It is recommended that your vehicle be towed with a wheel lift or flatbed
equipment. Do not tow with a slingbelt. Mazda has not approved a
slingbelt towing procedure.
On 4x2 vehicles,it is acceptable to tow the vehicle with the front
wheels on the ground and the rear wheels off the ground.
On 4x4 vehicles, it is recommended that your vehicle be towed with a
wheel lift and dollies or flatbed equipment with all the wheels off the
ground.
If the vehicle is towed by other means or incorrectly, vehicle
damage may occur.
CIMS #1218646
com_tow.no-sling-mbs itdseq=230
art=winer104_a
REVIEW COPY ÐÐ
2006 B-Series (mbs), Owners Guide (post-2002-fmt) (own2002),Market:USA(fus)
PAGE: 188OP:root EDIT SESSION: 1DATE: SEPT 15 2005 at 8:22JOB:@ibm2/ford_pdm/CLS_ford/GRP_own2002/JOB_mbs/DIV_og
Roadside Emergencies
188
Page 201 of 266
JOBNAME: No Job Name PAGE: 201 SESS: 1 OUTPUT: Thu Sep 15 08:22:27 2005
/ford_pdm/ford/own2002/mbs/og
²Remove particles such as bird droppings, tree sap, insect deposits, tar
spots, road salt and industrial fallout before repairing paint chips.
² Always read the instructions before using the products.
ALUMINUM WHEELS AND COVERS
Aluminum wheel rims or covers are coated with a clearcoat paint finish.
In order to maintain their shine:
² Clean with cool or lukewarm water and a neutral pH shampoo.
² Never apply any cleaning chemical to hot or warm wheel rims or
covers.
² Some automatic car washes may cause damage to the finish on your
wheel rims or covers. Chemical-strength cleaners, or cleaning
chemicals, in combination with brush agitation to remove brake dust
and dirt, could wear away the clearcoat finish over time.
² Do not use hydrofluoric acid-based or high caustic-based wheel
cleaners, steel wool, fuels or strong household detergent.
² To remove tar and grease, use Extra Strength Tar and Road Oil
Remover (0000±77±410E-01), available from your authorized Mazda
dealer.
ENGINE
Engines are more efficient when they are clean because grease and dirt
buildup keep the engine warmer than normal. When washing:
² Take care when using a power washer to clean the engine. The
high-pressure fluid could penetrate the sealed parts and cause
damage.
² Never spray the engine or other engine components with water. Water
will damage the engine or other engine components.
² Spray Engine Shampoo and Degreaser (0000±77±410E-09), available at
your authorized Mazda dealer, on all parts that require cleaning and
pressure rinse clean.
² Cover the highlighted areas to prevent water damage when cleaning
the engine.
CIMS #1001623
com_wheel-rim.mazfly
itdseq=248
CIMS #1010871
com_engine-fly.mbs itdseq=249
REVIEW COPY ÐÐ
2006 B-Series (mbs), Owners Guide (post-2002-fmt) (own2002),Market:USA(fus)
PAGE: 201OP:root EDIT SESSION: 1DATE: SEPT 15 2005 at 8:22JOB:@ibm2/ford_pdm/CLS_ford/GRP_own2002/JOB_mbs/DIV_og
Cleaning
201
Page 204 of 266
JOBNAME: No Job Name PAGE: 204 SESS: 1 OUTPUT: Thu Sep 15 08:22:27 2005
/ford_pdm/ford/own2002/mbs/og
a special solution in addition to alcohol which helps to remove the hot
wax deposited on the wiper blade and windshield from automated car
wash facilities. Be sure to replace wiper blades when they appear
worn or do not function properly.
² Do not use abrasives, as they may cause scratches.
² Do not use fuel, kerosene, or paint thinner to clean any parts.
INSTRUMENT PANEL AND CLUSTER LENS
Clean the instrument panel with a damp cloth, then with a clean, dry
cloth, or use Mazda Deluxe Leather and Vinyl Cleaner
(0000±77±430E-15).
² Avoid cleaners or polish that increase the gloss of the upper portion of
the instrument panel. The dull finish in this area helps protect the
driver from undesirable windshield reflection.
WARNING: Do not use chemical solvents or strong detergents
when cleaning the steering wheel or instrument panel to avoid
contamination of the airbag system.
² Be certain to wash or wipe your hands clean if you have been in
contact with certain products such as insect repellent and suntan
lotion in order to avoid possible damage to the interior painted
surfaces.
INTERIOR TRIM
² Clean the interior trim areas with a damp cloth, then with a clean, dry
cloth; you may also use Mazda Deluxe Leather and Vinyl Cleaner
(0000±77±430E-15).
² Do not use household or glass cleaners, as these may damage the
finish.
INTERIOR
For fabric, carpets, cloth seats, and safety belts:
² Remove dust and loose dirt with a vacuum cleaner.
² Remove light stains and soil with Upholstery Cleaner and Spot
Remover (0000±77±430E-01), available at your authorized Mazda
dealer.
² If grease or tar is present on the material, spot-clean the area first
with Spot and Stain Remover (0000±77±410E-01), available at your
authorized Mazda dealer.
CIMS #1521418
com_inst-panel.mazda
itdseq=252
CIMS #1521417
com_woodtone.mazda itdseq=253
CIMS #1129642
com_fabric.mazfly-no itdseq=254
REVIEW COPY ÐÐ
2006 B-Series (mbs), Owners Guide (post-2002-fmt) (own2002),Market:USA(fus)
PAGE: 204OP:root EDIT SESSION: 1DATE: SEPT 15 2005 at 8:22JOB:@ibm2/ford_pdm/CLS_ford/GRP_own2002/JOB_mbs/DIV_og
Cleaning
204