warning lights MAZDA MODEL B4000 TRUCK 2007 Owners Manual (in English)
[x] Cancel search | Manufacturer: MAZDA, Model Year: 2007, Model line: MODEL B4000 TRUCK, Model: MAZDA MODEL B4000 TRUCK 2007Pages: 279, PDF Size: 2.4 MB
Page 1 of 279
JOBNAME: No Job Name PAGE: 1 SESS: 6 OUTPUT: Thu Aug 3 11:45:36 2006
/ford_pdm/ford/own2002/mbs/og
Introduction 4
Instrument Cluster 12
Warning lights and chimes 12
Gauges 17
Entertainment Systems 19
AM/FM stereo 19
AM/FM Stereo single CD/MP3 system 21
AM/FM stereo with single CD 24
In-dash CDX6/MP3 disc Premium Pioneer audio system 29
AM/FM stereo with CDX6/MP3 32
Auxiliary input jack 37
Satellite radio information 39
Climate Controls 43
Heater only 43
Manual heating and air conditioning 44
Lights 46
Headlamps 46
Turn signal control 49
Bulb replacement 50
Driver Controls 57
Windshield wiper/washer control 57
Steering wheel adjustment 58
Power windows 59
Mirrors 60
Speed control 60
Locks and Security 66
Keys 66
Locks 66
Anti-theft system 70
Table of Contents
1
PAGE:1OP:rootEDIT SESSION:6DATE:AUG 3 2006 at 11:45JOB:@ibm2/ford_pdm/CLS_ford/GRP_own2002/JOB_mbs/DIV_og
REVIEW COPY ÐÐ
2007 B-Series(mbs), Owners Guide (post-2002-fmt)(own2002),Market:USA(fus)
Page 12 of 279
JOBNAME: No Job Name PAGE: 12 SESS: 1 OUTPUT: Thu Aug 3 11:45:36 2006
/ford_pdm/ford/own2002/mbs/og
WARNING LIGHTS AND CHIMES
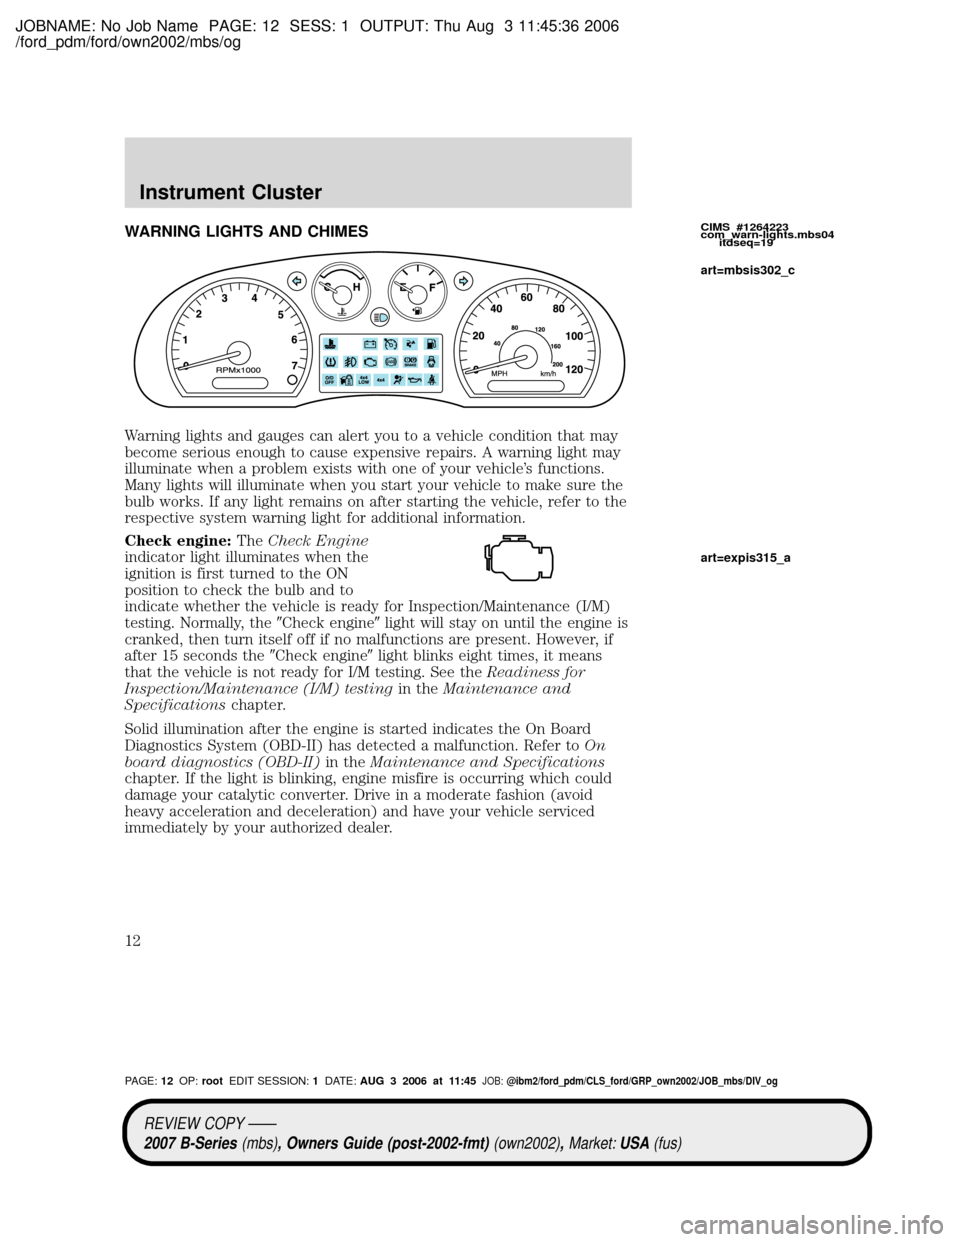
Warning lights and gauges can alert you to a vehicle condition that may
become serious enough to cause expensive repairs. A warning light may
illuminate when a problem exists with one of your vehicle's functions.
Many lights will illuminate when you start your vehicle to make sure the
bulb works. If any light remains on after starting the vehicle, refer to the
respective system warning light for additional information.
Check engine:TheCheck Engine
indicator light illuminates when the
ignition is first turned to the ON
position to check the bulb and to
indicate whether the vehicle is ready for Inspection/Maintenance (I/M)
testing. Normally, the9Check engine9light will stay on until the engine is
cranked, then turn itself off if no malfunctions are present. However, if
after 15 seconds the9Check engine9light blinks eight times, it means
that the vehicle is not ready for I/M testing. See theReadiness for
Inspection/Maintenance (I/M) testingin theMaintenance and
Specificationschapter.
Solid illumination after the engine is started indicates the On Board
Diagnostics System (OBD-II) has detected a malfunction. Refer toOn
board diagnostics (OBD-II)in theMaintenance and Specifications
chapter. If the light is blinking, engine misfire is occurring which could
damage your catalytic converter. Drive in a moderate fashion (avoid
heavy acceleration and deceleration) and have your vehicle serviced
immediately by your authorized dealer.CIMS #1264223
com_warn-lights.mbs04
itdseq=19
art=mbsis302_c
art=expis315_a
REVIEW COPY ÐÐ
2007 B-Series(mbs), Owners Guide (post-2002-fmt)(own2002),Market:USA(fus)
PAGE:12OP:rootEDIT SESSION:1DATE:AUG 3 2006 at 11:45JOB:@ibm2/ford_pdm/CLS_ford/GRP_own2002/JOB_mbs/DIV_og
Instrument Cluster
12
Page 15 of 279
JOBNAME: No Job Name PAGE: 15 SESS: 1 OUTPUT: Thu Aug 3 11:45:36 2006
/ford_pdm/ford/own2002/mbs/og
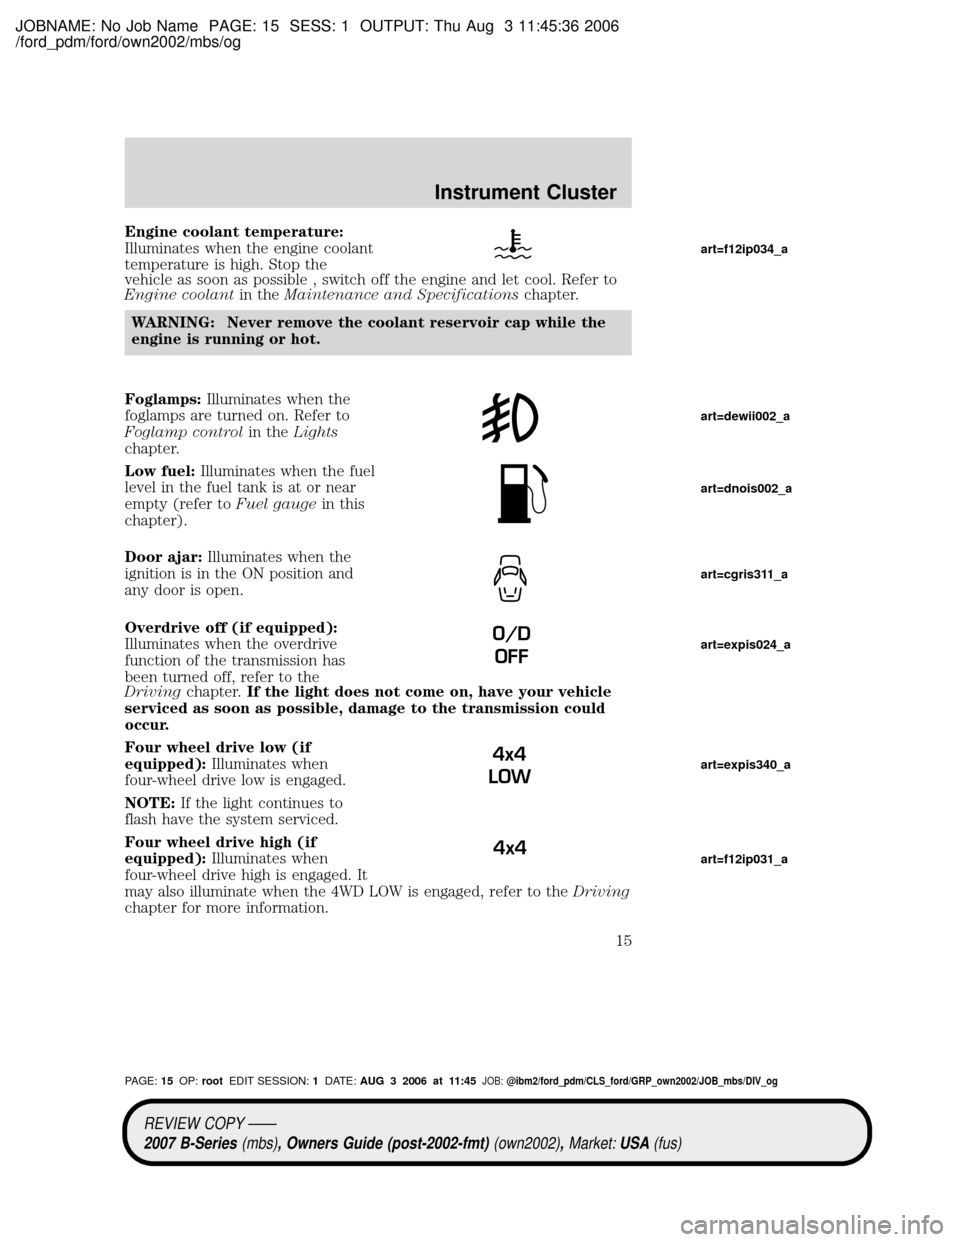
Engine coolant temperature:
Illuminates when the engine coolant
temperature is high. Stop the
vehicle as soon as possible , switch off the engine and let cool. Refer to
Engine coolantin theMaintenance and Specificationschapter.
WARNING: Never remove the coolant reservoir cap while the
engine is running or hot.
Foglamps:Illuminates when the
foglamps are turned on. Refer to
Foglamp controlin theLights
chapter.
Low fuel:Illuminates when the fuel
level in the fuel tank is at or near
empty (refer toFuel gaugein this
chapter).
Door ajar:Illuminates when the
ignition is in the ON position and
any door is open.
Overdrive off (if equipped):
Illuminates when the overdrive
function of the transmission has
been turned off, refer to the
Drivingchapter.If the light does not come on, have your vehicle
serviced as soon as possible, damage to the transmission could
occur.
Four wheel drive low (if
equipped):Illuminates when
four-wheel drive low is engaged.
NOTE:If the light continues to
flash have the system serviced.
Four wheel drive high (if
equipped):Illuminates when
four-wheel drive high is engaged. It
may also illuminate when the 4WD LOW is engaged, refer to theDriving
chapter for more information.
O/D
OFF
4x4
LOW
4x4
art=f12ip034_a
art=dewii002_a
art=dnois002_a
art=cgris311_a
art=expis024_a
art=expis340_a
art=f12ip031_a
REVIEW COPY ÐÐ
2007 B-Series(mbs), Owners Guide (post-2002-fmt)(own2002),Market:USA(fus)
PAGE:15OP:rootEDIT SESSION:1DATE:AUG 3 2006 at 11:45JOB:@ibm2/ford_pdm/CLS_ford/GRP_own2002/JOB_mbs/DIV_og
Instrument Cluster
15
Page 16 of 279
JOBNAME: No Job Name PAGE: 16 SESS: 1 OUTPUT: Thu Aug 3 11:45:36 2006
/ford_pdm/ford/own2002/mbs/og
NOTE:If the light continues to flash have the system serviced.
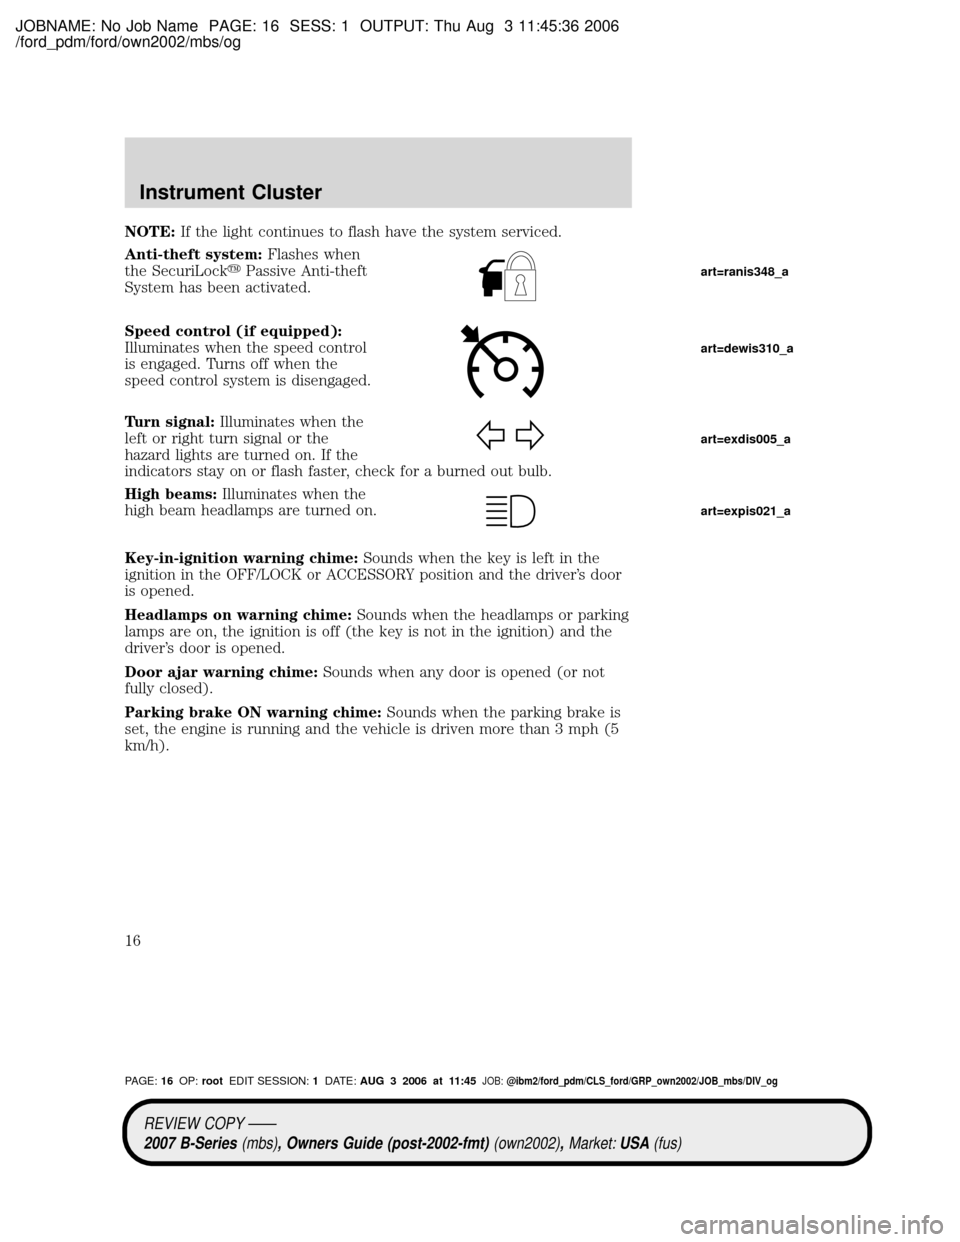
Anti-theft system:Flashes when
the SecuriLockyPassive Anti-theft
System has been activated.
Speed control (if equipped):
Illuminates when the speed control
is engaged. Turns off when the
speed control system is disengaged.
Turn signal:Illuminates when the
left or right turn signal or the
hazard lights are turned on. If the
indicators stay on or flash faster, check for a burned out bulb.
High beams:Illuminates when the
high beam headlamps are turned on.
Key-in-ignition warning chime:Sounds when the key is left in the
ignition in the OFF/LOCK or ACCESSORY position and the driver's door
is opened.
Headlamps on warning chime:Sounds when the headlamps or parking
lamps are on, the ignition is off (the key is not in the ignition) and the
driver's door is opened.
Door ajar warning chime:Sounds when any door is opened (or not
fully closed).
Parking brake ON warning chime:Sounds when the parking brake is
set, the engine is running and the vehicle is driven more than 3 mph (5
km/h).
art=ranis348_a
art=dewis310_a
art=exdis005_a
art=expis021_a
REVIEW COPY ÐÐ
2007 B-Series(mbs), Owners Guide (post-2002-fmt)(own2002),Market:USA(fus)
PAGE:16OP:rootEDIT SESSION:1DATE:AUG 3 2006 at 11:45JOB:@ibm2/ford_pdm/CLS_ford/GRP_own2002/JOB_mbs/DIV_og
Instrument Cluster
16
Page 47 of 279
JOBNAME: No Job Name PAGE: 47 SESS: 1 OUTPUT: Thu Aug 3 11:45:36 2006
/ford_pdm/ford/own2002/mbs/og
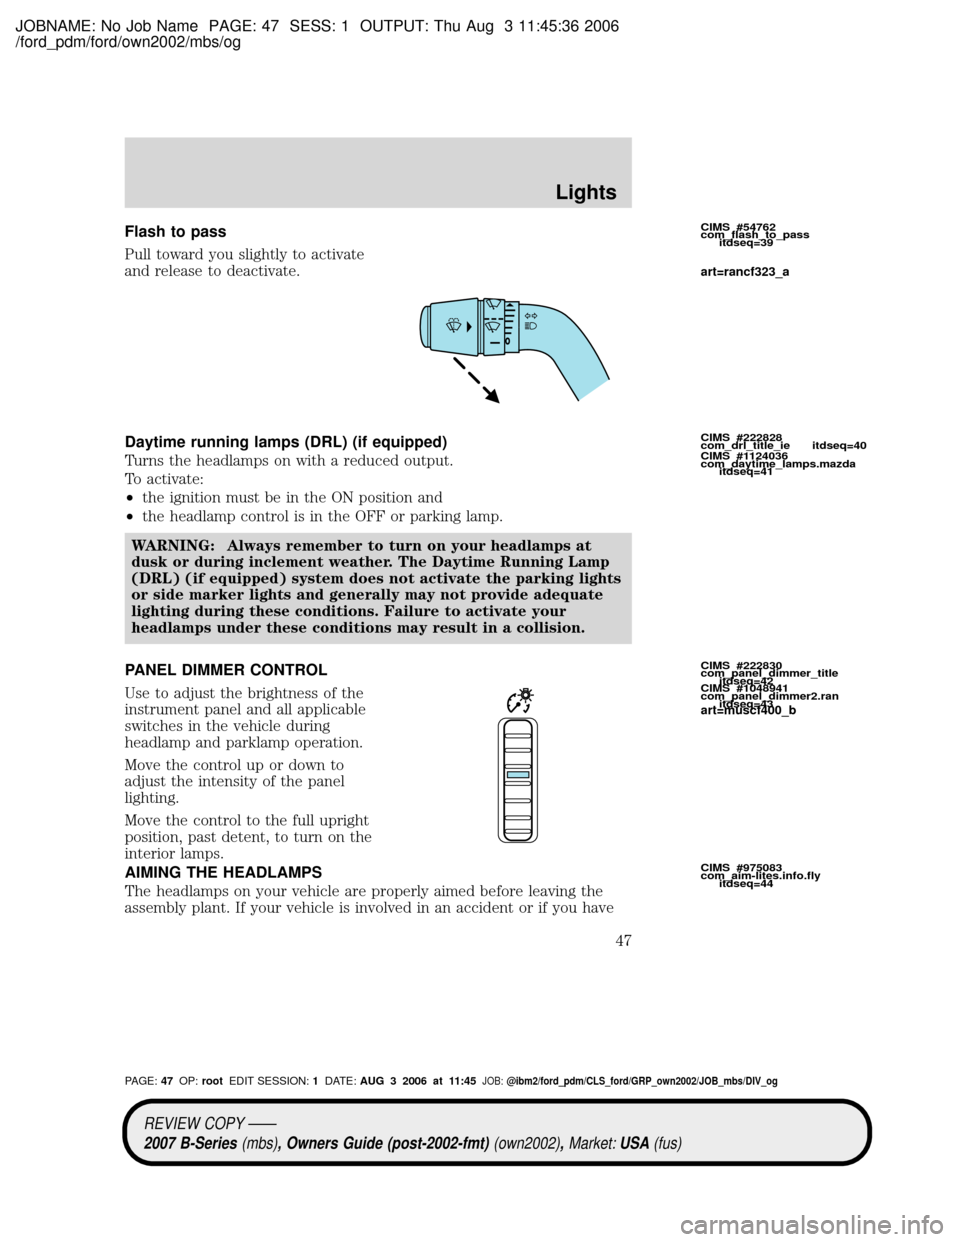
Flash to pass
Pull toward you slightly to activate
and release to deactivate.
Daytime running lamps (DRL) (if equipped)
Turns the headlamps on with a reduced output.
To activate:
²the ignition must be in the ON position and
²the headlamp control is in the OFF or parking lamp.
WARNING: Always remember to turn on your headlamps at
dusk or during inclement weather. The Daytime Running Lamp
(DRL) (if equipped) system does not activate the parking lights
or side marker lights and generally may not provide adequate
lighting during these conditions. Failure to activate your
headlamps under these conditions may result in a collision.
PANEL DIMMER CONTROL
Use to adjust the brightness of the
instrument panel and all applicable
switches in the vehicle during
headlamp and parklamp operation.
Move the control up or down to
adjust the intensity of the panel
lighting.
Move the control to the full upright
position, past detent, to turn on the
interior lamps.
AIMING THE HEADLAMPS
The headlamps on your vehicle are properly aimed before leaving the
assembly plant. If your vehicle is involved in an accident or if you haveCIMS #54762
com_flash_to_pass
itdseq=39
CIMS #222828
com_drl_title_ie itdseq=40
CIMS #1124036
com_daytime_lamps.mazda
itdseq=41
CIMS #222830
com_panel_dimmer_title
itdseq=42
CIMS #1048941
com_panel_dimmer2.ran
itdseq=43
CIMS #975083
com_aim-lites.info.fly
itdseq=44
art=rancf323_a
art=muscf400_b
REVIEW COPY ÐÐ
2007 B-Series(mbs), Owners Guide (post-2002-fmt)(own2002),Market:USA(fus)
PAGE:47OP:rootEDIT SESSION:1DATE:AUG 3 2006 at 11:45JOB:@ibm2/ford_pdm/CLS_ford/GRP_own2002/JOB_mbs/DIV_og
Lights
47
Page 51 of 279
JOBNAME: No Job Name PAGE: 51 SESS: 1 OUTPUT: Thu Aug 3 11:45:36 2006
/ford_pdm/ford/own2002/mbs/og
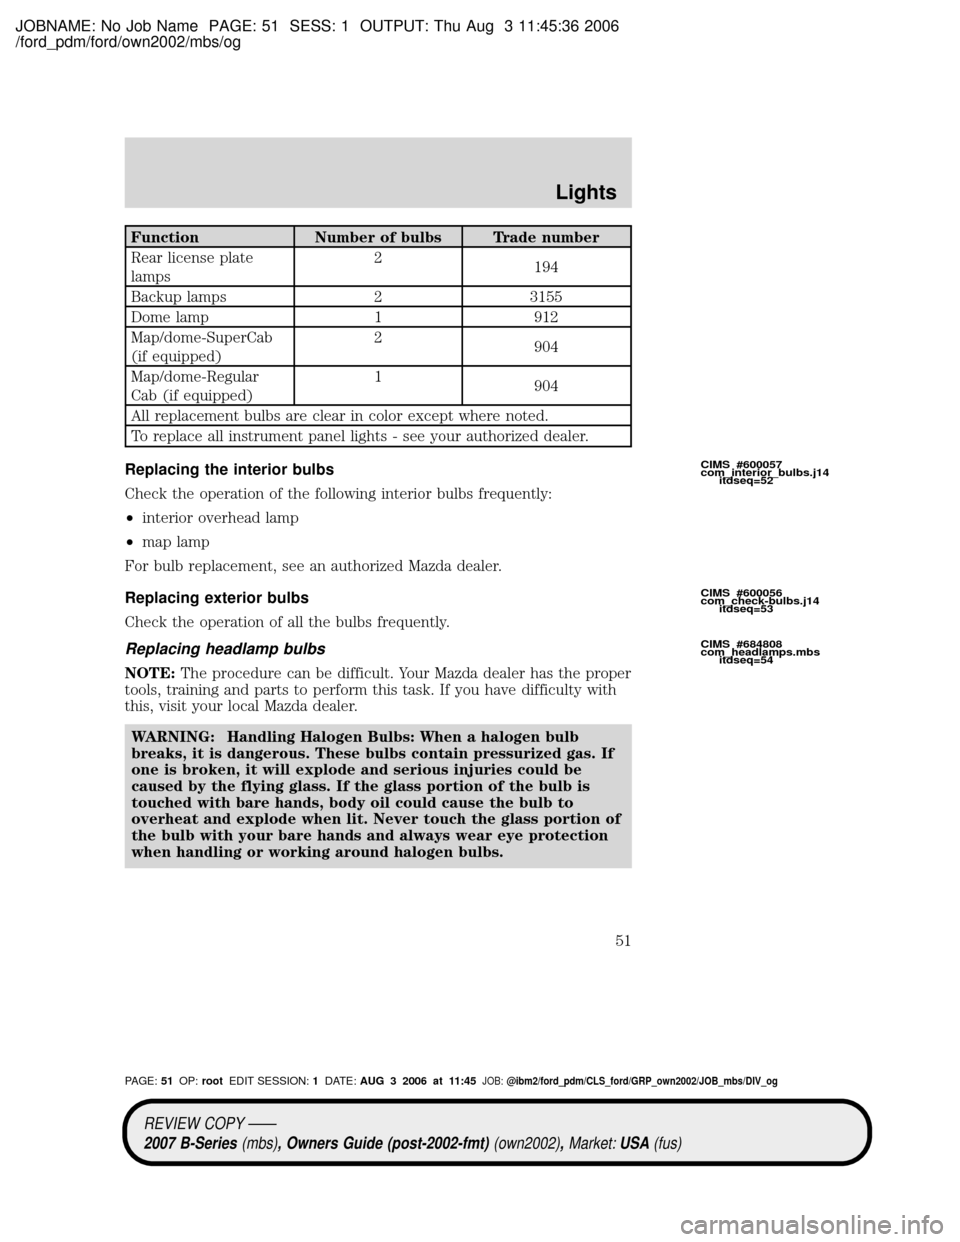
Function Number of bulbs Trade number
Rear license plate
lamps2
194
Backup lamps 2 3155
Dome lamp 1 912
Map/dome-SuperCab
(if equipped)2
904
Map/dome-Regular
Cab (if equipped)1
904
All replacement bulbs are clear in color except where noted.
To replace all instrument panel lights - see your authorized dealer.
Replacing the interior bulbs
Check the operation of the following interior bulbs frequently:
²interior overhead lamp
²map lamp
For bulb replacement, see an authorized Mazda dealer.
Replacing exterior bulbs
Check the operation of all the bulbs frequently.
Replacing headlamp bulbs
NOTE:The procedure can be difficult. Your Mazda dealer has the proper
tools, training and parts to perform this task. If you have difficulty with
this, visit your local Mazda dealer.
WARNING: Handling Halogen Bulbs: When a halogen bulb
breaks, it is dangerous. These bulbs contain pressurized gas. If
one is broken, it will explode and serious injuries could be
caused by the flying glass. If the glass portion of the bulb is
touched with bare hands, body oil could cause the bulb to
overheat and explode when lit. Never touch the glass portion of
the bulb with your bare hands and always wear eye protection
when handling or working around halogen bulbs.
CIMS #600057
com_interior_bulbs.j14
itdseq=52
CIMS #600056
com_check-bulbs.j14
itdseq=53
CIMS #684808
com_headlamps.mbs
itdseq=54
REVIEW COPY ÐÐ
2007 B-Series(mbs), Owners Guide (post-2002-fmt)(own2002),Market:USA(fus)
PAGE:51OP:rootEDIT SESSION:1DATE:AUG 3 2006 at 11:45JOB:@ibm2/ford_pdm/CLS_ford/GRP_own2002/JOB_mbs/DIV_og
Lights
51
Page 52 of 279
JOBNAME: No Job Name PAGE: 52 SESS: 1 OUTPUT: Thu Aug 3 11:45:36 2006
/ford_pdm/ford/own2002/mbs/og
WARNING: Children and Halogen Bulbs: Playing with a halogen
bulb is dangerous. Serious injuries could be caused by dropping
a halogen bulb or breaking in some other way. Always keep
halogen bulbs out of the reach of children.
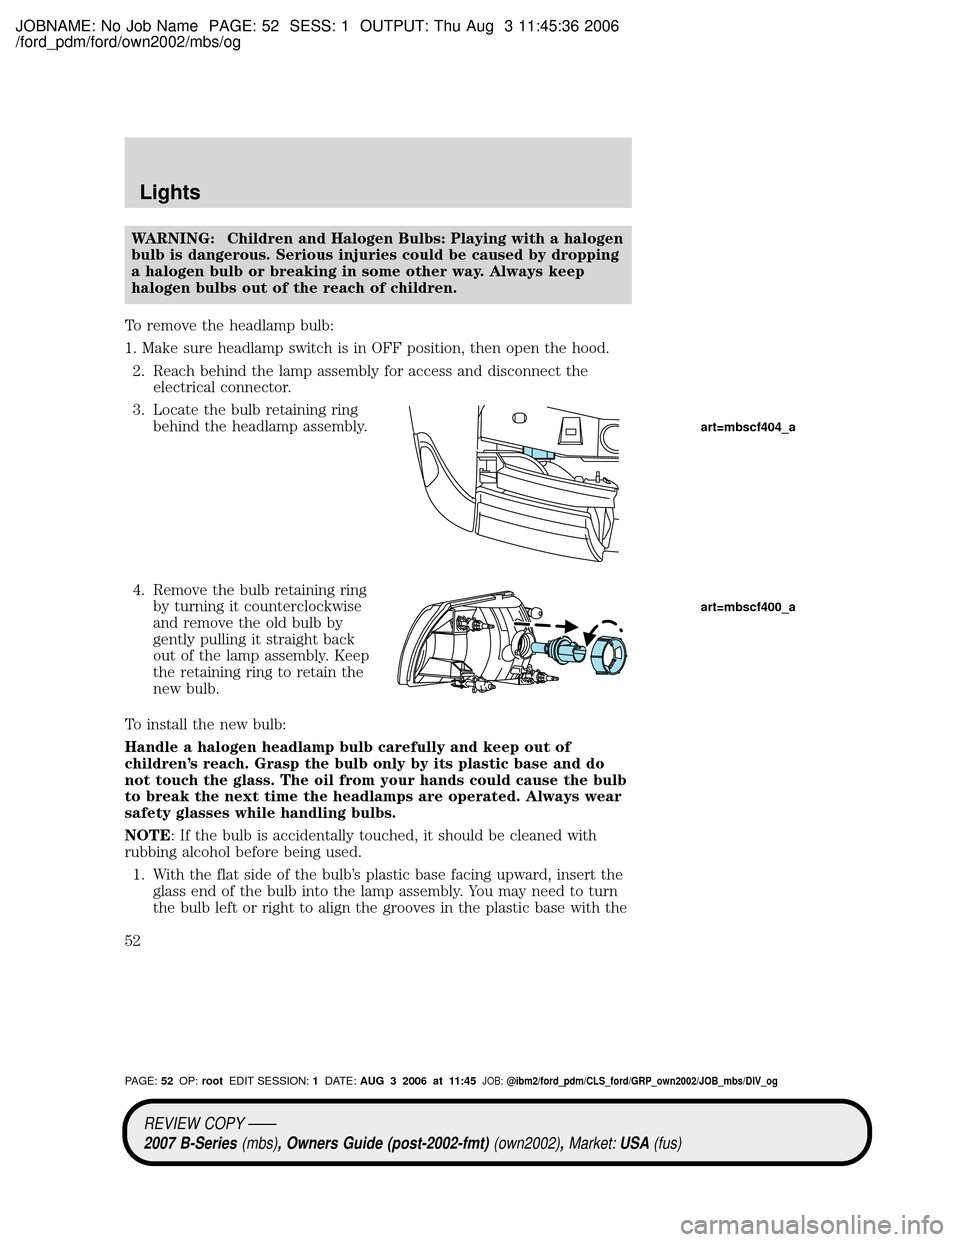
To remove the headlamp bulb:
1. Make sure headlamp switch is in OFF position, then open the hood.
2. Reach behind the lamp assembly for access and disconnect the
electrical connector.
3. Locate the bulb retaining ring
behind the headlamp assembly.
4. Remove the bulb retaining ring
by turning it counterclockwise
and remove the old bulb by
gently pulling it straight back
out of the lamp assembly. Keep
the retaining ring to retain the
new bulb.
To install the new bulb:
Handle a halogen headlamp bulb carefully and keep out of
children's reach. Grasp the bulb only by its plastic base and do
not touch the glass. The oil from your hands could cause the bulb
to break the next time the headlamps are operated. Always wear
safety glasses while handling bulbs.
NOTE: If the bulb is accidentally touched, it should be cleaned with
rubbing alcohol before being used.
1. With the flat side of the bulb's plastic base facing upward, insert the
glass end of the bulb into the lamp assembly. You may need to turn
the bulb left or right to align the grooves in the plastic base with the
art=mbscf404_a
art=mbscf400_a
REVIEW COPY ÐÐ
2007 B-Series(mbs), Owners Guide (post-2002-fmt)(own2002),Market:USA(fus)
PAGE:52OP:rootEDIT SESSION:1DATE:AUG 3 2006 at 11:45JOB:@ibm2/ford_pdm/CLS_ford/GRP_own2002/JOB_mbs/DIV_og
Lights
52
Page 55 of 279
JOBNAME: No Job Name PAGE: 55 SESS: 1 OUTPUT: Thu Aug 3 11:45:36 2006
/ford_pdm/ford/own2002/mbs/og
Replacing fog lamp bulbs
WARNING: Handling Halogen Bulbs: When a halogen bulb
breaks, it is dangerous. These bulbs contain pressurized gas. If
one is broken, it will explode and serious injuries could be
caused by the flying glass. If the glass portion of the bulb is
touched with bare hands, body oil could cause the bulb to
overheat and explode when lit. Never touch the glass portion of
the bulb with your bare hands and always wear eye protection
when handling or working around halogen bulbs.
WARNING: Children and Halogen Bulbs: Playing with a halogen
bulb is dangerous. Serious injuries could be caused by dropping
a halogen bulb or breaking in some other way. Always keep
halogen bulbs out of the reach of children.
NOTE: If the bulb is accidentally touched, it should be cleaned with
rubbing alcohol before being used.
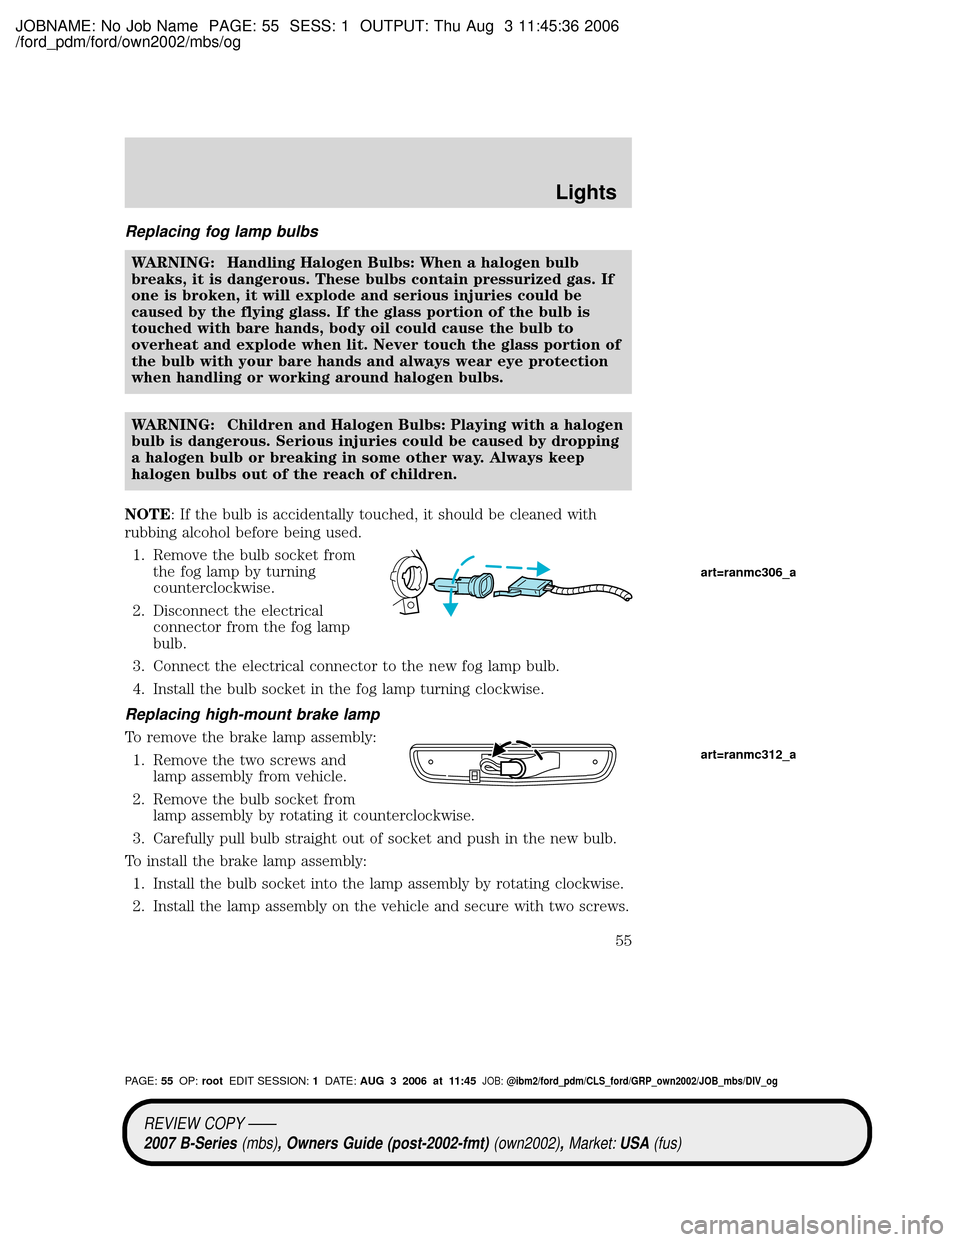
1. Remove the bulb socket from
the fog lamp by turning
counterclockwise.
2. Disconnect the electrical
connector from the fog lamp
bulb.
3. Connect the electrical connector to the new fog lamp bulb.
4. Install the bulb socket in the fog lamp turning clockwise.
Replacing high-mount brake lamp
To remove the brake lamp assembly:
1. Remove the two screws and
lamp assembly from vehicle.
2. Remove the bulb socket from
lamp assembly by rotating it counterclockwise.
3. Carefully pull bulb straight out of socket and push in the new bulb.
To install the brake lamp assembly:
1. Install the bulb socket into the lamp assembly by rotating clockwise.
2. Install the lamp assembly on the vehicle and secure with two screws.
art=ranmc306_a
art=ranmc312_a
REVIEW COPY ÐÐ
2007 B-Series(mbs), Owners Guide (post-2002-fmt)(own2002),Market:USA(fus)
PAGE:55OP:rootEDIT SESSION:1DATE:AUG 3 2006 at 11:45JOB:@ibm2/ford_pdm/CLS_ford/GRP_own2002/JOB_mbs/DIV_og
Lights
55
Page 76 of 279
JOBNAME: No Job Name PAGE: 76 SESS: 1 OUTPUT: Thu Aug 3 11:45:36 2006
/ford_pdm/ford/own2002/mbs/og
²Front passenger sensing system
²Passenger Airbag Off indicator light.
²Restraints Control Module (RCM) with impact and safing sensors.
²Restraint system warning light and back-up tone.
²The electrical wiring for the airbags, crash sensor(s), safety belt
pretensioners, front safety belt usage sensors, driver seat position
sensor, and indicator lights.
How does the Personal Safety SystemYwork?
The Personal Safety Systemycan adapt the deployment strategy of your
vehicle's safety devices according to crash severity and occupant
classification and conditions. A collection of crash and occupant sensors
provides information to the Restraints Control Module (RCM). During a
crash, the RCM activates the safety belt pretensioners and/or either
none, one, or both stages of the dual-stage airbag supplemental restraints
based on crash severity and occupant classification and conditions.
The fact that the pretensioners or airbags did not activate for both front
seat occupants in a collision does not mean that something is wrong with
the system. Rather, it means the Personal Safety Systemydetermined
the accident conditions (crash severity, belt usage, etc.) were not
appropriate to activate these safety devices. Front airbags and
pretensioners are designed to activate only in frontal and near-frontal
collisions, not rollovers, side-impacts, or rear-impacts unless the collision
causes sufficient longitudinal deceleration.
Driver and passenger dual-stage airbag supplemental restraints
The dual-stage airbags offer the capability to tailor the level of airbag
inflation energy. A lower, less forceful energy level is provided for more
common, moderate-severity impacts. A higher energy level is used for
the most severe impacts. Refer toAirbag Supplemental Restraints
section in this chapter.
Front crash severity sensor
The front crash severity sensor enhances the ability to detect the
severity of an impact. Positioned up front, it provides valuable
information early in the crash event on the severity of the impact. This
allows your Personal Safety Systemyto distinguish between different
levels of crash severity and modify the deployment strategy of the
dual-stage airbags and safety belt pretensioners.
Driver's seat position sensor
The driver's seat position sensor allows your Personal Safety Systemyto
tailor the deployment level of the driver dual-stage airbag based on seat
CIMS #1534971
com_how_work-pss_ran
itdseq=95
REVIEW COPY ÐÐ
2007 B-Series(mbs), Owners Guide (post-2002-fmt)(own2002),Market:USA(fus)
PAGE:76OP:rootEDIT SESSION:1DATE:AUG 3 2006 at 11:45JOB:@ibm2/ford_pdm/CLS_ford/GRP_own2002/JOB_mbs/DIV_og
Seating and Safety Restraints
76
Page 78 of 279
JOBNAME: No Job Name PAGE: 78 SESS: 1 OUTPUT: Thu Aug 3 11:45:36 2006
/ford_pdm/ford/own2002/mbs/og
allows your Personal Safety Systemyto tailor the airbag deployment and
safety belt pretensioner activation depending upon safety belt usage.
Refer toSafety belt usage sensorslater in this chapter.
Front outboard safety belt pretensioners
The safety belt pretensioners at the front outboard seating positions are
designed to tighten the safety belts firmly against the occupant's body
during frontal collisions, and in side collisions and rollovers when the
vehicle is equipped with the Safety Canopyysystem. This helps increase
the effectiveness of the safety belts. In frontal collisions, the safety belt
pretensioners can be activated alone or, if the collision is of sufficient
severity, together with the front airbags.
Front outboard safety belt energy management retractors
The front safety belt energy management retractors allow webbing to be
pulled out of the retractor in a gradual and controlled manner in
response to the occupant's forward momentum. This helps reduce the
risk of force-related injuries to the occupant's chest by limiting the load
on the occupant. Refer toEnergy management retractorssection in
this chapter.
Determining if the Personal Safety SystemYis operational
The Personal Safety Systemyuses a warning light in the instrument
cluster or a back-up tone to indicate the condition of the system. Refer
to theWarning lights and chimessection in theInstrument Cluster
chapter. Routine maintenance of the Personal Safety Systemyis not
required.
The Restraints Control Module (RCM) monitors its own internal circuits
and the circuits for the airbag supplemental restraints, crash sensor(s),
safety belt pretensioners, front safety belt buckle sensors, front
passenger sensing system, and the driver seat position sensor. In
addition, the RCM also monitors the restraints warning light in the
instrument cluster. A difficulty with the system is indicated by one or
more of the following.
²The warning light will either flash or stay lit.
²The warning light will not illuminate immediately after ignition is
turned on.
²A series of five beeps will be heard. The tone pattern will repeat
periodically until the problem and warning light are repaired.
If any of these things happen, even intermittently, have the Personal
Safety Systemyserviced at an authorized dealer immediately. Unless
serviced, the system may not function properly in the event of a
collision.
REVIEW COPY ÐÐ
2007 B-Series(mbs), Owners Guide (post-2002-fmt)(own2002),Market:USA(fus)
PAGE:78OP:rootEDIT SESSION:1DATE:AUG 3 2006 at 11:45JOB:@ibm2/ford_pdm/CLS_ford/GRP_own2002/JOB_mbs/DIV_og
Seating and Safety Restraints
78