lock MAZDA MODEL CX-5 2020 Owners Manual (in English)
[x] Cancel search | Manufacturer: MAZDA, Model Year: 2020, Model line: MODEL CX-5, Model: MAZDA MODEL CX-5 2020Pages: 714
Page 563 of 714

CAUTION
When removing the lens or lamp unit using
a flathead screwdriver, make sure that the
flathead screwdriver does not contact the
interior terminal. If the flathead screwdriver
contacts the terminal, a short circuit may
occur.
NOTE
ď‚·To replace the bulb, contact an
Authorized Mazda Dealer.
ď‚·Use the protective cover and carton for
the replacement bulb to dispose of the
old bulb promptly and out of the reach
of children.
â–ĽReplacing Exterior Light Bulbs
The exterior lights have either LEDs or
normal bulbs.
LED type
ď‚·Headlights/Daytime running lights
ď‚·Daytime running light
s/Parking lights
(Type A)
ď‚·Front side-marker lights (Type A)
ď‚·Fog lights*
ď‚·Brake lights (Type A)
ď‚·Taillights (Type A)
ď‚·Reverse lights
ď‚·High-mount brake light
ď‚·Side turn signal lights
ď‚·Rear side-marker lights (Type A)
ď‚·License plate lights
The LED bulb cannot be replaced as a
single unit because it is an integrated unit.
The LED bulb has to be replaced with the
unit. We recommend an Authorized
Mazda Dealer when the replacement is
necessary.
Bulb type
Front turn signal lights/Parking lights
1. Make sure the ignition is switched off, and the headlight switch is off.
2. Lift the hood.
Refer to Hood on page 6-21.
3. Turn the socket and bulb assembly
counterclockwise and remove it.
4. Disconnect the bulb from the socket.
5. Install the new bulb in the reverse order of the removal procedure.
Front side-marker lights (Type B)
1. Make sure the ignition is switched off, and the headlight switch is off.
2. If you are changing the right bulb, start
the engine, turn the steering wheel all
the way to the left, and turn off engine.
If you are changing the left bulb, turn
the steering wheel to the right.
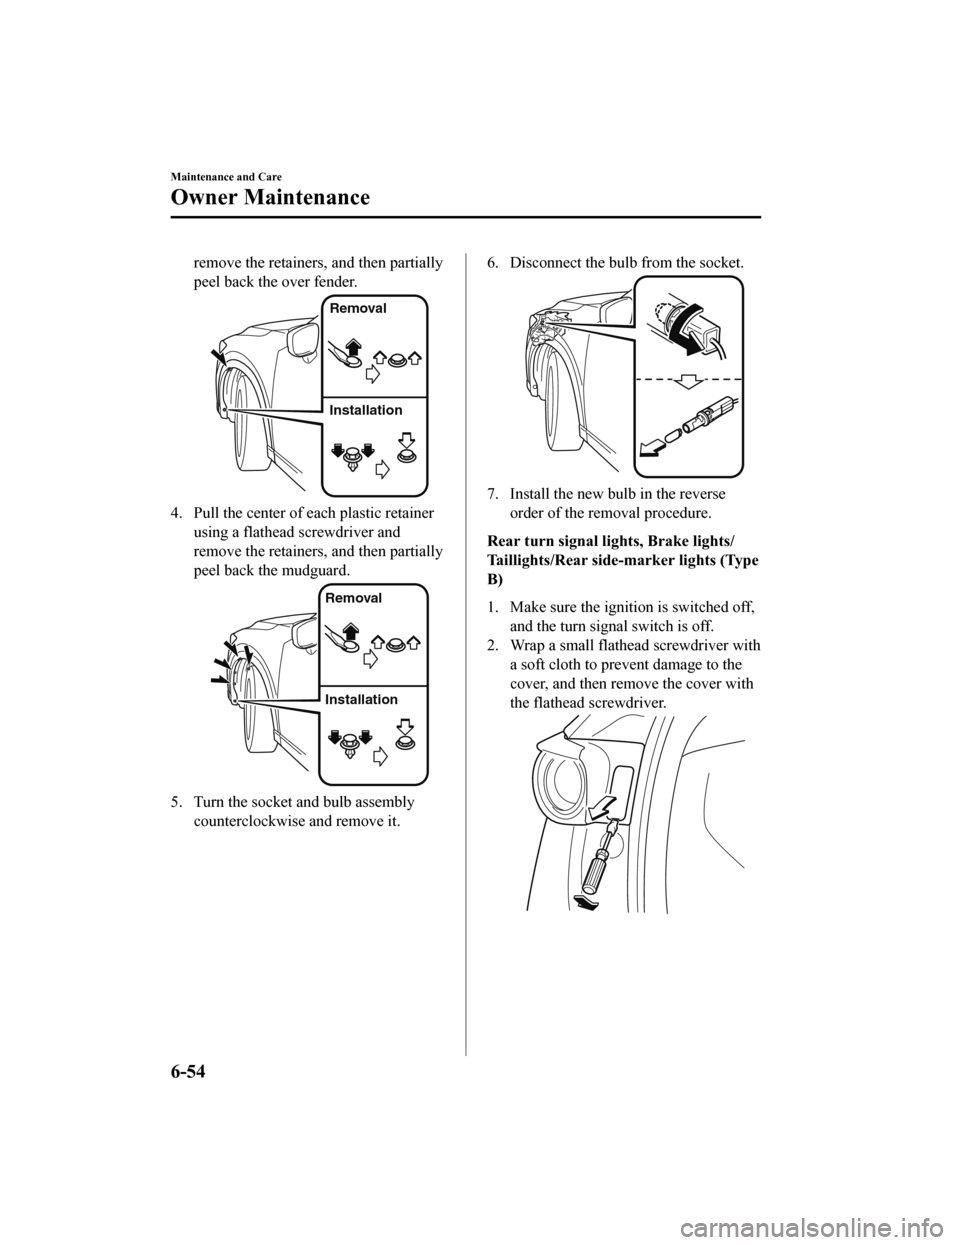
3. Pull the center of each plastic retainer using a flathead screwdriver and
Maintenance and Care
Owner Maintenance
*Some models.6-53
CX-5_8HX6-EA-19I_Edition2_old 2019-9-19 9:26:07
Page 564 of 714

remove the retainers, and then partially
peel back the over fender.
Removal
Installation
4. Pull the center of each plastic retainerusing a flathead screwdriver and
remove the retainers, and then partially
peel back the mudguard.
Removal
Installation
5. Turn the socket and bulb assemblycounterclockwise and remove it.
6. Disconnect the bulb from the socket.
7. Install the new bulb in the reverseorder of the removal procedure.
Rear turn signal lights, Brake lights/
Taillights/Rear side-marker lights (Type
B)
1. Make sure the ignition is switched off, and the turn signal switch is off.
2. Wrap a small flathead screwdriver with
a soft cloth to prevent damage to the
cover, and then remove the cover with
the flathead screwdriver.
Maintenance and Care
Owner Maintenance
6-54
CX-5_8HX6-EA-19I_Edition2_old 2019-9-19 9:26:07
Page 565 of 714

3. Turn the screws counterclockwise andremove them.
4. Pull the unit rearward to remove it.
5. Turn the socket and bulb assemblycounterclockwise and remove it.
6. Disconnect the bulb from the socket.
Rear turn signal lights
Brake lights/Taillights/Rear
side-marker lights
7. Install the new bulb in the reverseorder of the removal procedure.
â–ĽReplacing Interior Light Bulbs
The interior lights have either LEDs or
normal bulbs.
LED type
ď‚·Overhead lights/Front map lights
ď‚·Rear map lights
ď‚·Vanity mirror lights*
ď‚·Luggage compartment light
ď‚·Ambient lights*
The LED bulb cannot be replaced as a
single unit because it is an integrated unit.
The LED bulb has to be replaced with the
unit. We recommend an Authorized
Mazda Dealer when the replacement is
necessary.
Bulb type
Overhead light/Front map lights, Rear
map lights, Vanity mirror lights
*
1. Wrap a flathead sc
rewdriver with a
soft cloth to prevent damage to the
lens, and then remove the lens by
carefully prying on the edge of the lens
with a flathead screwdriver.
Maintenance and Care
Owner Maintenance
*Some models.6-55
CX-5_8HX6-EA-19I_Edition2_old 2019-9-19 9:26:07
Page 569 of 714

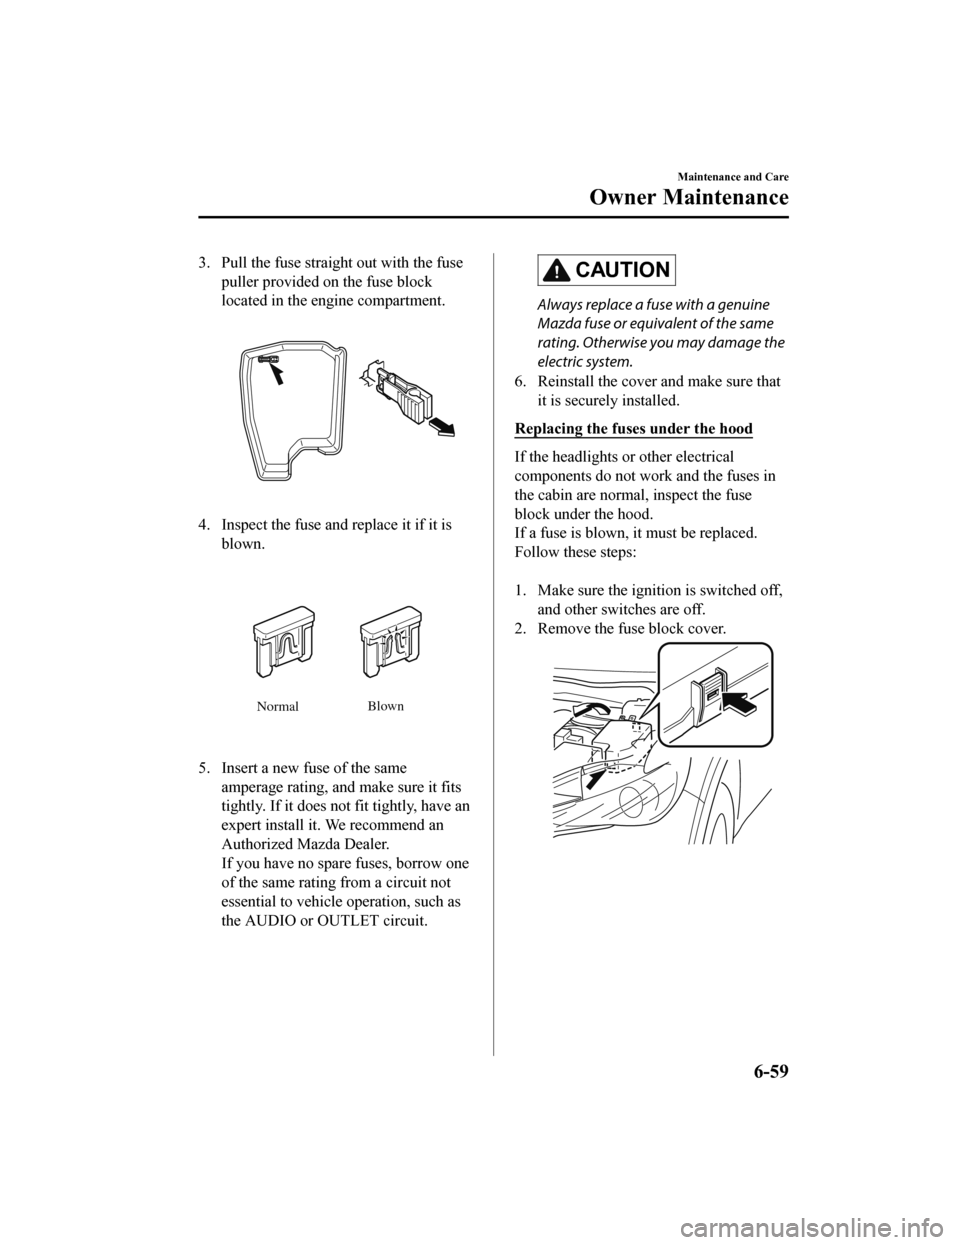
3. Pull the fuse straight out with the fusepuller provided on the fuse block
located in the engine compartment.
4. Inspect the fuse and replace it if it isblown.
Normal Blown
5. Insert a new fuse of the same
amperage rating, and make sure it fits
tightly. If it does not fit tightly, have an
expert install it. We recommend an
Authorized Mazda Dealer.
If you have no spare fuses, borrow one
of the same rating from a circuit not
essential to vehicle operation, such as
the AUDIO or OUTLET circuit.
CAUTION
Always replace a fuse with a genuine
Mazda fuse or equivalent of the same
rating. Otherwise you may damage the
electric system.
6. Reinstall the cover and make sure that it is securely installed.
Replacing the fuses under the hood
If the headlights or other electrical
components do not work and the fuses in
the cabin are normal, inspect the fuse
block under the hood.
If a fuse is blown, it must be replaced.
Follow these steps:
1. Make sure the ignition is switched off, and other switches are off.
2. Remove the fuse block cover.
Maintenance and Care
Owner Maintenance
6-59
CX-5_8HX6-EA-19I_Edition2_old 2019-9-19 9:26:07
Page 571 of 714

â–ĽFuse Panel Description
Fuse block (Engine compartment)
DESCRIPTION FUSE
RATING PROTECTED COMPONENT
1 CABIN.+B 50 A For protection of various circuits
2 IG2 30 A For protection of various circuits
3 INJECTOR
ENG.SUB 30 A
Engine control system
*
4 SCR1
EVVT 20 A Engine control system
5 P.WINDOW1 30 A ―
6 R.HEATER 20 A ―
7 ADD FAN DE 40 A Cooling fan
*
8 WIPER.DEI 20 AWindshield wiper de-icer*
9DEFOG 40 A Rear window defogger
10 DCDC DE 40 A ―
11 EPB R 20 A Electric parking brake (EPB) (RH)
12 EPB L 20 A Electric parking brake (EPB) (LH)
Maintenance and Care
Owner Maintenance
*Some models.6-61
CX-5_8HX6-EA-19I_Edition2_old 2019-9-19 9:26:07
Page 573 of 714

DESCRIPTIONFUSE
RATING PROTECTED COMPONENT
47 FUEL WARM 25 A Fuel warmer
*
48TAIL 15 A Taillights, License plate lights, Parking lights
49 SCR2
FUEL PUMP2 25 A
Engine control system
*
50 HAZARD 25 A Hazard warning flashers, Turn signal lights, Parking lights
51 H/L LOW R 15 A Headlight low beam (RH)
52 OUTLET 25 A Accessory sockets
53 STOP 10 A Brake lights
54 ROOM 15 A For protection of various circuit
Fuse block (Left side)
DESCRIPTION FUSE
RATING PROTECTED COMPONENT
1 P.SEAT D 30 A Power seat
*
2 P.WINDOW3 30 A Power windows
3 R.OUTLET3 15 A Accessory sockets
4 P.WINDOW2 25 A Power windows
5ESC L 1 5 A
Trailer hitch
*
Maintenance and Care
Owner Maintenance
*Some models.6-63
CX-5_8HX6-EA-19I_Edition2_old 2019-9-19 9:26:07
Page 574 of 714

DESCRIPTIONFUSE
RATING PROTECTED COMPONENT
6 D.LOCK 25 A Power door locks
7 SEAT WARM 20 A Seat warmer
*
8 SUNROOF 10 AMoonroof*
9 F.OUTLET 15 A Accessory sockets
10 MIRROR 7.5 A Power control mirror 11 R.OUTLET1 15 A ―
12 SCR3 15 A
Engine control system
*
13 SCR4 15 A
Engine control system*
14 R.OUTLET2 15 A Accessory sockets
15 USB 7.5 A USB power outlet
*
16PLG 20 A
Power liftgate*
17 M.DEF 7.5 A
Mirror defogger*
18 R.SEAT W 20 A Rear seat warmer*
19―― ―
20 AT IND 7.5 A AT shift indicator
*
21 P.SEAT P 30 APower seat*
Maintenance and Care
Owner Maintenance
6-64*Some models.
CX-5_8HX6-EA-19I_Edition2_old 2019-9-19 9:26:07
Page 590 of 714

hold-down bolt counterclockwise and
remove the spare tire.
Spare tire hold-down bolt
To secure the spare tire
Store the spare tire in the reverse order of
removal. After storing, verify that the
spare tire is stored securely.
Changing a Flat Tire
NOTE
If the following occurs while driving, it
could indicate a flat tire.
ď‚·Steering becomes difficult.
ď‚·The vehicle begins to vibrate
excessively.
ď‚·The vehicle pulls in one direction.
If you have a flat tire, drive slowly to a
level spot that is well off the road and out
of the way of traffic to change the tire.
Stopping in traffic or on the shoulder of a
busy road is dangerous.
WA R N I N G
Be sure to follow the directions for
changing a tire:
Changing a tire is dangerous if not done
properly. The vehicle can slip off the jack
and seriously injure someone.
No person should plac e any portion of their
body under a vehicle that is supported by a
jack.
Never allow anyone inside a vehicle
supported by a jack:
Allowing someone to remain in a vehicle
supported by a jack is dangerous. The
occupant could cause the vehicle to fall
resulting in serious injury.
NOTE
Make sure the jack is well lubricated
before using it.
1. Park on a hard, level surface off the right-of-way and firmly set the parking
brake.
If Trouble Arises
Flat Tire
7-6
CX-5_8HX6-EA-19I_Edition2_old 2019-9-19 9:26:07
Page 591 of 714

2. Put a vehicle with an automatictransaxle in Park (P), a manual
transaxle in Reverse (R) or 1, and turn
off the engine.
3. Turn on the hazard warning flasher.
4. Have passengers get out of the vehicle
and away from the vehicle and traffic.
5. Remove any luggage, the jack, tools, and spare tire (page 7-3).
6. Block the wheel diagonally opposite the flat tire. When blocking a wheel,
place a tire block both in front and
behind the tire.
NOTE
When blocking a tire, use rocks or
wood blocks of sufficient size if
possible to hold the tire in place.
â–ĽRemoving a Flat Tire
WA R N I N G
When jacking-up a vehicle, always shift the
shift lever to 1st or R position (manual
transaxle vehicle) or shift the selector lever
to P position (automatic transaxle vehicle),
apply the parking brake, and place wheel
blocks in the position diagonally opposed
to the jack:
Changing a
flat tire without using wheel
blocks is dangerous because the vehicle
may move and fall off the jack even with
the shift lever in 1st or R position, or the
selector lever is in P position, which could
result in an accident.
1. If your vehicle is equipped with steel wheels, pry off the center cap with the
beveled end of the jack lever.
CAUTION
Use the jack lever when removing the
center cap. Using your hands to remove
it may cause an injury. In addition,
using a tool other than the jack lever
may cause damage to the wheel or the
center cap.
2. Loosen the lug nu ts by turning them
counterclockwise one turn each, but do
If Trouble Arises
Flat Tire
7-7
CX-5_8HX6-EA-19I_Edition2_old 2019-9-19 9:26:07
Page 592 of 714

not remove any lug nuts until the tire
has been raised off the ground.
3. Place the jack on the ground.
4. Turn the jack screw in the directionshown in the figure and adjust the jack
head so that it is close to the jack-up
position.
Jack head
5. Place the jack under the jack-upposition closest to the tire being
changed with the jack head squarely
under the jack-up point.
Jacking position
6. Continue raising the jack head
gradually by rotating the screw with
your hand until the jack head is
inserted into the jack-up position.
Tire blocks
Jacking position
WARNING
Use only the front and rear jacking
positions recommended in this manual:
Attempting to jack the vehicle in
positions other than those
recommended in this manual is
dangerous. The vehicle could slip off
the jack and seriously injure or even kill
someone. Use only the front and rear
jacking positions recommended in this
manual.
Do not jack up the vehicle in a position
other than the designated jack-up
position or place any objects on or
under the jack:
Jacking up the vehicle in a position
other than the designated jack-up
position or placing objects on or under
the jack is dangerous as it could deform
the vehicle body or the vehicle could fall
off the jack resulting in an accident.
If Trouble Arises
Flat Tire
7-8
CX-5_8HX6-EA-19I_Edition2_old 2019-9-19 9:26:07