lift gate MAZDA MODEL CX-50 2023 Owner's Manual
[x] Cancel search | Manufacturer: MAZDA, Model Year: 2023, Model line: MODEL CX-50, Model: MAZDA MODEL CX-50 2023Pages: 583, PDF Size: 85.63 MB
Page 113 of 583

A beep sound is activated, and the
liftgate moves in the reverse
direction automatically and closes.
When the liftgate is closing
A beep sound is activated, but the
liftgate continues to close.
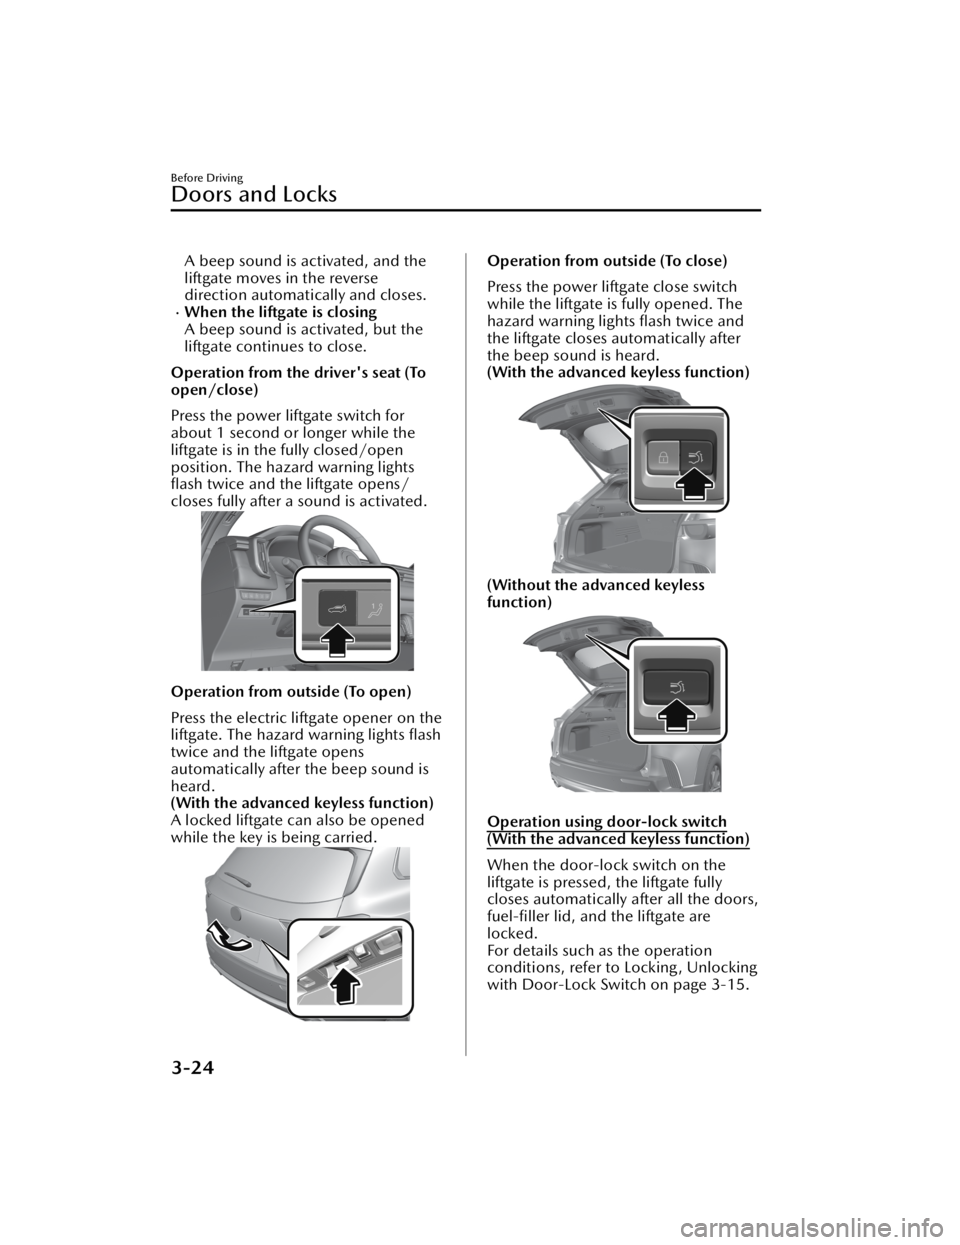
Operation from the driver's seat (To
open/close)
Press the power liftgate switch for
about 1 second or longer while the
liftgate is in the fully closed/open
position. The hazard warning lights
flash twice and the liftgate opens/
closes fully after a sound is activated.
Operation from outside (To open)
Press the electric liftgate opener on the
liftgate. The hazard warning lights flash
twice and the liftgate opens
automatically after the beep sound is
heard.
(With the advanced keyless function)
A locked liftgate can also be opened
while the key is being carried.
Operation from outside (To close)
Press the power liftgate close switch
while the liftgate is fully opened. The
hazard warning lights flash twice and
the liftgate closes automatically after
the beep sound is heard.
(With the advanced keyless function)
(Without the advanced keyless
function)
Operation using door-lock switch
(With the advanced keyless function)
When the door-lock switch on the
liftgate is pressed, the liftgate fully
closes automatically after all the doors,
fuel-filler lid, and the liftgate are
locked.
For details such as the operation
conditions, refer to Locking , Unlocking
with Door-Lock Switch on page 3-15.
Before Driving
Doors and Locks
3-24
CX-50_8KB8-EA-22A_Edition2_new 2022-1-6 14:55:18
Page 114 of 583

Automatic open/close stop function
The liftgate can be stopped at a
desired position while it is opening/
closing automatically.
Stopping the liftgate
If any of the following operations is
done while the liftgate is opening/
closing automatically, the liftgate is
stopped.
The power liftgate button on the
transmitter is pressed.
The power liftgate switch is pressed.The electric liftgate opener on the
liftgate is pressed.
The power liftgate close switch is
pressed.
(With the advanced keyless
function)
The door-lock switch on the liftgate
is pressed.
NOTE
The liftgate cannot be stopped in the
area about 20 cm (7.9 in) away from
the fully-closed position. It moves in
the close direction by the load weight
of the liftgate itself.
Moving the liftgate again
If any of the following operations is
done, the liftgate moves in the
direction opposite to the direction it
was moving before it stopped.
The power liftgate button on the
transmitter is pressed for about 1
second or longer.
The power liftgate switch is pressed
for about 1 second or longer.
The electric liftgate opener on the
liftgate is pressed.
The power liftgate close switch is
pressed.
(With the advanced keyless function)
When the door-lock switch on the
liftgate is pressed, the liftgate
automatically closes.
Changing the power liftgate fully
open position
The power liftgate fully-open position
can be changed according to the
height of a garage.
When changing the position
1. Stop the liftgate at the desired position.
2. Press the power liftgate close switch
for about three seconds.
A beep sound is activated two
times to indicate that the position
change has been completed.
NOTE
Set the desired fully-open position of
the liftgate at the position where it is
open more than halfway. The position
where it is less than halfway open
cannot be set.
To r e s e t
1. Open the liftgate.
2. Press the power liftgate close switchfor about seven seconds.
A beep sound is activated three
times to indicated that the reset has
been completed.
NOTE
After about 3 seconds have elapsed
since the switch was pressed, a beep
sound is activated 2 times to indicate
that the liftgate fully-open position has
changed. Continuously press the
switch for about 7 seconds to
complete the reset.
Jam-safe equipment
While the power liftgate is opening/
closing electrically and the system
detects a person or an object in the
Before Driving
Doors and Locks
3-25
CX-50_8KB8-EA-22A_Edition2_new 2022-1-6 14:55:18
Page 115 of 583

liftgate's path, the liftgate will move in
the reverse direction automatically and
stops.
WARNING
Always check the area around the
power liftgate before opening/closing
it:
Not checking for occupants and
objects around the power liftgate
before opening/closing it is
dangerous. The jam-safe equipment is
designed to prevent jamming in the
event an obstruction is in the liftgate's
path. The system may not detect
certain objects obstructing the liftgate
depending on the way they are
positioned and their shape. However,
if the jam-safe function detects an
obstruction and moves the liftgate in
the reverse direction, an occupant in
the liftgate's path could be seriously
injured.
CAUTION
Sensors are installed on both ends of
the power liftgate. Be careful not to
allow the sensors to be scratched or
damaged by sharp objects, otherwise
the liftgate may no longer open/close
automatically. In addition, if the sensor
is damaged while the liftgate is closing
automatically, the system will stop.
1. Sensor
NOTE
The jam-safe equipment does not
activate during easy closure operation
when the power liftgate is between the
near-shut position and fully closed
position.
When the power liftgate is moving in
the open/close direction and an
obstruction is detected, the beep
sound will be heard and the liftgate
moves in the reverse direction and
stops.
Liftgate easy closure
The Easy Closure system automatically
closes the liftgate completely from the
near-shut position.
This system also operates when the
liftgate is closed manually.
WARNING
When closing a liftgate, always keep
hands and fingers away from the
liftgate:
Placing hands or fingers around a
liftgate is dangerous because the
liftgate closes automatically from the
near-shut position, which could cause
hands and fingers to be pinched and
injured.
NOTE
If the electric liftgate opener is
pressed while the easy closure
function is operating, the liftgate can
be opened.
If the liftgate is opened/closed
repeatedly in a short period of time,
the easy closure function may not
operate. Wait for about 2 seconds
and then try again.
Before Driving
Doors and Locks
3-26
CX-50_8KB8-EA-22A_Edition2_new2022-1-6 14:55:18
Page 119 of 583

CAUTION
Always use only a genuine Mazda
fuel-filler cap or an approved
equivalent, available at an
Authorized Mazda Dealer. The
wrong cap can result in a serious
malfunction of the fuel and emission
control systems.
(U.S.A. and Canada)
It may also cause the check engine
light in the instrument cluster to
illuminate.
When using an automatic car wash
or a high water pressure car washer,
lock the vehicle. Otherwise, the
fuel-filler lid may open unexpectedly
and could be damaged.
▼ Refueling
Before refueling, close all the doors,
windows, and liftgate, and switch the
ignition OFF.
1. Using the following , unlock the
driver’s door.
Transmitter (page 3-15)Touch sensor (page 3-13)Door-lock switch (page 3-15)Auto lock/unlock function (page
3-17)
NOTE
When unlocking the driver's
door, the fuel lid is also unlocked
at the same time.
When locking the driver's door,
the fuel lid is locked after 90
seconds.
The time until the fuel lid is
locked after locking the driver's
door can be changed.
Refer to the Settings section in
the Mazda Connect Owner's
Manual.
However, when the driver's door
is locked using the following
functions, the fuel lid is also
locked at the same time.
Auto lock/unlock function
(page 3-17)
Auto re-lock function (page
3-5) and (page 3-13)
2. Press the location shown in the illustration and open the fuel lid.
3. To remove the fuel-filler cap, turn itcounterclockwise.
4. Attach the removed cap to the inner side of the fuel-filler lid.
1. Fuel-filler lid
2. Fuel-filler cap
5. Insert the refueling nozzle all the way and begin refueling. Pull out
the refueling nozzle after the
refueling stops automatically.
6. To close the fuel-filler cap, turn it clockwise until a click is heard.
Before Driving
Fuel and Emission
3-30
CX-50_8KB8-EA-22A_Edition2_new 2022-1-6 14:55:18
Page 127 of 583

2. Make sure that the power windowlock switch located on the driver's
door is not depressed.
3. Press the switch and fully open the window.
4. Pull up the switch to fully close the window and continue holding the
switch for about 2 seconds after the
window fully closed.
5. Make sure that the power windows operate correctly using the door
switches.
▼Jam-safe Window
When the window is closing and a
foreign object is detected between the
window and the window frame, the
window stops closing and
automatically opens partway.
NOTE
The jam-safe function may operate
under the following conditions:
A strong impact is detected while
the window is closing.
The window is closing in very low
temperatures.
(A window cannot be closed)
If the jam-safe function has operated
and the window cannot be closed,
check around the window frame for
a foreign object.
If there is no foreign object around
the window frame, forcibly close a
window using the following
procedure.
1. After switching the ignition OFF,
wait for 45 seconds or longer.
2. Switch the ignition ON.
3. Operate the switch in the direction to close the window
until the jam-safe function
operates and the window stops.
Repeat this operation a total of 5
times.
4. Continue pulling up the switch tofully close the window.
▼Remote Power Window Operation
All power windows can be opened
from outside the vehicle after the
doors are closed.
The power windows can be operated
remotely when the power window lock
switch on the driver's door is in the
lock or unlocked position.
Remote power window operation is
activated under the following
conditions.
All the doors and liftgate are closed.The ignition is switched OFF.
NOTE
The power windows cannot be
opened from the outside of the vehicle
if the power window initialization has
not been completed.
Opening
The windows can be opened for
ventilating the cabin before getting in
the vehicle.
Press the unlock button on the key
quickly and briefly 3 times and then
immediately afterwards, press and
hold the unlock button to open the
windows.
To stop the windows from opening ,
release the button. If the operation is
performed from the beginning again,
the windows open.
Before Driving
Windows
3-38
CX-50_8KB8-EA-22A_Edition2_new
2022-1-6 14:55:18
Page 133 of 583

Theft-Deterrent System*
▼Theft-Deterrent System
If the theft-deterrent system detects an
inappropriate entry into the vehicle,
which could result in the vehicle or its
contents being stolen, the alarm alerts
the surrounding area of an abnormality
by sounding the horn and flashing the
hazard warning lights.
The system will not function unless it's
properly armed. So when you leave the
vehicle, follow the arming procedure
correctly.
▼Operation
System triggering conditions
The horn sounds intermittently and the
hazard warning lights flash for about
30 seconds when the system is
triggered by any one of the following:
Unlocking a door with the auxiliary
key, door lock switch, or an inside
door-lock knob.
Forcing open a door, the hood or the
liftgate.
Opening the hood by operating the
hood release handle.
Switching the ignition ON without
using the push button start.
If the system is triggered again, the
lights and horn will activate until the
driver's door or the liftgate is unlocked
with the transmitter.
(With the advanced keyless function)
The lights and horn can also be
deactivated by touching the sensing
area of the door release touch sensor.
NOTE
If the battery goes dead while the
theft-deterrent system is armed, the
horn will activate and the hazard
warning lights will flash when the
battery is charged or replaced.
▼ How to Arm the System
1. Close the windows and the
panorama sunroof* securely.
2. Switch the ignition OFF.
3. Make sure the hood, the doors, and the liftgate are closed.
4. Press the lock button on the transmitter.
The hazard warning lights will flash
once.
The following method will also arm
the theft-deterrent system:
Press the door-lock switch “
”
while any door is open and then
close all of the doors.
(With the advanced keyless
function)
Touch the sensing area of the door
lock touch sensor.
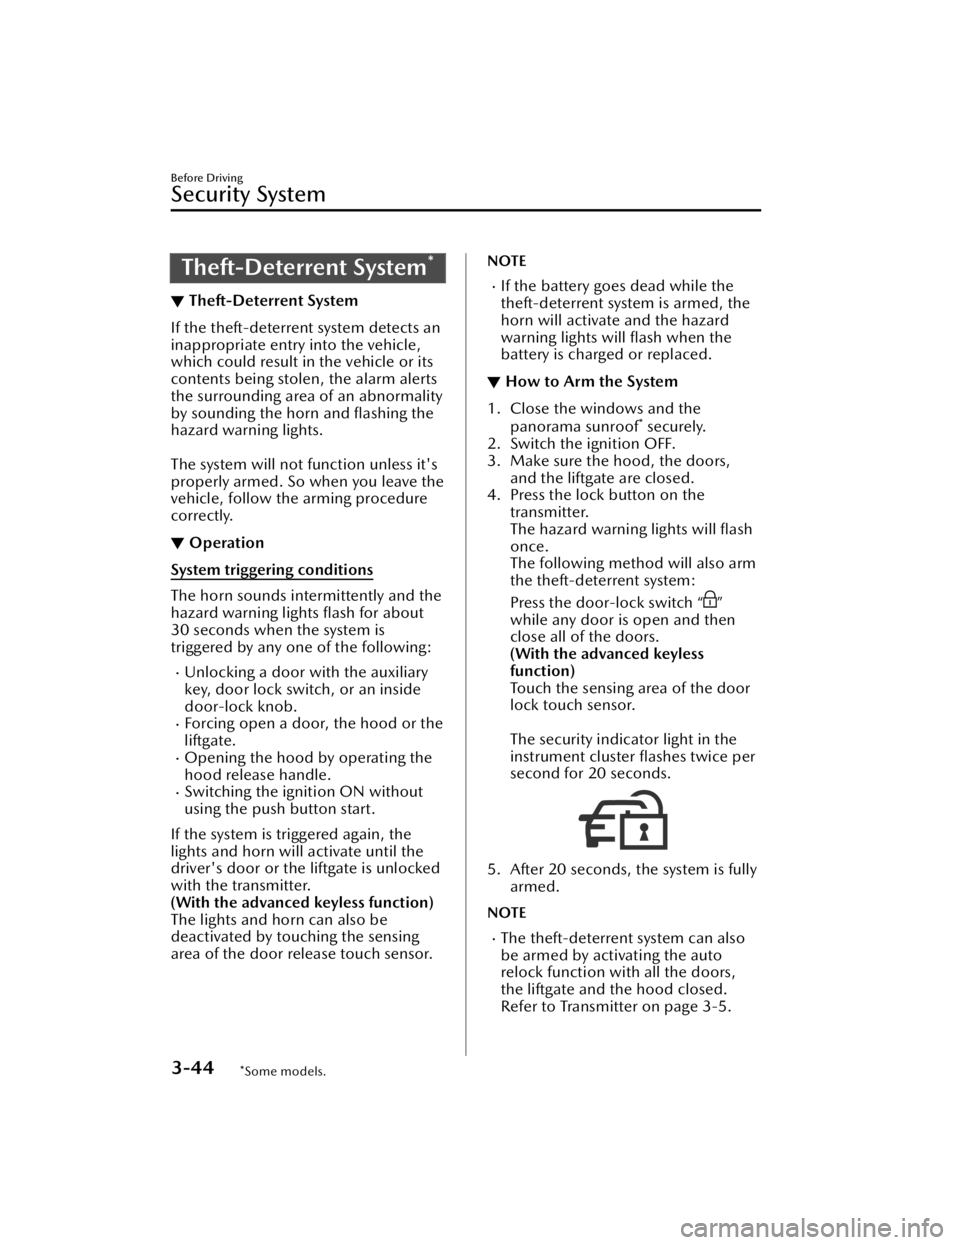
The security indicator light in the
instrument cluster flashes twice per
second for 20 seconds.
5. After 20 seconds, the system is fully armed.
NOTE
The theft-deterrent system can also
be armed by activating the auto
relock function with all the doors,
the liftgate and the hood closed.
Refer to Transmitter on page 3-5.
Before Driving
Security System
3-44*Some models.
CX-50_8KB8-EA-22A_Edition2_new 2022-1-6 14:55:18
Page 134 of 583

The system will disarm if one of the
following operations takes place
within 20 seconds after pressing the
lock button:
Unlocking any door.Opening any door.Opening the hood.Switching the ignition ON.
To rearm the system, do the arming
procedure again.
When the doors are locked by
pressing the lock button on the
transmitter while the theft-deterrent
system is armed, the hazard warning
lights will flash once to indicate that
the system is armed.
▼ To Tu r n
Off an Armed System
An armed system can be turned off
using any one of the following
methods:
Pressing the unlock button on the
transmitter.
Starting the engine with the push
button start.
(With the advanced keyless
function)
Touching the sensing area of the
door release touch sensor.
The hazard warning lights will flash
twice.
NOTE
When the doors are unlocked by
pressing the unlock button on the
transmitter while the theft-deterrent
system is turned off, the hazard
warning lights will flash twice to
indicate that the system is turned off.
▼ To S t o p t h e A l a r m
A triggered alarm can be turned off
using any one of the following
methods:
Pressing the unlock button on the
transmitter.
Starting the engine with the push
button start.
(With the advanced keyless
function)
Touching the sensing area of the
door release touch sensor.
Pressing the electric liftgate opener
while the key is being carried.
The hazard warning lights will flash
twice.
Before Driving
Security System
3-45
CX-50_8KB8-EA-22A_Edition2_new 2022-1-6 14:55:18
Page 163 of 583

(When the vehicle is stopped by the
MRCC with Stop & Go function/TJA
stop hold control)
1. When the vehicle is stopped by theMRCC with Stop & Go function/
TJA, engine idling stops and
continues to be stopped without
depressing the brake pedal.
2. When the accelerator pedal is depressed or the RES switch is
operated, while the vehicle is
stopped by the MRCC with Stop &
Go function/TJA, the engine will
automatically restart if the selector
lever is in the D/M position (not in
second gear fixed mode).
(When the vehicle is stopped by the
AUTOHOLD function)
1. When the brake pedal is depressed while the vehicle is being driven
and the vehicle comes to a stop,
the i-stop function will operate and
continue to operate even if the
brake is released (except when
driving in the R or M position
second gear fixed mode).
2. The engine restarts automatically when the accelerator pedal is
depressed with the selector lever in
the D/M position (not in second
gear fixed mode).
3. If the selector lever is in the N or P position, the engine does not
restart when the brake pedal is
released. The engine restarts when
the brake pedal is depressed again
or the selector lever is shifted to the
D, M (not in second gear fixed
mode) or the R position. (For the
purposes of safety, always keep the
brake pedal depressed when
shifting the selector lever while
engine idling is stopped.)(When using MRCC with Stop & Go
function/TJA)
1. Engine idling stops when thevehicle has decelerated to about 20
km/h (12 mph) or slower while in
headway control using the MRCC
with Stop & Go function/TJA.
2. If it is necessary to accelerate while in headway control using the MRCC
with Stop & Go function/TJA, the
engine restarts automatically.
Operation conditions
Under the following conditions, engine
idling stops and the i-stop indicator
light (green) turns on.
The engine has been started and the
vehicle is driven for a certain period.
The engine is started with the hood
closed.
All doors, liftgate, and hood are
closed.
The driver's seat belt is unfastened
and the driver's door is opened.
The hood is opened.The air conditioner is not operating
with the airflow mode in the
position.The temperature setting dial of the
air conditioner is in a position other
than maximum heating or maximum
cooling (A/C ON) position.
(Automatic climate control system)
The vehicle's interior temperature
and the set temperature for the air
conditioner are nearly the same.
The i-stop warning light (amber) is
not turned on/flashing.
The keyless entry & push button start
system functions are normal.
The brake vacuum is sufficiently high.The battery is in good condition.
When Driving
Start/Stop Engine
4-12
CX-50_8KB8-EA-22A_Edition2_new 2022-1-6 14:55:18
Page 171 of 583

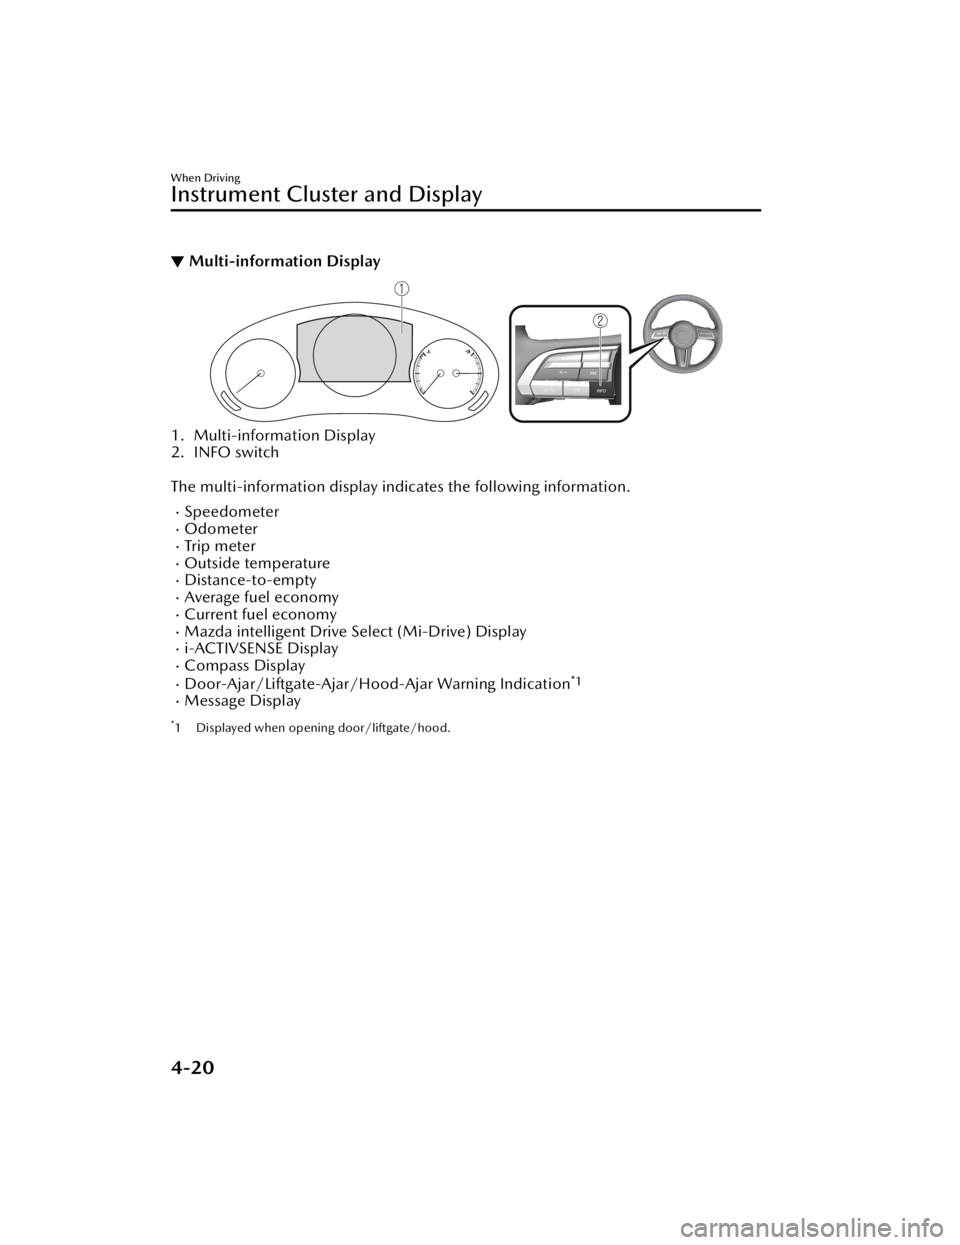
▼Multi-information Display
1. Multi-information Display
2. INFO switch
The multi-information display indicates the following information.
SpeedometerOdometerTr i p m e te rOutside temperatureDistance-to-emptyAverage fuel economyCurrent fuel economyMazda intelligent Drive Select (Mi-Drive) Displayi-ACTIVSENSE DisplayCompass DisplayDoor-Ajar/Liftgate-Ajar/Hood-Ajar Warning Indication*1
Message Display
*1 Displayed when opening door/liftgate/hood.
When Driving
Instrument Cluster and Display
4-20
CX-50_8KB8-EA-22A_Edition2_new
2022-1-6 14:55:18
Page 182 of 583

SignalWarning Refer to
Liftgate-Ajar Warning Indication 7-29
Hood-Ajar Warning Indication7-29
Door-Ajar Warning Light7-29
*1 The light turns on when the ignition is switched on for an operation check, and turns off a few
seconds later or when the engine is started. If the light does not turn on or remains turned on, have
the vehicle inspected at an Authorized Mazda Dealer.
▼ Indication/Indicator Lights
These lights turn on or flash to notify th
e user of the system operation status or a
system malfunction.
Signal Indicator Refer to
(Green)Seat Belt Indicator Light (Rear seat)
2-26
*Front Passenger Air Bag Deactivation Indicator Light2-67
Security Indicator LightImmobilizer
System3-43
Theft-Deterrent System
3-44
Malfunction 7-27
(Green) KEY Indicator Light
4-5
(Green)
*i-stop Indicator Light4-16
Wrench Indication/Indicator Light*14-34
When Driving
Instrument Cluster and Display
*Some models.4-31
CX-50_8KB8-EA-22A_Edition2_new
2022-1-6 14:55:18