audio MAZDA MODEL CX-7 2007 Quick Tips (in English)
[x] Cancel search | Manufacturer: MAZDA, Model Year: 2007, Model line: MODEL CX-7, Model: MAZDA MODEL CX-7 2007Pages: 14, PDF Size: 1.77 MB
Page 2 of 14

DRIVER’S VIEW
Always check the Owner’s Manual for more operating information and safety features
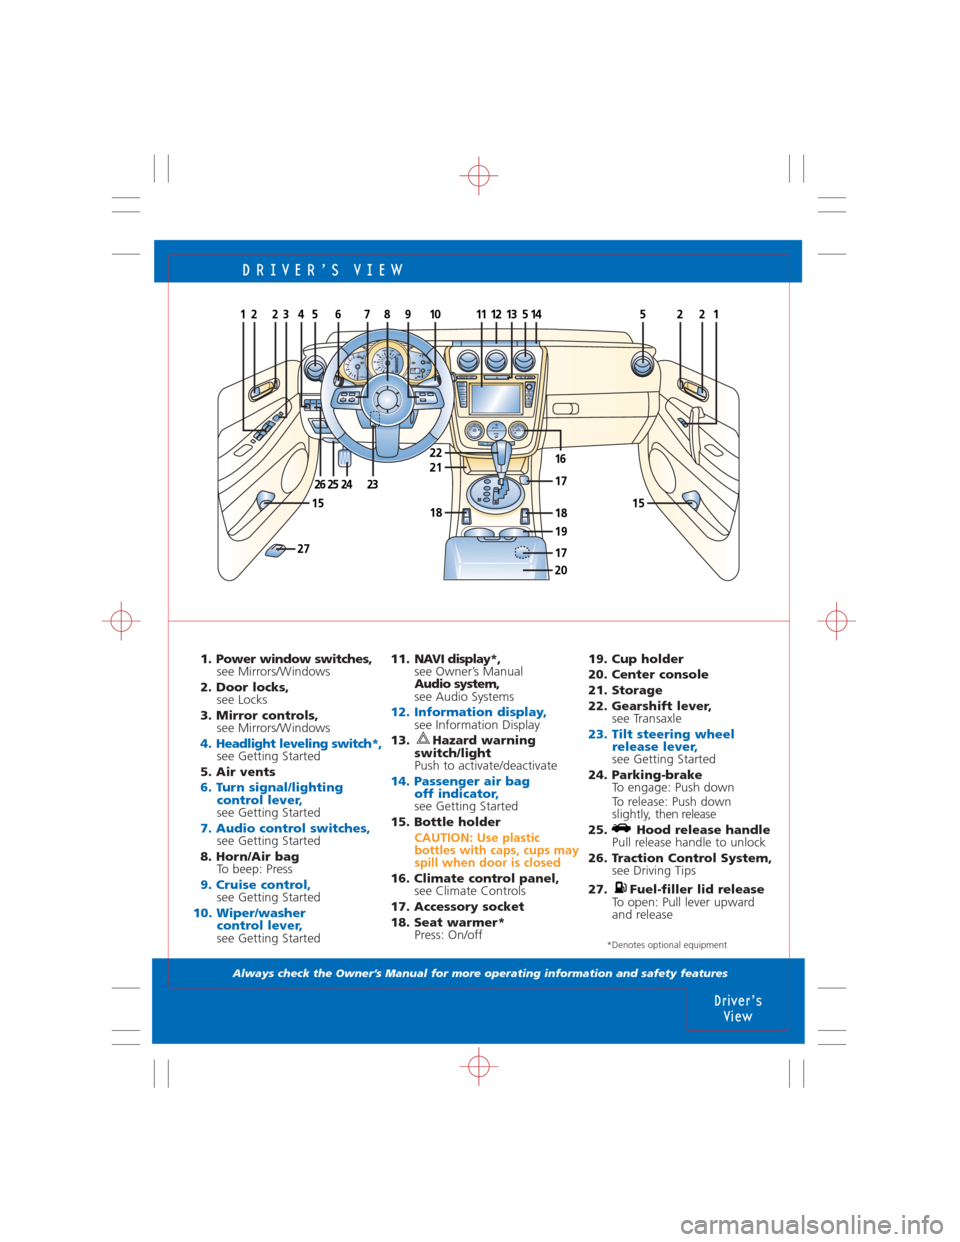
1. Power window switches,
see Mirrors/Windows
2. Door locks,
see Locks
3. Mirror controls,
see Mirrors/Windows
4. Headlight leveling switch*, see Getting Started
5. Air vents
6. Turn signal/lighting
control lever,
see Getting Started
7. Audio control switches,see Getting Started
8. Horn/Air bag
To beep: Press
9. Cruise control, see Getting Started
10. Wiper/washer
control lever,
see Getting Started11. NAVI display*,
see Owner’s Manual
Audio system,
see Audio Systems
12. Information display,see Information Display
13. Hazard warning
switch/light
Push to activate/deactivate
14. Passenger air bag
off indicator,
see Getting Started
15. Bottle holder
CAUTION: Use plastic
bottles with caps, cups may
spill when door is closed
16. Climate control panel,
see Climate Controls
17. Accessory socket
18. Seat warmer*
Press: On/off
Driver’s
View
TRIPA773.7
67498
H140
8 7
6
5
4
3
2
1
0220
40 60 80 100120140160180
200
20120 100
80
60
40
20
0C
Fx1000km/minE
P
R
N
D
M
122225
242526
3
1515
27
19
541
18
21
18
A/C AMBCHPUSHAUTOPUSHOFFFRONTMODE
51214
16
17
22
108796
23
FM/AM SAT CD MEDIAPUSHPOWER/VOL
SCAN
AUDIOSEEK
TRACK NAVI
MENU
RET
DISP LOAD
EJECT
1113
17
20
19. Cup holder
20. Center console
21. Storage
22. Gearshift lever,
see Transaxle
23. Tilt steering wheel
release lever,
see Getting Started
24. Parking-brake
To engage: Push down
To release: Push down
slightly, then release
25. Hood release handle
Pull release handle to unlock
26. Traction Control System,
see Driving Tips
27. Fuel-filler lid release
To open: Pull lever upward
and release
*Denotes optional equipment
Page 5 of 14

GETTING STARTED
Always check the Owner’s Manual for more operating information and safety features
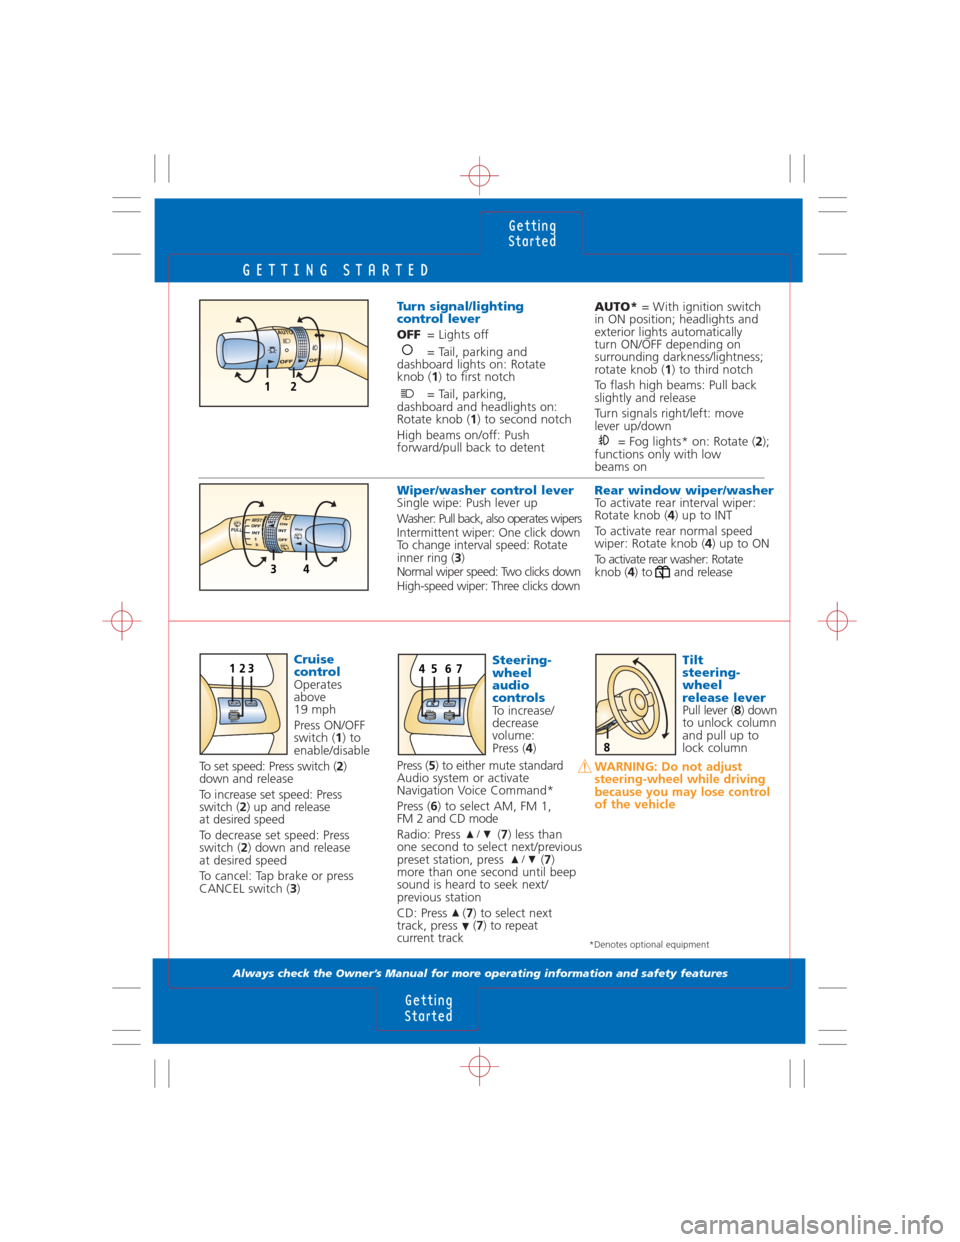
Steering-
wheel
audio
controls
To increase/
decrease
volume:
Press (4)
Press ( 5) to either mute standard
Audio system or activate
Navigation Voice Command*
Press ( 6) to select AM, FM 1,
FM 2 and CD mode
Radio: Press ( 7) less than
one second to select next/previous
preset station, press ( 7)
more than one second until beep
sound is heard to seek next/
previous station
CD: Press ( 7) to select next
track, press ( 7) to repeat
current track
/
/
Getting
Started
Getting
Started
Tilt
steering-
wheel
release lever
Pull lever ( 8) down
to unlock column
and pull up to
lock column
WARNING: Do not adjust
steering-wheel while driving
because you may lose control
of the vehicle
AUTO* = With ignition switch
in ON position; headlights and
exterior lights automatically
turn ON/OFF depending on
surrounding darkness/lightness;
rotate knob ( 1) to third notch
To flash high beams: Pull back
slightly and release
Turn signals right/left: move
lever up/down
= Fog lights* on: Rotate ( 2);
functions only with low
beams on
Cruise
control
Operates
above
19 mph
Press ON/OFF
switch ( 1) to
enable/disable
To set speed: Press switch ( 2)
down and release
To increase set speed: Press
switch ( 2) up and release
at desired speed
To decrease set speed: Press
switch ( 2) down and release
at desired speed
To cancel: Tap brake or press
CANCEL switch ( 3)
Turn signal/lighting
control lever
OFF = Lights off
= Tail, parking and
dashboard lights on: Rotate
knob ( 1) to first notch
= Tail, parking,
dashboard and headlights on:
Rotate knob ( 1) to second notch
High beams on/off: Push
forward/pull back to detent
Rear window wiper/washer To activate rear interval wiper:
Rotate knob ( 4) up to INT
To activate rear normal speed
wiper: Rotate knob ( 4) up to ON
To activate rear washer: Rotate
knob ( 4) to and releaseWiper/washer control leverSingle wipe: Push lever up
Washer: Pull back, also operates wipers
Intermittent wiper: One click down
To change interval speed: Rotate
inner ring ( 3)
Normal wiper speed: Two clicks down
High-speed wiper: Three clicks down
*Denotes optional equipment
21
AUTO
R EA R
43
M IS TPU LL
8
31
ON OFF CANCEL
RES/ +
SET/–
256
VOL+ – MODE
47
Page 11 of 14

CLIMATE CONTROLS
Always check the Owner’s Manual for more operating information and safety features
1. Air flow selections= air to dash
= air to dash and floor
= air to floor
= air to floor and windshield
= air to windshield (defrost)(Manual Climate Control) 6. Air intake control
Press switch to alternate
between recirculated (Indicator
light on) or outside (Indicator
light off) air mode
= recirculate inside air;
use for maximum cooling
WARNING: Do not use position in cold
weather, windows may
fog and hamper vision
Automatic operation
Press AUTO ( 10) for automatic
operation; rotate outer dial to set
temperature, refer to information
display for air flow selection, see
Owner's Manual
Tip: Automatic climate control
display viewed via information
display, see below
2. Fan control Rotate knob clockwise/
counterclockwise to increase/
decrease fan speed
3. Temperature control Cooler/warmer = rotate knob
counterclockwise/clockwise
4. A/C = air conditioner
Press to turn on/off
5. Rear window defogger Press on/off; shuts off with
ignition or automatically after
15 minutes of operation; also
operates heated outside mirrors*
7. AMB*Press AMB button ( 7) to display
ambient temperature, press again
to switch display to temperature
set for air conditioner
Tip: To change from
Fahrenheit to Centigrade or
vice versa: Press AMB button
(7) for 3 seconds or more
8. Windshield defroster switch
Press: Fresh air position is
automatically selected, A/C
automatically turns ON
9. OFF Press to turn system OFF
Control positions for
maximum defrost
Fan to maximum, temperature
to maximum hot, selected
Tip: To help prevent
windshield fogging in
humid weather, select
before starting engine
To prevent moisture buildup,
never drive with system off
Objects placed under the
front seats may interfere
with air flow to the rear
Information DisplayInformation display ( 1) has
the following functions: Clock,
audio display, automatic climate
control display* and ambient/cabin
temperature display* (AMB)Tip: Manual climate
control not viewable via
information display
Climate
Controls
Information Display
04 13
2
321
645
A/CA/C AMB
CHPUSHAUTOPUSHOFFFRONTMOD
E
4657910
2381
Manual A/C Automatic A/C*
*Denotes optional equipment
88:88 FM1 88.9 88.8CHDISC IN MD W ST RPT RDM AUTO-M8AMB FOAUTOA/C ECO1
Page 12 of 14

AM/FM STEREO/CD/CD CHANGER
Always check the Owner’s Manual for more operating information and safety features
6. SEEK/TRACKRadio: Press to
automatically seek higher/
lower frequency
CD: Press to select next
track/beginning of current track
7. LOAD* To load multiple discs:
Press and hold LOAD ( 7) until
beep sound is heard; insert
CD when “IN” is indicated on
information display ( 20)
To eject disc: Press Eject ( 15)
To eject specific disc: Press
and hold Eject ( 15) until beep
sound is heard; within five
seconds press the desired tray
number 1-6 ( 16)
/
/
1. Power/Volume
Press to turn on/off; rotate
to increase/decrease volume
2. Random Press to play CD selections
in random order, press again
to cancel
3. Program
†4. Auto-Memory Press and hold until a beep sound
is heard; system automatically
scans and temporarily stores six
strong stations in each band;
press again to switch to another
preset station
DISP
CD: Press repeatedly to scroll
through displays
Text* : Rotate right/left to display
titles longer than 12 characters
5. Tune Radio: Rotate counter
clockwise/clockwise for lower/
higher frequency
10. FM/AMPress to turn radio on and
select between FM1/FM2/AM
station preset buttons ( 16)
11. CD slot
12. SAT*, Satellite ready capability
13. CD, Press to play CD
14. Media
†
15. CD eject button
16. Memory preset buttons To set: Tune to station, press and
hold until beep sound is heard
17. Disc / * Press to skip to next/previous CD
18. Audio control Audio: Press to select ALC/BASS/
TREB/FADE/BAL/BEEP/Surround*
OFF/1/2/3, rotate right/left to
adjust selected feature
Tip: Automatic Level Control
(ALC) automatically adjusts
audio volume depending
on vehicle speed
8. ScanRadio: Press to sample
strong stations, press again
to stop at current station
CD: Press to play first few seconds
of each selection, press again
to stop at current selection
9. RPT Press to replay current
CD selection
Clock**To set: With ignition in ACC
or ON position, press ( A) and
hold until beep sounds; 12hr/24hr
will appear on display ( 20); press
( B ) to select; press ( A) again while
selection is flashing: Hr ADJUST
displays; press ( B) to select hour;
press ( A) when done, do the
same to set minutes
Navigation/Audio System*AudioPilot* (BOSE system)
Automatically adjusts audio volume
in accordance with level of noise
entering vehicle; press on-screen
button to turn ON/OFF
Centerpoint* (BOSE system)
Delivers multi-channel surround
sound while listening to CDs
See Owner's Manual for
complete details
19.
Reverse / Fast forward
Press to reverse/fast forward
through a track
20. Display,
see Information Display
Audio
Systems
Audio
Systems
LOAD
CLOCK S
ET
SCANTRACK
S EE K APCRPT
PROG RDM FM/AM SAT CD M
EDIA VOL
PUSH POWERDISC
DISC123 6
45
910111213BA14
1845231
78
6
16
17
15
19
88:88 FM1 88.9 88.8CHDISC IN MD W ST RPT RDM AUTO-M8AMB FOAUTOA/C ECO20
TEXT
PUSH AUDIO CONT TUNE PUSH AUTO-M.DISP.ESN
*Denotes optional equipment
**See Navigation Owner’s Manual for clock setting procedure if
equipped with Navigation System
†Not functional in U.S. market