maintenance MAZDA MODEL CX-7 2009 (in English) Repair Manual
[x] Cancel search | Manufacturer: MAZDA, Model Year: 2009, Model line: MODEL CX-7, Model: MAZDA MODEL CX-7 2009Pages: 454, PDF Size: 6.24 MB
Page 378 of 454

Black plate (378,1)
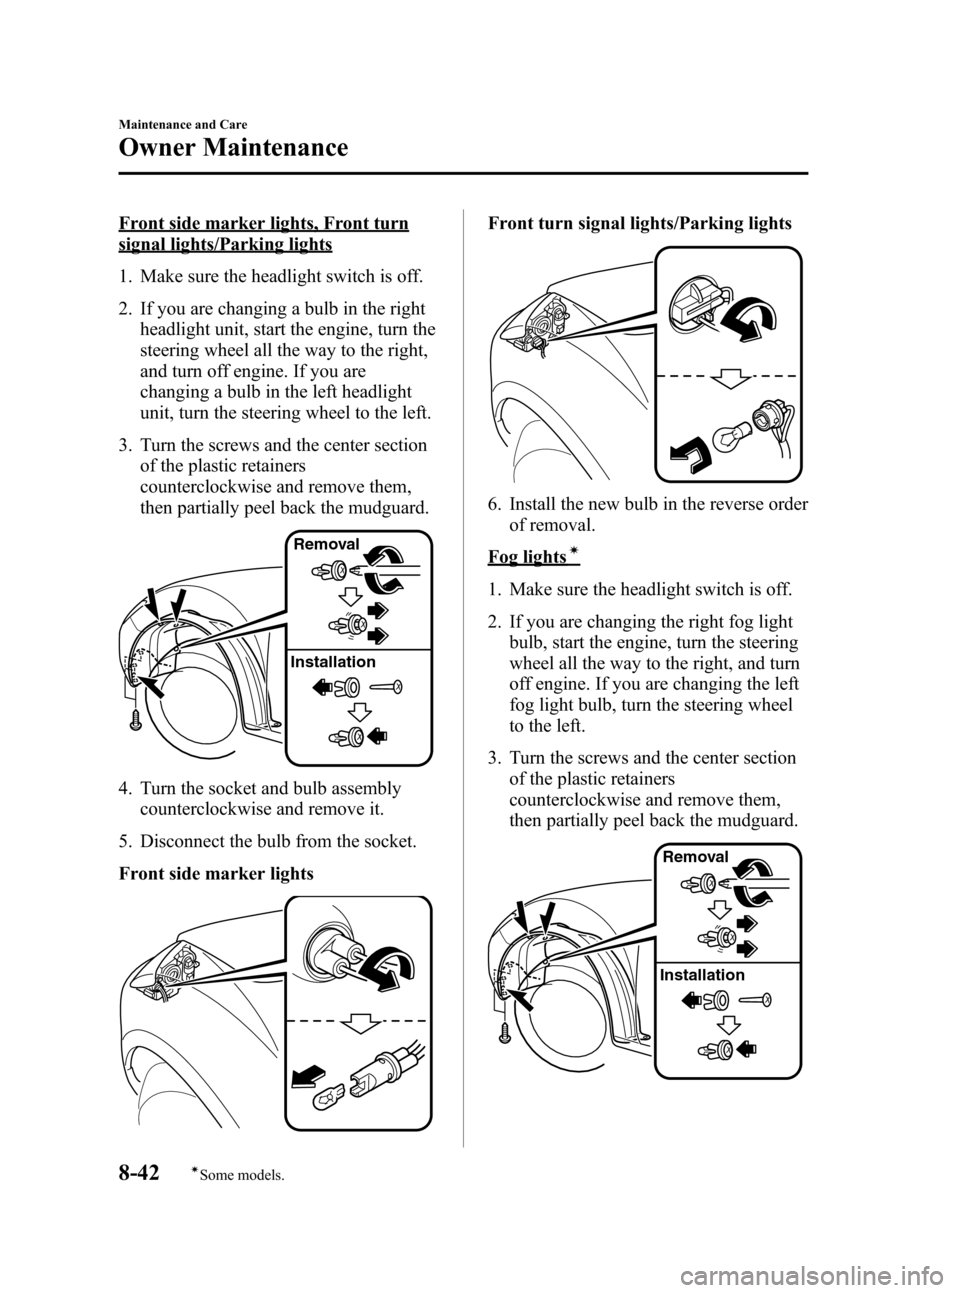
Front side marker lights, Front turn
signal lights/Parking lights
1. Make sure the headlight switch is off.
2. If you are changing a bulb in the right
headlight unit, start the engine, turn the
steering wheel all the way to the right,
and turn off engine. If you are
changing a bulb in the left headlight
unit, turn the steering wheel to the left.
3. Turn the screws and the center section
of the plastic retainers
counterclockwise and remove them,
then partially peel back the mudguard.
InstallationRemoval
4. Turn the socket and bulb assembly
counterclockwise and remove it.
5. Disconnect the bulb from the socket.
Front side marker lights
Front turn signal lights/Parking lights
6. Install the new bulb in the reverse order
of removal.
Fog lightsí
1. Make sure the headlight switch is off.
2. If you are changing the right fog light
bulb, start the engine, turn the steering
wheel all the way to the right, and turn
off engine. If you are changing the left
fog light bulb, turn the steering wheel
to the left.
3. Turn the screws and the center section
of the plastic retainers
counterclockwise and remove them,
then partially peel back the mudguard.
InstallationRemoval
8-42
Maintenance and Care
íSome models.
Owner Maintenance
CX-7_8Z60-EA-08D_Edition2 Page378
Friday, May 30 2008 5:29 PM
Form No.8Z60-EA-08D
Page 379 of 454

Black plate (379,1)
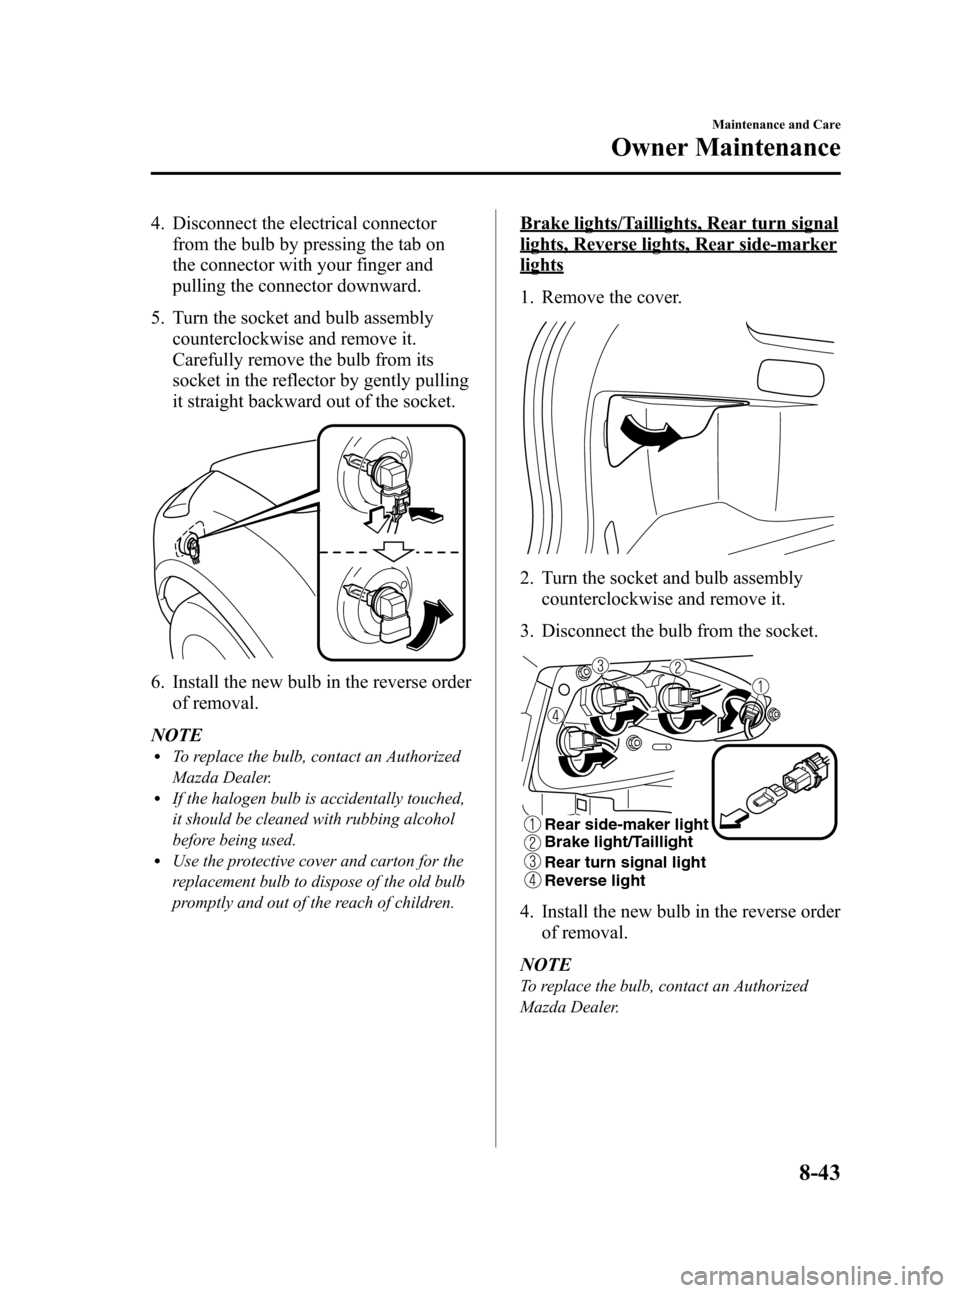
4. Disconnect the electrical connector
from the bulb by pressing the tab on
the connector with your finger and
pulling the connector downward.
5. Turn the socket and bulb assembly
counterclockwise and remove it.
Carefully remove the bulb from its
socket in the reflector by gently pulling
it straight backward out of the socket.
6. Install the new bulb in the reverse order
of removal.
NOTE
lTo replace the bulb, contact an Authorized
Mazda Dealer.
lIf the halogen bulb is accidentally touched,
it should be cleaned with rubbing alcohol
before being used.
lUse the protective cover and carton for the
replacement bulb to dispose of the old bulb
promptly and out of the reach of children.
Brake lights/Taillights, Rear turn signal
lights, Reverse lights, Rear side-marker
lights
1. Remove the cover.
2. Turn the socket and bulb assembly
counterclockwise and remove it.
3. Disconnect the bulb from the socket.
Rear side-maker light
Brake light/Taillight
Rear turn signal light
Reverse light
4. Install the new bulb in the reverse order
of removal.
NOTE
To replace the bulb, contact an Authorized
Mazda Dealer.
Maintenance and Care
Owner Maintenance
8-43
CX-7_8Z60-EA-08D_Edition2 Page379
Friday, May 30 2008 5:29 PM
Form No.8Z60-EA-08D
Page 380 of 454

Black plate (380,1)
High-mount brake light, Side turn
signal lightsí
Due to the complexity and difficulty of
the procedure, the LED bulbs should be
replaced by an Authorized Mazda Dealer.
NOTE
LED bulb replacement is not possible. The
rear combination component must be replaced.
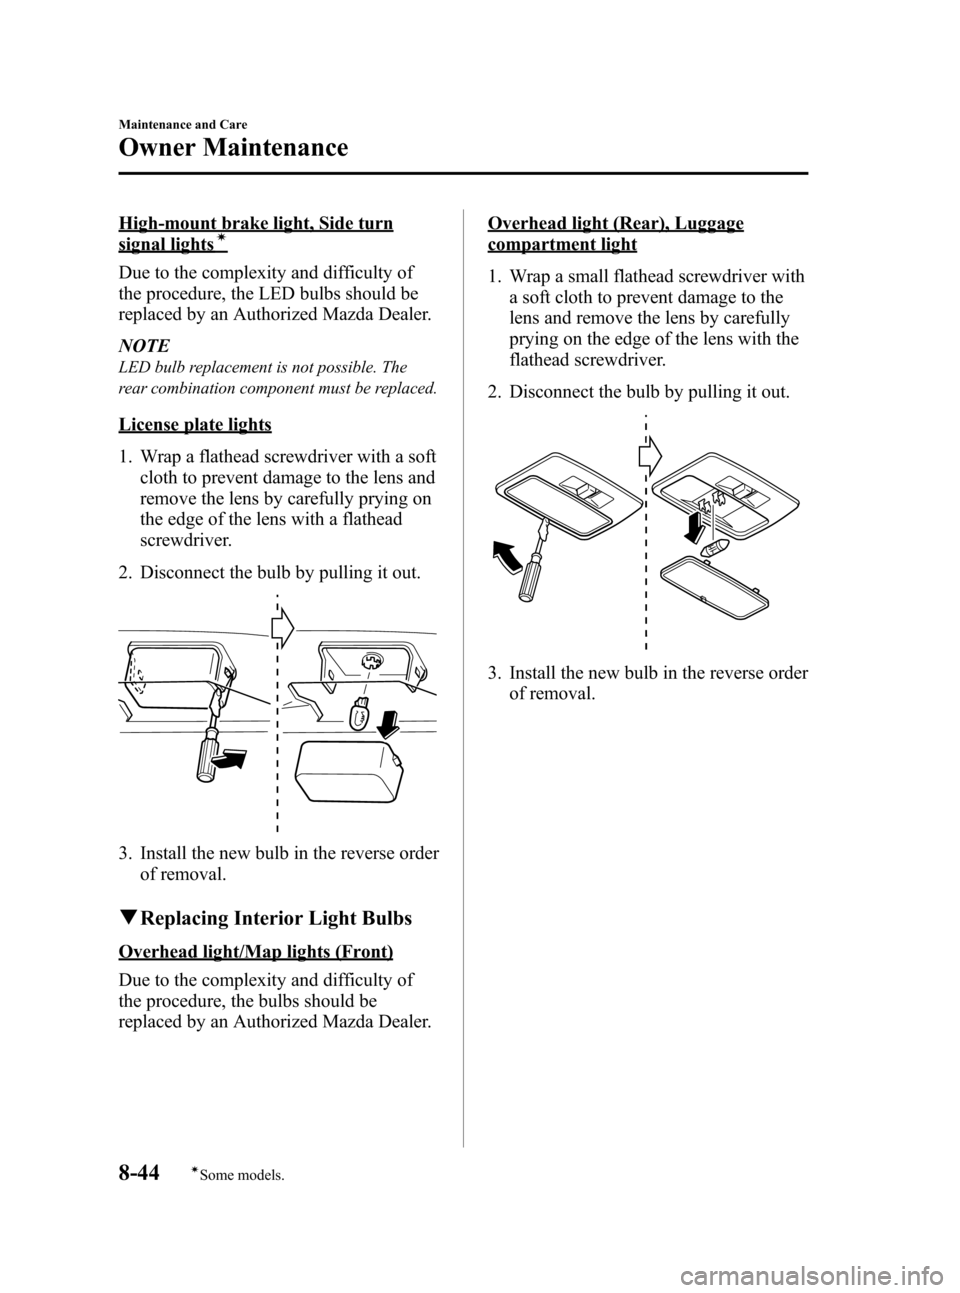
License plate lights
1. Wrap a flathead screwdriver with a soft
cloth to prevent damage to the lens and
remove the lens by carefully prying on
the edge of the lens with a flathead
screwdriver.
2. Disconnect the bulb by pulling it out.
3. Install the new bulb in the reverse order
of removal.
qReplacing Interior Light Bulbs
Overhead light/Map lights (Front)
Due to the complexity and difficulty of
the procedure, the bulbs should be
replaced by an Authorized Mazda Dealer.
Overhead light (Rear), Luggage
compartment light
1. Wrap a small flathead screwdriver with
a soft cloth to prevent damage to the
lens and remove the lens by carefully
prying on the edge of the lens with the
flathead screwdriver.
2. Disconnect the bulb by pulling it out.
3. Install the new bulb in the reverse order
of removal.
8-44
Maintenance and Care
íSome models.
Owner Maintenance
CX-7_8Z60-EA-08D_Edition2 Page380
Friday, May 30 2008 5:29 PM
Form No.8Z60-EA-08D
Page 381 of 454

Black plate (381,1)
Fuses
Your vehicle's electrical system is
protected by fuses.
If any lights, accessories, or controls don't
work, inspect the appropriate circuit
protector. If a fuse has blown, the inside
element will be melted.
If the same fuse blows again, avoid using
that system and consult an Authorized
Mazda Dealer as soon as possible.
qFuse Replacement
Replacing the fuses on the driver's side
If the electrical system does not work,
first inspect the fuses on the driver's side.
1. Turn off the ignition switch and other
switches.
2. Open the fuse panel cover.
Fuse panel cover
3. Pull the fuse straight out with the fuse
puller provided on the inside of the
cover for the fuse panel and the fuse
block cover inside of the engine
compartment.
4. Inspect the fuse and replace it if it's
blown.
NormalBlown
5. Insert a new fuse of the same amperage
rating, and make sure it fits tightly. If it
does not fit tightly, have an expert
install it. We recommend an
Authorized Mazda Dealer.
If you have no spare fuses, borrow one
of the same rating from a circuit not
essential to vehicle operation, such as
the ROOM circuit.
Maintenance and Care
Owner Maintenance
8-45
CX-7_8Z60-EA-08D_Edition2 Page381
Friday, May 30 2008 5:29 PM
Form No.8Z60-EA-08D
Page 382 of 454

Black plate (382,1)
CAUTION
Always replace a fuse with one of the
same rating. Otherwise you may
damage the electric system.
Replacing the fuses under the hood
If the headlights or other electrical
components do not work and the fuses in
the cabin are normal, inspect the fuse
block under the hood. If a fuse is blown, it
must be replaced. Follow these steps:
1. Turn off the ignition switch and all
other switches.
2. Remove the fuse block cover.
3. Pull the fuse straight out with the fuse
puller provided on the inside of the
engine compartment fuse block cover.
4. If any fuse but the MAIN fuse is
blown, replace it with a new oneof the
same amperage rating.
Normal
Blown
WARNING
Do not replace the main fuse by
yourself. Have an Authorized Mazda
Dealer perform the replacement:
Replacing the fuse by yourself is
dangerous because the MAIN fuse is
a high current fuse. Incorrect
replacement could cause an electrical
shock or a short circuit resulting in a
fire.
8-46
Maintenance and Care
Owner Maintenance
CX-7_8Z60-EA-08D_Edition2 Page382
Friday, May 30 2008 5:29 PM
Form No.8Z60-EA-08D
Page 383 of 454

Black plate (383,1)
qFuse Panel Description
Fuse block (Engine compartment)
DESCRIPTIONFUSE
RATINGPROTECTED COMPONENT
1 IGN 2 40 A Ignition system
2 BLOWER 40 A Blower motor
3 BTN 60 A For protection of various circuits
4 FAN 2 40 A Cooling fan
5 IGN 1 40 A Ignition system
6 FAN 1 40 A Cooling fan
7 P.SEAT 40 A Power seat
í
8 INJ 30 A Injector
9 ROOF 20 A Moonroofí
10 BOSE 30 A Bose®audio systemí
11 ENGINE 30 A Engine control system
12 D.LOCK 20 A Power door locks
13 P.WIND 30 A Power windows
14 FUEL 30 A Fuel pump
15 ABS 1 40 A ABS
16 ABS 2 20 A ABS
17 DSC 7.5 A DSC
Maintenance and Care
Owner Maintenance
8-47íSome models. CX-7_8Z60-EA-08D_Edition2 Page383
Friday, May 30 2008 5:29 PM
Form No.8Z60-EA-08D
Page 384 of 454

Black plate (384,1)
DESCRIPTIONFUSE
RATINGPROTECTED COMPONENT
18 FOG 20 A Fog lights
í
19 DEF 30 A Rear window defroster
20 TNS 15 A Parking lights, License plate lights, Illuminated entry system
21 A/C 10 A Air conditioner
í
22 ETC 20 A Accelerator position sensor
23 H/L HI 15 A Headlight high beam
24 DRL 15 A DRL
í
25 H/L LO RH 15 A Headlight low beam (RH)
26 H/L LO LH 15 A Headlight low beam (LH)
27 ENG BAR 2 7.5 A PCM
28 ECM 10 A Engine control system
29 ENG BAR 1 15 A Air flow sensor, EGR control valve
30 P.WIND 2 20 A Power windows
31 STOP 10 A Brake lights
32 HORN 20 A Horn
33 ENG B+ 25 A PCM
34 HAZARD 10 A Hazard warning flashers, Turn signals
8-48
Maintenance and Care
íSome models.
Owner Maintenance
CX-7_8Z60-EA-08D_Edition2 Page384
Friday, May 30 2008 5:29 PM
Form No.8Z60-EA-08D
Page 385 of 454

Black plate (385,1)
Fuse block (Driver's side)
DESCRIPTIONFUSE
RATINGPROTECTED COMPONENT
1 OUTLET 1 15 A Accessory Socket
2 OUTLET 2 15 A Accessory Socket
3 P.MIR 7.5 A Power control mirror
4 WIPER 30 A Windshield wiper and washer
5 M.DEF 7.5 A Mirror defroster
í
6 ENG BAR 3 7.5 A Air flow sensor, EGR control valve
7 P.WIND 15 A Power windows
8 A/B 7.5 A Advance Restraint System
9 ENGINE 15 A Engine control system
10 METER 10 A Instrument cluster
11 BBS――
12 ROOM 15 A Audio system, Overhead light
13 OPT――
14 ILLUMI 10 A Dashboard illumination
15 SEAT 20 A Seat warmer
í
16 A/C 10 A Air conditionerí
17 R.WIP 10 A Rear window wiper and washer
18 R.FOG――
Maintenance and Care
Owner Maintenance
8-49íSome models. CX-7_8Z60-EA-08D_Edition2 Page385
Friday, May 30 2008 5:29 PM
Form No.8Z60-EA-08D
Page 386 of 454

Black plate (386,1)
How to Minimize
Environmental Paint Damage
The paintwork on your Mazda represents
the latest technical developments in
composition and methods of application.
Environmental hazards, however, can
harm the paint's protective properties, if
proper care is not taken.
Here are some examples of possible
damage, with tips on how to prevent
them.
qEtching Caused by Acid Rain or
Industrial Fallout
Occurrence
Industrial pollutants and vehicle emissions
drift into the air and mix with rain or dew
to form acids. These acids can settle on a
vehicle's finish. As the water evaporates,
the acid becomes concentrated and can
damage the finish.
And the longer the acid remains on the
surface, the greater the chance is for
damage.
Prevention
It is necessary to wash and wax your
vehicle to preserve its finish according to
the instructions in this section. These
steps should be taken immediately after
you suspect that acid rain has settled on
your vehicle's finish.
qDamage Caused by Bird
Dropping, Insects, or Tree Sap
Occurrence
Bird droppings contain acids. If these
aren't removed they can eat away the clear
and color base coat of the vehicle's
paintwork.
When insects stick to the paint surface
and decompose, corrosive compounds
form. These can erode the clear and color
base coat of the vehicle's paintwork if
they are not removed.
Tree sap will harden and adhere
permanently to the paint finish. If you
scratch the sap off while it is hard, some
vehicle paint could come off with it.
Prevention
It is necessary to have your Mazda
washed and waxed to preserve its finish
according to the instructions in this
section. This should be done as soon as
possible.
Bird droppings can be removed with a
soft sponge and water. If you are traveling
and these are not available, a moistened
tissue may also take care of the problem.
The cleaned area should be waxed
according to the instructions in this
section.
Insects and tree sap are best removed with
a soft sponge and water or a commercially
available chemical cleaner.
Another method is to cover the affected
area with dampened newspaper for one to
two hours. After removing the newspaper,
rinse off the loosened debris with water.
8-50
Maintenance and Care
Appearance Care
CX-7_8Z60-EA-08D_Edition2 Page386
Friday, May 30 2008 5:29 PM
Form No.8Z60-EA-08D
Page 387 of 454

Black plate (387,1)
qWater Marks
Occurrence
Rain, fog, dew, and even tap water can
contain harmful minerals such as salt and
lime. If moisture containing these
minerals settles on the vehicle and
evaporates, the minerals will concentrate
and harden to form white rings. The rings
can damage your vehicle's finish.
Prevention
It is necessary to wash and wax your
vehicle to preserve its finish according to
the instructions in this section. These
steps should be taken immediately after
you find water marks on your vehicle's
finish.
qPaint Chipping
Occurrence
Paint chipping occurs when gravel thrown
in the air by another vehicle's tires hits
your vehicle.
How to avoid paint chipping
Keeping a safe distance between you and
the vehicle ahead reduces the chances of
having your paint chipped by flying
gravel.NOTE
lThe paint chipping zone varies with the
speed of the vehicle. For example, when
traveling at 90 km/h (56 mph), the paint
chipping zone is 50 m (164 ft).
lIn low temperatures a vehicle's finish
hardens. This increases the chance of paint
chipping.
lChipped paint can lead to rust forming on
your Mazda. Before this happens, repair the
damage by using Mazda touch-up paint
according to the instructions in this section.
Failure to repair the affected area could
lead to serious rusting and expensive
repairs.
Maintenance and Care
Appearance Care
8-51
CX-7_8Z60-EA-08D_Edition2 Page387
Friday, May 30 2008 5:29 PM
Form No.8Z60-EA-08D