light MAZDA MODEL CX-9 2007 Owners Manual (in English)
[x] Cancel search | Manufacturer: MAZDA, Model Year: 2007, Model line: MODEL CX-9, Model: MAZDA MODEL CX-9 2007Pages: 502, PDF Size: 9.94 MB
Page 346 of 502

Black plate (346,1)
Sunvisors
When you need a sunvisor, lower it for
use in front or swing it to the side.
Sunvisor
qSide Extention Sunvisors
The visor extender extends the sunvisor's
range of sun shading.
To use, pull it out.
CAUTION
When moving the sunvisor, reinsert
the visor extender, otherwise the
visor extender could hit the rearview
mirror.
qVanity Mirrors
To use the vanity mirror, lower the
sunvisor.
The vanity mirror light will illuminate
when you open the cover.
6-120
Interior Comfort
Interior Equipment
CX-9_8V83-EA-06I_Edition3 Page346
Monday, February 26 2007 7:20 PM
Form No.8V83-EA-06I
Page 347 of 502

Black plate (347,1)
Interior Lights
qIlluminated Entry System
When the illuminated entry system
operates, the overhead light (switch is in
the DOOR position) and the courtesy
lights turn on for:
lAbout 30 seconds after the driver's
door is unlocked and the ignition
switch is in the LOCK position (with
the ignition key removed).
lAbout 15 seconds after all doors are
closed (If your vehicle is equipped with
the advanced key, the overhead light
turns on for about 5 seconds when the
advanced key is outside of the vehicle).
lAbout 15 seconds after the ignition
switch is in the LOCK position (with
the ignition key removed) with all
doors closed.
The light also turns off when:
lThe ignition switch is turned to the ON
position and all doors are closed.
lThe driver's door is locked.
NOTE
Battery saver
If any door is left opened, the light goes out
after about 30 minutes to save the battery.
The light turns on again when the ignition
switch is turned to the ON position, or when
any door is opened after all doors have been
closed.
qOverhead Lights
When the center/rear overhead light
switch is in the DOOR position, the
center/rear overhead light can be turned
on or off using the front overhead light
switch.
Front
Switch
PositionOverhead Lights
lLight offlAll overhead lights are off when
the center/rear overhead light
switch is in the DOOR position
lLight is on when any door is openlLight is on or off when the
illuminated entry system is on
lLight onlAll overhead lights are on when
the center/rear overhead light
switch is in the DOOR position
Interior Comfort
Interior Equipment
6-121
CX-9_8V83-EA-06I_Edition3 Page347
Monday, February 26 2007 7:20 PM
Form No.8V83-EA-06I
Page 348 of 502

Black plate (348,1)
Center/Rear
Switch
PositionOverhead Lights
Light off
Light on or off in accordance with the
operation of front overhead light
switch
Light on
qMap Lights
The map lights are switched on or off by
pressing the switches.
qLuggage Compartment Light
Switch
PositionLuggage Compartment Light
Light off
Light on when the liftgate is open
qCourtesy Lights
Turns on when any door is open or the
illuminated entry system is on.
Courtesy Light
6-122
Interior Comfort
Interior Equipment
CX-9_8V83-EA-06I_Edition3 Page348
Monday, February 26 2007 7:20 PM
Form No.8V83-EA-06I
Page 350 of 502

Black plate (350,1)
qClock
When the ignition switch is in the ACC or
ON position, the time is displayed.
Without navigation system
Time setting
1. Press the CLK switch until a beep
sounds, and“12Hr”and“24Hr”will be
displayed.
2. Press the SET switch to switch between
“12Hr”and“24Hr”displays. The
selected display will flash.
To select the desired clock setting,
press the CLK switch again while the
preferred setting is flashing.
3.“Hr. ADJUST”will be displayed next,
and the hour portion of the display will
flash. Press the SET switch to set the
hour, then press the CLK switch.
4.“Min. ADJUST”will be displayed
next, and the minutes portion of the
display will flash. Press the SET switch
to set the minutes, then press the CLK
switch.Time resetting
While the clock is displayed, press the
SET switch 1.5 seconds or more. When
the switch is released, a beep will sound
and the clock will be reset as follows:
(Example)
12:01―12:29→12:00
12:30―12:59→1:00
NOTE
When the SET switch is released, the seconds
are reset to“00”.
With navigation system
Refer to the separate manual
“NAVIGATION SYSTEM”.
NOTE
Minutes and seconds are adjusted by the GPS,
however, it is necessary to adjust hours under
the following conditions:
lDriving across different time zoneslDaylight saving time start and end
qAmbient Temperature Display
When the ignition switch is in the ON
position, press the OUTSIDE switch
(page 6-6) to display the ambient
temperature.
6-124
Interior Comfort
Interior Equipment
CX-9_8V83-EA-06I_Edition3 Page350
Monday, February 26 2007 7:20 PM
Form No.8V83-EA-06I
Page 353 of 502

Black plate (353,1)
Bottle Holder
Bottle holders are on the inside of the
doors.
Bottle holder
CAUTION
Do not use the bottle holders for
containers without caps. The
contents may spill when the door is
opened or closed.
Storage Compartments
WARNING
Keep storage boxes closed when
driving:
Driving with the storage boxes open
is dangerous. To reduce the
possibility of injury in an accident or
a sudden stop, keep the storage
boxes closed when driving.
CAUTION
Do not leave lighters or eyeglasses in
the storage boxes while parked under
the sun. A lighter could explode or
the plastic material in eyeglasses
could deform and crack from high
temperature.
qOverhead Console
This console box is designed to store
accessories.
Push and release to open.
Interior Comfort
Interior Equipment
6-127
CX-9_8V83-EA-06I_Edition3 Page353
Monday, February 26 2007 7:20 PM
Form No.8V83-EA-06I
Page 360 of 502

Black plate (360,1)
Parking in an Emergency
The hazard warning lights should always
be used when you stop on or near a
roadway in an emergency.
The hazard warning lights warn other
drivers that your vehicle is a traffic hazard
and that they must take extreme caution
when near it.
Depress the hazard warning flasher and all
the turn signals will flash.
NOTE
lThe turn signals do not work when the
hazard warning lights are on.
lCheck local regulations about the use of
hazard warning lights while the vehicle is
being towed to verify that it is not in
violation of the law.
7-2
In Case of an Emergency
Parking in an Emergency
CX-9_8V83-EA-06I_Edition3 Page360
Monday, February 26 2007 7:20 PM
Form No.8V83-EA-06I
Page 362 of 502

Black plate (362,1)
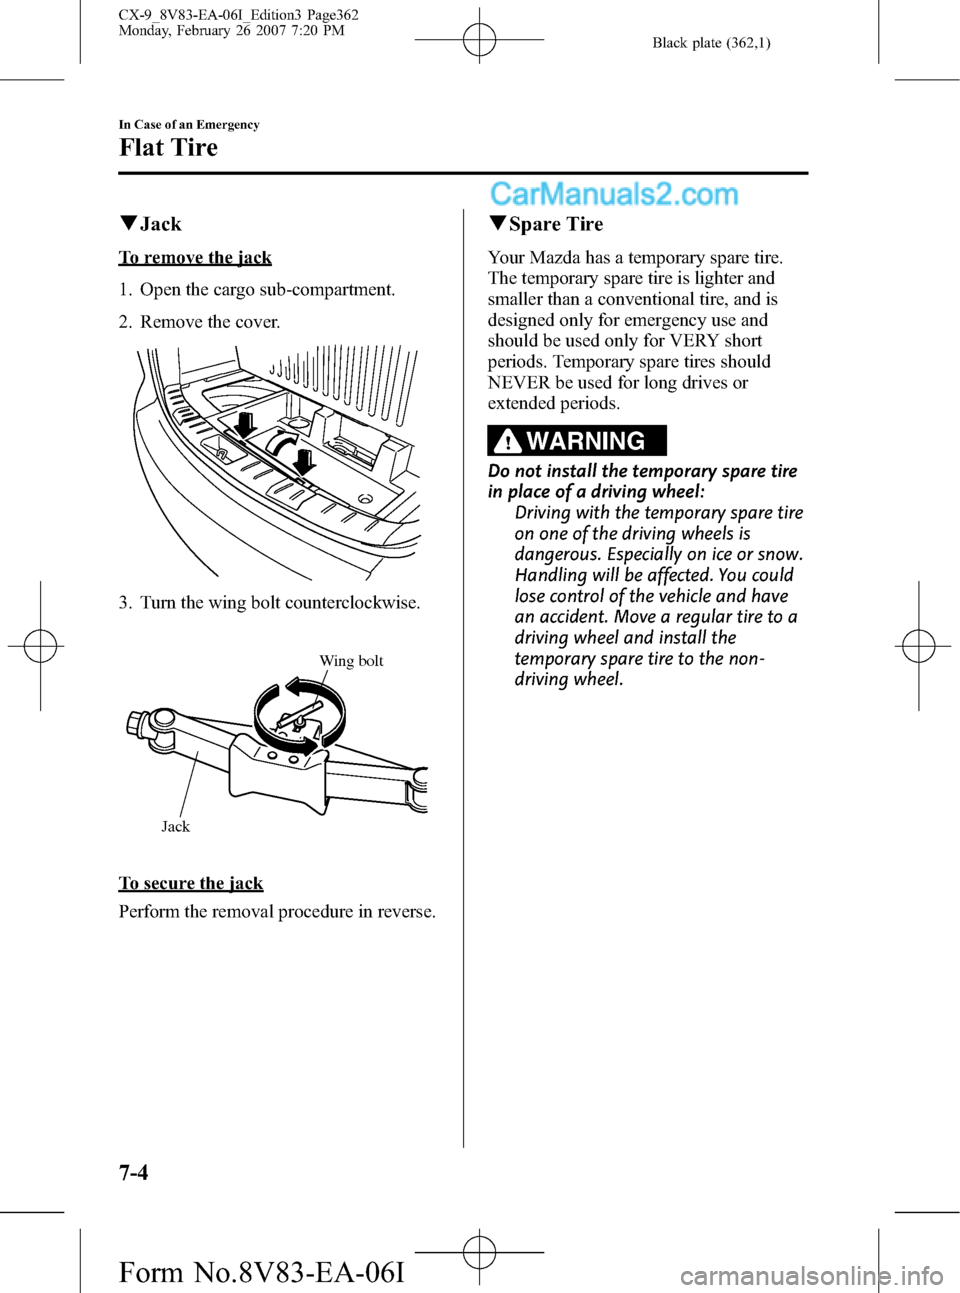
qJack
To remove the jack
1. Open the cargo sub-compartment.
2. Remove the cover.
3. Turn the wing bolt counterclockwise.
Jack
Wing bolt
To secure the jack
Perform the removal procedure in reverse.
qSpare Tire
Your Mazda has a temporary spare tire.
The temporary spare tire is lighter and
smaller than a conventional tire, and is
designed only for emergency use and
should be used only for VERY short
periods. Temporary spare tires should
NEVER be used for long drives or
extended periods.
WARNING
Do not install the temporary spare tire
in place of a driving wheel:
Driving with the temporary spare tire
on one of the driving wheels is
dangerous. Especially on ice or snow.
Handling will be affected. You could
lose control of the vehicle and have
an accident. Move a regular tire to a
driving wheel and install the
temporary spare tire to the non-
driving wheel.
7-4
In Case of an Emergency
Flat Tire
CX-9_8V83-EA-06I_Edition3 Page362
Monday, February 26 2007 7:20 PM
Form No.8V83-EA-06I
Page 363 of 502

Black plate (363,1)
CAUTION
ØWhen using the temporary spare
tire, driving stability may decrease
compared to when using only the
conventional tire. Drive carefully.
ØTo avoid damage to the temporary
spare tire or to the vehicle, observe
the following precautions:
ØDo not exceed 80 km/h (50
mph).
ØAvoid driving over obstacles.
Also, do not drive through an
automatic car wash. This tire's
diameter is smaller than a
conventional tire, so the ground
clearance is reduced about
25 mm (1 in).
ØDo not use a tire chain on this
tire because it will not fit
properly.
ØDo not use your temporary
spare tire on any other vehicle;
it has been designed only for
your Mazda.
ØUse only one temporary spare
tire on your vehicle at the same
time.
NOTE
(With Tire Pressure Monitoring System)
A tire pressure sensor is not installed to the
temporary spare tire. The warning light will
flash continuously while the temporary spare
tire is being used (page 5-29).
To remove the spare tire
1. Have everyone get out of the vehicle
and away from the vehicle and traffic.
2. Open the cargo sub-compartment.3. Remove the cover.
Cover
4. Attach the socket to the spare tire
carrier bolt, the jack lever to the socket,
and the lug wrench to the opposite end
of the jack lever.
Bolt Socket Lug wrench
Jack lever
In Case of an Emergency
Flat Tire
7-5
CX-9_8V83-EA-06I_Edition3 Page363
Monday, February 26 2007 7:20 PM
Form No.8V83-EA-06I
Page 371 of 502

Black plate (371,1)
12. Pull the belt end to secure the flat tire.
13. Check the tire inflation pressure.
Refer to the specification charts on
page 10-6.
14. Have the flat tire repaired or replaced
as soon as possible.
WARNING
Do not drive with any tires that have
incorrect air pressure:
Driving on tires with incorrect air
pressure is dangerous. Tires with
incorrect pressure could affect
handling and result in an accident.
When you check the regular tires' air
pressure, check the spare tire, too.NOTE
(With Tire Pressure Monitoring System)
A tire pressure sensor is not installed to the
temporary spare tire. The warning light will
flash continuously while the temporary spare
tire is being used (page 5-29).
NOTE
To prevent the jack and tool from rattling, store
them properly.
In Case of an Emergency
Flat Tire
7-13
CX-9_8V83-EA-06I_Edition3 Page371
Monday, February 26 2007 7:20 PM
Form No.8V83-EA-06I
Page 383 of 502

Black plate (383,1)
8Maintenance and Care
How to keep your Mazda in top condition.
Introduction .................................................................................. 8-2
Introduction ............................................................................... 8-2
Scheduled Maintenance ................................................................ 8-3
Scheduled Maintenance (USA, Canada, and Puerto Rico) ....... 8-3
Scheduled Maintenance (Mexico) ............................................. 8-9
Owner Maintenance ................................................................... 8-16
Owner Maintenance Schedule ................................................ 8-16
Owner Maintenance Precautions ............................................. 8-17
Engine Compartment Overview .............................................. 8-18
Engine Oil ............................................................................... 8-19
Engine Coolant ....................................................................... 8-21
Brake Fluid ............................................................................. 8-23
Power Steering Fluid ............................................................... 8-24
Automatic Transaxle Fluid (ATF) ........................................... 8-24
Washer Fluid ........................................................................... 8-26
Body Lubrication .................................................................... 8-27
Wiper Blades ........................................................................... 8-27
Battery ..................................................................................... 8-31
Tires ........................................................................................ 8-33
Light Bulbs ............................................................................. 8-37
Fuses ....................................................................................... 8-44
Appearance Care ........................................................................ 8-52
How to Minimize Environmental Paint Damage .................... 8-52
Exterior Care ........................................................................... 8-54
Interior Care ............................................................................ 8-57
8-1
CX-9_8V83-EA-06I_Edition3 Page383
Monday, February 26 2007 7:20 PM
Form No.8V83-EA-06I