dashboard warning lights MAZDA MODEL CX-9 2008 Quick Tips (in English)
[x] Cancel search | Manufacturer: MAZDA, Model Year: 2008, Model line: MODEL CX-9, Model: MAZDA MODEL CX-9 2008Pages: 15, PDF Size: 2.04 MB
Page 4 of 15

GETTING STARTED
Always check the Owner’s Manual for more operating information and safety features
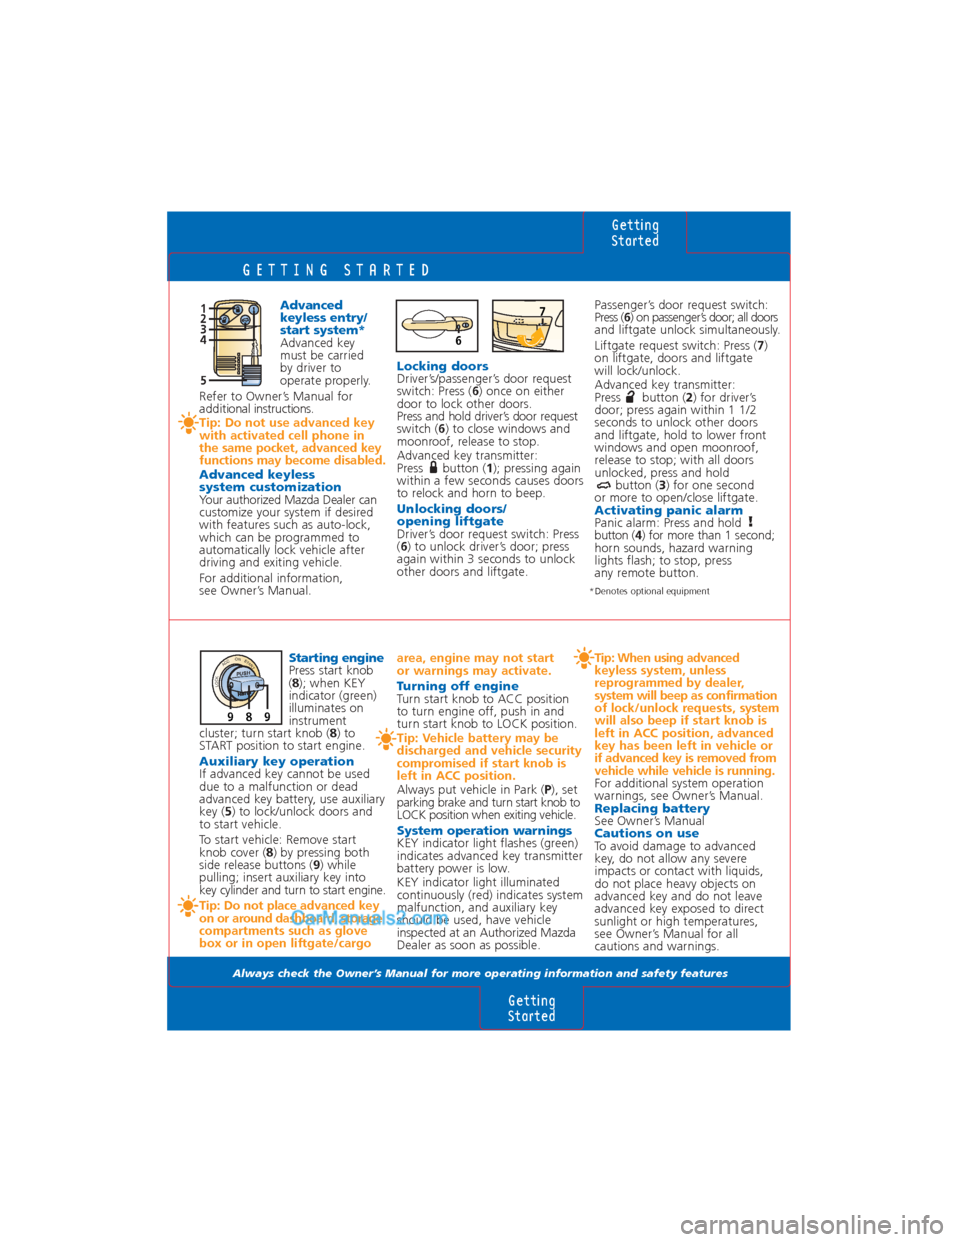
Advanced
keyless entry/
start system*
Advanced key
must be carried
by driver to
operate properly.
Refer to Owner’s Manual for
addi tional instructions.
Tip: Do not use advanced key
with activated cell phone in
the same pocket, advanced key
functions may become disabled.
Advanced keyless
system customization
Your authorized Mazda Dealer can
customize your system if desired
with features such as auto-lock,
which can be programmed to
automatically lock vehicle after
driving and exiting vehicle.
For additional information,
see Owner’s Manual. Passenger’s door request switch:
Press (
6) on passenger’s door; all doors
and liftgate unlock simultaneously.
Liftgate request switch: Press ( 7)
on liftgate, doors and liftgate
will lock/unlock.
Advanced key transmitter:
Press button ( 2) for driver’s
door; press again within 1 1/2
seconds to unlock other doors
and liftgate, hold to lower front
windows and open moonroof,
release to stop; with all doors
unlocked, press and hold button ( 3) for one second
or more to open/close liftgate.Activating panic alarmPanic alarm: Press and hold
button ( 4) for more than 1 second;
horn sounds, hazard warning
lights flash; to stop, press
any remote button.
area, engine may not start
or warnings may activate.
Turning off engine
Turn start knob to ACC position
to turn engine off, push in and
turn start knob to LOCK position.
Tip: Vehicle battery may be
discharged and vehicle security
compromised if start knob is
left in ACC position.
Always put vehicle in Park ( P), set
parking brake and turn start knob to
LOCK position when exiting vehicle.
System operation warningsKEY indicator light flashes (green)
indicates advanced key transmitter
battery power is low.
KEY indicator light illuminated
continuously (red) indicates system
malfunction, and auxiliary key
should be used, have vehicle
inspected at an Authorized Mazda
Dealer as soon as possible.
Tip: When using advanced
keyless system, unless
reprogrammed by dealer,
system will beep as confirmation
of lock/unlock requests, system
will also beep if start knob is
left in ACC position, advanced
key has been left in vehicle or
if advanced key is removed from
vehicle while vehicle is running.
For additional system operation
warnings, see Owner’s Manual.
Replacing batterySee Owner’s ManualCautions on useTo avoid damage to advanced
key, do not allow any severe
impacts or contact with liquids,
do not place heavy objects on
advanced key and do not leave
advanced key exposed to direct
sunlight or high temperatures,
see Owner’s Manual for all
cautions and warnings.
Getting
Started
Getting
Started
1 2
5
4 3
*Denotes optional equipment
Starting enginePress start knob
( 8 ); when KEY
indicator (green)
illuminates on
instrument
cluster; turn start knob ( 8) to
START position to start engine.
Auxiliary key operationIf advanced key cannot be used
due to a malfunction or dead
advanced key battery, use auxiliary
key ( 5) to lock/unlock doors and
to start vehicle.
To start vehicle: Remove start
knob cover ( 8) by pressing both
side release buttons ( 9) while
pulling; insert auxiliary key into
key cylinder and turn to start engine.
Tip: Do not place advanced key
on or around dashboard, storage
compartments such as glove
box or in open liftgate/cargo Locking doors
Driver’s/passenger’s door request
switch: Press (
6) once on either
door to lock other doors.
Press and hold driver’s door request
switch ( 6) to close windows and
moonroof, release to stop.
Advanced key transmitter:
Press button ( 1); pressing again
within a few seconds causes doors
to relock and horn to beep.
Unlocking doors/
opening liftgate
Driver’s door request switch: Press
( 6 ) to unlock driver’s door; press
again within 3 seconds to unlock
other doors and liftgate.
LOCK ACC ON STARTPU SH
989
6
7
Page 5 of 15

GETTING STARTED
Always check the Owner’s Manual for more operating information and safety features
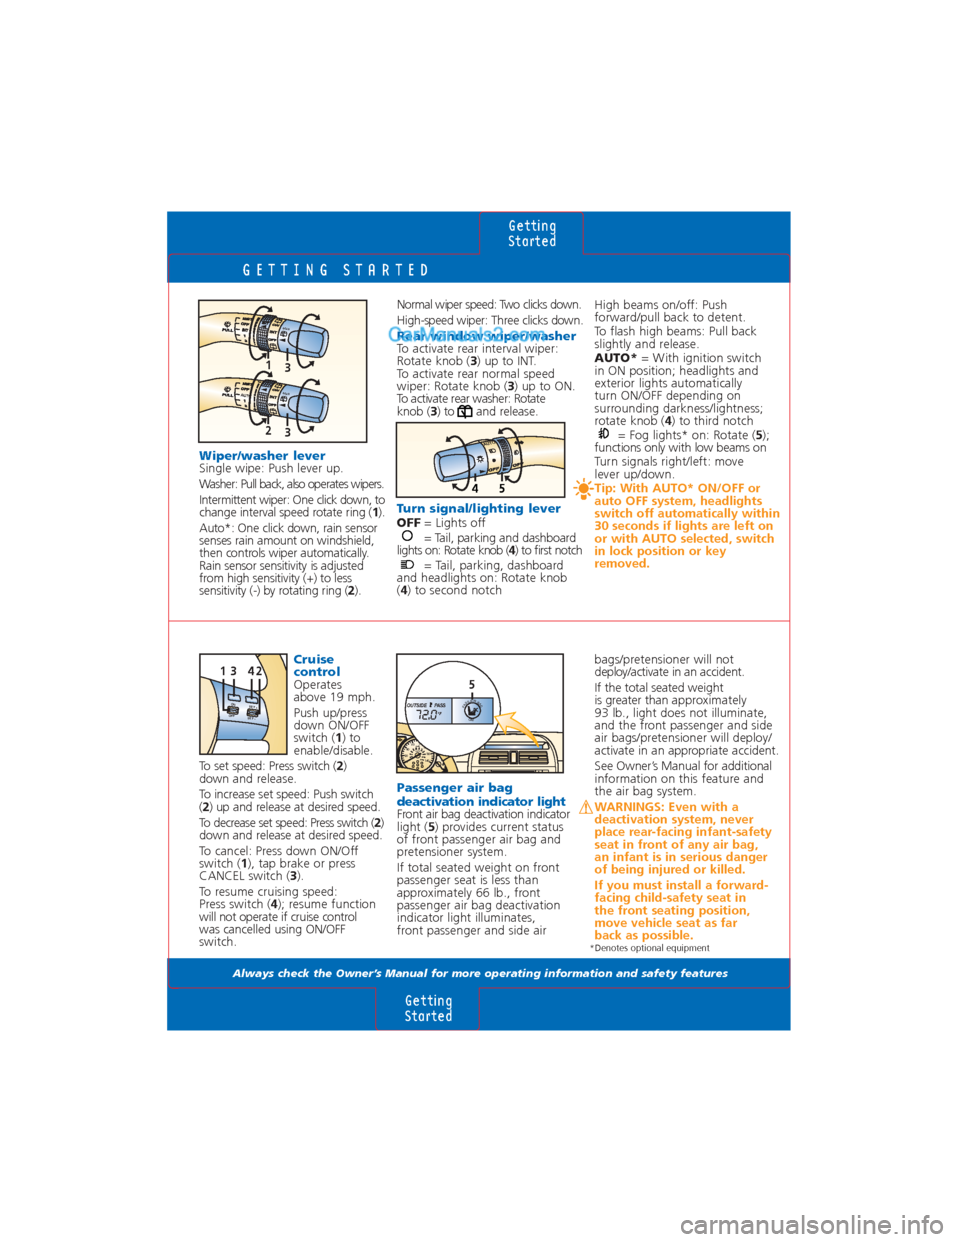
Wiper/washer leverSingle wipe: Push lever up.
Washer: Pull back, also operates wipers.
Intermittent wiper: One click down, to
change interval speed rotate ring (1).
Auto*: One click down, rain sensor
senses rain amount on windshield,
then controls wiper automatically.
Rain sensor sensitivity is adjusted
from high sensitivity (+) to less
sensitivity (-) by rotating ring ( 2).
Passenger air bag
deactivation indicator light
Front air bag deactivation indicator
light ( 5) provides current status
of front passenger air bag and
pretensioner system.
If total seated weight on front
passenger seat is less than
approximately 66 lb., front
passenger air bag deactivation
indicator light illuminates,
front passenger and side air
Getting
Started
Getting
Started
bags/pretensioner will not
deploy/activate in an accident.
If the total seated weight
is greater than approximately
93 lb., light does not illuminate,
and the front passenger and side
air bags/pretensioner will deploy/
activate in an appropriate accident.
See Owner’s Manual for additional
information on this feature and
the air bag system.
WARNINGS: Even with a
deactivation system, never
place rear-facing infant-safety
seat in front of any air bag,
an infant is in serious danger
of being injured or killed.
If you must install a forward-
facing child-safety seat in
the front seating position,
move vehicle seat as far
back as possible.
High beams on/off: Push
forward/pull back to detent.
To flash high beams: Pull back
slightly and release.
AUTO* = With ignition switch
in ON position; headlights and
exterior lights automatically
turn ON/OFF depending on
surrounding darkness/lightness;
rotate knob ( 4) to third notch
= Fog lights* on: Rotate ( 5);
functions only with low beams on
Turn signals right/left: move
lever up/down.
Tip: With AUTO* ON/OFF or
auto OFF system, headlights
switch off automatically within
30 seconds if lights are left on
or with AUTO selected, switch
in lock position or key
removed.
Cruise
control
Operates
above 19 mph.
Push up/press
down ON/OFF
switch ( 1) to
enable/disable.
To set speed: Press switch ( 2)
down and release.
To increase set speed: Push switch
( 2 ) up and release at desired speed.
To decrease set speed: Press switch ( 2)
down and release at desired speed.
To cancel: Press down ON/Off
switch ( 1), tap brake or press
CANCEL switch ( 3).
To resume cruising speed:
Press switch ( 4); resume function
will not operate if cruise control
was cancelled using ON/OFF
switch. Normal wiper speed: Two clicks down.
High-speed wiper: Three clicks down.
Rear window wiper/washer To activate rear interval wiper:
Rotate knob (
3) up to INT.
To activate rear normal speed
wiper: Rotate knob ( 3) up to ON.
To activate rear washer: Rotate
knob ( 3) to and release.
Turn signal/lighting leverOFF = Lights off
= Tail, parking and dashboard
lights on: Rotate knob ( 4) to first notch
= Tail, parking, dashboard
and headlights on: Rotate knob
( 4 ) to second notch
S ET +
S ET -
ON
OF F
4312
54
AUTO
1 3
REA R
2
R
EA
RAU TO
3
LOAD
km/h mph H
C0
20 40
60
80
10 0
12 0
14 0 220
20
40
60
80
100
120
140
160
18 0
200 12 2.3
5
PASS AIR BAG OFF OUTSIDE PASS72.0 oF
*Denotes optional equipment