navigation system MAZDA MODEL CX-9 2008 Quick Tips (in English)
[x] Cancel search | Manufacturer: MAZDA, Model Year: 2008, Model line: MODEL CX-9, Model: MAZDA MODEL CX-9 2008Pages: 15, PDF Size: 2.04 MB
Page 3 of 15

GETTING STARTED
Always check the Owner’s Manual for more operating information and safety features
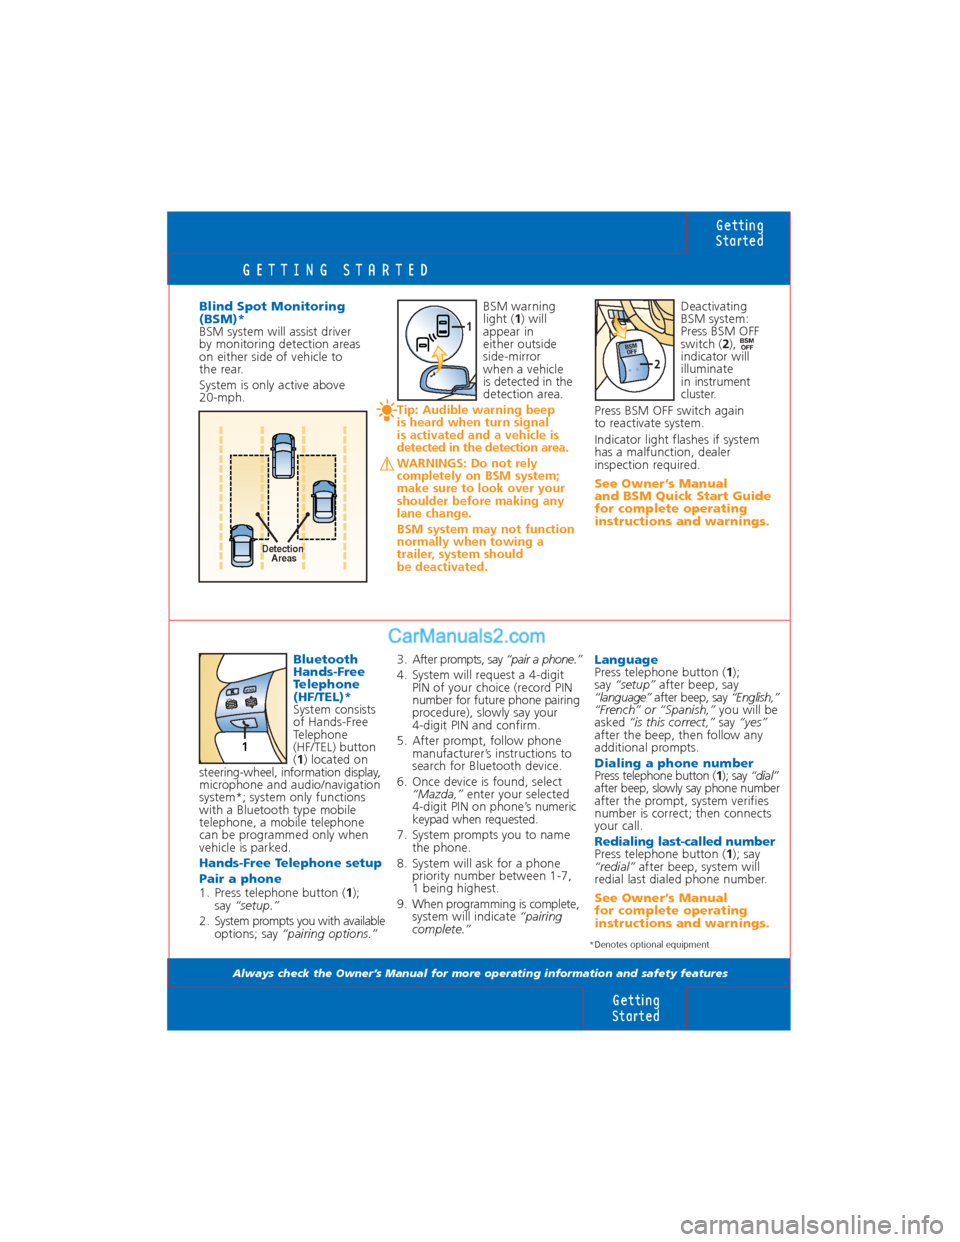
Bluetooth
Hands-Free
Telephone
(HF/TEL)*
System consists
of Hands-Free
Telephone
(HF/TEL) button
(1) located on
steering-wheel, information display,
microphone and audio/navigation
system*; system only functions
with a Bluetooth type mobile
telephone, a mobile telephone
can be programmed only when
vehicle is parked.
Hands-Free Telephone setup
Pair a phone
1. Press telephone button (1);
say “setup.”
2. System prompts you with available
options; say “pairing options.”BSM warning
light (1) will
appear in
either outside
side-mirror
when a vehicle
is detected in the
detection area.
Tip: Audible warning beep
is heard when turn signal
is activated and a vehicle is
detected in the detection area.
WARNINGS: Do not rely
completely on BSM system;
make sure to look over your
shoulder before making any
lane change.
BSM system may not function
normally when towing a
trailer, system should
be deactivated.
Getting
Started
Getting
Started
LanguagePress telephone button (1);
say “setup”after beep, say
“language”after beep, say “English,”
“French” or “Spanish,”you will be
asked “is this correct,”say “yes”
after the beep, then follow any
additional prompts.
Dialing a phone numberPress telephone button (1); say “dial”
after beep, slowly say phone number
after the prompt, system verifies
number is correct; then connects
your call.
Redialing last-called numberPress telephone button (1); say
“redial”after beep, system will
redial last dialed phone number.
See Owner’s Manual
for complete operating
instructions and warnings. Blind Spot Monitoring
(BSM)*
BSM system will assist driver
by monitoring detection areas
on either side of vehicle to
the rear.
System is only active above
20-mph.
3. After prompts, say “pair a phone.”
4. System will request a 4-digit
PIN of your choice (record PIN
number for future phone pairing
procedure), slowly say your
4-digit PIN and confirm.
5. After prompt, follow phone
manufacturer’s instructions to
search for Bluetooth device.
6. Once device is found, select
“Mazda,”enter your selected
4-digit PIN on phone’s numeric
keypad when requested.
7. System prompts you to name
the phone.
8. System will ask for a phone
priority number between 1-7,
1 being highest.
9. When programming is complete,
system will indicate“pairing
complete.”
*Denotes optional equipment
1
Detection
Areas
VOL+
–MOD
E
1
Deactivating
BSM system:
Press BSM OFF
switch (2),
indicator will
illuminate
in instrument
cluster.
Press BSM OFF switch again
to reactivate system.
Indicator light flashes if system
has a malfunction, dealer
inspection required.
See Owner’s Manual
and BSM Quick Start Guide
for complete operating
instructions and warnings.
BSMOFFBSM
OFF
2
Page 12 of 15

AM/FM STEREO/CD/CD CHANGER
Always check the Owner’s Manual for more operating information and safety features
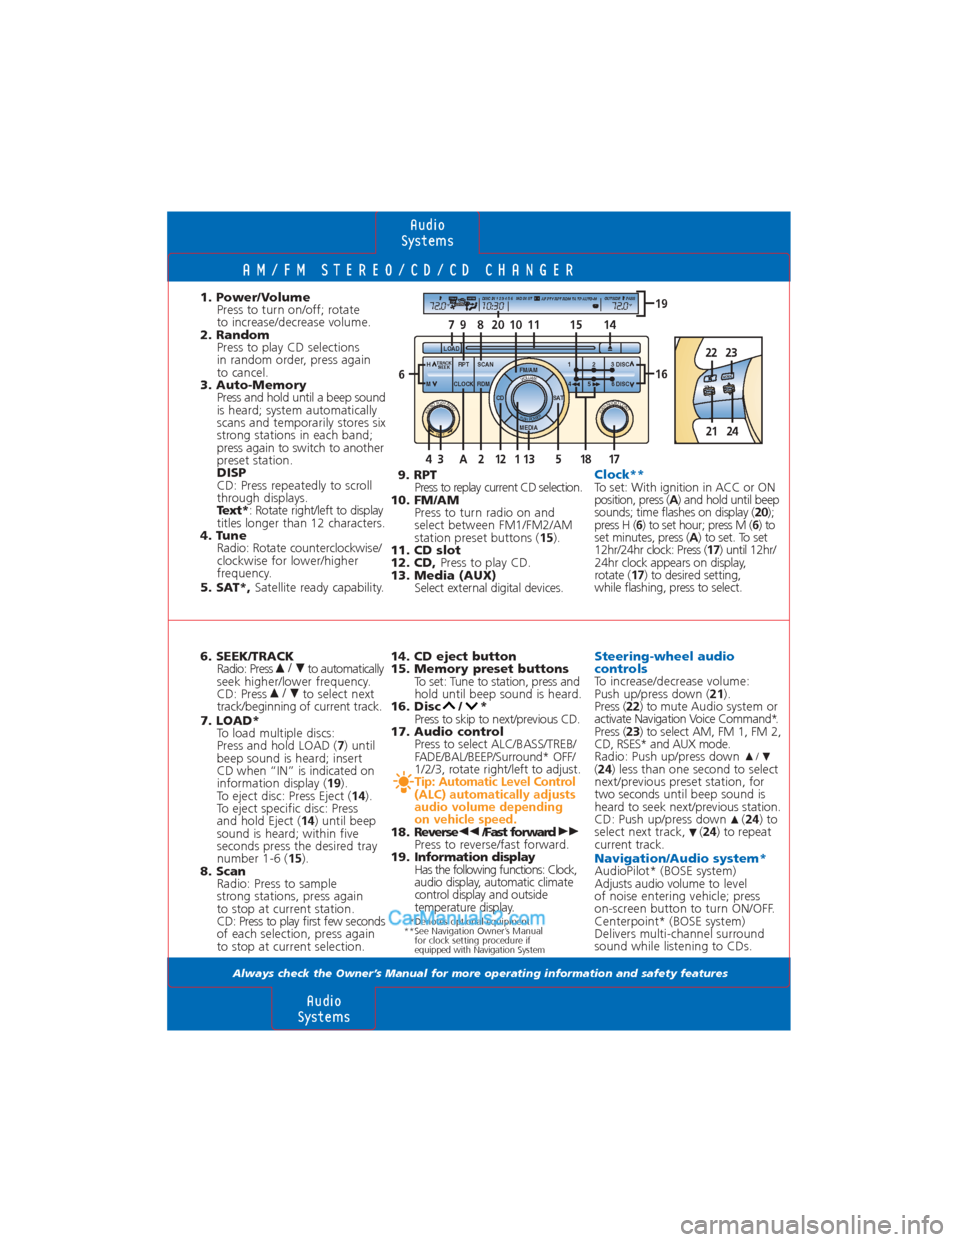
6. SEEK/TRACKRadio: Press to automatically
seek higher/lower frequency.
CD: Press to select next
track/beginning of current track.
7. LOAD* To load multiple discs:
Press and hold LOAD ( 7) until
beep sound is heard; insert
CD when “IN” is indicated on
information display ( 19).
To eject disc: Press Eject ( 14).
To eject specific disc: Press
and hold Eject ( 14) until beep
sound is heard; within five
seconds press the desired tray
number 1-6 ( 15).
8. Scan Radio: Press to sample
strong stations, press again
to stop at current station.
CD: Press to play first few seconds
of each selection, press again
to stop at current selection.
/
/
1. Power/VolumePress to turn on/off; rotate
to increase/decrease volume.
2. Random Press to play CD selections
in random order, press again
to cancel.
3. Auto-Memory Press and hold until a beep sound
is heard; system automatically
scans and temporarily stores six
strong stations in each band;
press again to switch to another
preset station.
DISP
CD: Press repeatedly to scroll
through displays.
Text* : Rotate right/left to display
titles longer than 12 characters.
4. Tune Radio: Rotate counterclockwise/
clockwise for lower/higher
frequency.
5. SAT*, Satellite ready capability.
14. CD eject button
15. Memory preset buttonsTo set: Tune to station, press and
hold until beep sound is heard.
16. Disc / * Press to skip to next/previous CD.
17. Audio control Press to select ALC/BASS/TREB/
FADE/BAL/BEEP/Surround* OFF/
1/2/3, rotate right/left to adjust.
Tip: Automatic Level Control
(ALC) automatically adjusts
audio volume depending
on vehicle speed.
18. Reverse /Fast forward
Press to reverse/fast forward.
19. Information display
Has the following functions: Clock,
audio display, automatic climate
control display and outside
temperature display.
9. RPT Press to replay current CD selection.
10. FM/AM Press to turn radio on and
select between FM1/FM2/AM
station preset buttons ( 15).
11. CD slot
12. CD, Press to play CD.
13. Media (AUX) Select external digital devices.
Steering-wheel audio
controls
To increase/decrease volume:
Push up/press down ( 21).
Press ( 22) to mute Audio system or
activate Navigation Voice Command*.
Press ( 23) to select AM, FM 1, FM 2,
CD, RSES* and AUX mode.
Radio: Push up/press down
( 24 ) less than one second to select
next/previous preset station, for
two seconds until beep sound is
heard to seek next/previous station.
CD: Push up/press down ( 24) to
select next track, ( 24) to repeat
current track.
Navigation/Audio system*AudioPilot* (BOSE system)
Adjusts audio volume to level
of noise entering vehicle; press
on-screen button to turn ON/OFF.
Centerpoint* (BOSE system)
Delivers multi-channel surround
sound while listening to CDs.
/
Clock**To set: With ignition in ACC or ON
position, press ( A) and hold until beep
sounds; time flashes on display ( 20);
press H ( 6) to set hour; press M ( 6) to
set minutes, press ( A) to set. To set
12hr/24hr clock: Press ( 17) until 12hr/
24hr clock appears on display,
rotate ( 17) to desired setting,
while flashing, press to select.
Audio
Systems
Audio
Systems
SCAN
LOAD
RPT
H
M CLOCK RDM 4 5 6 DISC 1 3 DISC
FM/AM
MEDIA 2
SAT
111079814
PUSH AUDIO CONT AUDIO PUSH AUTO TEXT
VOLUME
TRACK SEEK
CD
PUSH POWER
13 1 12 2A 517 18 3 4
72.0 10:30 DISC IN 1 2 3 4 5 6 MD IN ST OUTSIDE PASSAF PTY RPT RDM TA TP AUTO-M AUTO DUAL
A/C oF 72.0 oF
16 6
19
1520
*Denotes optional equipment
**See Navigation Owner’s Manual for clock setting procedure if
equipped with Navigation System
VO L
+
– M
OD
E
2223
2124
Page 13 of 15

CARGO AREA
Always check the Owner’s Manual for more operating information and safety features
Cargo Area
Driving Tips
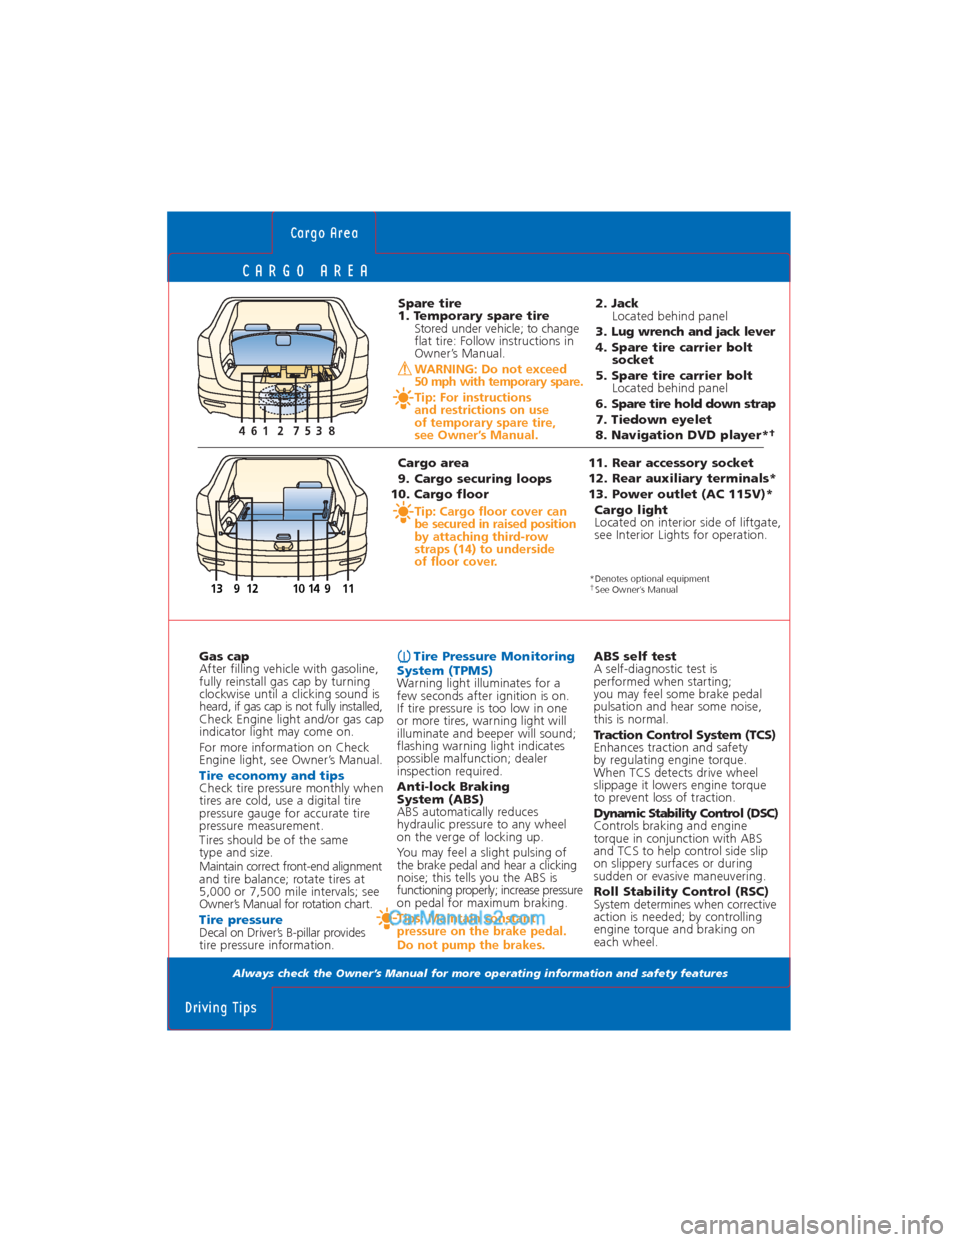
Spare tire
1. Temporary spare tire
Stored under vehicle; to change
flat tire: Follow instructions in
Owner’s Manual.
WARNING: Do not exceed
50 mph with temporary spare.
Tip: For instructions
and restrictions on use
of temporary spare tire,
see Owner’s Manual.
Gas cap
After filling vehicle with gasoline,
fully reinstall gas cap by turning
clockwise until a clicking sound is
heard, if gas cap is not fully installed,
Check Engine light and/or gas cap
indicator light may come on.
For more information on Check
Engine light, see Owner’s Manual.
Tire economy and tipsCheck tire pressure monthly when
tires are cold, use a digital tire
pressure gauge for accurate tire
pressure measurement.
Tires should be of the same
type and size.
Maintain correct front-end alignment
and tire balance; rotate tires at
5,000 or 7,500 mile intervals; see
Owner’s Manual for rotation chart.
Tire pressure Decal on Driver’s B-pillar provides
tire pressure information.
Tire Pressure Monitoring
System (TPMS)
Warning light illuminates for a
few seconds after ignition is on.
If tire pressure is too low in one
or more tires, warning light will
illuminate and beeper will sound;
flashing warning light indicates
possible malfunction; dealer
inspection required.
Anti-lock Braking
System (ABS)
ABS automatically reduces
hydraulic pressure to any wheel
on the verge of locking up.
You may feel a slight pulsing of
the brake pedal and hear a clicking
noise; this tells you the ABS is
functioning properly; increase pressure
on pedal for maximum braking.
Tips: Maintain constant
pressure on the brake pedal.
Do not pump the brakes.
2. Jack
Located behind panel
3. Lug wrench and jack lever
4. Spare tire carrier bolt
socket
5. Spare tire carrier bolt
Located behind panel
6. Spare tire hold down strap
7. Tiedown eyelet
8. Navigation DVD player*
†
Cargo area
9. Cargo securing loops
10. Cargo floor
Tip: Cargo floor cover can
be secured in raised position
by attaching third-row
straps (14) to underside
of floor cover.
11. Rear accessory socket
12. Rear auxiliary terminals*
13. Power outlet (AC 115V)*
Cargo light
Located on interior side of liftgate,
see Interior Lights for operation.
10 9911141312
3 7 12 58 46
ABS self test
A self-diagnostic test is
performed when starting;
you may feel some brake pedal
pulsation and hear some noise,
this is normal.
Traction Control System (TCS)
Enhances traction and safety
by regulating engine torque.
When TCS detects drive wheel
slippage it lowers engine torque
to prevent loss of traction.
Dynamic Stability Control (DSC)
Controls braking and engine
torque in conjunction with ABS
and TCS to help control side slip
on slippery surfaces or during
sudden or evasive maneuvering.
Roll Stability Control (RSC)
System determines when corrective
action is needed; by controlling
engine torque and braking on
each wheel.
*Denotes optional equipment†See Owner’s Manual