seats MAZDA MODEL CX-9 2008 Quick Tips (in English)
[x] Cancel search | Manufacturer: MAZDA, Model Year: 2008, Model line: MODEL CX-9, Model: MAZDA MODEL CX-9 2008Pages: 15, PDF Size: 2.04 MB
Page 9 of 15

SEATS
Always check the Owner’s Manual for more operating information and safety features
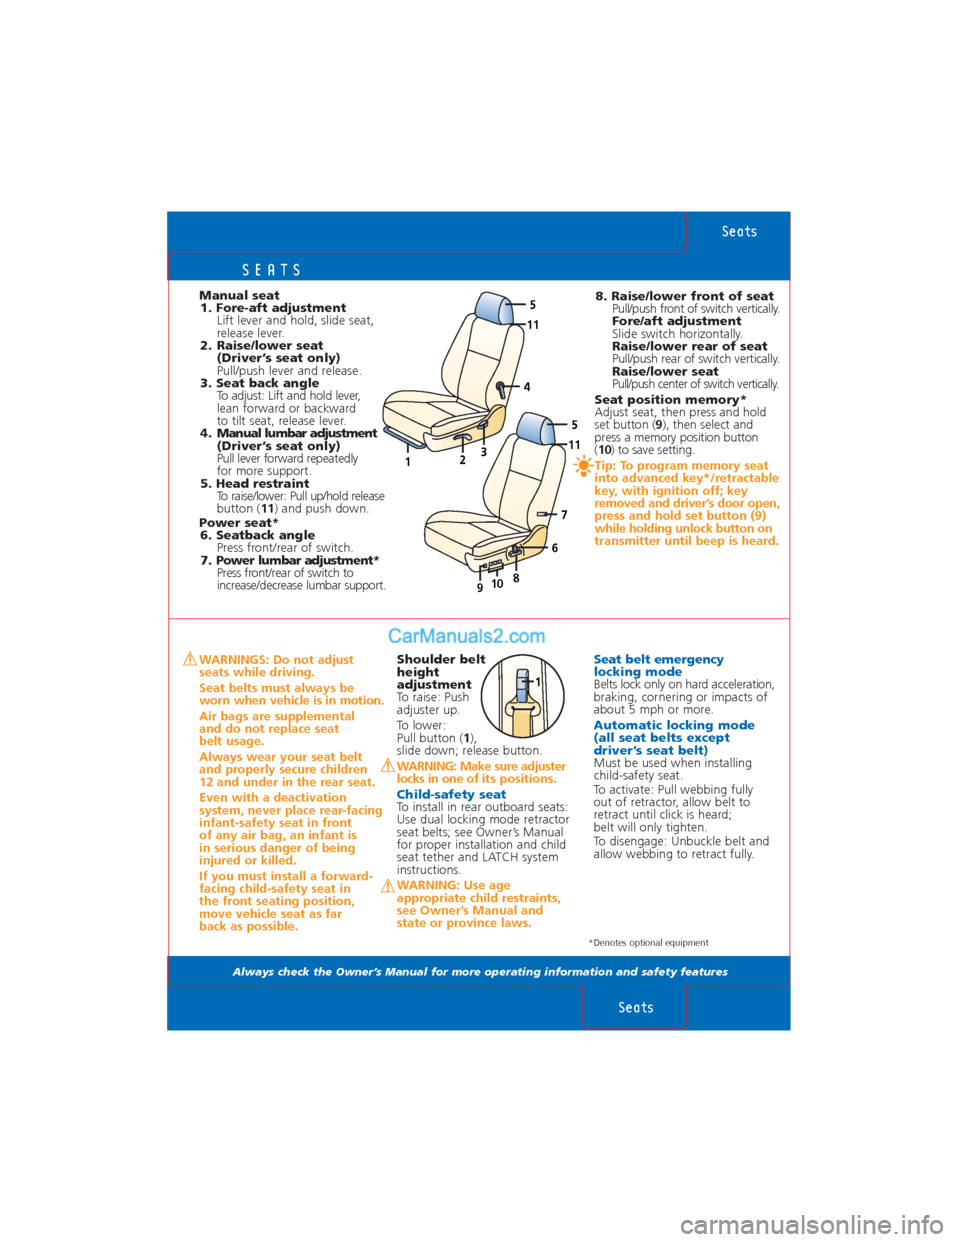
Manual seat
1. Fore-aft adjustment
Lift lever and hold, slide seat,
release lever.
2. Raise/lower seat
(Driver’s seat only)
Pull/push lever and release.
3. Seat back angle
To adjust: Lift and hold lever,
lean forward or backward
to tilt seat, release lever.
4 . Manual lumbar adjustment
(Driver’s seat only)
Pull lever forward repeatedly
for more support.
5. Head restraint
To raise/lower: Pull up/hold release
button (11) and push down.
Power seat*
6. Seatback angle
Press front/rear of switch.
7. Power lumbar adjustment*
Press front/rear of switch to
increase/decrease lumbar support.
Seats
Seats
WARNINGS: Do not adjust
seats while driving.
Seat belts must always be
worn when vehicle is in motion.
Air bags are supplemental
and do not replace seat
belt usage.
Always wear your seat belt
and properly secure children
12 and under in the rear seat.
Even with a deactivation
system, never place rear-facing
infant-safety seat in front
of any air bag, an infant is
in serious danger of being
injured or killed.
If you must install a forward-
facing child-safety seat in
the front seating position,
move vehicle seat as far
back as possible.Seat belt emergency
locking mode
Belts lock only on hard acceleration,
braking, cornering or impacts of
about 5 mph or more.
Automatic locking mode
(all seat belts except
driver’s seat belt)
Must be used when installing
child-safety seat.
To activate: Pull webbing fully
out of retractor, allow belt to
retract until click is heard;
belt will only tighten.
To disengage: Unbuckle belt and
allow webbing to retract fully. Shoulder belt
height
adjustment
To raise: Push
adjuster up.
To lower:
Pull button (1),
slide down; release button.WARNING: Make sure adjuster
locks in one of its positions.
Child-safety seat
To install in rear outboard seats:
Use dual locking mode retractor
seat belts; see Owner’s Manual
for proper installation and child
seat tether and LATCH system
instructions.
WARNING: Use age
appropriate child restraints,
see Owner’s Manual and
state or province laws.
5
11
6
1089
7
5
11
123
4
1
*Denotes optional equipment
8. Raise/lower front of seat
Pull/push front of switch vertically.
Fore/aft adjustment
Slide switch horizontally.
Raise/lower rear of seat
Pull/push rear of switch vertically.
Raise/lower seat
Pull/push center of switch vertically.
Seat position memory*
Adjust seat, then press and hold
set button (9), then select and
press a memory position button
(10) to save setting.
Tip: To program memory seat
into advanced key*/retractable
key, with ignition off; key
removed and driver’s door open,
press and hold set button (9)
while holding unlock button on
transmitter until beep is heard.
Page 10 of 15

REAR SEATS
Always check the Owner’s Manual for more operating information and safety features
Automatic
Transaxle
Gearshift
must be in
Park or
Neutral to
start engine;
it must
be in Park
to remove
ignition key.
P = Park
To move gearshift from Park:
Press firmly on brake pedal then
move the shift lever out of P.
R = Reverse
N = Neutral
No gear engaged.
D Drive (Overdrive)
For normal driving: Shifts through
all forward gears automatically.
Rear Seats
Transaxle
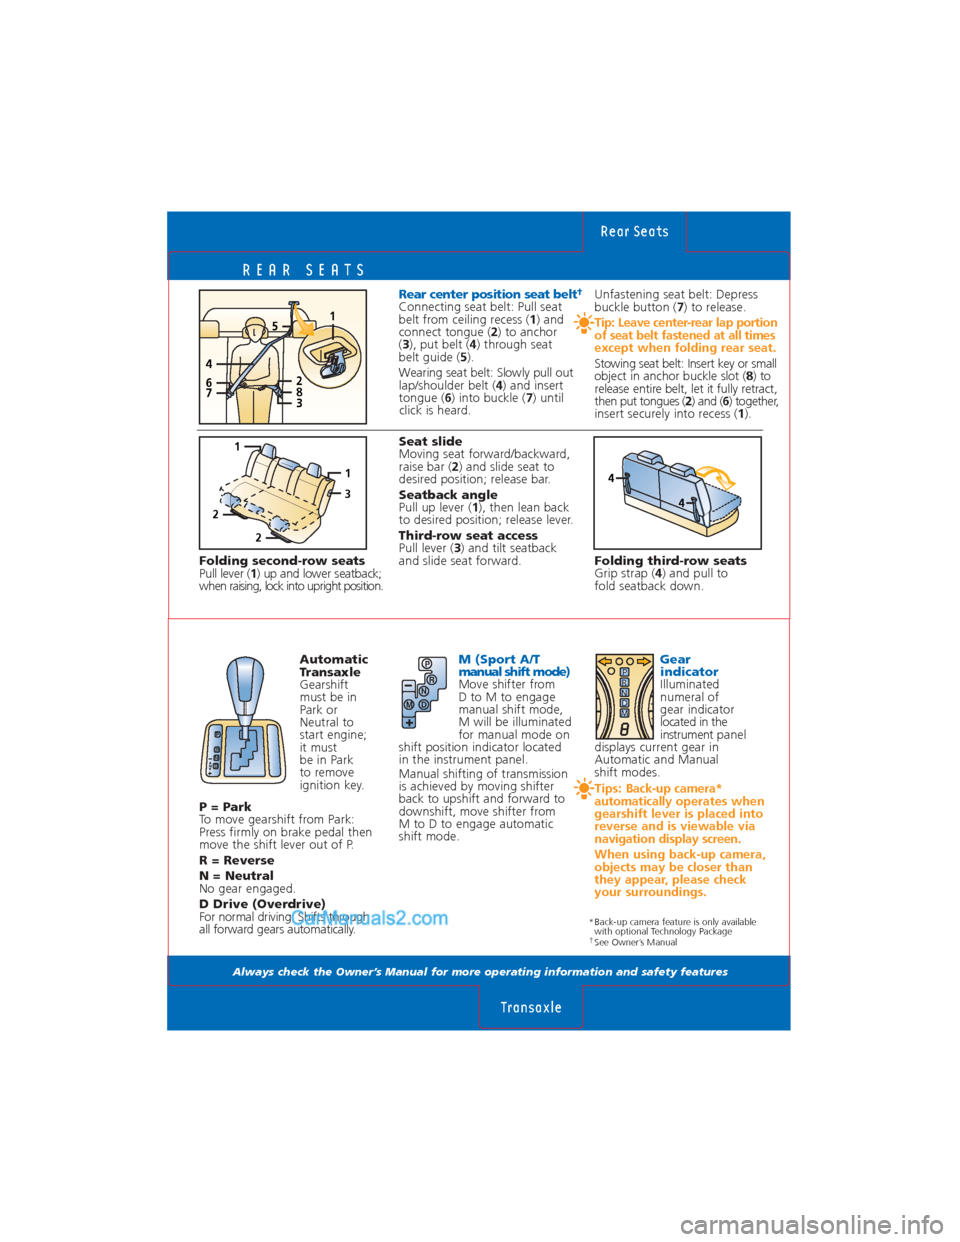
Folding second-row seats
Pull lever ( 1) up and lower seatback;
when raising, lock into upright position. Seat slide
Moving seat forward/backward,
raise bar (
2) and slide seat to
desired position; release bar.
Seatback angle
Pull up lever ( 1), then lean back
to desired position; release lever.
Third-row seat access
Pull lever ( 3) and tilt seatback
and slide seat forward. Folding third-row seats
Grip strap (4) and pull to
fold seatback down.
Rear center position seat belt†
Connecting seat belt: Pull seat
belt from ceiling recess ( 1) and
connect tongue ( 2) to anchor
( 3 ), put belt ( 4) through seat
belt guide ( 5).
Wearing seat belt: Slowly pull out
lap/shoulder belt ( 4) and insert
tongue ( 6) into buckle ( 7) until
click is heard.
M (Sport A/T
manual shift mode)
Move shifter from
D to M to engage
manual shift mode,
M will be illuminated
for manual mode on
shift position indicator located
in the instrument panel.
Manual shifting of transmission
is achieved by moving shifter
back to upshift and forward to
downshift, move shifter from
M to D to engage automatic
shift mode.
Gear
indicator
Illuminated
numeral of
gear indicator
located in the
instrument panel
displays current gear in
Automatic and Manual
shift modes.
Tips: Back-up camera*
automatically operates when
gearshift lever is placed into
reverse and is viewable via
navigation display screen.
When using back-up camera,
objects may be closer than
they appear, please check
your surroundings.
P
M
R
N
D
P
R
N
D
MP
R
N
D
M
*Back-up camera feature is only available with optional Technology Package
†See Owner’s Manual
3
1
1
2
2
4
4
2
376
51
4
8
Unfastening seat belt: Depress
buckle button (7) to release.
Tip: Leave center-rear lap portion
of seat belt fastened at all times
except when folding rear seat.
Stowing seat belt: Insert key or small
object in anchor buckle slot ( 8) to
release entire belt, let it fully retract,
then put tongues ( 2) and ( 6) together,
insert securely into recess ( 1).
Page 11 of 15

CLIMATE CONTROLS
Always check the Owner’s Manual for more operating information and safety features
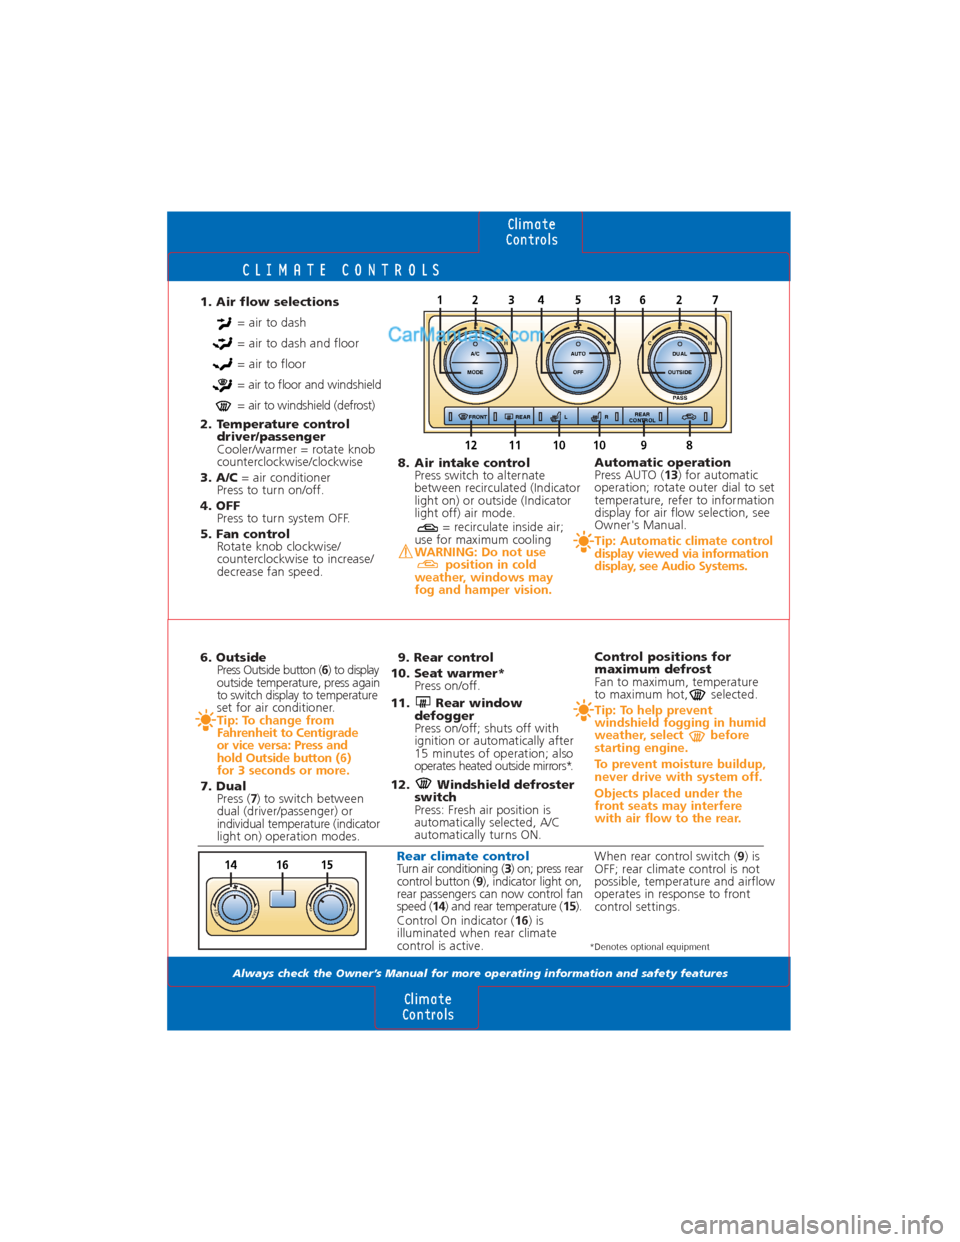
1. Air flow selections= air to dash
= air to dash and floor
= air to floor
= air to floor and windshield
= air to windshield (defrost)
2. Temperature control driver/passenger
Cooler/warmer = rotate knob
counterclockwise/clockwise
3. A/C = air conditioner
Press to turn on/off.
4. OFF Press to turn system OFF.
5. Fan control Rotate knob clockwise/
counterclockwise to increase/
decrease fan speed. 8. Air intake control
Press switch to alternate
between recirculated (Indicator
light on) or outside (Indicator
light off) air mode.
= recirculate inside air;
use for maximum cooling
WARNING: Do not use position in cold
weather, windows may
fog and hamper vision.
Automatic operation
Press AUTO ( 13) for automatic
operation; rotate outer dial to set
temperature, refer to information
display for air flow selection, see
Owner's Manual.
Tip: Automatic climate control
display viewed via information
display, see Audio Systems.
6. Outside Press Outside button ( 6) to display
outside temperature, press again
to switch display to temperature
set for air conditioner.
Tip: To change from
Fahrenheit to Centigrade
or vice versa: Press and
hold Outside button ( 6)
for 3 seconds or more.
7. Dual Press ( 7) to switch between
dual (driver/passenger) or
individual temperature (indicator
light on) operation modes. 9. Rear control
10. Seat warmer* Press on/off.
11. Rear window defogger
Press on/off; shuts off with
ignition or automatically after
15 minutes of operation; also
operates heated outside mirrors*.
12. Windshield defroster switch
Press: Fresh air position is
automatically selected, A/C
automatically turns ON.
Control positions for
maximum defrost
Fan to maximum, temperature
to maximum hot, selected.
Tip: To help prevent
windshield fogging in humid
weather, select before
starting engine.
To prevent moisture buildup,
never drive with system off.
Objects placed under the
front seats may interfere
with air flow to the rear.
Rear climate controlTurn air conditioning ( 3) on; press rear
control button ( 9), indicator light on,
rear passengers can now control fan
speed ( 14) and rear temperature ( 15).
Control On indicator ( 16) is
illuminated when rear climate
control is active.
Climate
Controls
Climate
Controls
AUTO
OFF DUAL
PASS
OUTSIDEA/C
MODE
5223137641
FRONT REAR REAR
CONTROL
LR CH
CH
1211101098
*Denotes optional equipment
CHOFFMAX
151416When rear control switch (9
) is
OFF; rear climate control is not
possible, temperature and airflow
operates in response to front
control settings.