jack MAZDA MODEL CX-9 2009 (in English) User Guide
[x] Cancel search | Manufacturer: MAZDA, Model Year: 2009, Model line: MODEL CX-9, Model: MAZDA MODEL CX-9 2009Pages: 538, PDF Size: 12.18 MB
Page 401 of 538

Black plate (401,1)
qRemoving a Flat Tire
1. Loosen the lug nuts by turning them
counterclockwise one turn each, but
don't remove any lug nuts until the tire
has been raised off the ground.
2. Place the jack under the jacking
position closest to the tire being
changed.
Jacking positionJacking position
WARNING
Use only the front and rear jacking
positions recommended in this manual:
Attempting to jack the vehicle in
positions other than those
recommended in this manual is
dangerous. The vehicle could slip off
the jack and seriously injure or even
kill someone. Use only the front and
rear jacking positions recommended
in this manual.
Use only the jack provided with your
Mazda:
Using a jack that is not designed for
your Mazda is dangerous. The vehicle
could slip off the jack and seriously
injure someone.
Never place objects under the jack:
Jacking the vehicle with an object
under the jack is dangerous. The jack
could slip and someone could be
seriously injured by the jack or the
falling vehicle.
3. Insert the jack lever and attach the lug
wrench to tire jack.
In Case of an Emergency
Flat Tire
7-9
CX-9_8Z66-EA-08F_Edition3 Page401
Tuesday, March 31 2009 1:54 PM
Form No.8Z66-EA-08F
Page 404 of 538

Black plate (404,1)
If you are unsure of how tight the nuts
should be, have them inspected at an
Authorized Mazda Dealer.
Nut tightening torque
N·m (kgf·m, ft·lbf)107.8―147.0
(11.0―14.9, 79.6―108.4)
WARNING
Always securely and correctly tighten
the lug nuts:
Improperly or loosely tightened lug
nuts are dangerous. The wheel could
wobble or come off. This could result
in loss of vehicle control and cause a
serious accident.
Be sure to reinstall the same nuts you
removed or replace them with metric
nuts of the same configuration:
Because the wheel studs and lug nuts
on your Mazda have metric threads,
using a non-metric nut is dangerous.
On a metric stud, it would not secure
the wheel and would damage the
stud, which could cause the wheel to
slip off and cause an accident.
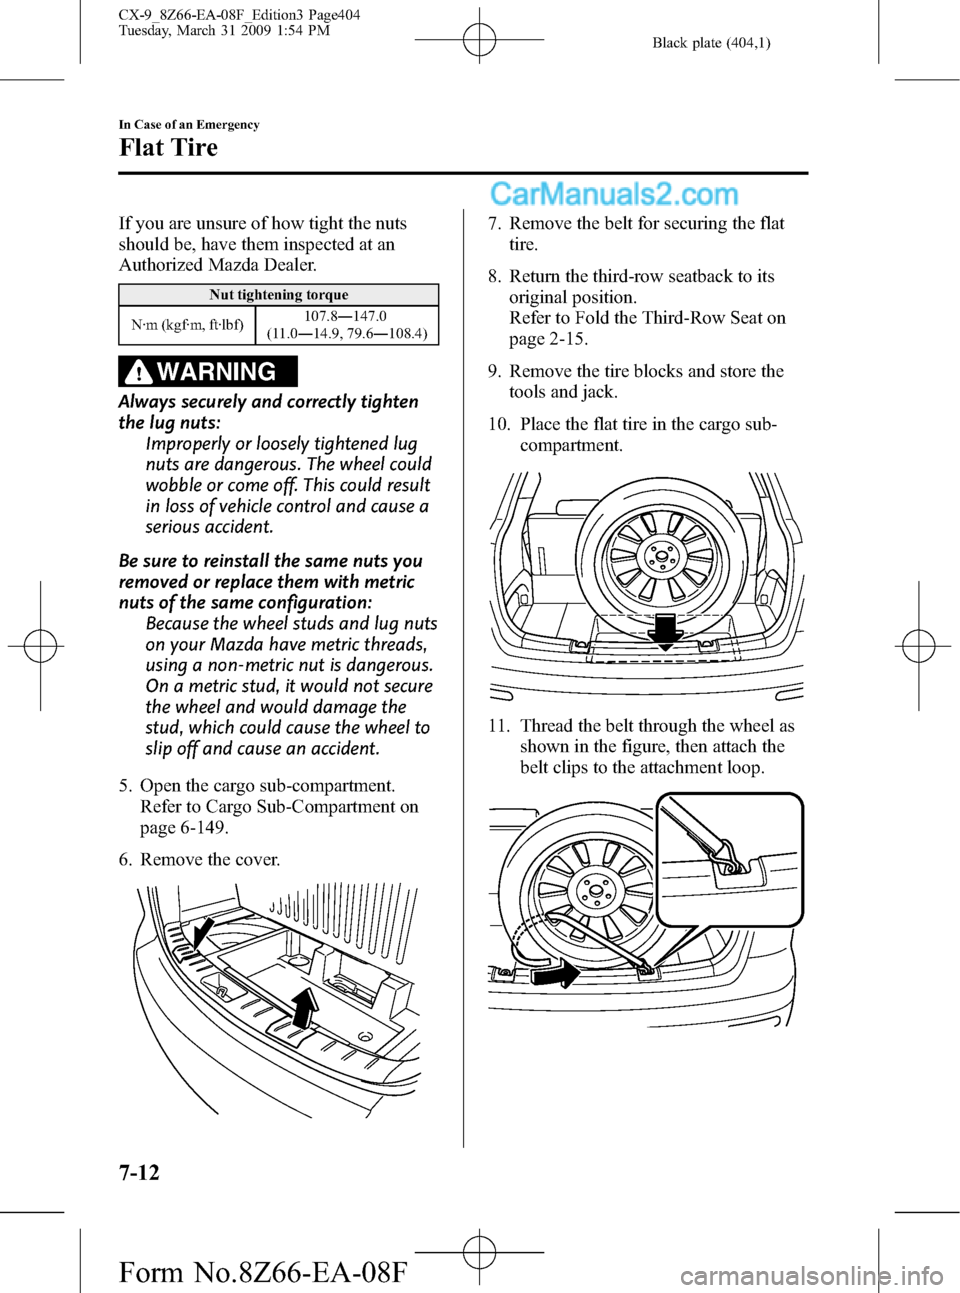
5. Open the cargo sub-compartment.
Refer to Cargo Sub-Compartment on
page 6-149.
6. Remove the cover.
7. Remove the belt for securing the flat
tire.
8. Return the third-row seatback to its
original position.
Refer to Fold the Third-Row Seat on
page 2-15.
9. Remove the tire blocks and store the
tools and jack.
10. Place the flat tire in the cargo sub-
compartment.
11. Thread the belt through the wheel as
shown in the figure, then attach the
belt clips to the attachment loop.
7-12
In Case of an Emergency
Flat Tire
CX-9_8Z66-EA-08F_Edition3 Page404
Tuesday, March 31 2009 1:54 PM
Form No.8Z66-EA-08F
Page 405 of 538

Black plate (405,1)
NOTE
Attach location *1 of the belt to the attachment
loop on the right.
Buckle
Belt clips1
12. Pull the belt end to secure the flat tire.
13. Check the tire inflation pressure.
Refer to the specification charts on
page 10-6.
14. Have the flat tire repaired or replaced
as soon as possible.
WARNING
Do not drive with any tires that have
incorrect air pressure:
Driving on tires with incorrect air
pressure is dangerous. Tires with
incorrect pressure could affect
handling and result in an accident.
When you check the regular tires' air
pressure, check the spare tire, too.
NOTE
(With Tire Pressure Monitoring System)
A tire pressure sensor is not installed to the
temporary spare tire. The warning light will
flash continuously while the temporary spare
tire is being used (page 5-29).
NOTE
To prevent the jack and tool from rattling, store
them properly.
In Case of an Emergency
Flat Tire
7-13
CX-9_8Z66-EA-08F_Edition3 Page405
Tuesday, March 31 2009 1:54 PM
Form No.8Z66-EA-08F