seat memory MAZDA MODEL CX-9 2010 Smart Start Guide (in English)
[x] Cancel search | Manufacturer: MAZDA, Model Year: 2010, Model line: MODEL CX-9, Model: MAZDA MODEL CX-9 2010Pages: 16, PDF Size: 3.68 MB
Page 3 of 16

34
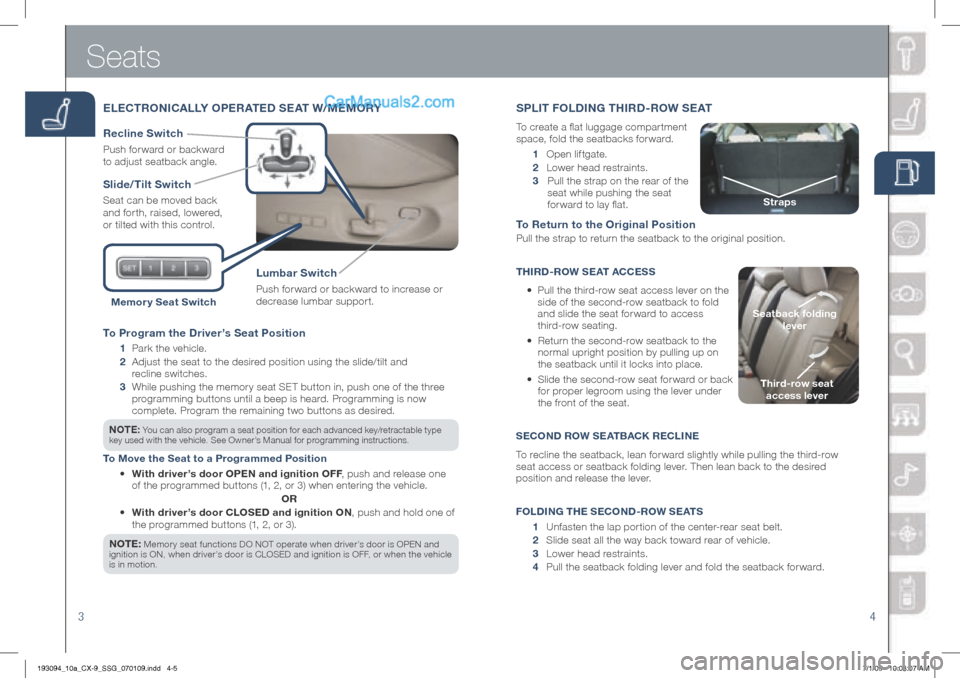
To Program the Driver’s Seat Position
1 Pa rk the vehicle.
2
Adjust the seat to the desired position using the slide/tilt and
recline switches.
3
While pushing the memory seat SET button in, push one of the three
programming buttons until a beep is heard. Programming is now
complete. Pr ogram the remaining two buttons as desired.
nOTE: You can als o program a seat position for each advanced key/retractable type
key used with the vehicle. See Owner’s Manual for programming instructions.
To Move the Seat to a Programmed Position
• With driver’s door OPE n and ignition OFF, push and release one
of the programmed buttons (1, 2, or 3) when entering the vehicle.
Or
• With driver’s door CLOSED and ignition O n, push and hold one of
the programmed buttons ( 1, 2, or 3).
n OTE:
Me mory seat functions DO NOT operate when driver’s door is OPEN and
ignition is ON, when driver’s door is CLOSED and ignition is OFF, or when the vehicle
is in motion.
Seats
ELECT rO nICALL y OPE rATED SEAT W/MEMO ry
Slide/Tilt Switch
Seat can be moved back
and forth, raised, lowered,
or tilted with this control.
Lumbar Switch
Push forward or backward to increase or
decrease lumbar support.
r ecline Switch
Push forward or backward
to adjust seatback angle.
Memor y Seat Switch
1 Open liftgate.
2
Lower head restraints.
3 Pull the strap on the rear of the
seat while pushing the seat
forward to lay flat.
To r eturn to the Original Position
Pull the strap to return the seatback to the original position.
ThIr D -rOW S EAT ACCESS
• Pull the third-row seat access lever on the
side of the second-row seatback to fold
and slide the seat forward to access
third-row seating.
•
Return the second-row seatback to the
normal upright position by pulling up on
the seatback until it locks into place.
•
Slide the second-row seat for ward or back
for proper legroom using the lever under
the front of the seat.
S ECO nD rOW S EATBACK rECLI nE
To recline the seatback, lean forward slightly while pulling the third-row
seat access or seatback folding lever. Then lean back to the desired
position and release the lever.
F OLDI nG T hE S ECO nD -rOW S EATS
1 Unfasten the lap portion of the center-rear seat belt.
2 Slide seat all the way back toward rear of vehicle.
3 Lower head restraints.
4 Pull the seatback folding lever and fold the seatback forward.
SPLIT F OLDInG Th Ir D -r OW SEAT
To create a flat luggage compar tment
space, fold the seatbacks forward.
Third-row seat
access lever
Seatback folding
lever
Straps
193094_10a_CX-9_SSG_070109.indd 4-57/1/09 10:08:07 AM
Page 10 of 16

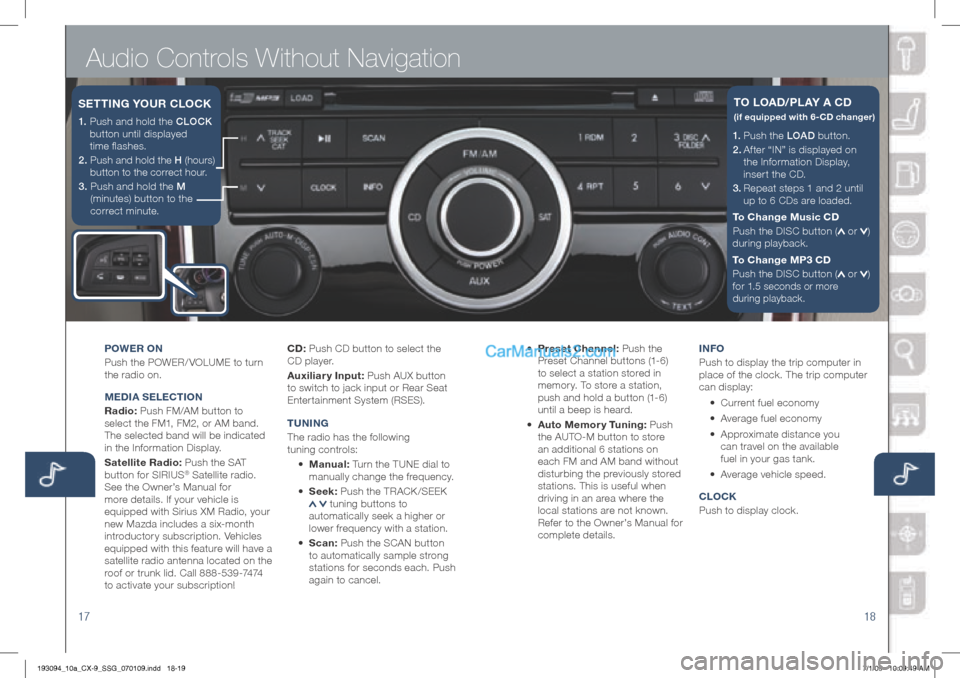
Audio Controls Without Navigation
1718
1. P u s h t h e LOAD button.
2.
Af ter “IN” is displayed on
the Information Display,
insert the CD.
3.
Repeat steps 1 and 2 until
up to 6 CDs are loaded.
To Change Music CD
Push the DISC button (
or )
during playback.
To Change MP3 CD
Push the DISC button (
or )
for
1.5 seconds or more
during playback.
TO LOAD/PLA y A CD
(if equipped with 6-CD changer)
POWEr On
Push the POWER/ VOLUME to turn
the radio on.
M EDIA S ELECTIO n
r adio: Push FM/AM button to
select the FM1, FM2, or AM band.
The selected band will be indicated
in the Information Display.
Satellite radio: Push the SAT
button for SIRIUS
® Satellite radio.
See the Owner’s Manual for
more details. If your vehicle is
equipped with Sirius XM Radio, your
new Mazda includes a six-month
introductory subscription. Vehicles
equipped with this feature will have a
satellite radio antenna located on the
roof or trunk lid. Call 888-539-7474
to activate your subscription! CD:
Push CD button to select the
CD player.
Auxiliary Input: Push AUX button
to switch to jack input or Rear Seat
Entertainment System (RSES).
T U nIn G
The radio has the following
tuning controls:
• Manual: Turn the TUNE dial to
manually change the frequency.
• Seek: Push the TRACK /SEEK
tuning buttons to
automatically seek a higher or
lower frequency with a station.
• Scan: Push the SCAN button
to automatically sample strong
stations for seconds each. Push
again to cancel. •
Preset Channel: Push the
Preset Channel buttons (1-6)
to select a station stored in
memory. To store a station,
push and hold a button (1-6)
until a beep is heard.
• Auto Memor y Tuning: Push
the AUTO-M button to store
an additional 6 stations on
each FM and AM band without
disturbing the previously stored
stations. This is useful when
driving in an area where the
local stations are not known.
Refer to the Owner’s Manual for
complete details. I
n FO
Push to display the trip computer in
place of the clock. The trip computer
can display:
• Current fuel economy
• Average fuel economy
•
Approximate distance you
can travel on the available
fuel in your gas tank.
•
Average vehicle speed.
CLOCK
Push to display clock.
1. Push and hold the CLOCK
button until displayed
time flashes.
2. Push and hold the H (hours)
button to the correct hour.
3. Push and hold the M
(minutes) button to the
correct minute.
SETTI nG y OUr CLOCK
193094_10a_CX-9_SSG_070109.indd 18-197/1/09 10:09:49 AM
Page 15 of 16

Keyless Entr y
...............................1-2 • Keyless Transmitter
• Advanced Key*
• Door Request Switches*
• Liftgate Request Switch*
• Power Door Locks
Starting The Engine
.......................2 • Star t Knob Ignition
(Advanced Key*)
Liftgate
............................................2
• Manual Operation
• Power Liftgate (PLG) Operation*
Seats
............................................3-4 • Adjustment
• Memory Seat Function*
r
ear Seat Access ...........................4 • 2nd and 3rd row seating access
Driver’s View
...............................5-6 • Location of Switches and Controls
Instrument Cluster
.....................7- 8 • Review indicator light function
and location
Lighting Control
.............................9
Wiper/Washer
................................10
Sport A /T Manual Shift Mode ......11
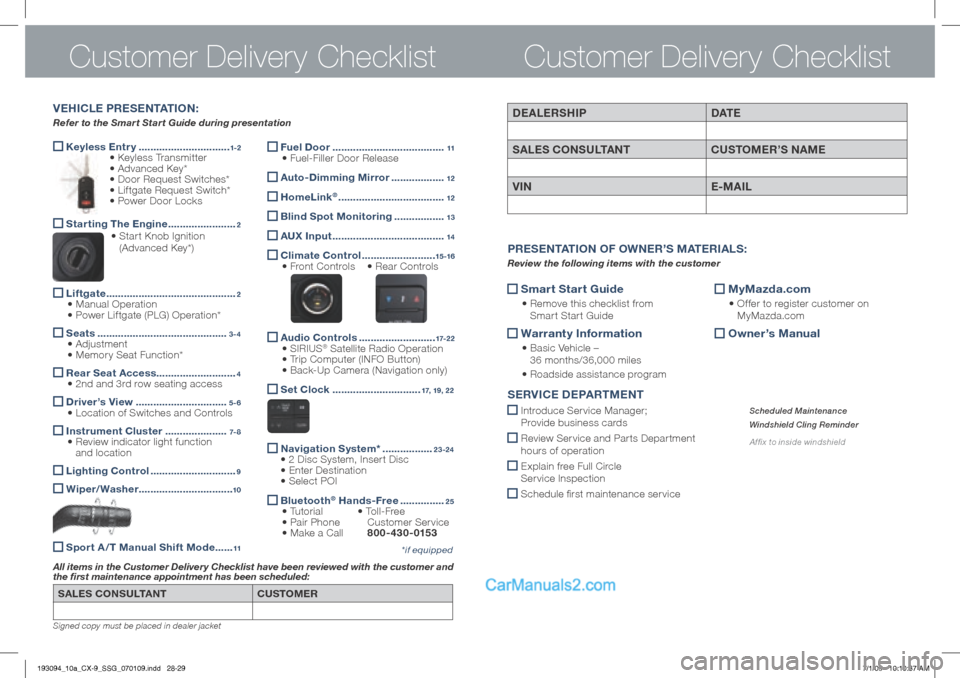
Customer Delivery ChecklistCustomer Delivery Checklist
SALES COnSULTA nT CUSTOMEr
All items in the Customer Delivery Checklist have been reviewed with the customer and
the first maintenance appointment has been scheduled:
*if equipped
Signed copy must be placed in dealer jacket
DEALErSh IP DAT E
SALES CO nSULTA nT CUSTOMEr’S n AME
VIn E-MAIL
Smart Start Guide
•
Remove this checklist from
Smart Start Guide
Warranty Information
•
Basic Vehicle –
36 months/36,000 miles
• Roadside assistance program
MyMazda.com
•
Offer to register customer on
MyMazda.com
Owner’s Manual
Pr
ESE nTATIO n OF O WnEr’ S M ATE rIALS :
Review the following items with the customer
SErVICE D EPArTME nT
Introduce Service Manager;
Provide business cards
Review Ser vice and Par ts Depar tment
hours of operation
Explain free Full Circle
Ser vice Inspection
Schedule first maintenance service
Scheduled Maintenance
Windshield Cling Reminder
Affix to inside windshield
V E h ICLE P rESE nTATIO n:
Refer to the Smart Start Guide during presentation
Fuel Door
......................................11 • Fuel-Filler Door Release
Auto-Dimming Mirror ..................12
homeLink® ....................................12
Blind Spot Monitoring
.................13
AUX Input
......................................14
Climate Control
.........................15 -16 • Front Controls • Rear Controls
Audio Controls
..........................17-2 2 • SIRIUS® Satellite Radio Operation
• Trip Computer (INFO Button)
• Back-Up Camera (Navigation only)
Set Clock
..............................17, 19, 22
n
avigation System* .................23-24
• 2 Disc System, Insert Disc
• Enter Destination
• Select POI
Bluetooth®
h ands-Free ...............25 • Tutorial • To l l - F r e e
• Pair Phone Customer Service
• Make a Call 800-430-0153
193094_10a_CX-9_SSG_070109.indd 28-297/1/09 10:10:37 AM