door lock MAZDA MODEL CX-9 2011 Owners Manual (in English)
[x] Cancel search | Manufacturer: MAZDA, Model Year: 2011, Model line: MODEL CX-9, Model: MAZDA MODEL CX-9 2011Pages: 606, PDF Size: 13.55 MB
Page 8 of 606
Black plate (8,1)
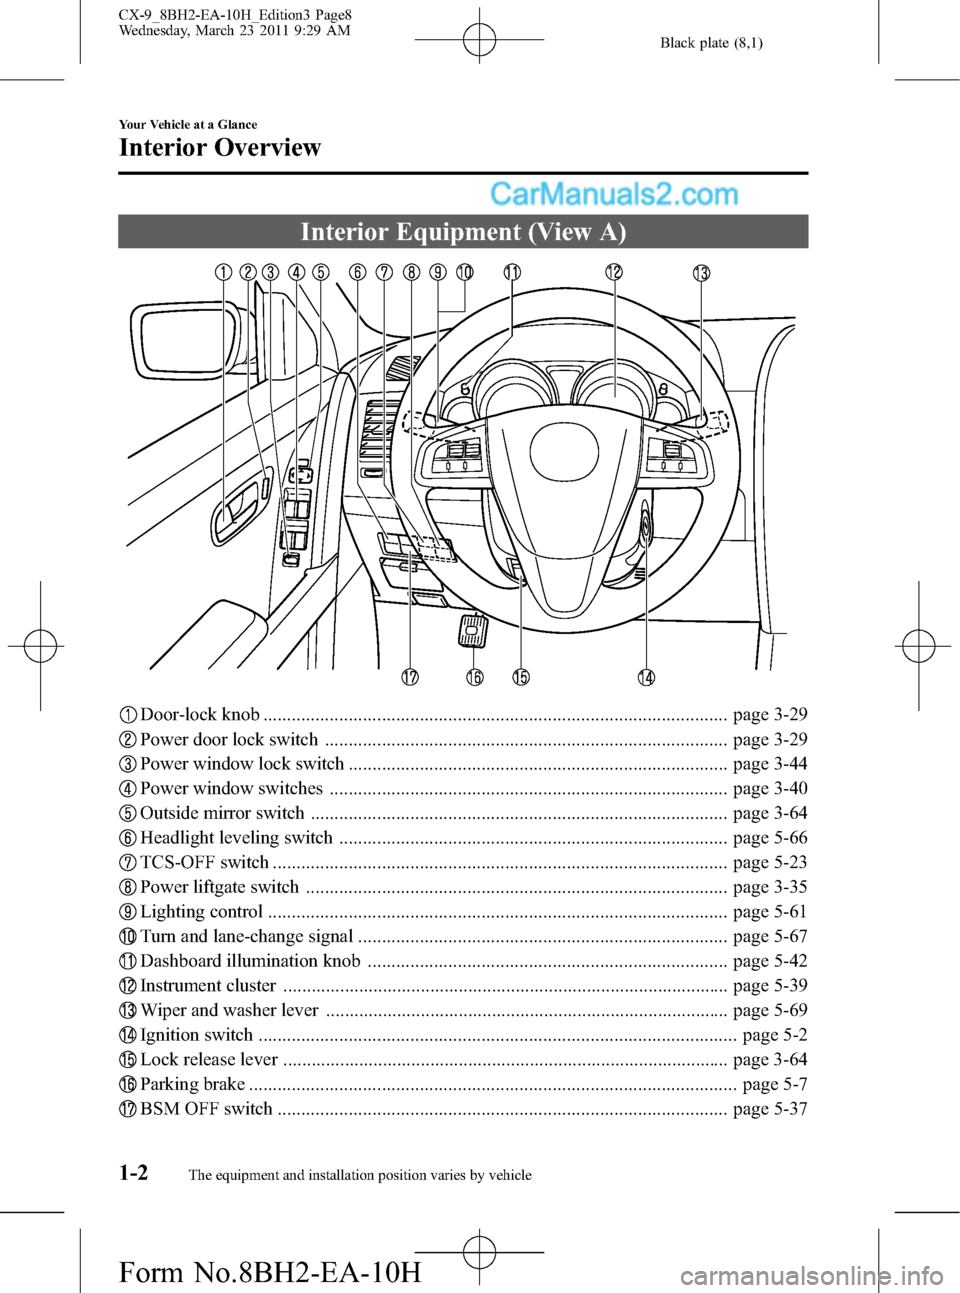
Interior Equipment (View A)
Door-lock knob .................................................................................................. page 3-29
Power door lock switch ..................................................................................... page 3-29
Power window lock switch ................................................................................ page 3-44
Power window switches .................................................................................... page 3-40
Outside mirror switch ........................................................................................ page 3-64
Headlight leveling switch .................................................................................. page 5-66
TCS-OFF switch ................................................................................................ page 5-23
Power liftgate switch ......................................................................................... page 3-35
Lighting control ................................................................................................. page 5-61
Turn and lane-change signal .............................................................................. page 5-67
Dashboard illumination knob ............................................................................ page 5-42
Instrument cluster .............................................................................................. page 5-39
Wiper and washer lever ..................................................................................... page 5-69
Ignition switch ..................................................................................................... page 5-2
Lock release lever .............................................................................................. page 3-64
Parking brake ....................................................................................................... page 5-7
BSM OFF switch ............................................................................................... page 5-37
1-2
Your Vehicle at a Glance
The equipment and installation position varies by vehicle
Interior Overview
CX-9_8BH2-EA-10H_Edition3 Page8
Wednesday, March 23 2011 9:29 AM
Form No.8BH2-EA-10H
Page 11 of 606
Black plate (11,1)
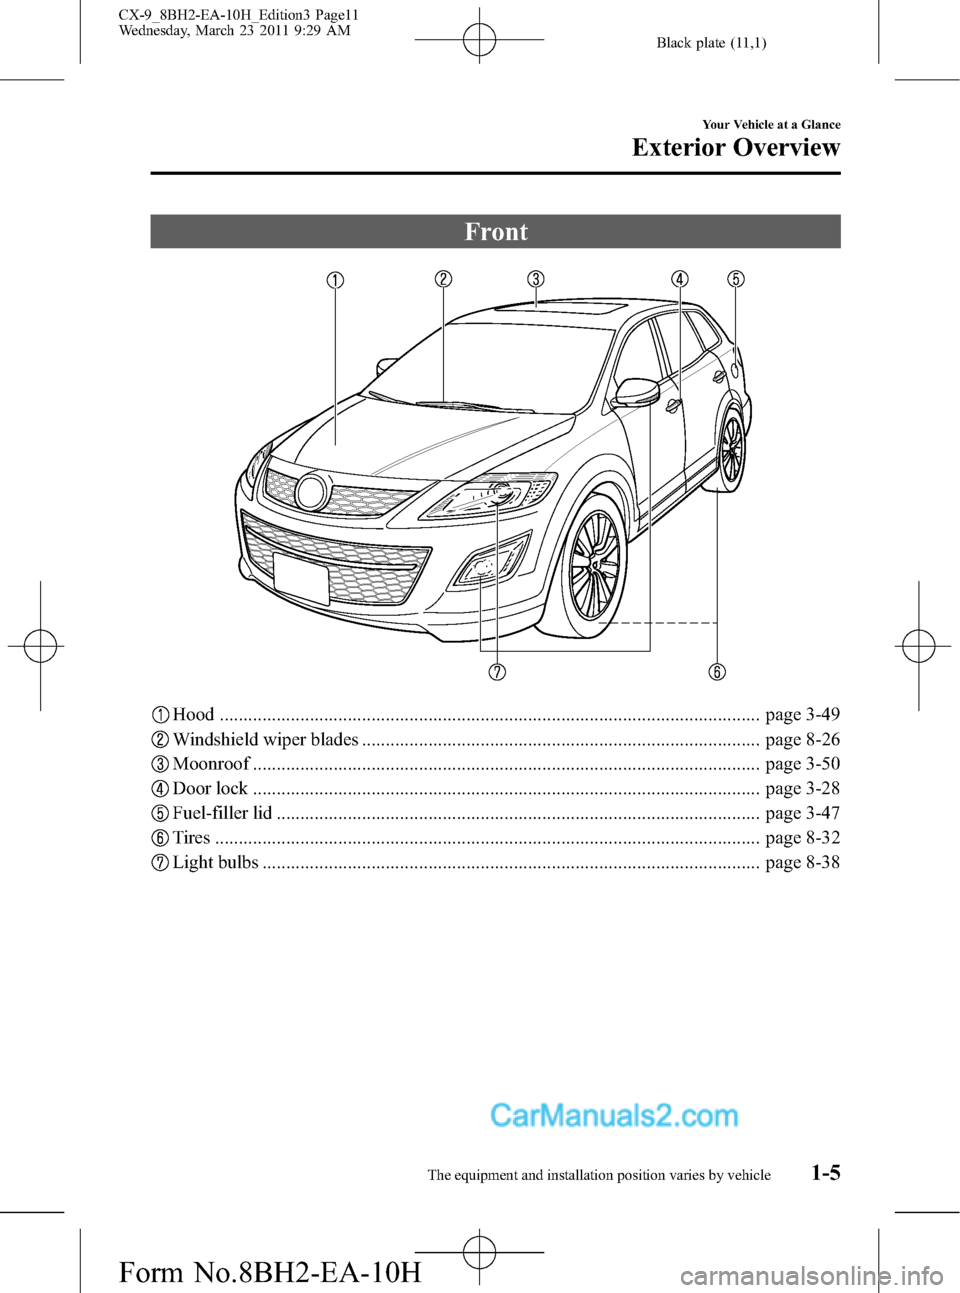
Front
Hood .................................................................................................................. page 3-49
Windshield wiper blades .................................................................................... page 8-26
Moonroof ........................................................................................................... page 3-50
Door lock ........................................................................................................... page 3-28
Fuel-filler lid ...................................................................................................... page 3-47
Tires ................................................................................................................... page 8-32
Light bulbs ......................................................................................................... page 8-38
Your Vehicle at a Glance
Exterior Overview
1-5The equipment and installation position varies by vehicle CX-9_8BH2-EA-10H_Edition3 Page11
Wednesday, March 23 2011 9:29 AM
Form No.8BH2-EA-10H
Page 18 of 606
Black plate (18,1)
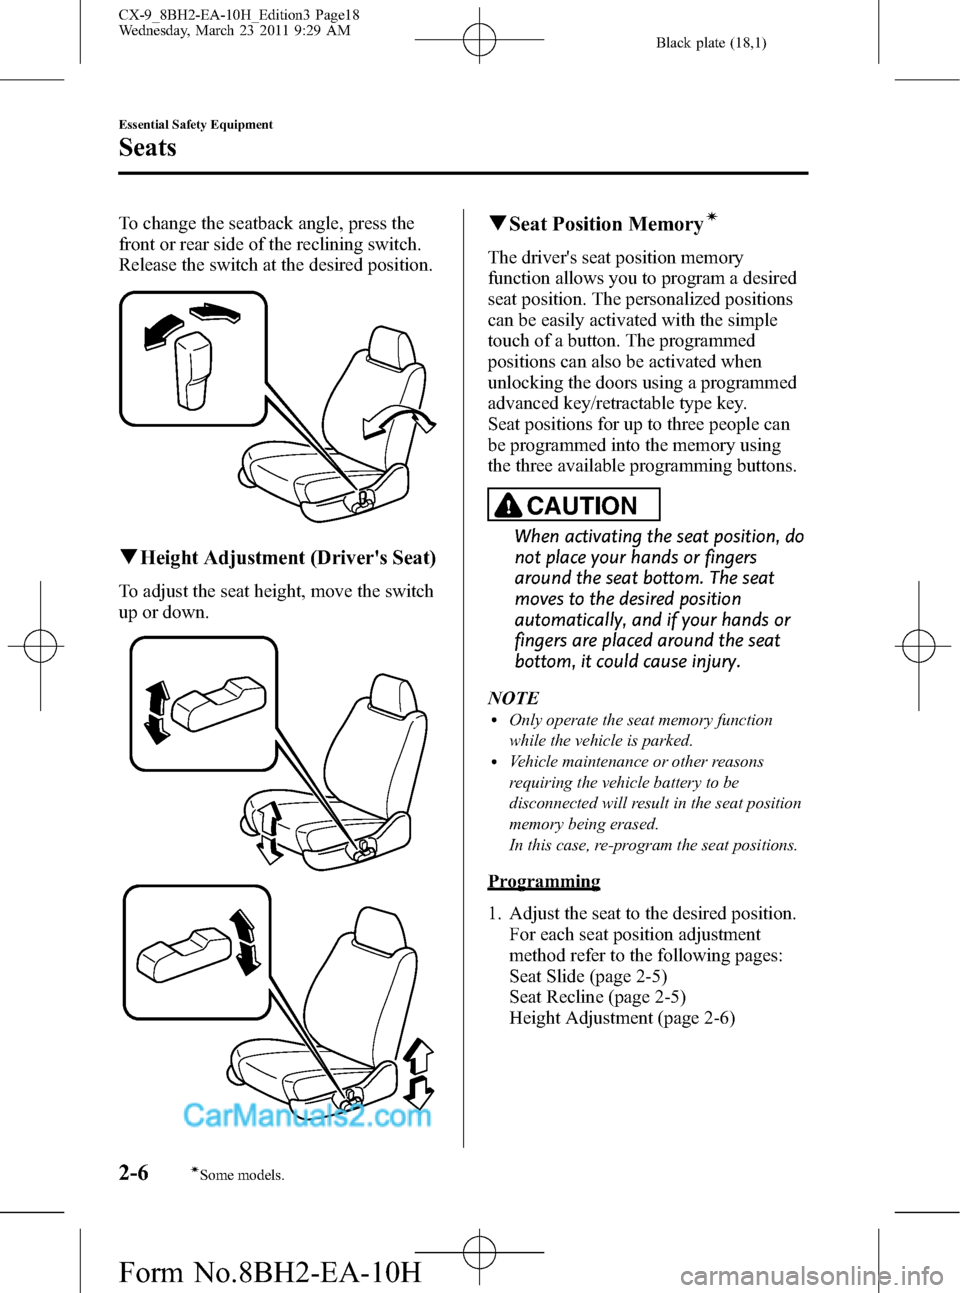
To change the seatback angle, press the
front or rear side of the reclining switch.
Release the switch at the desired position.
qHeight Adjustment (Driver's Seat)
To adjust the seat height, move the switch
up or down.
qSeat Position Memoryí
The driver's seat position memory
function allows you to program a desired
seat position. The personalized positions
can be easily activated with the simple
touch of a button. The programmed
positions can also be activated when
unlocking the doors using a programmed
advanced key/retractable type key.
Seat positions for up to three people can
be programmed into the memory using
the three available programming buttons.
CAUTION
When activating the seat position, do
not place your hands or fingers
around the seat bottom. The seat
moves to the desired position
automatically, and if your hands or
fingers are placed around the seat
bottom, it could cause injury.
NOTE
lOnly operate the seat memory function
while the vehicle is parked.
lVehicle maintenance or other reasons
requiring the vehicle battery to be
disconnected will result in the seat position
memory being erased.
In this case, re-program the seat positions.
Programming
1. Adjust the seat to the desired position.
For each seat position adjustment
method refer to the following pages:
Seat Slide (page 2-5)
Seat Recline (page 2-5)
Height Adjustment (page 2-6)
2-6
Essential Safety Equipment
íSome models.
Seats
CX-9_8BH2-EA-10H_Edition3 Page18
Wednesday, March 23 2011 9:29 AM
Form No.8BH2-EA-10H
Page 19 of 606
Black plate (19,1)
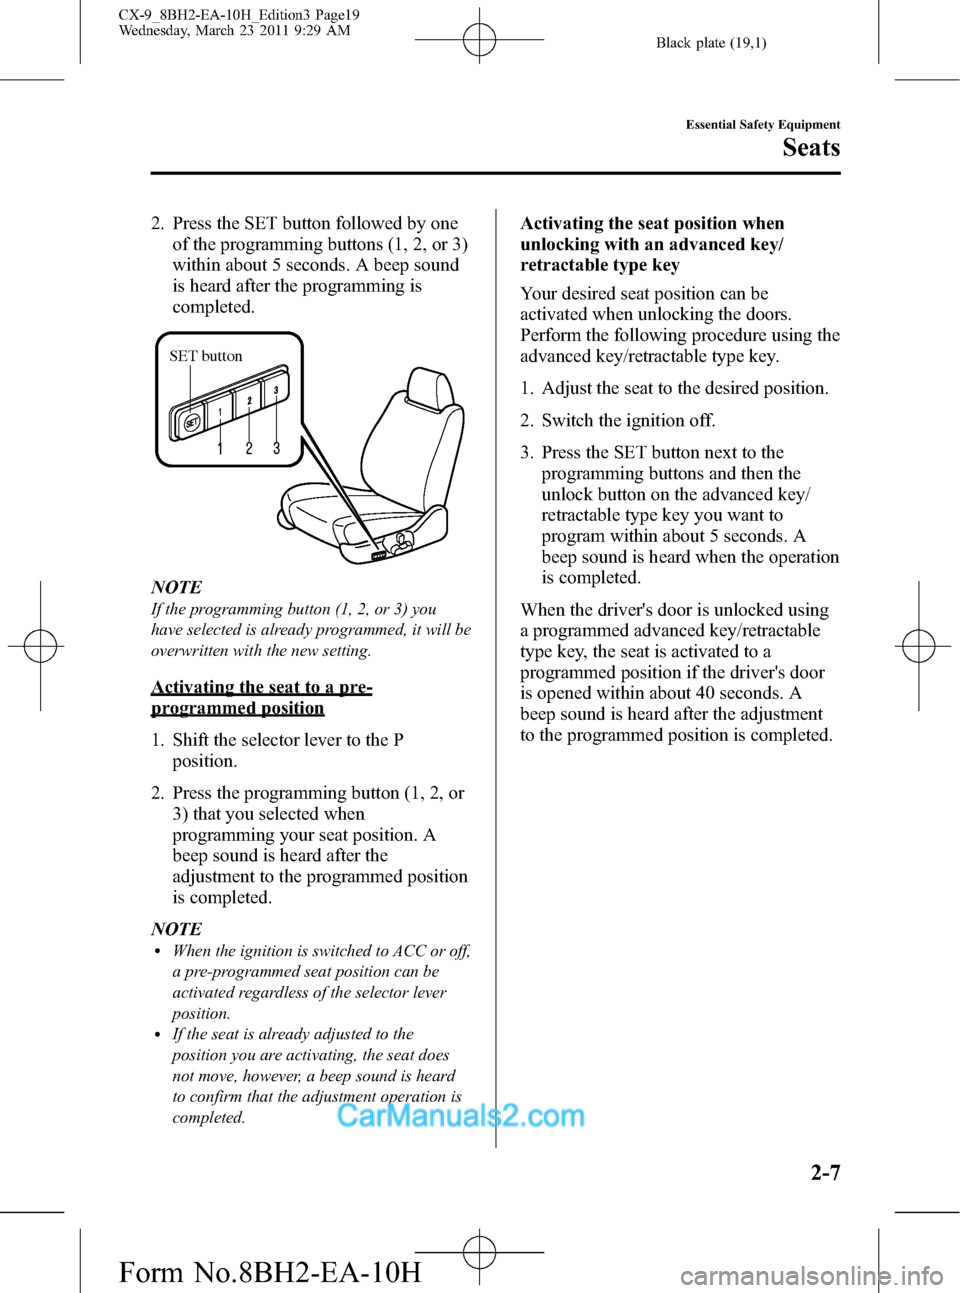
2. Press the SET button followed by one
of the programming buttons (1, 2, or 3)
within about 5 seconds. A beep sound
is heard after the programming is
completed.
SET button
NOTE
If the programming button (1, 2, or 3) you
have selected is already programmed, it will be
overwritten with the new setting.
Activating the seat to a pre-
programmed position
1. Shift the selector lever to the P
position.
2. Press the programming button (1, 2, or
3) that you selected when
programming your seat position. A
beep sound is heard after the
adjustment to the programmed position
is completed.
NOTE
lWhen the ignition is switched to ACC or off,
a pre-programmed seat position can be
activated regardless of the selector lever
position.
lIf the seat is already adjusted to the
position you are activating, the seat does
not move, however, a beep sound is heard
to confirm that the adjustment operation is
completed.
Activating the seat position when
unlocking with an advanced key/
retractable type key
Your desired seat position can be
activated when unlocking the doors.
Perform the following procedure using the
advanced key/retractable type key.
1. Adjust the seat to the desired position.
2. Switch the ignition off.
3. Press the SET button next to the
programming buttons and then the
unlock button on the advanced key/
retractable type key you want to
program within about 5 seconds. A
beep sound is heard when the operation
is completed.
When the driver's door is unlocked using
a programmed advanced key/retractable
type key, the seat is activated to a
programmed position if the driver's door
is opened within about 40 seconds. A
beep sound is heard after the adjustment
to the programmed position is completed.
Essential Safety Equipment
Seats
2-7
CX-9_8BH2-EA-10H_Edition3 Page19
Wednesday, March 23 2011 9:29 AM
Form No.8BH2-EA-10H
Page 20 of 606
Black plate (20,1)
NOTElIf the seat is already adjusted to the
position you are activating, the seat does
not move (a beep sound is not heard).
lThe advanced key/retractable key cannot be
programmed while the key is inserted in the
key cylinder.
lIf any of the following operations is
performed while activating a seat, the
activation will cancel (After pressing a
programming button or unlocking the doors
with a programmed advanced key/
retractable type key, and while the positions
are being adjusted).
lThe selector lever is shifted to a position
other than P (The ignition is switched
ON).
lAny of the seat adjustment switches
other than a lumbar support switch are
operated.
lThe SET button is pressed.lA programming button (1, 2, or 3) is
pressed.
lVehicle locking/unlocking is done using
the transmitter.
lThe vehicle starts moving.l(To cancel the seat activation when using
a programmed advanced key/retractable
type key to unlock the doors)
Perform the following procedure.
lSwitch the ignition off.lPress the SET button next to the
programming button (1, 2, or 3) and
then the lock button on the advanced
key/retractable type key within about 5
seconds. A beep sound is heard after the
operation is completed.
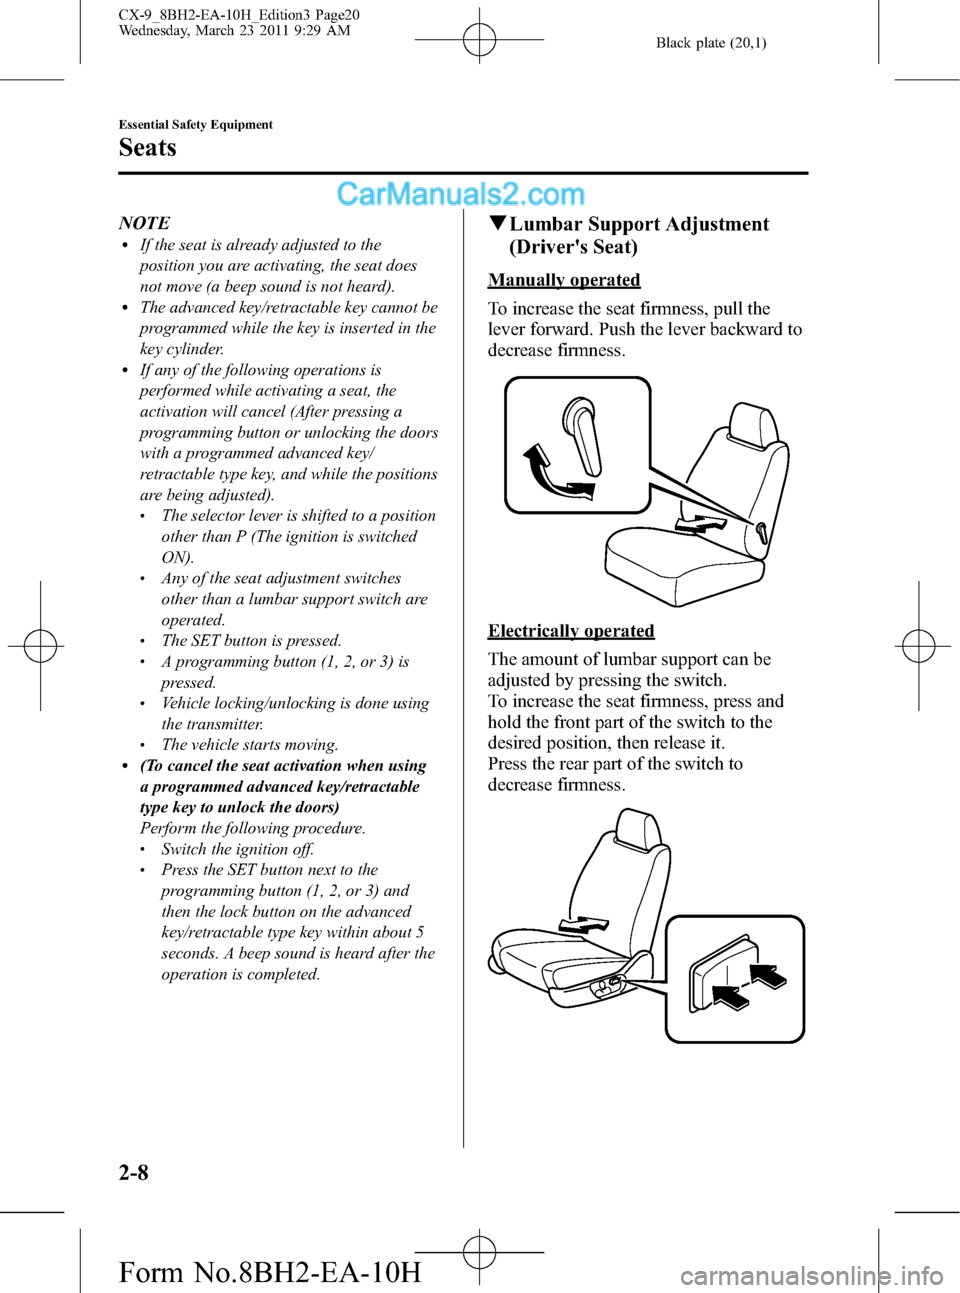
qLumbar Support Adjustment
(Driver's Seat)
Manually operated
To increase the seat firmness, pull the
lever forward. Push the lever backward to
decrease firmness.
Electrically operated
The amount of lumbar support can be
adjusted by pressing the switch.
To increase the seat firmness, press and
hold the front part of the switch to the
desired position, then release it.
Press the rear part of the switch to
decrease firmness.
2-8
Essential Safety Equipment
Seats
CX-9_8BH2-EA-10H_Edition3 Page20
Wednesday, March 23 2011 9:29 AM
Form No.8BH2-EA-10H
Page 50 of 606
Black plate (50,1)
Do not allow a child or anyone to lean over or against the side window of a vehicle
with side and curtain air bags:
It is dangerous to allow anyone to lean over or against the side window, the area of
the front passenger seat, the front and rear window pillars and the roof edge along
both sides from which the side and curtain air bags deploy, even if a child-restraint
system is used. The impact of inflation from a side or curtain air bag could cause
serious injury or death to an out of position child. Furthermore, leaning over or
against the front door could block the side and curtain air bags and eliminate the
advantages of supplemental protection. With the front air bag and the additional
side air bag that comes out of the front seat, the rear seat is always a better location
for children. Take special care not to allow a child to lean over or against the side
window, even if the child is seated in a child-restraint system.
Never use one seat belt on more than one person at a time:
Using one seat belt for more than one person at a time is dangerous. A seat belt
used in this way cannot spread the impact forces properly and the two passengers
could be crushed together and seriously injured or even killed. Never use one belt for
more than one person at a time and always operate the vehicle with each occupant
properly restrained.
CAUTION
A seat belt or child-restraint system can become very hot in a closed vehicle during
warm weather. To avoid burning yourself or a child, check them before you or your
child touches them.
NOTE
Your Mazda is equipped with LATCH lower anchors for attachment of specially designed LATCH
child-restraint systems in the rear seats. When using these anchors to secure a child-restraint system,
refer to“LATCH Child-Restraint Systems”(page 2-48).
2-38
Essential Safety Equipment
Child Restraint
CX-9_8BH2-EA-10H_Edition3 Page50
Wednesday, March 23 2011 9:30 AM
Form No.8BH2-EA-10H
Page 57 of 606
Black plate (57,1)
Never use a rear-facing child-restraint
system in the front seat with an air bag
that could deploy:
Rear-facing child-restraint systems
on the front seat are particularly
dangerous.
Even in a moderate collision, the
child-restraint system can be hit by a
deploying air bag and moved
violently backward resulting in
serious injury or death to the child.
Even though you may feel assured
that the front passenger air bag will
not deploy based on the fact that the
front passenger air bag deactivation
indicator light illuminates, you
should not use a rear-facing child-
restraint system in the front seat.Do not allow a child or anyone to lean
over or against the side window of a
vehicle with side and curtain air bags:
It is dangerous to allow anyone to
lean over or against the side window,
the area of the front passenger seat,
the front and rear window pillars and
the roof edge along both sides from
which the side and curtain air bags
deploy, even if a child-restraint
system is used. The impact of
inflation from a side or curtain air
bag could cause serious injury or
death to an out of position child.
Furthermore, leaning over or against
the front door could block the side
and curtain air bags and eliminate
the advantages of supplemental
protection. With the front air bag and
the additional side air bag that
comes out of the front seat, the rear
seat is always a better location for
children. Take special care not to
allow a child to lean over or against
the side window, even if the child is
seated in a child-restraint system.
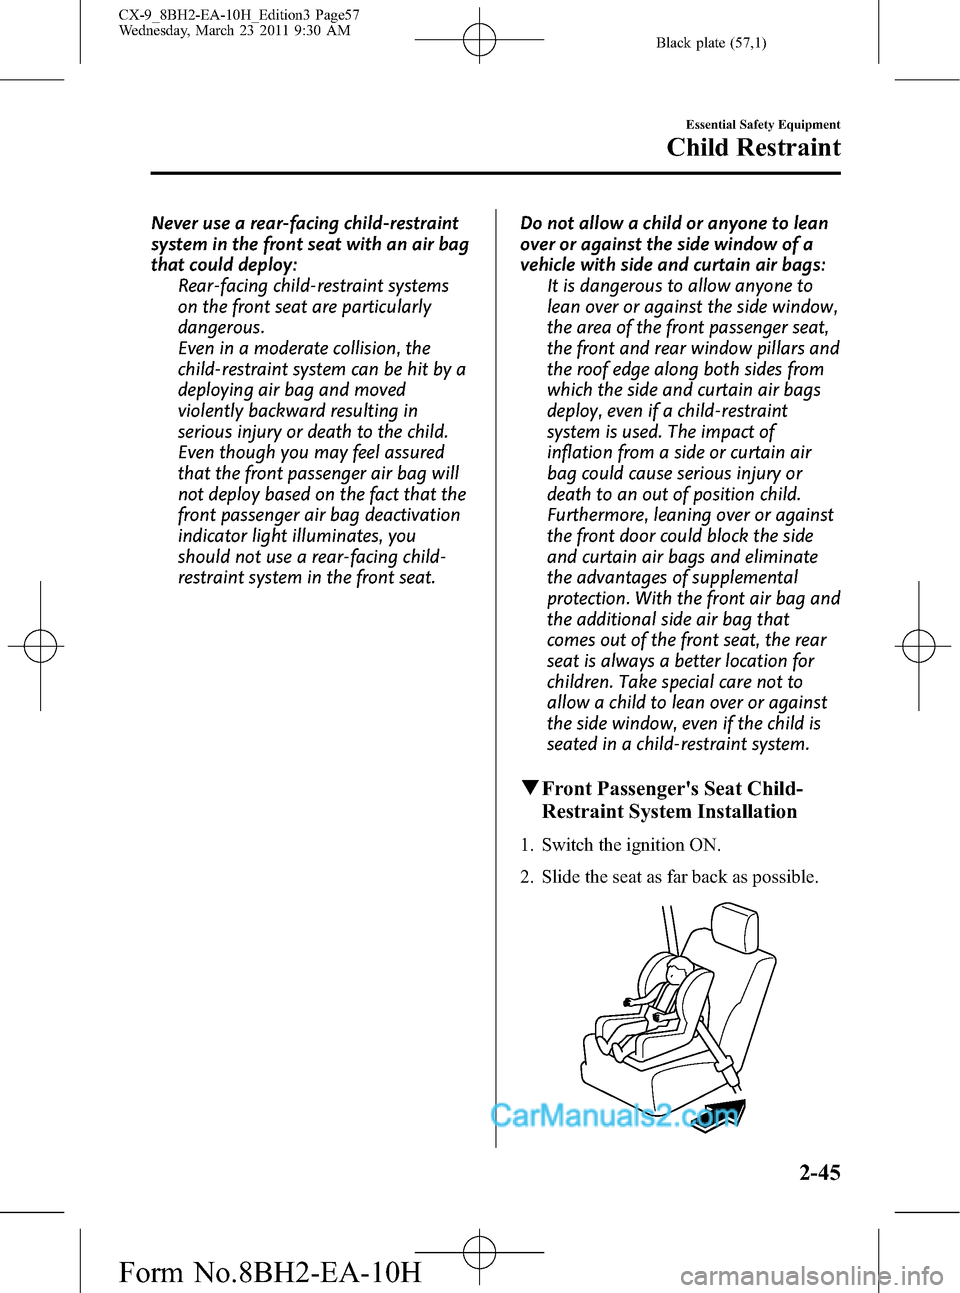
qFront Passenger's Seat Child-
Restraint System Installation
1. Switch the ignition ON.
2. Slide the seat as far back as possible.
Essential Safety Equipment
Child Restraint
2-45
CX-9_8BH2-EA-10H_Edition3 Page57
Wednesday, March 23 2011 9:30 AM
Form No.8BH2-EA-10H
Page 85 of 606
Black plate (85,1)
3Knowing Your Mazda
Explanation of basic operations and controls; opening/closing and adjustment
of various parts.
Advanced Keyless Entry and Start System ................................ 3-2
Advanced Keysí...................................................................... 3-2
Operation Using Advanced Keyless Functions ......................... 3-7
Operation Using Advanced Key Functions ............................. 3-13
Advanced Key Suspend Function ........................................... 3-17
Warning and Beep Sounds ...................................................... 3-18
When Warning Indicator/Beep is Activated ............................ 3-20
Doors and Locks ......................................................................... 3-21
Keys ........................................................................................ 3-21
Keyless Entry System
í.......................................................... 3-22
Door Locks ............................................................................. 3-28
Liftgate .................................................................................... 3-33
Power Windows ...................................................................... 3-40
Fuel-Filler Lid and Cap ........................................................... 3-47
Hood ....................................................................................... 3-49
Moonroof
í............................................................................. 3-50
Security System ........................................................................... 3-53
Immobilizer System (with Advanced Key) ............................. 3-53
Immobilizer System (without Advanced Key) ........................ 3-57
Theft-Deterrent System
í........................................................ 3-61
Steering Wheel and Mirrors ...................................................... 3-64
Steering Wheel ........................................................................ 3-64
Mirrors .................................................................................... 3-64
3-1íSome models.
CX-9_8BH2-EA-10H_Edition3 Page85
Wednesday, March 23 2011 9:30 AM
Form No.8BH2-EA-10H
Page 86 of 606
Black plate (86,1)
Advanced Keysí
The advanced keyless functions (advanced keyless entry and start system) enable the
following operations while the advanced key is being carried (page 3-7).
lLocking/unlocking the doors and the liftgate without operating the key.lStarting the engine without operating the key.
Additional functions are available using the buttons on the advanced key.
Refer to Operation Using Advanced Key Functions on page 3-13.
lThe following operations are possible using the transmitter of the keyless entry system
from a distance (Lock/Unlock/Panic/Liftgateíbutton):lLocking/unlocking the doors and the liftgate.lOpening/closing the power liftgateí.lOpening the power windows and the moonroofí.lOperating the theft-deterrent systemí.lTurning on the alarm.lLocking/unlocking the doors or starting the engine using the auxiliary key.
WARNING
Do not leave the key in your vehicle with children and keep them in a place where
your children will not find or play with them:
Leaving children in a vehicle with the key is dangerous. This could result in someone
being badly injured or even killed. Children may find these new kinds of keys to be
an interesting toy to play with and could cause the power windows or other controls
to operate, or even make the vehicle move.
Radio waves from the advanced key may affect medical equipment such as
pacemakers:
Before using the advanced key near people who use medical equipment, ask the
medical equipment manufacturer or your physician if radio waves from the
advanced key will affect the equipment.
NOTE
lThe driver must carry the advanced key to ensure the system functions properly.lRefer to Immobilizer System (page 3-53) for information regarding keys and engine starting.l(With theft-deterrent system)
Refer to Theft-Deterrent System (page 3-61) for information regarding keys and the prevention of
vehicle and vehicle contents theft.
3-2
Knowing Your Mazda
íSome models.
Advanced Keyless Entry and Start System
CX-9_8BH2-EA-10H_Edition3 Page86
Wednesday, March 23 2011 9:30 AM
Form No.8BH2-EA-10H
Page 91 of 606
Black plate (91,1)
CAUTION
ØBe careful not to allow the rubber
ring shown in the figure to be
scratched or damaged.
ØIf the rubber ring detaches,
reattach it before inserting a new
battery.
Rubber ring
qService
If you have a problem with the advanced
keyless functions, consult an Authorized
Mazda Dealer.
If your advanced key is lost or stolen,
bring all remaining advanced keys to an
Authorized Mazda Dealer as soon as
possible for a replacement and to make
the lost or stolen advanced key
inoperative.
CAUTION
Radio equipment like this is governed
by laws in the United States.
Changes or modifications not
expressly approved by the party
responsible for compliance could void
the user's authority to operate the
equipment.
Operation Using Advanced
Keyless Functions
qOperational Range
The system operates only when the driver
is in the vehicle or within operational
range while the advanced key is being
carried.
NOTE
When the battery power is low, or in places
where there are high-intensity radio waves or
noise, the operational range may become
narrower or the system may not operate.
Locking, unlocking the doors and the
liftgate
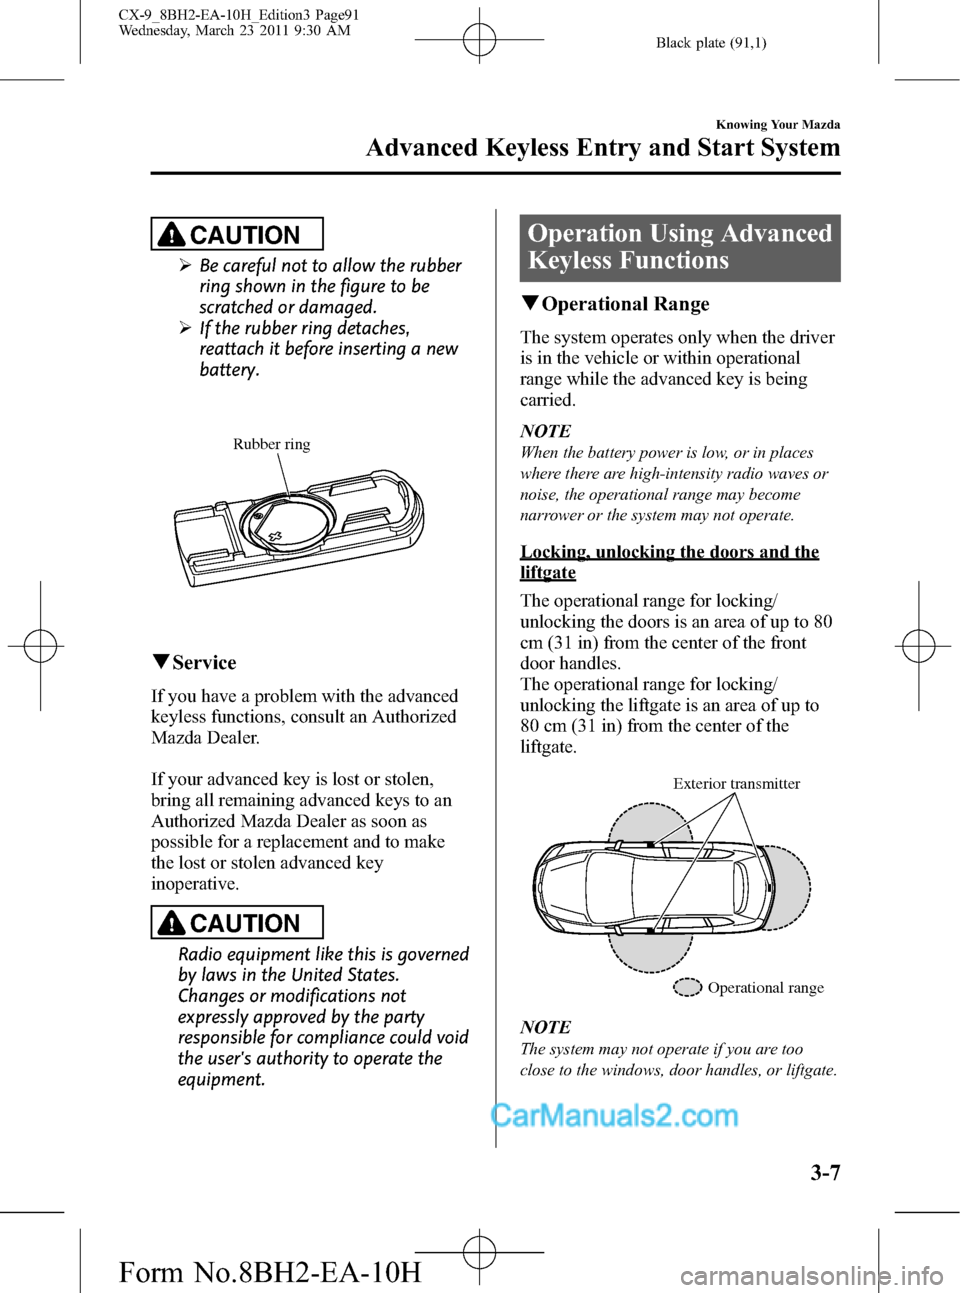
The operational range for locking/
unlocking the doors is an area of up to 80
cm (31 in) from the center of the front
door handles.
The operational range for locking/
unlocking the liftgate is an area of up to
80 cm (31 in) from the center of the
liftgate.
Exterior transmitter
Operational range
NOTE
The system may not operate if you are too
close to the windows, door handles, or liftgate.
Knowing Your Mazda
Advanced Keyless Entry and Start System
3-7
CX-9_8BH2-EA-10H_Edition3 Page91
Wednesday, March 23 2011 9:30 AM
Form No.8BH2-EA-10H