ABS MAZDA MODEL CX-9 2011 Smart Start Guide (in English)
[x] Cancel search | Manufacturer: MAZDA, Model Year: 2011, Model line: MODEL CX-9, Model: MAZDA MODEL CX-9 2011Pages: 16, PDF Size: 3.94 MB
Page 5 of 16

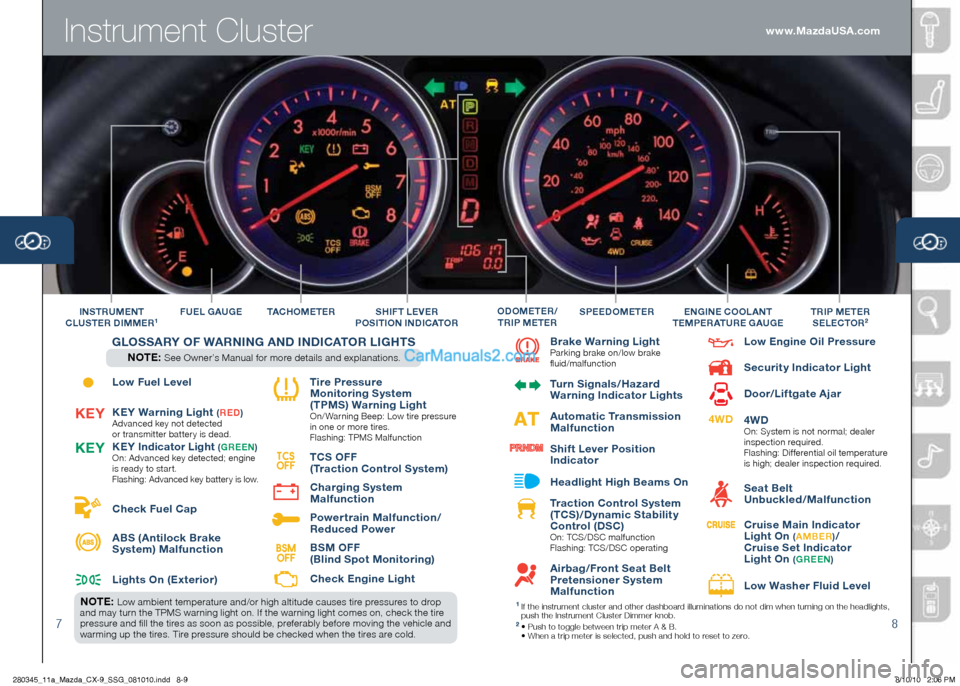
Instrument Cluster
78
Low Fuel Level
KEy Warning Light
(R ED )Advanced key not detected
or transmitter batter y is dead.
KE y Indicator Light (G REE n)
On: Advanced key detected; engine
is ready to star t.
Flashing: Advanced key battery is low.
Check Fuel Cap
ABS (Antilock Brake
System) Malfunction
Lights On (Exterior) Tire Pressure
Monitoring System
( TPMS) Warning Light
On/ Warning Beep: Low tire pressure
in one or more tires.
Flashing: TPMS Malfunction
T CS OFF
( Traction Control System)
Charging System
Malfunction
Power train Malfunction/
Reduced Power
BSM OFF
(Blind Spot Monitoring)
Check Engine Light
T AC hOMETER
F
UEL GAUGE
Brake Warning LightParking brake on/low brake
fluid/malfunction
Turn Signals/ hazard
Warning Indicator Lights
Automatic Transmission
Malfunction
Shif t Lever Position
Indicator
h eadlight high Beams On
Traction Control System
( TCS)/Dynamic Stabilit y
Control (DSC)
On: TCS/DSC malfunction
Flashing: TCS/DSC operating
Airbag/Front Seat Belt
Pretensioner System
Malfunction Low Engine Oil Pressure
Securit y Indicator Light
Door/Lif tgate Ajar
4WD
On:
System is not normal; dealer
inspection required.
Flashing: Dif ferential oil temperature
is high; dealer inspection required.
Seat Belt
Unbuckled/Malfunction
Cruise Main Indicator
Light On
( A MBER )/
Cruise Set Indicator
Light On
( G REE n)
Low Washer Fluid Level
S PEEDOMETERTRIP METER
SELECTOR2In STRUME nT
CLUSTER DIMMER1En GInE COOLA nT
TEMPERATURE GAUGEO DOMETER /
T RIP METERSh IFT LEVER
P OSITIO n InDICATOR
TCS
OFFK Ey
K
Ey
4WD
BSM
OFF
G LOSSAR y OF WAR nIn G A n D I n DICATOR LIG hTS
n OTE: See Owner’s Manual for more details and explanations.
n OTE: Low ambient temperature and/or high altitude causes tire pressures to drop
and may turn the TPMS warning light on. If the warning light comes on, check the tire
pressure and fill the tires as soon as possible, preferably before moving the vehicle and
warming up the tires. Tire pressure should be checked when the tires are cold.1 If the instrument cluster and other dashboard illuminations do not dim when turning on the headlights,
push the Instrument Cluster Dimmer knob.
2 • Push to toggle between trip meter A & B.
• When a trip meter is selected, push and hold to reset to zero.
www.MazdaUSA.com
280345_11a_Mazda_CX-9_SSG_081010.indd 8-98/10/10 2:06 PM
Page 12 of 16

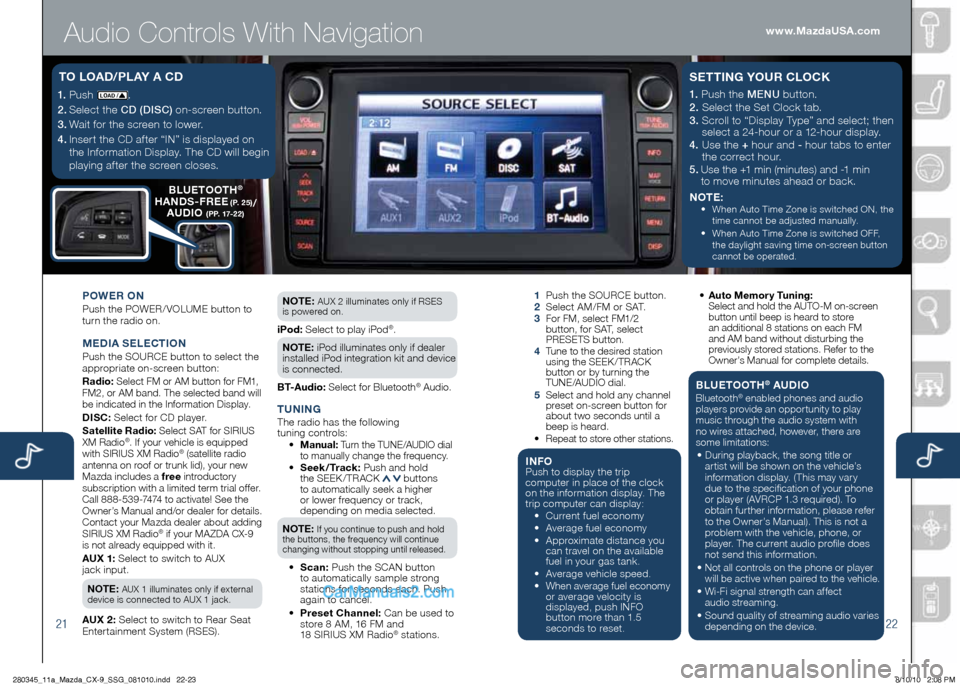
Audio Controls With Navigation
2122
1.
Push LOAD /.
2.
Select the CD (DISC) on-screen button.
3.
Wait for the screen to lower.
4. Inser t the CD af ter “IN” is displayed on
the Information Display. The CD will begin
playing af ter the screen closes.
T O LOAD/ PL Ay A CD
POWER O n
Push the POWER/ VOLUME button to
turn the radio on.
M EDIA SELECTIO n
Push the SOURCE button to select the
appropriate on-screen button:
Radio: Select FM or AM button for FM1,
FM2, or AM band. The selected band will
be indicated in the Information Display.
DISC: Select for CD player.
Satellite Radio: Select SAT for SIRIUS
XM Radio®. If your vehicle is equipped
with SIRIUS XM Radio® (satellite radio
antenna on roof or trunk lid), your new
Mazda includes a free introductory
subscription with a limited term trial offer.
Call 888-539-7474 to activate! See the
Owner’s Manual and/or dealer for details.
Contact your Mazda dealer about adding
SIRIUS XM Radio
® if your MAZDA CX-9
is not already equipped with it.
AUX 1: Select to switch to AUX
jack input.
n OTE: AUX 1 illuminates only if external
device is connected to AUX 1 jack.
AUX 2: Select to switch to Rear Seat
Enter tainment System (RSES). n
OTE:
AUX 2 illuminates only if RSES
is powered on.
iPod: Select to play iPod®.
n OTE: iPod illuminates only if dealer
installed iPod integration kit and device
is connected.
BT-Audio: Select for Bluetooth® Audio.
T U nIn GThe radio has the following
tuning controls:
• M anual: Turn the TUNE/AUDIO dial
to manually change the frequency.
•
Seek /Track: Push and hold
the SEEK / TRACK buttons
to automatically seek a higher
or lower frequency or track,
depending on media selected.
n OTE:
If you continue to push and hold
the buttons, the frequency will continue
changing without stopping until released.
• S can: Push the SCAN button
to automatically sample strong
stations for seconds each. Push
again to cancel.
• Preset Channel: Can be used to
store 8 AM, 16 FM and
18 SIRIUS XM Radio
® stations.
1 Push the SOURCE button.
2 Select AM/FM or SAT.
3
For FM, select FM1/2
button, for SAT, select
PRESETS button.
4
Tune to the desired station
using the SEEK /TRACK
button or by turning the
TUNE/AUDIO dial.
5
Select and hold any channel
preset on-screen button for
about two seconds until a
beep is heard.
•
Repeat to store other stations.
I n FOPush to display the trip
computer in place of the clock
on the information display. The
trip computer can display:
•
Current fuel economy
• Average fuel economy
•
Approximate distance you
can travel on the available
fuel in your gas tank.
•
Average vehicle speed.
•
When average fuel economy
or average velocity is
displayed, push INFO
button more than 1.5
seconds to reset.
1.
Push the MENU button.
2. Select the Set Clock tab.
3. Scroll to “Display Type” and select; then
select a 24-hour or a 12-hour display.
4. Use the + hour and - hour tabs to enter
the correct hour.
5.
Use the +1 min (minutes) and -1 min
to move minutes ahead or back.
n OTE:
•
When Auto Time Zone is switched ON, the
time cannot be adjusted manually.
•
When Auto Time Zone is switched OFF,
the daylight saving time
on-screen button
cannot be operated.
S ETTI nG y OUR CLOCK
• Auto Memor y Tuning:
Select and hold the AUTO-M on-screen button until beep is heard to store
an additional 8 stations on each FM
and AM band without disturbing the
previously stored stations. Refer to the
Owner’s Manual for complete details.
BLUETOOT h® AUDIO
Bluetooth® enabled phones and audio
players provide an opportunity to play
music through the audio system with
no wires attached, however, there are
some limitations:
• During playback, the song title or
artist will be shown on the vehicle’s
information display. (This may vary
due to the specification of your phone
or player (AVRCP 1.3 required). To
obtain further information, please refer
to the Owner’s Manual). This is not a
problem with the vehicle, phone, or
player. The current audio profile does
not send this information.
• Not all controls on the phone or player will be active when paired to the vehicle.
• Wi-Fi signal strength can affect
audio streaming.
• Sound quality of streaming audio varies
depending on the device.
B LUETOOT h®
hA nDS -FREE (P. 25)/
AUDIO (PP. 17-22)
www.MazdaUSA.com
280345_11a_Mazda_CX-9_SSG_081010.indd 22-238/10/10 2:08 PM