key MAZDA MODEL CX-9 2011 Smart Start Guide (in English)
[x] Cancel search | Manufacturer: MAZDA, Model Year: 2011, Model line: MODEL CX-9, Model: MAZDA MODEL CX-9 2011Pages: 16, PDF Size: 3.94 MB
Page 2 of 16
Key
12
Genuine Mazda Accessor y
Remote Star t is available at
your Mazda Dealer.
LIFTGATE
•
To open, unlock the lif tgate, pull up
on the handle and raise the lif tgate.
•
To close, push lif tgate down until it
securely locks, but do not slam.
S TARTI nG T h E E n GI nE
While Carr ying the Advanced Key…
•
Star t the engine by pushing the star t knob in and turning it (like a
normal key) while depressing the brake pedal.
•
Shut the engine OFF by turning the star t knob to the ACC position
and then pushing in and turning to the Lock position.
•
The KE y indicator light will show green when the advanced key is
detected. If the KE y indicator light flashes green, the advanced key
transmitter batter y power is low.
P OWER LIFTGATE
•
To open or close using the advanced keyless transmitter, unlock the
liftgate and push and hold the open/close button for one second or more.
•
To open or close from the driver’s seat, unlock the liftgate and push and
hold the power liftgate switch on the dashboard (see Driver’s View) for
one second or more.
•
To close when the lif tgate is open, push and hold the power lif tgate
switch located on the lower edge of the lif tgate panel for one second
or more. Liftgate
h andle
Liftgate handle
Power Liftgate Switch
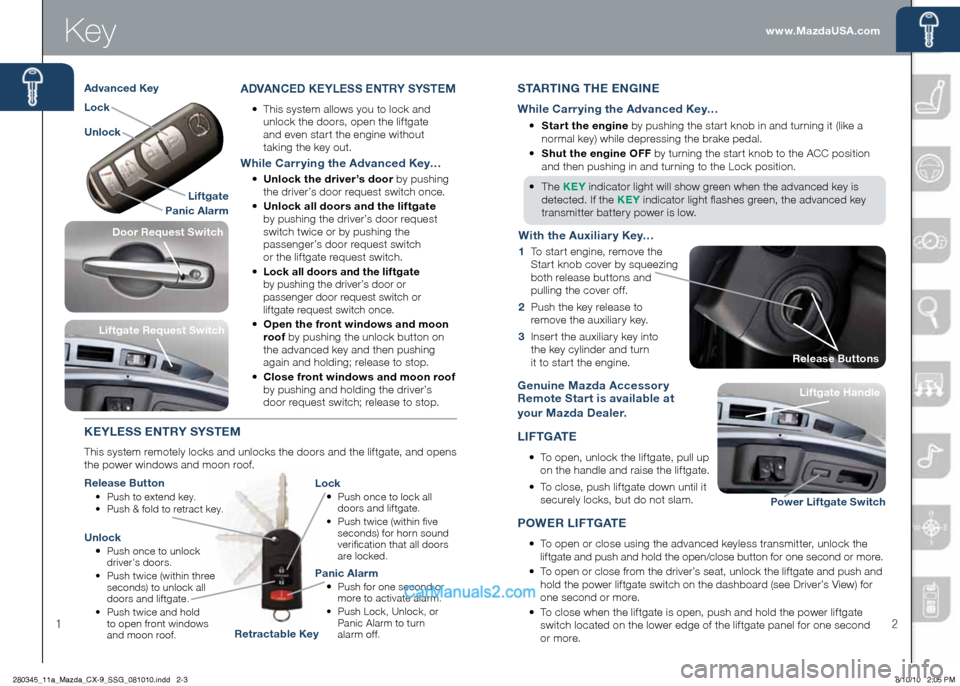
ADVA nCED KE yLESS E nTR y S ySTEM
•
This system allows you to lock and
unlock the doors, open the lif tgate
and even star t the engine without
taking the key out.
While Carr ying the Advanced Key…
•
Unlock the driver’s door by pushing
the driver’s door request switch once.
•
Unlock all doors and the lif tgate
by pushing the driver’s door request
switch twice or by pushing the
passenger’s door request switch
or the lif tgate request switch.
•
Lock all doors and the liftgate
by pushing the driver’s door or
passenger door request switch or
liftgate request switch once.
• Open the front windows and moon
roof by pushing the unlock button on
the advanced key and then pushing
again and holding; release to stop.
• Close front windows and moon roof
by pushing and holding the driver’s
door request switch; release to stop.
KE yLESS E nTR y S ySTEM
This system remotely locks and unlocks the doors and the lif tgate, and opens
the power windows and moon roof.
Release Button
• Push to extend key.
• Push & fold to retract key.
Lock
•
Push once to lock all
doors and lif tgate.
•
Push twice (within five
seconds) for horn sound
verification that all doors
are locked.
Unlock
• Push once to unlock
driver’s doors.
•
Push twice (within three
seconds) to unlock all
doors and lif tgate.
•
Push twice and hold
to open front windows
and moon roof.
Panic Alarm
• Push for one second or
more to activate alarm.
•
Push Lock, Unlock, or
Panic Alarm to turn
alarm of f.
Liftgate Request Switch
With the Auxiliar y Key…
1
To star t engine, remove the
Star t knob cover by squeezing
both release buttons and
pulling the cover of f.
2
Push the key release to
remove the auxiliar y key.
3 Inser t the auxiliar y key into
the key cylinder and turn
it to star t the engine.
Liftgate
Panic Alarm
Lock
Unlock
Advanced Key
Retractable Key Release Buttons
Door Request Switch
www.MazdaUSA.com
280345_11a_Mazda_CX-9_SSG_081010.indd 2-38/10/10 2:05 PM
Page 3 of 16
34
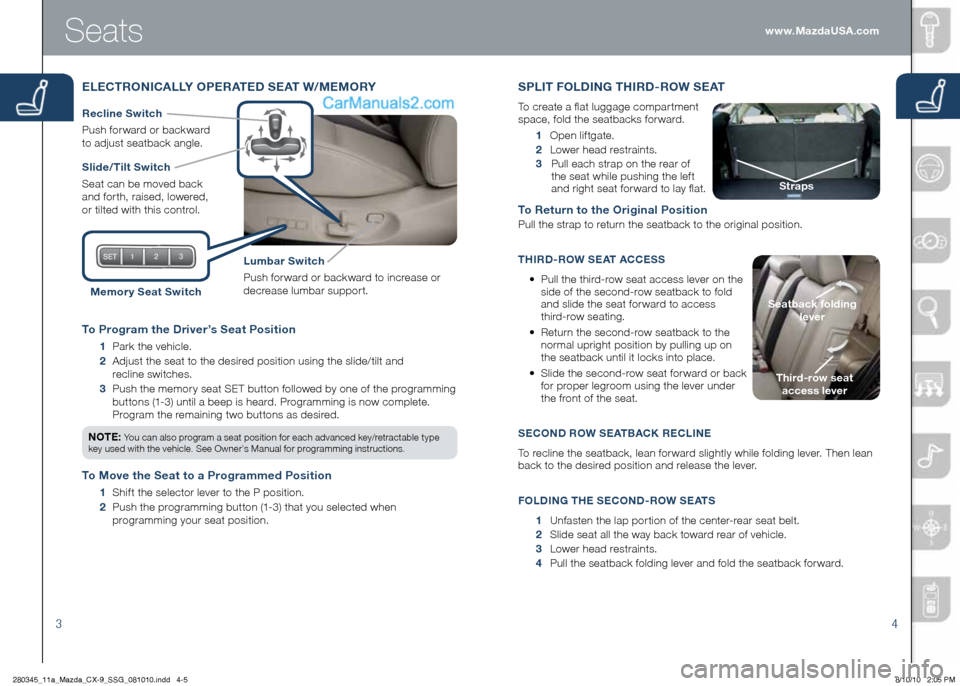
To Program the Driver’s Seat Position
1 Park the vehicle.
2
Adjust the seat to the desired position using the slide/tilt and
recline switches.
3
Push the memor y seat SET button followed by one of the programming
buttons (1-3) until a beep is heard. Programming is now complete.
Program the remaining two buttons as desired.
n OTE: You can also program a seat position for each advanced key/retractable type
key used with the vehicle. See Owner’s Manual for programming instructions.
To Move the Seat to a Programmed Position
1 Shif t the selector lever to the P position.
2
Push the programming button (1-3) that you selected when
programming your seat position.
Seats
ELECTRO nICALL y OPERATED SEAT W/MEMOR y
Slide/ Tilt Switch
Seat can be moved back
and for th, raised, lowered,
or tilted with this control.
Lumbar Switch
Push for ward or backward to increase or
decrease lumbar suppor t.
Recline Switch
Push
for ward or backward
to adjust seatback angle.
Memor y Seat Switch
1 Open lif tgate.
2 Lower head restraints.
3 Pull each strap on the rear of
the seat while pushing the lef t
and right seat for ward to lay flat.
To Return to the Original Position
Pull the strap to return the seatback to the original position.
Th IRD -ROW SEAT ACCESS
•
Pull the third-row seat access lever on the
side of the second-row seatback to fold
and slide the seat for ward to access
third-row seating.
•
Return the second-row seatback to the
normal upright position by pulling up on
the seatback until it locks into place.
•
Slide the second-row seat for ward or back
for proper legroom using the lever under
the front of the seat.
S ECO nD R OW SEAT BACK RECLI nE
To recline the seatback, lean for ward slightly while folding lever. Then lean
back to the desired position and release the lever.
F OLDI nG T h E S ECO nD -R OW SEATS
1 Unfasten the lap por tion of the center-rear seat belt.
2 Slide seat all the way back toward rear of vehicle.
3 Lower head restraints.
4 Pull the seatback folding lever and fold the seatback for ward.
S PLIT FOLDI nG Th IRD -ROW SEAT
To create a flat luggage compar tment
space, fold the seatbacks for ward.
Third-row seat
access lever
Seatback folding
lever
Straps
www.MazdaUSA.com
280345_11a_Mazda_CX-9_SSG_081010.indd 4-58/10/10 2:05 PM
Page 5 of 16
Instrument Cluster
78
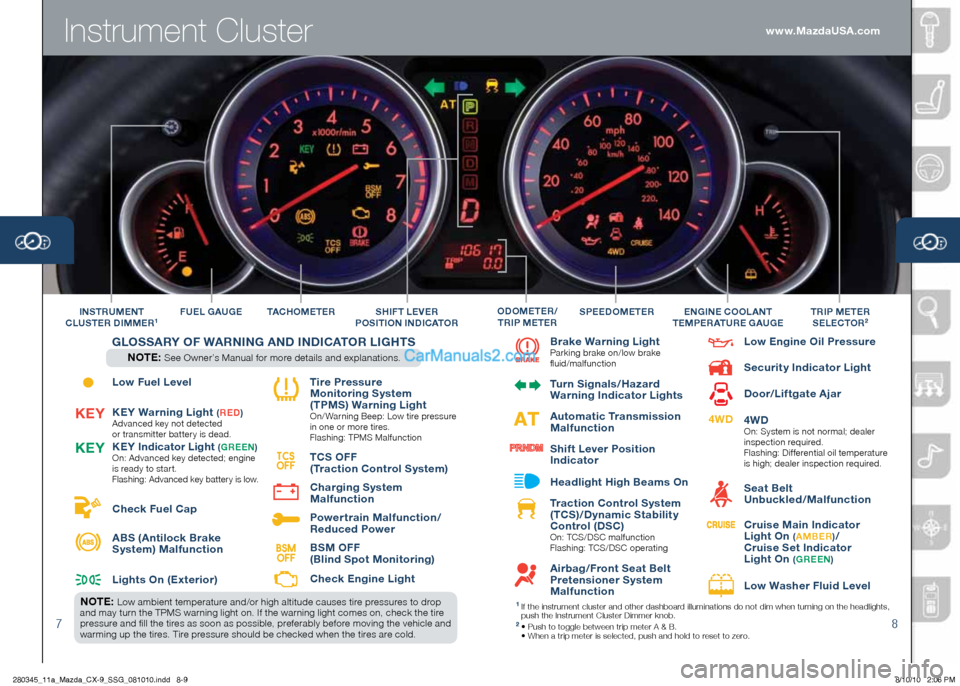
Low Fuel Level
KEy Warning Light
(R ED )Advanced key not detected
or transmitter batter y is dead.
KE y Indicator Light (G REE n)
On: Advanced key detected; engine
is ready to star t.
Flashing: Advanced key battery is low.
Check Fuel Cap
ABS (Antilock Brake
System) Malfunction
Lights On (Exterior) Tire Pressure
Monitoring System
( TPMS) Warning Light
On/ Warning Beep: Low tire pressure
in one or more tires.
Flashing: TPMS Malfunction
T CS OFF
( Traction Control System)
Charging System
Malfunction
Power train Malfunction/
Reduced Power
BSM OFF
(Blind Spot Monitoring)
Check Engine Light
T AC hOMETER
F
UEL GAUGE
Brake Warning LightParking brake on/low brake
fluid/malfunction
Turn Signals/ hazard
Warning Indicator Lights
Automatic Transmission
Malfunction
Shif t Lever Position
Indicator
h eadlight high Beams On
Traction Control System
( TCS)/Dynamic Stabilit y
Control (DSC)
On: TCS/DSC malfunction
Flashing: TCS/DSC operating
Airbag/Front Seat Belt
Pretensioner System
Malfunction Low Engine Oil Pressure
Securit y Indicator Light
Door/Lif tgate Ajar
4WD
On:
System is not normal; dealer
inspection required.
Flashing: Dif ferential oil temperature
is high; dealer inspection required.
Seat Belt
Unbuckled/Malfunction
Cruise Main Indicator
Light On
( A MBER )/
Cruise Set Indicator
Light On
( G REE n)
Low Washer Fluid Level
S PEEDOMETERTRIP METER
SELECTOR2In STRUME nT
CLUSTER DIMMER1En GInE COOLA nT
TEMPERATURE GAUGEO DOMETER /
T RIP METERSh IFT LEVER
P OSITIO n InDICATOR
TCS
OFFK Ey
K
Ey
4WD
BSM
OFF
G LOSSAR y OF WAR nIn G A n D I n DICATOR LIG hTS
n OTE: See Owner’s Manual for more details and explanations.
n OTE: Low ambient temperature and/or high altitude causes tire pressures to drop
and may turn the TPMS warning light on. If the warning light comes on, check the tire
pressure and fill the tires as soon as possible, preferably before moving the vehicle and
warming up the tires. Tire pressure should be checked when the tires are cold.1 If the instrument cluster and other dashboard illuminations do not dim when turning on the headlights,
push the Instrument Cluster Dimmer knob.
2 • Push to toggle between trip meter A & B.
• When a trip meter is selected, push and hold to reset to zero.
www.MazdaUSA.com
280345_11a_Mazda_CX-9_SSG_081010.indd 8-98/10/10 2:06 PM
Page 13 of 16
Navigation System
2324
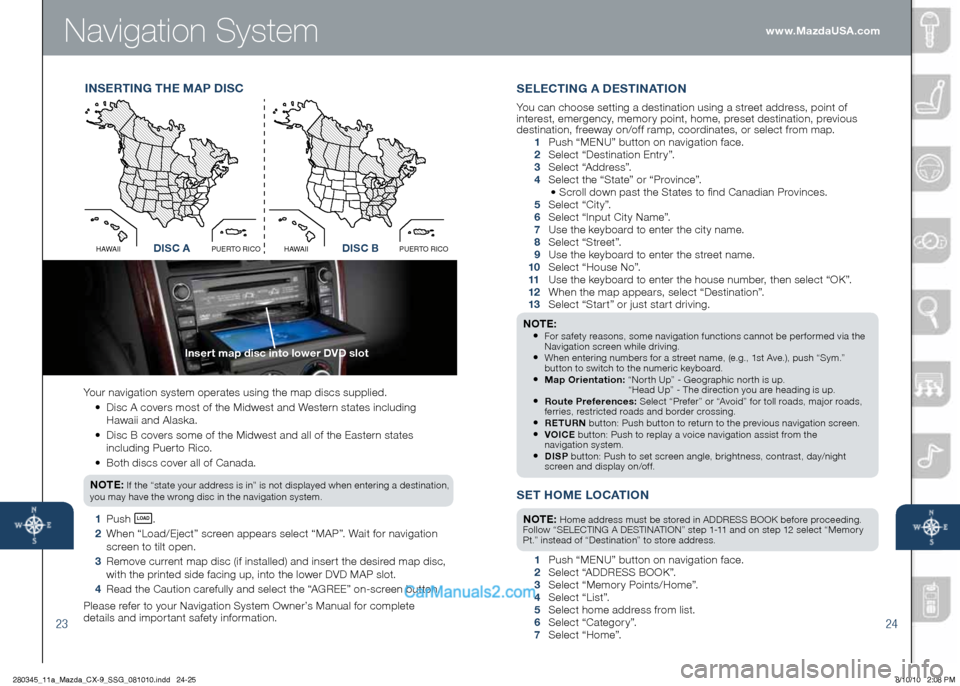
Your navigation system operates using the map discs supplied.
•
Disc A covers most of the Midwest and Western states including
Hawaii and Alaska.
•
Disc B covers some of the Midwest and all of the Eastern states
including Puer to Rico.
• Both discs cover all of Canada.
n OTE:
If the “state your address is in” is not displayed when entering a destination,
you may have the wrong disc in the navigation system.
1 Push LOAD .
2 When “Load/Eject” screen appears select “MAP”. Wait for navigation
screen to tilt open.
3 Remove current map disc (if installed) and inser t the desired map disc,
with the printed side facing up, into the lower DVD MAP slot.
4 Read the Caution carefully and select the “AGREE” on-screen button.
Please refer to your Navigation System Owner’s Manual for complete
details and impor tant safety information.
In SERTI nG T hE M AP D ISC
Insert map disc into lower DVD slot
SET hOME LOCATIO n
nOTE: Home address must be stored in ADDRESS BOOK before proceeding.
Follow “SELECTING A DESTINATION” step 1-11 and on step 12 select “Memor y
Pt.” instead of “Destination” to store address.
1 Push “MENU” button on navigation face.
2 Select “ADDRESS BOOK”.
3 Select “Memor y Points/Home”.
4 Select “List”.
5 Select home address from list.
6 Select “Categor y”.
7 Select “Home”.
S ELECTI nG A DESTI nATIO n
You can choose setting a destination using a street address, point of
interest, emergency, memor y point, home, preset destination, previous
destination, freeway on/of f ramp, coordinates, or select from map.
1 Push “ M ENU ” button on navigation face.
2 Select “Destination Entr y”.
3 Select “Address”.
4 Select the “State” or “Province”.
• Scroll down past the States to find Canadian Provinces.
5 Select “City”.
6 Select “Input City Name”.
7 Use the keyboard to enter the city name.
8 Select “Street”.
9 Use the keyboard to enter the street name.
10 Select “House No”.
11
Use the keyboard to enter the house number, then select “OK”.
12
When the map appears, select “Destination”.
13
Select “Star t” or just star t driving.
n OTE: • For safety reasons, some navigation functions cannot be per formed via the
Navigation screen while driving.
• When entering numbers for a street name, (e.g., 1st Ave.), push “Sym.”
button to switch to the numeric keyboard.
• Map Orientation: “Nor th Up” - Geographic nor th is up.
“Head Up” - The direction you are heading is up.
• Route Preferences: Select “Prefer” or “Avoid” for toll roads, major roads,
ferries, restricted roads and border crossing.
• RETUR n button: Push button to return to the previous navigation screen.• VOICE button: Push to replay a voice navigation assist from the
navigation system.
• DISP button: Push to set screen angle, brightness, contrast, day/night
screen and display on/of f.
Disc AO
C
I
R
O
T
R
E
U
P
I
I
A
W
A
HDisc B
O
C
I
R
O
T
R
E
U
P
I
I
A
W
A
HDISC ADISC B www.MazdaUSA.com
280345_11a_Mazda_CX-9_SSG_081010.indd 24-258/10/10 2:08 PM
Page 15 of 16
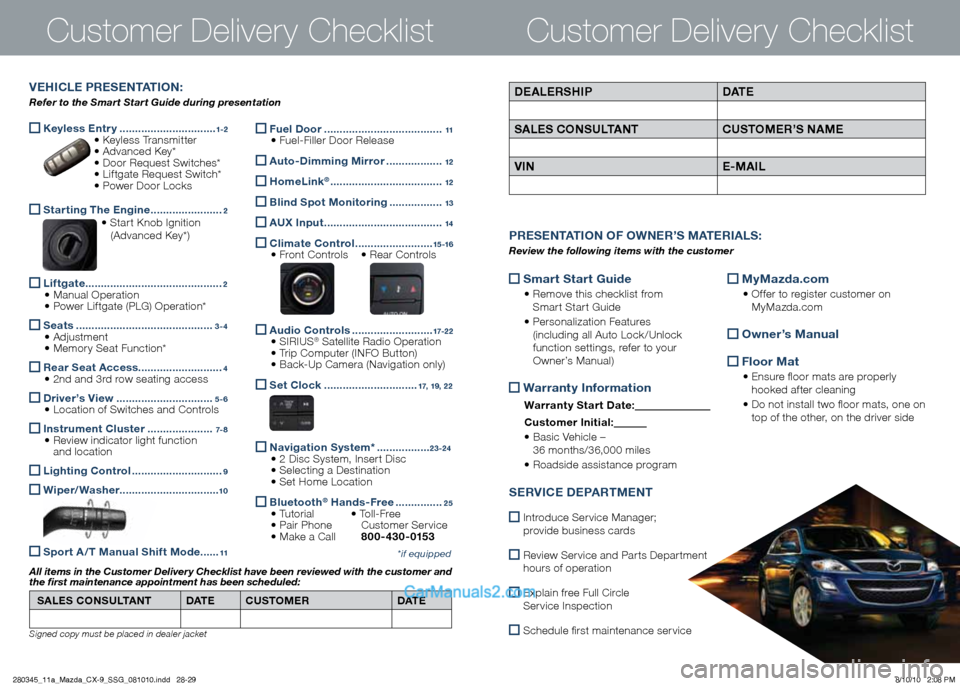
Keyless Entr y
...............................1-2 • Keyless Transmitter
• Advanced Key*
• Door Request Switches*
• Lif tgate Request Switch*
• Power Door Locks
Star ting The Engine
.......................2 • Star t Knob Ignition
(Advanced Key*)
Lif tgate
............................................2
• Manual Operation
• Power Lif tgate (PLG) Operation*
Seats
............................................3 - 4 • Adjustment
• Memor y Seat Function*
Rear Seat Access
...........................4 • 2nd and 3rd row seating access
Driver’s View
...............................5 - 6 • Location of Switches and Controls
Instrument Cluster
.....................7- 8 • Review indicator light function
and location
Lighting Control
.............................9
Wiper/ Washer
................................10
Spor t A / T Manual Shif t Mode ......11
Customer Delivery ChecklistCustomer Delivery Checklist
*if equipped
DEALERS hIP DATE
SALES CO nSULTA nT CUSTOMER’S nAME
VI n E-MAIL
PRESE nTATIO n OF O WnER ’S M ATERIALS :
Review the following items with the customer
VE h ICLE PRESE nTATIO n:
Refer to the Smart Start Guide during presentation
Fuel Door
......................................11 • Fuel-Filler Door Release
Auto-Dimming Mirror ..................12
h omeLink® ....................................12
Blind Spot Monitoring
.................13
AUX Input
......................................14
Climate Control
.........................15 -16 • Front Controls • Rear Controls
Audio Controls
..........................17-2 2 • SIRIUS® Satellite Radio Operation
• Trip Computer (INFO Button)
• Back-Up Camera (Navigation only)
Set Clock ..............................17, 19, 2 2
n avigation System* .................23 -24
• 2 Disc System, Inser t Disc
• Selecting a Destination
• Set Home Location
Bluetooth®
h ands-Free ...............25 • Tutorial • Toll-Free
• Pair Phone Customer Ser vice
• Make a Call 80 0 - 430 - 0153
Smar t Star t Guide
•
Remove this checklist from
Smar t Star t Guide
• Personalization Features
(including all Auto Lock /Unlock
function settings, refer to your
Owner’s Manual)
Warrant y Information
Warrant y Star t Date:
Customer Ini tial:
• Basic Vehicle –
36 months/36,000 miles
• Roadside assistance program
MyMazda.com
•
Of fer to register customer on
MyMazda.com
Owner’s Manual
Floor Mat
•
Ensure floor mats are properly
hooked af ter cleaning
• Do not install two floor mats, one on
top of the other, on the driver side
S ERVICE DEPARTME nT
Introduce Ser vice Manager;
provide business cards
Review Ser vice and Par ts Depar tment
hours of operation
Explain free Full Circle
Ser vice Inspection
Schedule first maintenance ser vice
SALES CO nSULTA nT DATE CUSTOMER DATE
All items in the Customer Delivery Checklist have been reviewed with the customer and
the first maintenance appointment has been scheduled:
Signed copy must be placed in dealer jacket
280345_11a_Mazda_CX-9_SSG_081010.indd 28-298/10/10 2:08 PM