engine MAZDA MODEL CX-9 2013 Smart Start Guide (in English)
[x] Cancel search | Manufacturer: MAZDA, Model Year: 2013, Model line: MODEL CX-9, Model: MAZDA MODEL CX-9 2013Pages: 16, PDF Size: 3.96 MB
Page 2 of 16
Key
12
Auxiliary Key Release
Auxiliary Key
Key (Rear)
StAR ting the engine
While Carrying the Advanced Key…
•
Start the engine by pushing the start knob in and turning it (like a
normal key) while depressing the brake pedal.
• Shut the engine OFF by turning the start knob to the ACC position
and then pushing in and turning to the OFF position.
•
The
indicator light will show green when the advanced key is
detected. If the
indicator light flashes green, the advanced key
transmitter battery power is low.
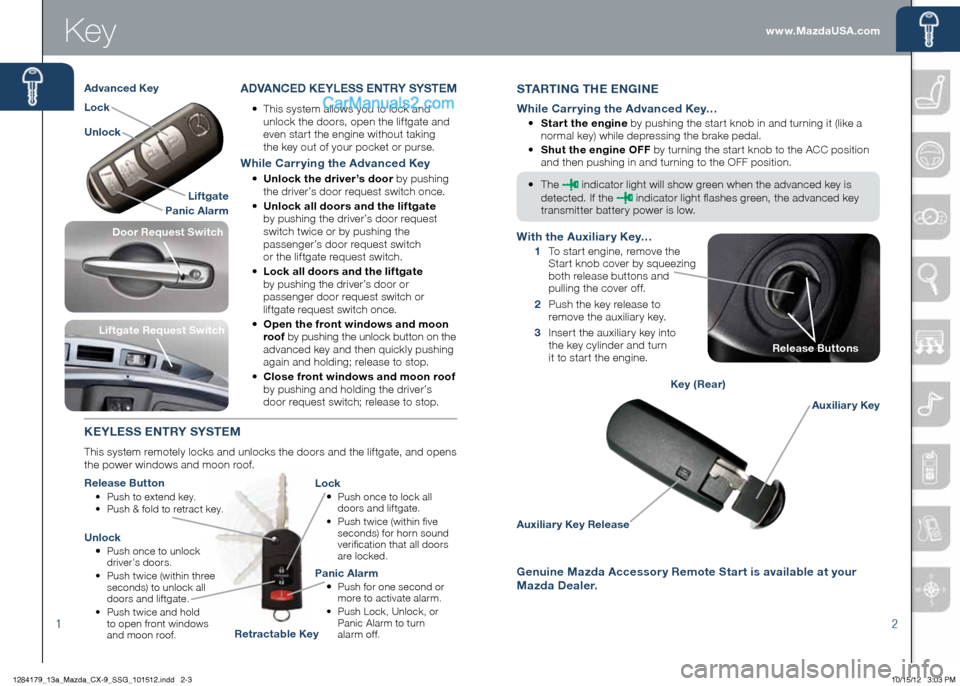
ADVA nCeD K eYL eSS ent RY SYSteM
•
This system allows you to lock and
unlock the doors, open the liftgate and
even start the engine without taking
the key out of your pocket or purse.
While Carrying the Advanced Key
• Unlock the driver’s door by pushing
the driver’s door request switch once.
• Unlock all doors and the liftgate
by pushing the driver’s door request
switch twice or by pushing the
passenger’s door request switch
or the liftgate request switch.
• Lock all doors and the liftgate
by pushing the driver’s door or
passenger door request switch or
liftgate request switch once.
• Open the front windows and moon
roof by pushing the unlock button on the
advanced key and then quickly pushing
again and holding; release to stop.
• Close front windows and moon roof
by pushing and holding the driver’s
door request switch; release to stop.
K eYL eSS entRY SYS teM
This system remotely locks and unlocks the doors and the liftgate, and opens
the power windows and moon roof.
Release Button
• Push to extend key.
• Push & fold to retract key.
Lock
•
Push once to lock all
doors and liftgate.
•
Push twice (within five
seconds) for horn sound
verification that all doors
are locked.
Unlock
• Push once to unlock
driver’s doors.
•
Push twice (within three
seconds) to unlock all
doors and liftgate.
•
Push twice and hold
to open front windows
and moon roof.
Panic Alarm
• Push for one second or
more to activate alarm.
•
Push Lock, Unlock, or
Panic Alarm to turn
alarm of f.
Liftgate Request Switch
With the Auxiliary Key…
1 To start engine, remove the
Start knob cover by squeezing
both release buttons and
pulling the cover off.
2 Push the key release to
remove the auxiliary key.
3 Insert the auxiliary key into
the key cylinder and turn
it to start the engine.
Liftgate
Panic Alarm
Lock
Unlock
Advanced Key
Retractable Key
Release Buttons
genuine Mazda Accessory Remote Start is available at your
Mazda Dealer.
Door Request Switch
www.MazdaUSA.com
1284179_13a_Mazda_CX-9_SSG_101512.indd 2-310/15/12 3:03 PM
Page 5 of 16
Instrument Cluster
78
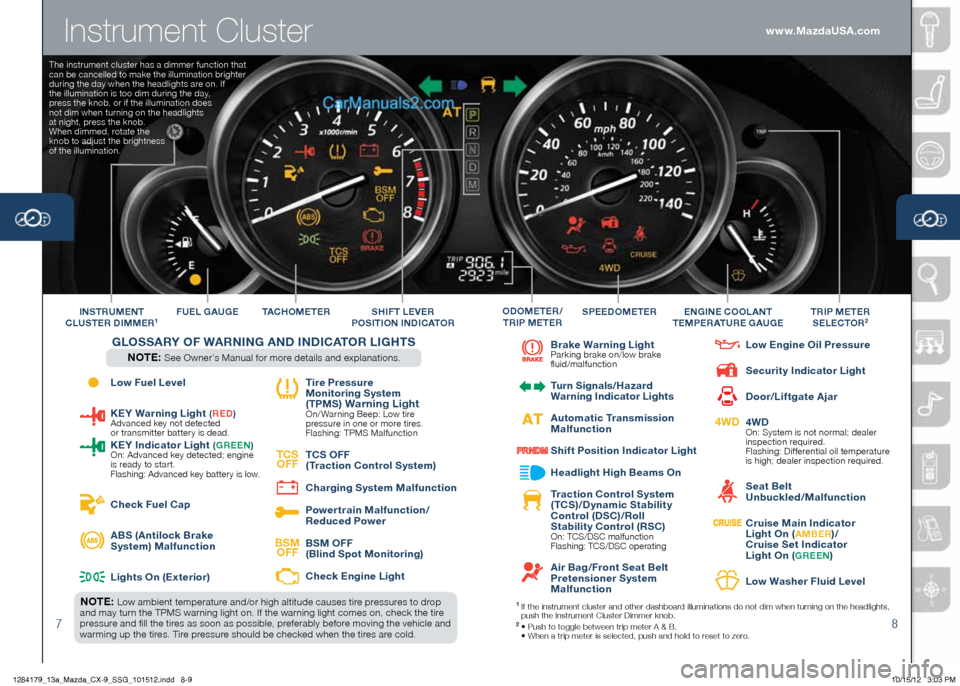
Low Fuel Level
Ke
Y Warning Light (Re D) Advanced key not detected
or transmitter battery is dead.
K
eY indicator L ight (gR een ) On: Advanced key detected; engine
is ready to start.
Flashing: Advanced key battery is low.
Check Fuel Cap
ABS (Antilock Brake
System) Malfunction
Lights On (
exterior)
t
ire Pressure
Monitoring System
( t PMS
) Warning Light On/ Warning Beep: Low tire
pressure in one or more tires.
Flashing: TPMS Malfunction
tCS
OFF
t
CS OFF
( t raction Control System)
Charging System Malfunction
Powertra
in Malfunction/
Reduced Power
BSM OFF
BSM OFF
(Blind Spot Monitoring)
Check e
ngine Light
Brake Warning Light
Parking brake on/low brake
fluid/malfunction
t
urn Signals/ hazard
Warning i ndicator Lights
Automatic t
ransmission
Malfunction
Shift Position i
ndicator Light
h
eadlight h igh Beams On
t
raction Control System
( t CS)/Dynamic Stability
Control (DSC)/Roll
Stability Control (RSC)
On: TCS/DSC malfunction
Flashing: TCS/DSC operating
Air Bag/Front Seat Belt
Pretensioner System
Malfunction
Low e
ngine Oil Pressure
Security i
ndicator Light
Door/Liftgate Ajar
4WD
4WD
On: System is not normal; dealer
inspection required.
Flashing: Differential oil temperature
is high; dealer inspection required.
Seat Belt
Unbuckled/Malfunction
Cruise Main indicator
Light On (A MBe R)/
Cruise Set indicator
Light On (
gR een)
Low Washer Fluid Level
tAC
hO M e t e R
F
U eL gAU ge SPeeDOM eteRtRiP M ete R
S eLeCt OR2in StRUM ent
CLUSte R D iMM eR1engine COOLA nt
teMP eRAtUR e g AUgeODOM eteR/
tR iP M ete RShiFt Le VeR
P OS itiOn in DiCA tOR
gLOSSARY OF W ARning A nD in DiCA tOR L ight S
nOte : See Owner’s Manual for more details and explanations.
nOte : Low ambient temperature and/or high altitude causes tire pressures to drop
and may turn the TPMS warning light on. If the warning light comes on, check the tire
pressure and fill the tires as soon as possible, preferably before moving the vehicle and
warming up the tires. Tire pressure should be checked when the tires are cold.1 If the instrument cluster and other dashboard illuminations do not dim when turning on the headlights,
push the Instrument Cluster Dimmer knob.
2 • Push to toggle between trip meter A & B.
• When a trip meter is selected, push and hold to reset to zero.
The instrument cluster has a dimmer function that
can be cancelled to make the illumination brighter
during the day when the headlights are on. If
the illumination is too dim during the day,
press the knob, or if the illumination does
not dim when turning on the headlights
at night, press the knob.
When dimmed, rotate the
knob to adjust the brightness
of the illumination.
www.MazdaUSA.com
1284179_13a_Mazda_CX-9_SSG_101512.indd 8-910/15/12 3:03 PM
Page 7 of 16
Feature Highlights
1112
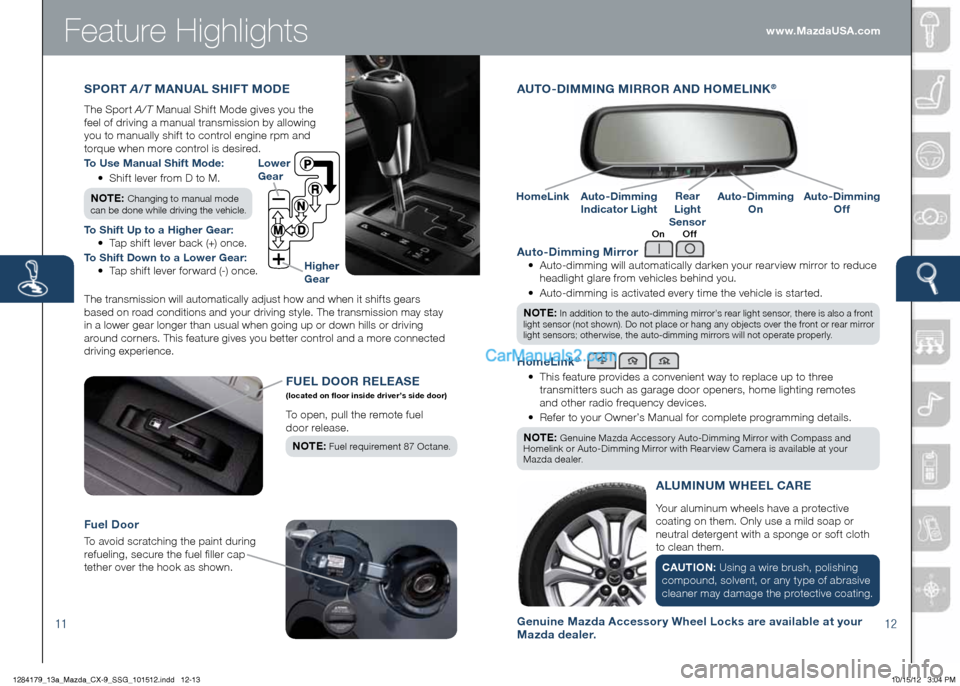
Auto-Dimming Mirror
•
Auto-dimming will automatically darken your rearview mirror to reduce
headlight glare from vehicles behind you.
•
Auto-dimming is activated every time the vehicle is started.
n Ote :
In addition to the auto-dimming mirror’s rear light sensor, there is also a front
light sensor (not shown). Do not place or hang any objects over the front or rear mirror
light sensors; otherwise, the auto-dimming mirrors will not operate properly.
homeLink®
•
This feature provides a convenient way to replace up to three
transmitters such as garage door openers, home lighting remotes
and other radio frequency devices.
• Refer to your Owner’s Manual for complete programming details.
n Ote :
Genuine Mazda Accessory Auto-Dimming Mirror with Compass and
Homelink or Auto-Dimming Mirror with Rearview Camera is available at your
Mazda dealer.
A U tO -Di MMing Mi RROR AnD hOMeLinK®
Auto-Dimming
i ndicator LightAuto-Dimming
On
homeLinkRear
Light
SensorAuto-Dimming
Off
On Off
FU eL D OOR Re Le AS e (located on floor inside driver’s side door)
To open, pull the remote fuel
door release.
n Ote :
Fuel requirement 87 Octane.
Fuel Door
To avoid scratching the paint during
refueling, secure the fuel filler cap
tether over the hook as shown.
The transmission will automatically adjust how and when it shifts gears
based on road conditions and your driving style. The transmission may stay
in a lower gear longer than usual when going up or down hills or driving
around corners. This feature gives you better control and a more connected
driving experience.
Lower
g ear
higher
g ear
SPOR t A/T MA nUAL S hiFt MODe
The Sport A/T Manual Shift Mode gives you the
feel of driving a manual transmission by allowing
you to manually shift to control engine rpm and
torque when more control is desired.
t o Use Manual Shift Mode:
• Shift lever from D to M.
n Ote :
Changing to manual mode
can be done while driving the vehicle.
t o Shift Up to a higher gear:
• Tap shift lever back (+) once.
t o Shift Down to a Lower gear:
• Tap shift lever forward (-) once.
genuine Mazda Accessory Wheel Locks are available at your
Mazda dealer.
Your aluminum wheels have a protective
coating on them. Only use a mild soap or
neutral detergent with a sponge or soft cloth
to clean them.
CAU tiOn : Using a wire brush, polishing
compound, solvent, or any type of abrasive
cleaner may damage the protective coating.
ALUMinUM W heeL CAR e
www.MazdaUSA.com
1284179_13a_Mazda_CX-9_SSG_101512.indd 12-1310/15/12 3:04 PM
Page 11 of 16
Bluetooth
®
1920
PAiR ing YOUR BLUet OOth® PhOne OR AUD iO De ViC e
n Ote :
• For safety reasons, you cannot pair a phone while driving.
• Before pairing your cell phone or audio device, it is recommended that you
refer to its manual for steps to turn on Bluetooth
® and perform pairing.
• For customer service and device compatibility:
toll-free call: 800-430-0153
Website: www.MazdaUSA.com/bluetooth
• iMPOR tA nt : Set the volume level on your cell phone or audio device to the
highest level before distortion starts, then adjust the volume on the audio system.
• When in range of another Wi-Fi device, the Bluetooth connection between your
phone and the system may disconnect for a short time if you have Wi-Fi enabled.
Turn off Wi-Fi on your phone if needed.
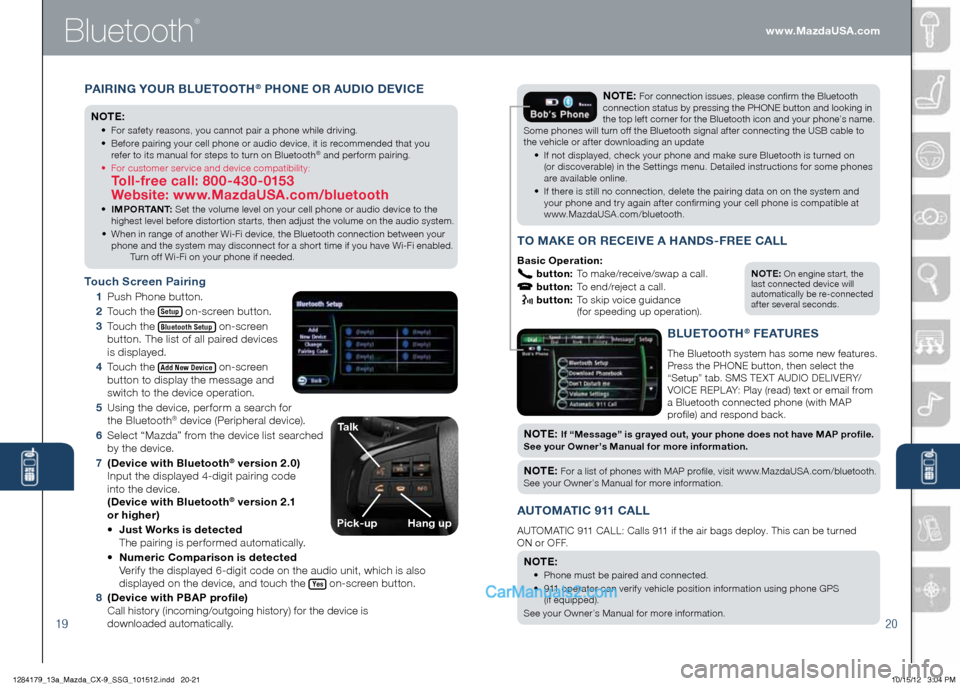
t ouch Screen Pairing
1
Push Phone button.
2
Touch the
Setup on-screen button.
3
Touch the
Bluetooth Setup on-screen
button. The list of all paired devices
is displayed.
4
Touch the
Add New Device on-screen
button to display the message and
switch to the device operation.
5 Using the device, perform a search for
the Bluetooth
® device (Peripheral device).
6
Select “Mazda” from the device list searched
by the device.
7
(Device with Bluetooth
® version 2.0)
Input the displayed 4-digit pairing code
into the device.
(Device with Bluetooth
® v e r s i o n 2 .1
or higher)
• Just Works is detected
The pairing is performed automatically.
• numeric Comparison is detected
Verify the displayed 6-digit code on the audio unit, which is also
displayed on the device, and touch the
Yes on-screen button.
8
(Device with PBAP profile)
Call history (incoming/outgoing history) for the device is
downloaded automatically.
n Ote : On engine start, the
last connected device will
automatically be re-connected
after several seconds.
tO MAK e OR ReC ei Ve A h An DS -FR ee CALL
Basic Operation:
button: To make/receive/swap a call.
button: To end/reject a call.
button: To skip voice guidance
(for speeding up operation).
nO te : For connection issues, please confirm the Bluetooth
connection status by pressing the PHONE button and looking in
the top left corner for the Bluetooth icon and your phone’s name.
Some phones will turn off the Bluetooth signal after connecting the USB cable to
the vehicle or after downloading an update
• If not displayed, check your phone and make sure Bluetooth is turned on
(or discoverable) in the Settings menu. Detailed instructions for some phones
are available online.
• If there is still no connection, delete the pairing data on on the system and
your phone and try again after confirming your cell phone is compatible at
www.MazdaUSA.com/bluetooth.
BLU etOO th® FeAtUR eS
The Bluetooth system has some new features.
Press the PHONE button, then select the
“Setup” tab. SMS TEXT AUDIO DELIVERY/
VOICE REPL AY: Play (read) text or email from
a Bluetooth connected phone (with MAP
profil e) and respond back.
nOt e: if “Message” is grayed out, your phone does not have MAP profile.
See your Owner’s Manual for more information.
n O te : For a list of phones with MAP profile, visit www.MazdaUSA.com/bluetooth.
See your Owner’s Manual for more information.
AU tOMA tiC 911 CALL
AUTOMATIC 911 CALL: Calls 911 if the air bags deploy. This can be turned
ON or OFF.
n Ote :
• Phone must be paired and connected.
• 911 operator can verify vehicle position information using phone GPS
(if equipped).
See your Owner’s Manu al for more information.
talk
Pick-uphang up
www.MazdaUSA.com
1284179_13a_Mazda_CX-9_SSG_101512.indd 20-2110/15/12 3:04 PM
Page 12 of 16
2122
PeRSOnALize YOUR MAzDA CX-9 With genUine
MAzDA ACCeSSORieS:
• All-Weather Floor Mats
• Auto-Dimming Rearview
Mirror with Compass
• Cargo Mat, Carpet
• Cargo Net
• Cargo Tray
• Fog Lights
• Front Mask
• Hood Bug Deflector
• Moonroof Wind Deflector
• Navigation System
• Paint Protection
Door Edge
Front Kit • Rear Bumper Guard
•
Rearview Camera
with Auto-Dimming
Mirror Display
• Remote Engine Start
• Retractable Cargo Cover
• Roof Rack
Bike Carrier
Cargo Box, Short
Cargo Box, Medium
Luggage Basket
Kayak Carrier
Ski/Snowboard Carrier
Surfboard Carrier • SiriusXM
® Satellite Radio
• Splash Guards
• Touch-Up Paint
• Trailer Hitch (Class II)
Bike Carrier,
Hitch Mounted
• Wheel Locks
• Windshield Sunscreen www.MazdaUSA.com
Feature Highlights
USB Port
Refer to the Owner’s Manual for additional information.
1
Connect the cable into the portable audio player and the USB port.
2 •
Audio Controls (without navigation): Push the AUX button on
the audio unit to switch to the USB mode and start playback.
•
Audio Controls (with navigation): Push AUDIO button on audio
system, then touch the USB on-screen button.
n Ote :
When the iPod® is connected to the USB port, the USB on-screen tab
changes to the iPod on-screen tab. Do not remove the iPod while in the iPod
mode. Otherwise, the data could be damaged.
3
Use the vehicle’s audio system or steering wheel controls to control
the USB device connected.
n Ote :
The iPod functions on the iPod cannot be operated while it is connected
to the vehicle’s audio system because it controls the iPod functions.
2 •
Audio Controls (without navigation): Push the AUX button on
the audio unit to switch to the AUX mode.
•
Audio Controls (with navigation): Push AUDIO button on audio
system, then touch AUX on-screen button.
3 Use the portable audio player controls to play music.
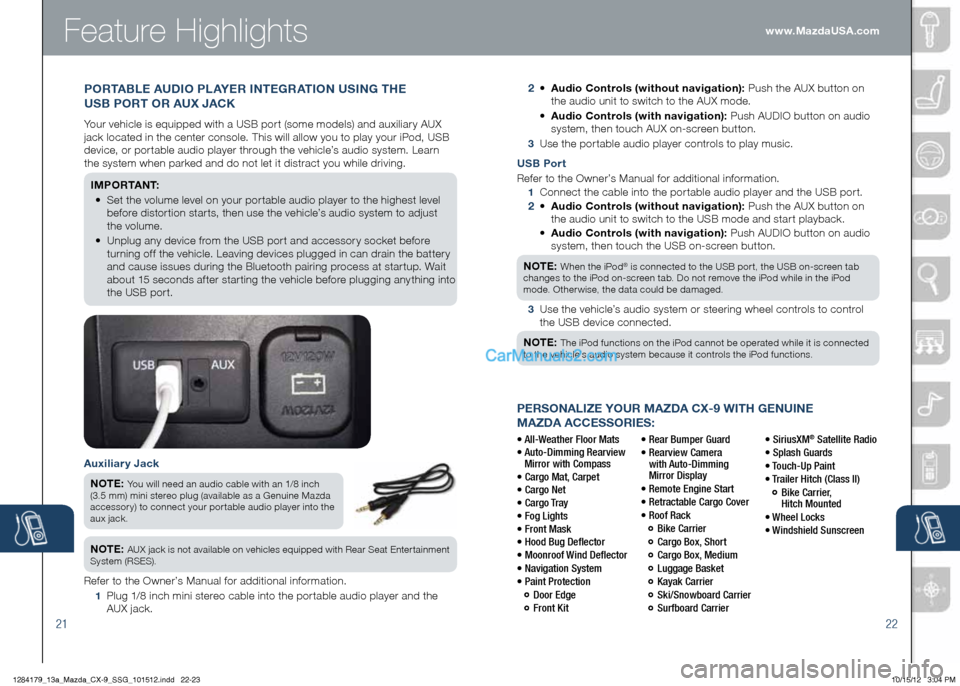
Auxiliary Jack
n Ote :
You will need an audio cable with an 1/8 inch
(3.5 mm) mini stereo plug (available as a Genuine Mazda
accessory) to connect your portable audio player into the
aux jack.
n Ote : AUX jack is not available on vehicles equipped with Rear Seat Entertainment
System (RSES).
Refer to the Owner’s Manual for additional information.
1 Plug 1/8 inch mini stereo cable into the portable audio player and the
AUX jack.
POR tABL e AUD iO PLAY eR integ RAtiOn US ing the
USB POR t OR AUX JACK
Your vehicle is equipped with a USB port (some models) and auxiliary AUX
jack located in the center console. This will allow you to play your iPod, USB
device, or portable audio player through the vehicle’s audio system. Learn
the system when parked and do not let it distract you while driving.
iM P O R tA n t:
•
Set the volume level on your portable audio player to the highest level
before distortion starts, then use the vehicle’s audio system to adjust
the volume.
•
Unplug any device from the USB port and accessory socket before
turning off the vehicle. Leaving devices plugged in can drain the battery
and cause issues during the Bluetooth pairing process at startup. Wait
about 15 seconds after starting the vehicle before plugging anything into
the USB port.
1284179_13a_Mazda_CX-9_SSG_101512.indd 22-2310/15/12 3:04 PM