rear view mirror MAZDA MODEL CX-9 2013 Smart Start Guide (in English)
[x] Cancel search | Manufacturer: MAZDA, Model Year: 2013, Model line: MODEL CX-9, Model: MAZDA MODEL CX-9 2013Pages: 16, PDF Size: 3.96 MB
Page 7 of 16

Feature Highlights
1112
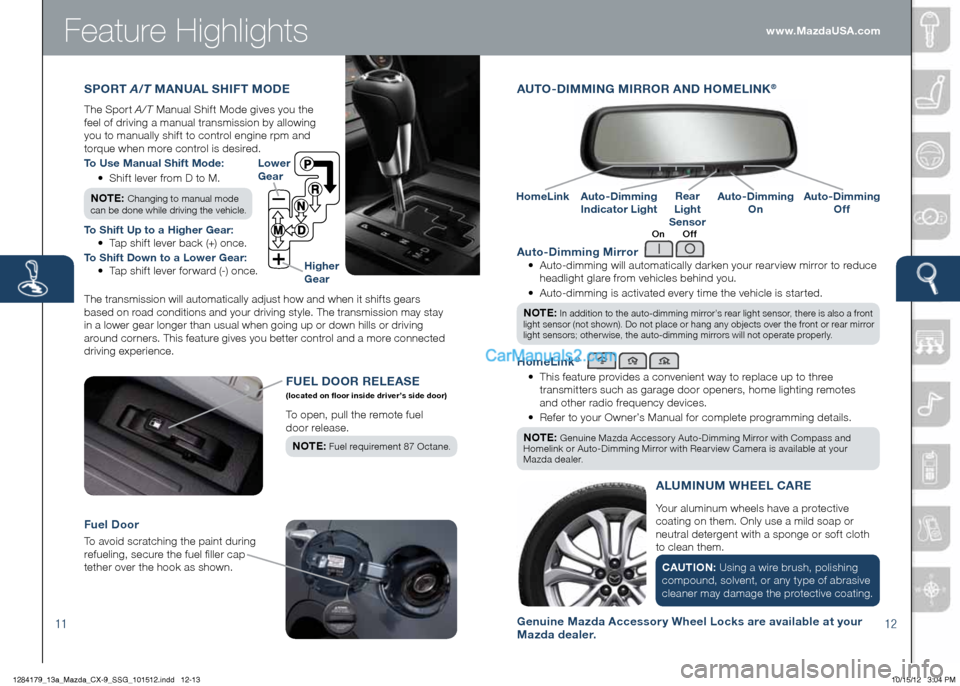
Auto-Dimming Mirror
•
Auto-dimming will automatically darken your rearview mirror to reduce
headlight glare from vehicles behind you.
•
Auto-dimming is activated every time the vehicle is started.
n Ote :
In addition to the auto-dimming mirror’s rear light sensor, there is also a front
light sensor (not shown). Do not place or hang any objects over the front or rear mirror
light sensors; otherwise, the auto-dimming mirrors will not operate properly.
homeLink®
•
This feature provides a convenient way to replace up to three
transmitters such as garage door openers, home lighting remotes
and other radio frequency devices.
• Refer to your Owner’s Manual for complete programming details.
n Ote :
Genuine Mazda Accessory Auto-Dimming Mirror with Compass and
Homelink or Auto-Dimming Mirror with Rearview Camera is available at your
Mazda dealer.
A U tO -Di MMing Mi RROR AnD hOMeLinK®
Auto-Dimming
i ndicator LightAuto-Dimming
On
homeLinkRear
Light
SensorAuto-Dimming
Off
On Off
FU eL D OOR Re Le AS e (located on floor inside driver’s side door)
To open, pull the remote fuel
door release.
n Ote :
Fuel requirement 87 Octane.
Fuel Door
To avoid scratching the paint during
refueling, secure the fuel filler cap
tether over the hook as shown.
The transmission will automatically adjust how and when it shifts gears
based on road conditions and your driving style. The transmission may stay
in a lower gear longer than usual when going up or down hills or driving
around corners. This feature gives you better control and a more connected
driving experience.
Lower
g ear
higher
g ear
SPOR t A/T MA nUAL S hiFt MODe
The Sport A/T Manual Shift Mode gives you the
feel of driving a manual transmission by allowing
you to manually shift to control engine rpm and
torque when more control is desired.
t o Use Manual Shift Mode:
• Shift lever from D to M.
n Ote :
Changing to manual mode
can be done while driving the vehicle.
t o Shift Up to a higher gear:
• Tap shift lever back (+) once.
t o Shift Down to a Lower gear:
• Tap shift lever forward (-) once.
genuine Mazda Accessory Wheel Locks are available at your
Mazda dealer.
Your aluminum wheels have a protective
coating on them. Only use a mild soap or
neutral detergent with a sponge or soft cloth
to clean them.
CAU tiOn : Using a wire brush, polishing
compound, solvent, or any type of abrasive
cleaner may damage the protective coating.
ALUMinUM W heeL CAR e
www.MazdaUSA.com
1284179_13a_Mazda_CX-9_SSG_101512.indd 12-1310/15/12 3:04 PM
Page 8 of 16

Feature Highlights
1314
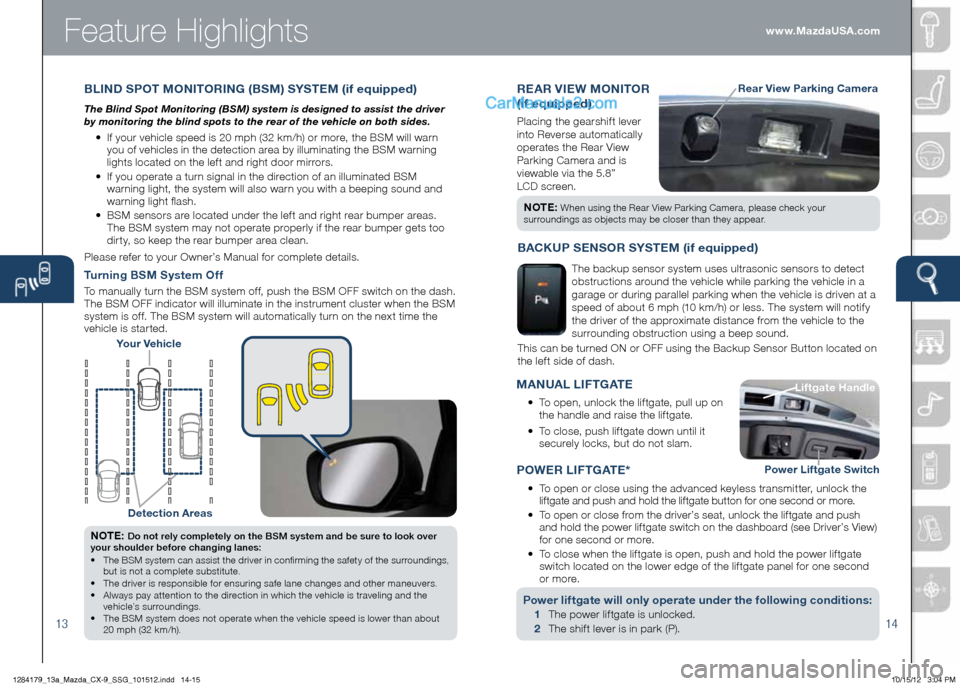
ReAR Vie W MOnit OR
(if equipped)
Placing the gearshift lever
into Reverse automatically
operates the Rear View
Parking Camera and is
viewable via the 5.8”
LCD screen.
Rear View Parking Camera
n Ote : When using the Rear View Parking Camera, please check your
surroundings as objects may be closer than they appear.
BL inD SPO t MOnit ORing (BSM) SYSte M (if equipped)
The Blind Spot Monitoring (BSM) system is designed to assist the driver
by monitoring the blind spots to the rear of the vehicle on both sides.
• If your vehicle speed is 20 mph (32 km/h) or more, the BSM will warn
you of vehicles in the detection area by illuminating the BSM warning
lights located on the left and right door mirrors.
• If you operate a turn signal in the direction of an illuminated BSM
warning light, the system will also warn you with a beeping sound and
warning light flash.
• BSM sensors are located under the left and right rear bumper areas.
The BSM system may not operate properly if the rear bumper gets too
dirty, so keep the rear bumper area clean.
Please refer to your Owner’s Manual for complete details.
Your Vehicle
Detection Areas
n Ote : Do not rely completely on the BSM system and be sure to look over
your shoulder before changing lanes:
• The BSM system can assist the driver in confirming the safety of the surroundings,
but is not a complete substitute.
• The driver is responsible for ensuring safe lane changes and other maneuvers.
• Always pay attention to the direction in which the vehicle is traveling and the
vehicle’s surroundings.
• The BSM system does not operate when the vehicle speed is lower than about
20 mph (32 km/h).
turning BSM System Off
To manually turn the BSM system off, push the BSM OFF switch on the dash.
The BSM OFF indicator will illuminate in the instrument cluster when the BSM
system is off. The BSM system will automatically turn on the next time the
vehicle is started.
BACKUP Sen SOR SYSteM (if equipped)
The backup sensor system uses ultrasonic sensors to detect
obstructions around the vehicle while parking the vehicle in a
garage or during parallel parking when the vehicle is driven at a
speed of about 6 mph (10 km/h) or less. The system will notify
the driver of the approximate distance from the vehicle to the
surrounding obstruction using a beep sound.
This can be turned ON or OFF using the Backup Sensor Button located on
the left side of dash.
P OW eR L iF tg Ate *
• To open or close using the advanced keyless transmitter, unlock the
liftgate and push and hold the liftgate button for one second or more.
•
To open or close from the driver’s seat, unlock the liftgate and push
and hold the power liftgate switch on the dashboard (see Driver’s View)
for one second or more.
•
To close when the liftgate is open, push and hold the power liftgate
switch located on the lower edge of the liftgate panel for one second
or more.
Power liftgate will only operate under the following conditions:
1 The power liftgate is unlocked.
2 The shift lever is in park (P). Liftgate
h andle
Liftgate h andle
Power Liftgate Switch
MAnUAL L iF tg Ate
•
To open, unlock the liftgate, pull up on
the handle and raise the liftgate.
•
To close, push liftgate down until it
securely locks, but do not slam. www.MazdaUSA.com
1284179_13a_Mazda_CX-9_SSG_101512.indd 14-1510/15/12 3:04 PM
Page 12 of 16

2122
PeRSOnALize YOUR MAzDA CX-9 With genUine
MAzDA ACCeSSORieS:
• All-Weather Floor Mats
• Auto-Dimming Rearview
Mirror with Compass
• Cargo Mat, Carpet
• Cargo Net
• Cargo Tray
• Fog Lights
• Front Mask
• Hood Bug Deflector
• Moonroof Wind Deflector
• Navigation System
• Paint Protection
Door Edge
Front Kit • Rear Bumper Guard
•
Rearview Camera
with Auto-Dimming
Mirror Display
• Remote Engine Start
• Retractable Cargo Cover
• Roof Rack
Bike Carrier
Cargo Box, Short
Cargo Box, Medium
Luggage Basket
Kayak Carrier
Ski/Snowboard Carrier
Surfboard Carrier • SiriusXM
® Satellite Radio
• Splash Guards
• Touch-Up Paint
• Trailer Hitch (Class II)
Bike Carrier,
Hitch Mounted
• Wheel Locks
• Windshield Sunscreen www.MazdaUSA.com
Feature Highlights
USB Port
Refer to the Owner’s Manual for additional information.
1
Connect the cable into the portable audio player and the USB port.
2 •
Audio Controls (without navigation): Push the AUX button on
the audio unit to switch to the USB mode and start playback.
•
Audio Controls (with navigation): Push AUDIO button on audio
system, then touch the USB on-screen button.
n Ote :
When the iPod® is connected to the USB port, the USB on-screen tab
changes to the iPod on-screen tab. Do not remove the iPod while in the iPod
mode. Otherwise, the data could be damaged.
3
Use the vehicle’s audio system or steering wheel controls to control
the USB device connected.
n Ote :
The iPod functions on the iPod cannot be operated while it is connected
to the vehicle’s audio system because it controls the iPod functions.
2 •
Audio Controls (without navigation): Push the AUX button on
the audio unit to switch to the AUX mode.
•
Audio Controls (with navigation): Push AUDIO button on audio
system, then touch AUX on-screen button.
3 Use the portable audio player controls to play music.
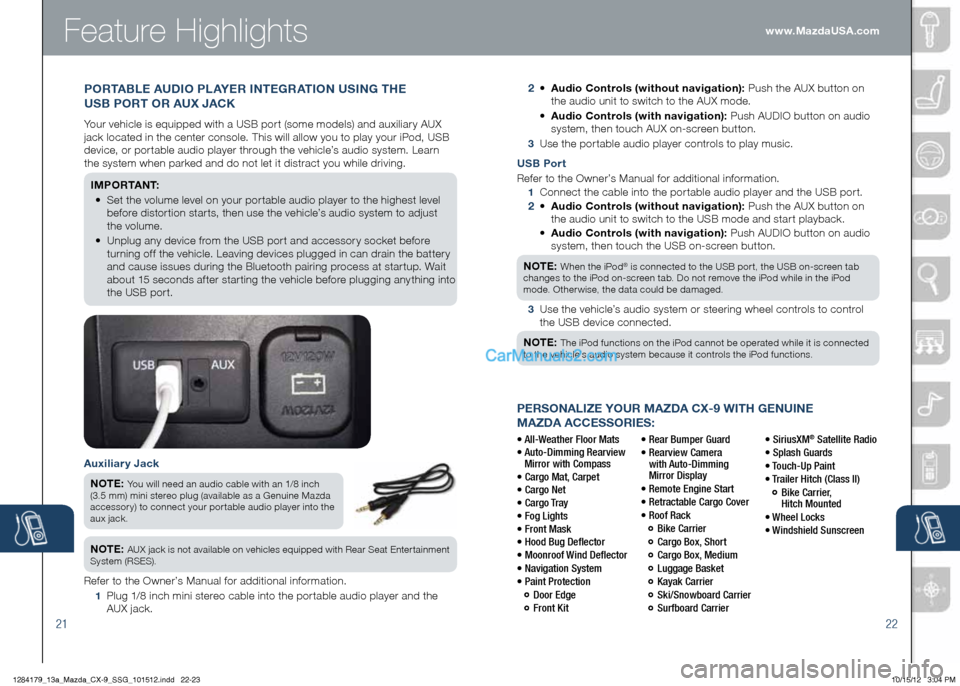
Auxiliary Jack
n Ote :
You will need an audio cable with an 1/8 inch
(3.5 mm) mini stereo plug (available as a Genuine Mazda
accessory) to connect your portable audio player into the
aux jack.
n Ote : AUX jack is not available on vehicles equipped with Rear Seat Entertainment
System (RSES).
Refer to the Owner’s Manual for additional information.
1 Plug 1/8 inch mini stereo cable into the portable audio player and the
AUX jack.
POR tABL e AUD iO PLAY eR integ RAtiOn US ing the
USB POR t OR AUX JACK
Your vehicle is equipped with a USB port (some models) and auxiliary AUX
jack located in the center console. This will allow you to play your iPod, USB
device, or portable audio player through the vehicle’s audio system. Learn
the system when parked and do not let it distract you while driving.
iM P O R tA n t:
•
Set the volume level on your portable audio player to the highest level
before distortion starts, then use the vehicle’s audio system to adjust
the volume.
•
Unplug any device from the USB port and accessory socket before
turning off the vehicle. Leaving devices plugged in can drain the battery
and cause issues during the Bluetooth pairing process at startup. Wait
about 15 seconds after starting the vehicle before plugging anything into
the USB port.
1284179_13a_Mazda_CX-9_SSG_101512.indd 22-2310/15/12 3:04 PM
Page 15 of 16

Keyless e
ntry ...............................1-2 • Keyless Transmitter
• Advanced Key*
• Door Request Switches*
• Liftgate Request Switch*
• Power Door Locks
Starting the e
ngine .......................2 • Start Knob Ignition
(Advanced Key*)
Seats
............................................3-4 • Adjustment
• Memory Seat Function*
Rear Seat Access
...........................4 • 2nd and 3rd row seating access
Driver’s View
...............................5-6 • Location of Switches and Controls
Set Clock
........................................6
instrument Cluster
.....................7- 8 • Review indicator light function
and location
Lighting Control
.............................9
Wiper/Washer
................................10
Sport A / t Manual Shift Mode .....11
Fuel Door
......................................11 • Fuel-Filler Door Release
Customer Delivery ChecklistCustomer Delivery Checklist
*if equipped
DeALe RShiP DAt e
SAL eS CO nSUL tA nt CUStOMeR’S n AMe
V in e-MA iLVehi CLe PR eS ent Ati On:
Refer to the Smart Start Guide during presentation
Auto-Dimming Mirror* .................12
homeLink®* ..................................12
Blind Spot Monitoring*
................13
Rear View Monitor* ......................14
Backup Sensor System*.
.............14
Liftgate
..........................................14
• Manual Operation
• Power Liftgate (PLG) Operation*
Climate Control
........................15 -16
• Front Controls • Rear Controls
Audio Controls
..........................17-18 • Sirius® Satellite Radio Operation
• Trip Computer (INFO Button)
• Back-Up Camera (Navigation only)
Bluetooth® h
ands-Free ...........19 -20 • Tutorial • To l l - F r e e
• Pair Phone Customer Service
• Make a Call 800-430-0153
USB/AUX i
nput .........................21-2 2
naviga
tion System* .................23-24
• Planning a route
• SD Card
Power Mirr
ors with Reverse
t ilt Down Function* .....................25
SAL eS CO nSUL tA nt DAt e CUStOMeR DAt e
All items in the Customer Deliver y Checklist have been reviewed with the customer and
the first maintenance appointment has been scheduled:
Signed copy must be placed in dealer jacket
Smart Start guide
•
Remove this checklist from
Smart Start Guide
• Personalization Features
(including all Auto Lock /Unlock
function settings, refer to your
Owner’s Manual)
Warranty information
Warranty Start Date:
Customer i nitial:
• Basic Vehicle –
36 months/36,000 miles
• Roadside assistance program
www.MyMazda.com
•
Offer to register customer on
www.MyMazda.com
Owner’s Manual
Maintenance Passport
Floor Mats
•
Ensure floor mats are properly
hooked after cleaning
• Do not install two floor mats, one on
top of the other, on the driver side
• Accessory rubber floor mats should
be cleaned with mild soap and
water only
P R eS ent Ati On OF OWne R’S M Ate RiALS :
Review the following items with the customer
SeRV iC e De PARtM ent
Introduce Service Manager;
provide business cards
Review Service and Parts
Department hours of operation
Explain free Full Circle
Service Inspection
Schedule first maintenance service
1284179_13a_Mazda_CX-9_SSG_101512.indd 28-2910/15/12 3:05 PM