light MAZDA MODEL CX-9 2017 Owners Manual (in English)
[x] Cancel search | Manufacturer: MAZDA, Model Year: 2017, Model line: MODEL CX-9, Model: MAZDA MODEL CX-9 2017Pages: 612
Page 429 of 612

6–17
Maintenance and Care
Scheduled Maintenance
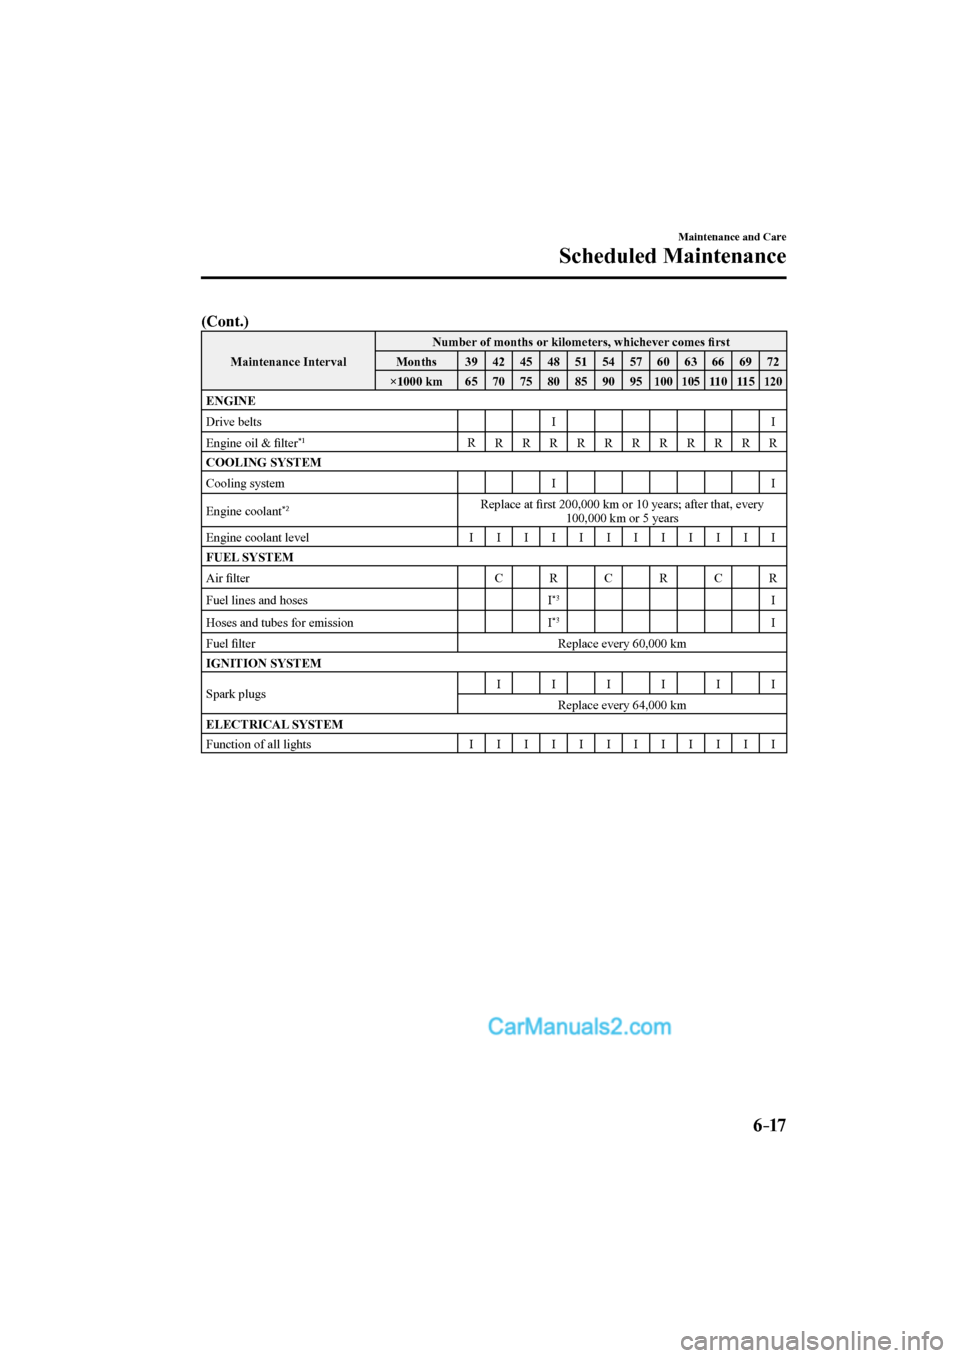
(Cont.)
Maintenance Interval Number of months or kilometers, whichever comes fi rst
Months 39
42 45 48 51 54 57 60 63 66 69 72
×1000 km 65
70 75 80 85 90 95
100 105 110 115 120
ENGINE
Drive belts I I
Engine oil & fi lter
*1 R
R R R R R R R R R R R
COOLING SYSTEM
Cooling system I I
Engine coolant
*2 Replace at fi rst 200,000 km or 10 years; after that, every
100,000 km or 5 years
Engine coolant level I
I I I I I I I I I I I
FUEL SYSTEM
Air fi lter C R C R C R
Fuel lines and hoses I
*3 I
Hoses and tubes for emission I
*3 I
Fuel fi lter Replace every 60,000 km
IGNITION SYSTEM
Spark plugs I I I I I I
Replace every 64,000 km
ELECTRICAL SYSTEM
Function of all lights I
I I I I I I I I I I I
CX-9_8FS7-EA-16K_Edition2.indb 17CX-9_8FS7-EA-16K_Edition2.indb 172016/12/15 18:35:572016/12/15 18:35:57
Page 430 of 612

6–18
Maintenance and Care
Scheduled Maintenance
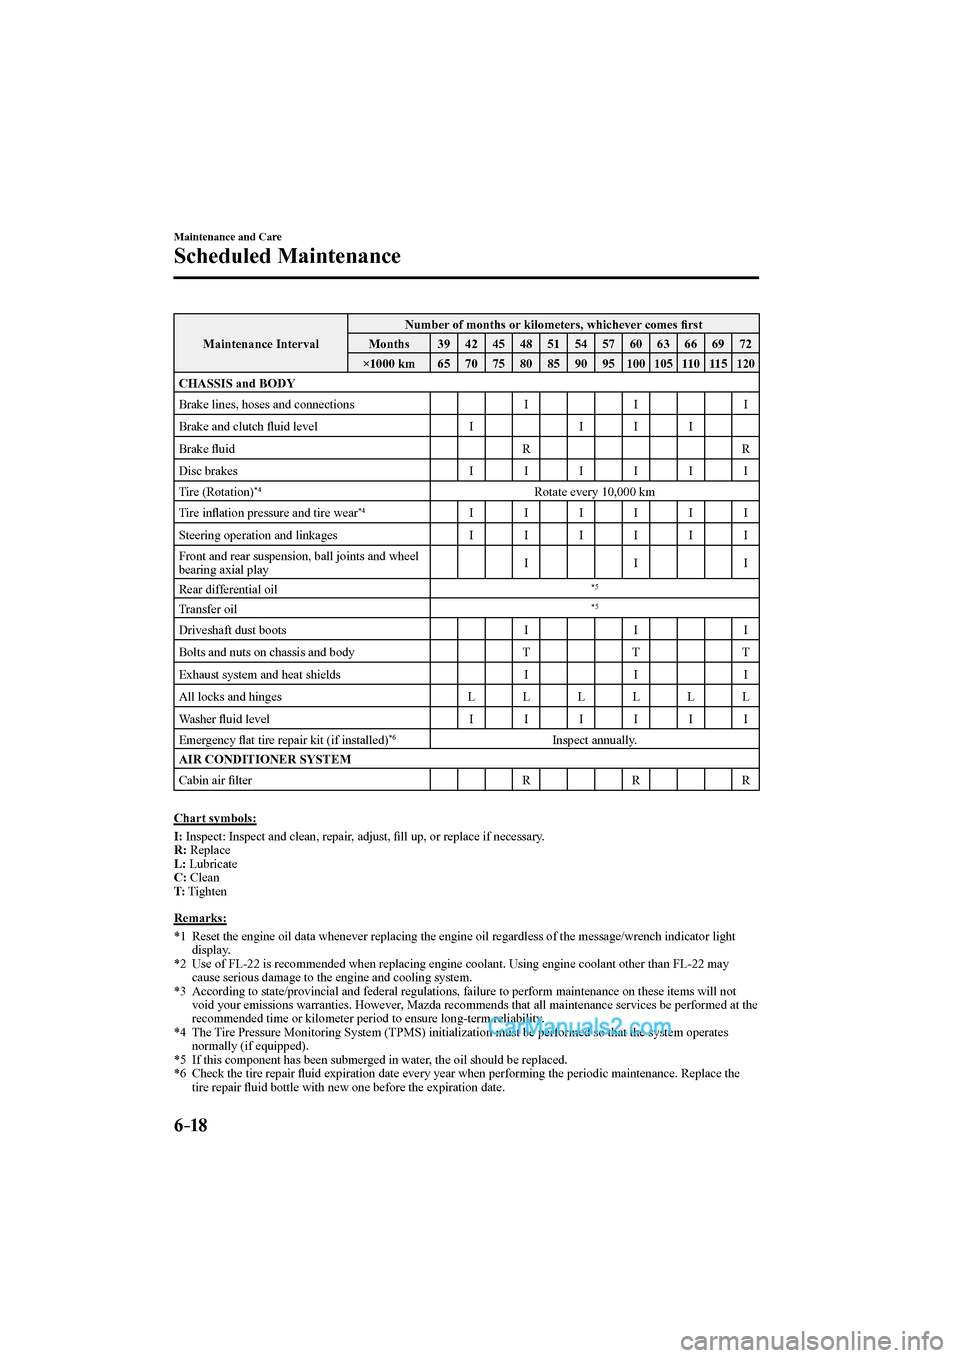
Maintenance Interval Number of months or kilometers, whichever comes fi rst
Months 39
42 45 48 51 54 57 60 63 66 69 72
×1000 km 65
70 75 80 85 90 95
100 105 110 115 120
CHASSIS and BODY
Brake lines, hoses and connections I I I
Brake and clutch fl uid level I I I I
Brake fl uid R R
Disc brakes I I I I I I
Tire (Rotation)
*4 Rotate every 10,000 km
Tire infl ation pressure and tire wear
*4 I I I I I I
Steering operation and linkages I I I I I I
Front and rear suspension, ball joints and wheel
bearing axial play I I I
Rear differential oil
*5
Transfer oil *5
Driveshaft dust boots I I I
Bolts and nuts on chassis and body T T T
Exhaust system and heat shields I I I
All locks and hinges L L L L L L
Washer fl uid level I I I I I I
Emergency fl at tire repair kit (if installed)
*6 Inspect annually.
AIR CONDITIONER SYSTEM
Cabin air fi lter R R R
Chart symbols:
I : Inspect: Inspect and clean, repair, adjust, fi ll up, or replace if necessary.
R : Replace
L : Lubricate
C : Clean
T : Tighten
Remarks:
*1 Reset the engine oil data whenever replacing the engine oil regardless of the message/wrench indicator light
display.
*2 Use of FL-22 is recommended when replacing engine coolant. Using engine coolant other than FL-22 may
cause serious damage to the engine and cooling system.
*3 According to state/provincial and federal regulations, failure to perform maintenance on these items will not
void your emissions warranties. However, Mazda recommends that all maintenance services be performed at the
recommended time or kilometer period to ensure long-term reliability.
*4 The Tire Pressure Monitoring System (TPMS) initialization must be performed so that the system operates
normally (if equipped).
*5 If this component has been submerged in water, the oil should be replaced.
*6 Check the tire repair fl uid expiration date every year when performing the periodic maintenance. Replace the
tire repair fl uid bottle with new one before the expiration date.
CX-9_8FS7-EA-16K_Edition2.indb 18CX-9_8FS7-EA-16K_Edition2.indb 182016/12/15 18:35:582016/12/15 18:35:58
Page 431 of 612

6–19
Maintenance and Care
Scheduled Maintenance
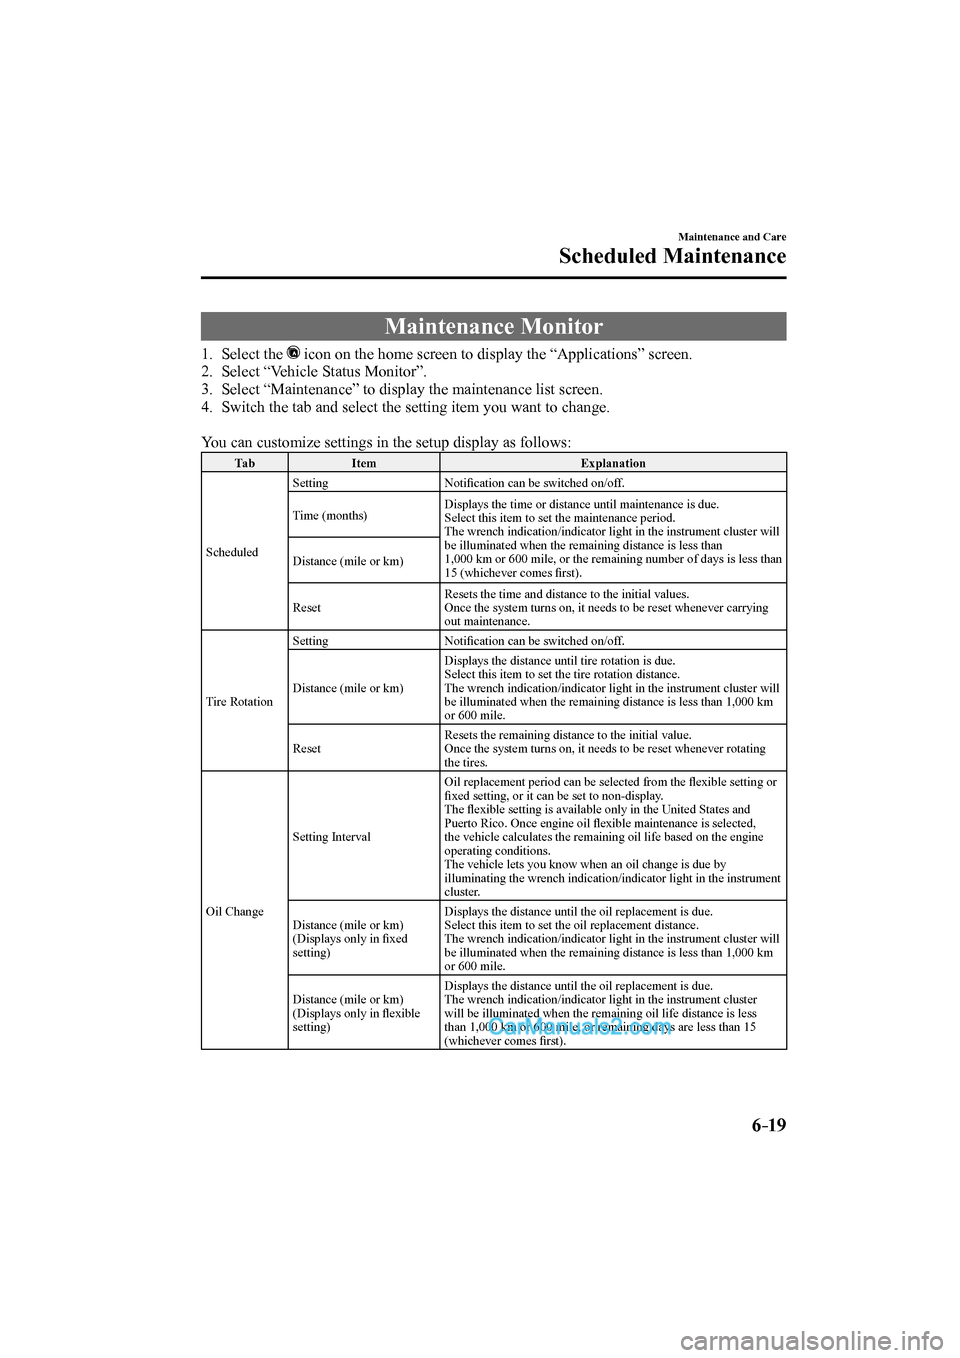
Maintenance Monitor
1. Select the icon on the home screen to display the “Applications” screen.
2. Select “Vehicle Status Monitor”.
3. Select “Maintenance” to display the maintenance list screen.
4. Switch the tab and select the setting item you want to change.
You can customize settings in the setup display as follows:
Tab Item Explanation
Scheduled Setting Notifi cation can be switched on/off.
Time (months) Displays the time or distance until maintenance is due.
Select this item to set the maintenance period.
The wrench indication/indicator light in the instrument cluster will
be illuminated when the remaining distance is less than
1,000 km or 600 mile, or the remaining number of days is less than
15 (whichever comes fi rst). Distance (mile or km)
Reset Resets the time and distance to the initial values.
Once the system turns on, it needs to be reset whenever carrying
out maintenance.
Tire Rotation Setting Notifi cation can be switched on/off.
Distance (mile or km) Displays the distance until tire rotation is due.
Select this item to set the tire rotation distance.
The wrench indication/indicator light in the instrument cluster will
be illuminated when the remaining distance is less than 1,000 km
or 600 mile.
Reset Resets the remaining distance to the initial value.
Once the system turns on, it needs to be reset whenever rotating
the tires.
Oil Change Setting Interval Oil replacement period can be selected from the fl exible setting or
fi xed setting, or it can be set to non-display.
The fl exible setting is available only in the United States and
Puerto Rico. Once engine oil fl exible maintenance is selected,
the vehicle calculates the remaining oil life based on the engine
operating conditions.
The vehicle lets you know when an oil change is due by
illuminating the wrench indication/indicator light in the instrument
cluster.
Distance (mile or km)
(Displays only in fi xed
setting) Displays the distance until the oil replacement is due.
Select this item to set the oil replacement distance.
The wrench indication/indicator light in the instrument cluster will
be illuminated when the remaining distance is less than 1,000 km
or 600 mile.
Distance (mile or km)
(Displays only in fl exible
setting) Displays the distance until the oil replacement is due.
The wrench indication/indicator light in the instrument cluster
will be illuminated when the remaining oil life distance is less
than 1,000 km or 600 mile, or remaining days are less than 15
(whichever comes fi rst).
CX-9_8FS7-EA-16K_Edition2.indb 19CX-9_8FS7-EA-16K_Edition2.indb 192016/12/15 18:35:582016/12/15 18:35:58
Page 440 of 612

6–28
Maintenance and Care
Owner Maintenance
Vehicle Engine Control Unit Reset Procedure
After replacing the engine oil, it is recommended to have a repair shop such as an
Authorized Mazda Dealer perform the initialization (engine oil data resetting) of the
recorded value. If the value recorded by the computer is not initialized, the wrench indicator
light may not turn off or it may turn on earlier than normal.
NOTE
There are two methods for resetting the engine control unit.
1. The procedure described in the following.
2. The procedure described in the maintenance monitor item when the fl exible
maintenance setting is selected. Refer to Maintenance Monitor on page 6-19 .
If either one of the methods is performed, resetting of the engine control unit is completed.
NOTE
The initialization (engine oil data resetting) of the recorded value can be performed using
the following procedure:
1. Switch the ignition OFF.
2. Switch the ignition ON with the dashboard illumination knob pressed, and press and
hold the dashboard illumination knob for about 7 seconds.
Dashboard illumination knob
CX-9_8FS7-EA-16K_Edition2.indb 28CX-9_8FS7-EA-16K_Edition2.indb 282016/12/15 18:36:022016/12/15 18:36:02
Page 452 of 612

6–40
Maintenance and Care
Owner Maintenance
Battery Maintenance
To get the best service from a battery:
Keep it securely mounted.
Keep the top clean and dry.
Keep terminals and connections clean,
tight, and coated with petroleum jelly or
terminal grease.
Rinse off spilled electrolyte immediately
with a solution of water and baking
soda.
If the vehicle will not be used for an
extended time, disconnect the battery
cables and charge the battery every six
weeks.
Battery Replacement
Contact an Authorized Mazda Dealer for a
battery replacement purchase.
Key Battery Replacement
If the buttons on the transmitter are
inoperable and the operation indicator
light does not fl ash, the battery may be
dead.
Replace with a new battery before the
transmitter becomes unusable.
CAUTION
Make sure the battery is installed
correctly. Battery leakage could occur if it
is not installed correctly.
When replacing the battery, be careful
not to touch any of the internal circuitry
and electrical terminals, bend the
electrical terminals, or get dirt in the
transmitter as the transmitter could be
damaged.
There is the danger of explosion if the
battery is not correctly replaced.
Dispose of used batteries according to
the following instructions.
Insulate the plus and minus terminals
of the battery using cellophane or
equivalent tape.
Never disassemble.
Never throw the battery into fi re or
water.
Never deform or crush.
Replace only with the same type battery
(CR2025 or equivalent).
CX-9_8FS7-EA-16K_Edition2.indb 40CX-9_8FS7-EA-16K_Edition2.indb 402016/12/15 18:36:092016/12/15 18:36:09
Page 453 of 612

6–41
Maintenance and Care
Owner Maintenance
The following conditions indicate that the
battery power is low:
The KEY indicator light (green) fl ashes
in the instrument cluster for about 30
seconds after the engine is turned off
(for vehicles with a type A instrument
cluster (page 4-31 ), messages are
displayed in the instrument cluster).
The system does not operate and
the operation indicator light on the
transmitter does not fl ash when the
buttons are pressed.
The system's operational range is
reduced.
Replacing the battery at an Authorized
Mazda Dealer is recommended to prevent
damage to the key. If replacing the battery
by yourself, follow the instruction.
Replacing the key battery
1. Press the knob and pull out the
auxiliary key.
Knob
2. Twist a tape-wrapped fl athead
screwdriver in the direction of the
arrow and open the cover slightly.
Cover
3. Insert the tape-wrapped fl athead
screwdriver into the gap and slide it in
the direction of the arrow.
Cover
Gap
4. Twist the fl athead screwdriver in the
direction of the arrow and remove the
cover.
Cover
CX-9_8FS7-EA-16K_Edition2.indb 41CX-9_8FS7-EA-16K_Edition2.indb 412016/12/15 18:36:092016/12/15 18:36:09
Page 457 of 612

6–45
Maintenance and Care
Owner Maintenance
Replacing a Tire
WARNING
Always use tires that are in good
condition:
Driving with worn tires is dangerous.
Reduced braking, steering, and
traction could result in an accident.
Replace all four tires at the same time:
Replacing just one tire is dangerous. It
could cause poor handling and poor
braking resulting in loss of vehicle
control. Mazda strongly recommends
that you replace all four tires at the
same time.
If a tire wears evenly, a wear indicator will
appear as a solid band across the tread.
Replace the tire when this happens.
New treadTread wear indicator
Worn tread
You should replace the tire before the band
crosses the entire tread.
(With tire pressure monitoring system)
After adjusting the tire pressure,
initialization of the tire pressure
monitoring system is necessary to make
the system operate normally.
Refer to Tire Pressure Monitoring System
Initialization on page 4-153 .
NOTE
Tires degrade over time, even when
they are not being used on the road. It
is recommended that tires generally be
replaced when they are 6 years or older.
Heat caused by hot climates or frequent
high loading conditions can accelerate
the aging process. You should replace the
spare tire when you replace the other road
tires due to the aging of the spare tire. The
period in which the tire was manufactured
(both week and year) is indicated by a
4-digit number.
Refer to Tire Labeling on page 8-24 .
Temporary Spare Tire
Inspect the temporary spare tire at least
monthly to make sure it is properly
infl ated and stored.
NOTE
The temporary spare tire condition
gradually deteriorates even if it has not
been used.
The temporary spare tire is easier to
handle because of its construction which
is lighter and smaller than a conventional
tire. This tire should be used only for an
emergency and only for a short distance.
Use the temporary spare tire only until the
conventional tire is repaired, which should
be as soon as possible.
Refer to Tires on page 9-9 .
CX-9_8FS7-EA-16K_Edition2.indb 45CX-9_8FS7-EA-16K_Edition2.indb 452016/12/15 18:36:112016/12/15 18:36:11
Page 458 of 612

6–46
Maintenance and Care
Owner Maintenance
*Some models.
CAUTION
Do not use your temporary spare tire
rim with a snow tire or a conventional
tire. Neither will properly fi t and could
damage both tire and rim.
The temporary spare tire has a tread life
of less than 5,000 km (3,000 miles). The
tread life may be shorter depending on
driving conditions.
The temporary spare tire is for limited
use, however, if the tread wear solid-
band indicator appears, replace the tire
with the same type of temporary spare
(page 6-45 ).
NOTE
Tires degrade over time, even when
they are not being used on the road. It
is recommended that tires generally be
replaced when they are 6 years or older.
Heat caused by hot climates or frequent
high loading conditions can accelerate
the aging process. You should replace the
spare tire when you replace the other road
tires due to the aging of the spare tire. The
period in which the tire was manufactured
(both week and year) is indicated by a
4-digit number.
Refer to Tire Labeling on page 8-24 .
Replacing a Wheel
WARNING
Always use wheels of the correct size on
your vehicle:
Using a wrong-sized wheel is
dangerous. Braking and handling
could be aff ected, leading to loss of
control and an accident.
CAUTION
A wrong-sized wheel may adversely
aff ect:
Tire fi t
Wheel and bearing life
Ground clearance
Snow-chain clearance
Speedometer calibration
Headlight aim
Bumper height
Tire Pressure Monitoring System *
NOTE
When replacing a wheel, make sure
the new one is the same as the original
factory wheel in diameter, rim width,
and offset (inset/outset).
For details, contact an Authorized
Mazda Dealer.
Proper tire balancing provides the best
riding comfort and helps reduce tread
wear. Out-of-balance tires can cause
vibration and uneven wear, such as
cupping and fl at spots.
CX-9_8FS7-EA-16K_Edition2.indb 46CX-9_8FS7-EA-16K_Edition2.indb 462016/12/15 18:36:122016/12/15 18:36:12
Page 459 of 612

6–47
Maintenance and Care
Owner Maintenance
Light Bulbs
Type A (With Adaptive Front Lighting System (AFS))
Type B (Without Adaptive Front Lighting System (AFS))Rear side-marker lights
Rear turn signal lightsBrake lights
License plate lights
Headlights (Low/High beam)High-mount brake light
Overhead lights (Front)/
Map lights (Front)Luggage compartment light
Vanity mirror lights
Daytime running lights/
Parking lightsTaillights
Ambient lights
Reverse lights
Fog lights
Front turn signal lights
Fog lights
Map lights (Center)Overhead light (Rear)
Rear side-marker lights
Rear turn signal lightsBrake lights
License plate lights
Headlights (Low/High beam)/
Daytime running lightsHigh-mount brake light
Overhead lights (Front)/
Map lights (Front)Luggage compartment light
Vanity mirror lights
Reverse lights
Front turn signal lights
Map lights (Center)Overhead light (Rear)
Parking lights/Front
side-marker lights Front side-marker lights
Some models.
Side turn
signal lights
Side turn
signal lights
Signature wing
illumination
Brake lights/Taillights
Brake lights/Taillights
Ambient lights
CX-9_8FS7-EA-16K_Edition2.indb 47CX-9_8FS7-EA-16K_Edition2.indb 472016/12/15 18:36:122016/12/15 18:36:12
Page 460 of 612

6–48
Maintenance and Care
Owner Maintenance
*Some models.
CAUTION
When removing the lens or lamp unit
using a fl athead screwdriver, make
sure that the fl athead screwdriver does
not contact the interior terminal. If
the fl athead screwdriver contacts the
terminal, a short circuit may occur.
NOTE
To replace the bulb, contact an
Authorized Mazda Dealer.
Use the protective cover and carton for
the replacement bulb to dispose of the
old bulb promptly and out of the reach
of children.
Replacing Exterior Light Bulbs
Headlights (type A), Headlights/Daytime
running lights (type B), Front turn
signal lights (type A), Daytime running
lights/Parking lights (type A), Front
side-marker lights (type A), Signature
wing illumination (type A)
* , Fog lights * ,
Brake lights, Taillights, High-mount
brake light, Side turn signal lights, Rear
side-marker lights
The LED bulb cannot be replaced as a
single unit because it is an integrated unit.
The LED bulb has to be replaced with the
unit. We recommend an Authorized Mazda
Dealer when the replacement is necessary.
Front turn signal lights (type B),
Parking lights/Front side-marker lights
(type B)
NOTE
When replacing a bulb for the front turn
signal lights and parking lights/front
side-marker lights, turn the steering wheel
and change the direction in which the tires
are pointed to the position where the bulb
replacement can be done easily.
Turn the steering wheel after starting the
engine and stop the engine after you fi nish
turning the steering wheel.
1. If you are changing the right bulb, start
the engine, turn the steering wheel
all the way to the right, and turn off
engine. If you are changing the left
bulb, turn the steering wheel to the left,
and turn off engine.
2. Make sure the ignition is switched off,
and the headlight switch is off.
3. Turn the screw counterclockwise and
remove it.
CX-9_8FS7-EA-16K_Edition2.indb 48CX-9_8FS7-EA-16K_Edition2.indb 482016/12/15 18:36:122016/12/15 18:36:12