lock MAZDA MODEL CX-9 2019 (in English) Owner's Manual
[x] Cancel search | Manufacturer: MAZDA, Model Year: 2019, Model line: MODEL CX-9, Model: MAZDA MODEL CX-9 2019Pages: 692
Page 63 of 692

3. Make sure the seatback is securelylatched by pushing it back until it is
fully locked.
4. (Second-row seat)
Remove the head restraint. However,
when installing a backless booster seat,
always install the vehicle head restraint
to the seat where the backless booster
seat is installed.
Refer to Head Restraints on page 2-21.
5. Secure the child-restraint system with
the lap portion of the lap/shoulder belt.
See the manufacturer's instructions on
the child-restraint system for belt
routing instructions.
6. To get the retractor into the automatic
locking mode, pull the shoulder belt
portion of the seat belt until the entire
length of the belt is out of the retractor.7. Push the child-restraint system firmlyinto the vehicle seat. Be sure the belt
retracts as snugly as possible. A
clicking noise from the retractor will
be heard during retraction if the system
is in the automatic locking mode. If the
belt does not lock the seat down tight,
repeat this step.
NOTE
ï‚·Inspect this function before each use
of the child-restraint system. You
should not be able to pull the
shoulder belt out of the retractor
while the system is in the automatic
locking mode. When you remove the
child-restraint system, be sure the
belt fully retracts to return the
system to emergency locking mode
before occupants use the seat belts.
8. If your child-restraint system requires the use of a tether strap, refer to the
manufacturer's instructions to hook
and tighten the tether strap.
Essential Safety Equipment
Child Restraint
2-51
CX-9_8HB2-EA-18G_Edition1 2018-5-11 13:09:27
Page 66 of 692

WA R N I N G
Always move the front passenger seat as
far back as possible if installing a
front-facing child-restraint system on it is
unavoidable:
As your vehicle has front air bags and
doubly so because your vehicle has side air
bags, a front-facing child-restraint system
should be put on the front passenger seat
only when it is unavoidable.
Even if the front passenger air bag
deactivation indicator light illuminates,
always move the seat as far back as
possible, because the force of a deploying
air bag could cause serious injury or death
to the child.
Never use a rear-facing child-restraint
system in the front seat with an air bag
that could deploy:
Rear-facing child-restraint systems on the
front seat are particularly dangerous.
Even in a moderate collision, the
child-restraint system can be hit by a
deploying air bag and moved violently
backward resulting in serious injury or
death to the child. Even though you may
feel assured that the front passenger air
bag will not deploy based on the fact that
the front passenger air bag deactivation
indicator light illuminates, you should not
use a rear-facing child-restraint system in
the front seat.
Do not allow a child or anyone to lean over
or against the side window of a vehicle
with side and curtain air bags:
It is dangerous to allow anyone to lean
over or against the side window, the area
of the front passenger seat, the front and
rear window pillars and the roof edge
along both sides from which the side and
curtain air bags deploy, even if a
child-restraint system is used. The impact
of inflation from a side or curtain air bag
could cause serious injury or death to an
out of position child. Furthermore, leaning
over or against the front door could block
the side and curtain air bags and eliminate
the advantages of supplemental
protection. With the front air bag and the
additional side air bag that comes out of
the front seat, the rear seat is always a
better location for children. Take special
care not to allow a child to lean over or
against the side window, even if the child is
seated in a child-restraint system.
Always remove the head restraint and
install child-restraint system (except when
installing a backless booster seat):
Installing a child-restraint system without
removing the head restraint is dangerous.
The child-restraint system cannot be
installed correctly which may result in
death or injury to the child in a collision.
Always install the head restraint and adjust
it to the appropriate position after
removing the child-restraint system:
Driving with the head restraint removed is
dangerous as impact to the occupant's
head cannot be prevented during
emergency braking or in a collision, which
could result in a serious accident, injury or
death.
Essential Safety Equipment
Child Restraint
2-54
CX-9_8HB2-EA-18G_Edition12018-5-11 13:09:27
Page 67 of 692

Refer to Head Restraints on page 2-21.
Front Passenger's Seat Child-Restraint
System Installation (With Front
Passenger Occupant Classification
System)
1. Make sure the ignition is switched off.
2. Slide the seat as far back as possible.
3. Remove the head restraint. However,
when installing a backless booster seat,
always install the vehicle head restraint
to the seat where the backless booster
seat is installed.
4. Place the child-restraint system on the seat without putti ng your weight on the
seat and fasten the seat belt. See the
manufacturer's instructions on the
child-restraint system for belt routing
instructions.
5. To get the retractor into the automatic
locking mode, pull the shoulder belt
portion of the seat belt until the entire
length of the belt is out of the retractor.
6. Push the child-restraint system firmlyinto the vehicle seat. Be sure the belt
retracts as snugly as possible. A
clicking noise from the retractor will
be heard during retraction if the system
is in automatic lo cking mode. If the
belt does not lock the seat down tight,
repeat the previous step and also this
one.
NOTE
ï‚·Inspect this function before each use
of the child-restraint system. You
should not be able to pull the
shoulder belt out of the retractor
while the system is in the automatic
locking mode. When you remove the
child-restraint system, be sure the
belt fully retracts to return the
system to emergency locking mode
before occupants use the seat belts.
ï‚·Follow the child-restraint system
manufacturer's instructions
carefully.
Depending on the type of
child-restraint system, it may not
employ seat belts which are in
automatic locking mode.
7. Seat your child safely in the
child-restraint system and secure the
child according to the instructions
from the child-restraint system
manufacturer.
Essential Safety Equipment
Child Restraint
2-55
CX-9_8HB2-EA-18G_Edition1 2018-5-11 13:09:27
Page 70 of 692

Make sure there are no seat belts or foreign objects near or around the ISOFIX/LATCH*1
child-restraint system:
Not following the child-restraint system manufacturer's instructions when installing the
child-restraint system is dangerous. If seat belts or a foreign object prevent the child-restraint
system from being securely attached to the ISOFIX/LATCH
*1 lower anchors and the
child-restraint system is installed improperly, the child-restraint system could move in a
sudden stop or collision causing serious injury or death to the child or other occupants. When
installing the child-restraint system, make sure there are no seat belts or foreign objects near
or around the ISOFIX/LATCH
*1 lower anchors. Always follow the child-restraint system
manufacturer's instructions.
*1 ISOFIX (Mexico)/LATCH (Except Mexico)
Installation on second-row outboard
seats
1. First, adjust the front seat to allow clearance between the child-restraint
system and the front seat.
Refer to Adjusting the Driver's Seat on
page 2-5.
Refer to Adjusting the Front
Passenger's Seat on page 2-13.
2. Adjust the second-row seat position using the following procedure.
Fold the second-row seatback
forward.
Raise the second-row seatback until
a click sound is heard and it is locked
in place.
3. If the second-row seat is reclined, return it to the u pright position.
4. Make sure the seatback is securely
latched by pushing it back until it is
fully locked.
5. Expand the area between the seat
bottom and the seatback slightly to
verify the locatio ns of the ISOFIX/
LATCH
*1 lower anchors.
NOTE
ï‚·The markings above the ISOFIX/
LATCH
*1 lower anchors indicate the
locations of the ISOFIX/LATCH
*1
lower anchors for the attachment of
a child-restraint system.
Essential Safety Equipment
Child Restraint
2-58
CX-9_8HB2-EA-18G_Edition1 2018-5-11 13:09:27
Page 97 of 692

3Before Driving
Use of various features, including keys, doors, mirrors and windows.
Keys.................................................... 3-2 Keys.............................................. 3-2
Keyless Entry System................... 3-3
Advanced Keyless Entry
System.................................................3-9 Advanced Keyless Entry System
*.....
...................................................... 3-9
Operational Range...................... 3-10
Doors and Locks.............................. 3-11 Door Locks................................. 3-11
Liftgate....................................... 3-19
Fuel and Emission........................... 3-27 Fuel and Engine Exhaust
Precautions................................. 3-27
Fuel-Filler Lid and Cap.............. 3-30
Mirrors............................................. 3-32 Mirrors........................................ 3-32
Windows........................................... 3-37 Power Windows..........................3-37
Moonroof
*.................................. 3-40
Security System............................... 3-43Modification and Add-On
Equipment...................................3-43
Immobilizer System....................3-43
Theft-Deterrent System
*.............3-45
Driving Tips..................................... 3-47 Break-In Period.......................... 3-47
Saving Fuel and Protection of the
Environment............................... 3-47
Hazardous Driving.... ..................3-48
Floor Mat.................................... 3-49
Rocking the Vehicle....................3-49
Winter Driving............................3-50
Driving In Flooded A rea............ 3-52
Overloading................................ 3-52
Driving on Uneven Road............ 3-53
Turbocharger Information.......... 3-54
Towing.............................................. 3-55 Trailer Towing (U.S.A. and
Canada)....................................... 3-55
Recreational Towing................... 3-63
*Some models.3-1
CX-9_8HB2-EA-18G_Edition1 2018-5-11 13:09:27
Page 99 of 692

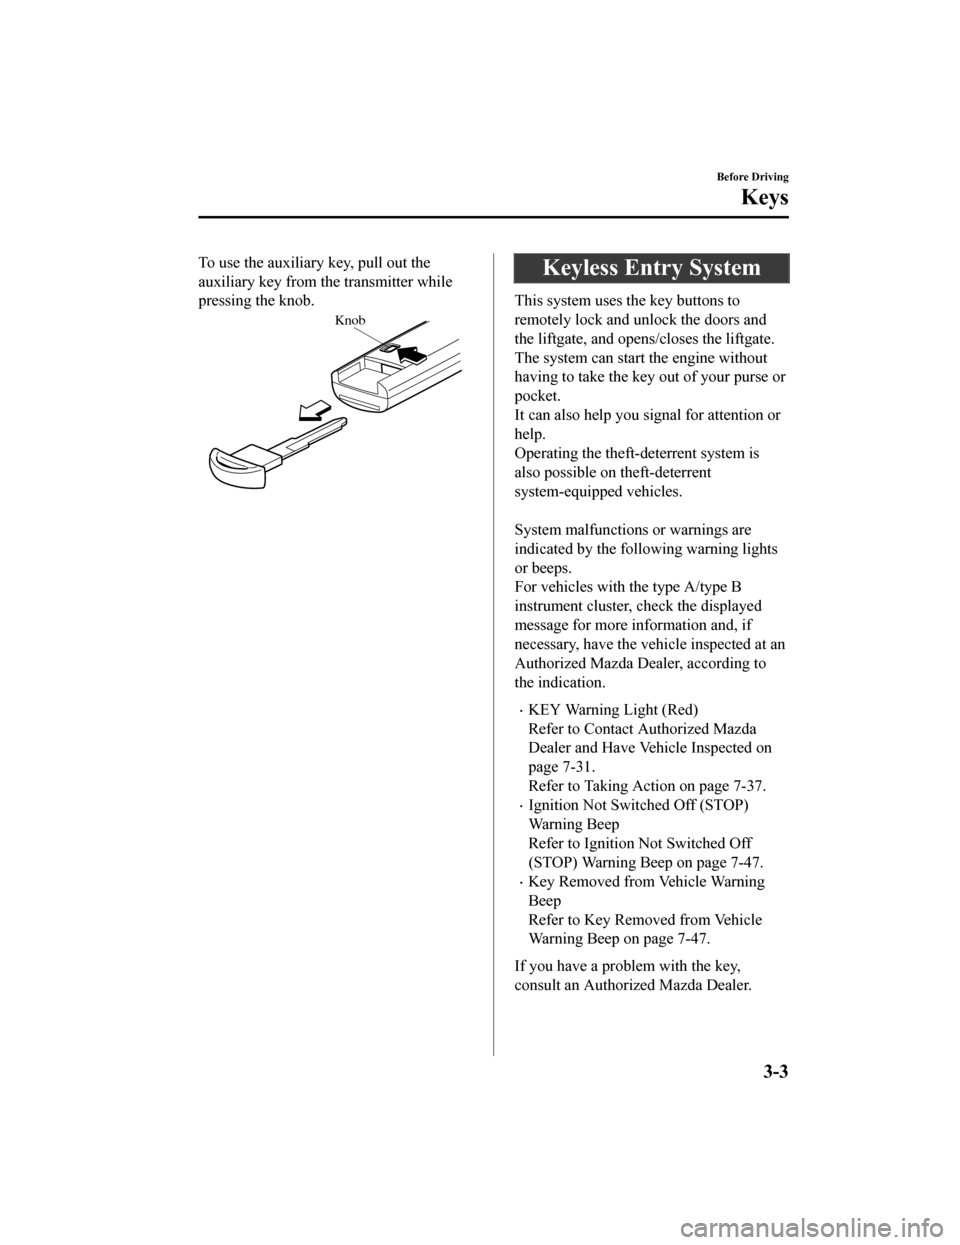
To use the auxiliary key, pull out the
auxiliary key from th e transmitter while
pressing the knob.
Knob
Keyless Entry System
This system uses the key buttons to
remotely lock and unlock the doors and
the liftgate, and opens/closes the liftgate.
The system can start the engine without
having to take the key out of your purse or
pocket.
It can also help you signal for attention or
help.
Operating the theft-deterrent system is
also possible on theft-deterrent
system-equipped vehicles.
System malfunctions or warnings are
indicated by the following warning lights
or beeps.
For vehicles with the type A/type B
instrument cluster, check the displayed
message for more i nformation and, if
necessary, have the vehicle inspected at an
Authorized Mazda Dealer, according to
the indication.
ï‚·KEY Warning Light (Red)
Refer to Contact Authorized Mazda
Dealer and Have Vehicle Inspected on
page 7-31.
Refer to Taking Action on page 7-37.
ï‚·Ignition Not Switched Off (STOP)
Warning Beep
Refer to Ignition Not Switched Off
(STOP) Warning Beep on page 7-47.
ï‚·Key Removed from Vehicle Warning
Beep
Refer to Key Removed from Vehicle
Warning Beep on page 7-47.
If you have a problem with the key,
consult an Authorized Mazda Dealer.
Before Driving
Keys
3-3
CX-9_8HB2-EA-18G_Edition1 2018-5-11 13:09:27
Page 100 of 692

If your key is lost or stolen, consult an
Authorized Mazda Dealer as soon as
possible for a replacement and to make the
lost or stolen key inoperative.
CAUTION
Radio equipment like this is governed by
laws in the United States.
Changes or modifications not expressly
approved by the party responsible for
compliance could void the user's authority
to operate the equipment.
NOTE
ï‚·The keyless entry system operation may
vary due to local conditions.
ï‚·The keyless entry system is fully
operational (door/liftgate lock/unlock)
when the ignition is switched off. The
system does not operate if the ignition is
switched to any position other than off.
ï‚·If the key does not operate when
pressing a button or the operational
range becomes too small, the battery
may be weak. To install a new battery,
refer to Key Battery Replacement (page
6-36).
ï‚·Battery life is about 1 year. Replace the
battery with a new one if the KEY
indicator light (green) flashes in the
instrument cluster (for vehicles with a
type A/type B instrument cluster (page
4-12, 4-29), messages are displayed
in the instrument cluster). Replacing the
battery about once a year is
recommended because the KEY warning
light/indicator light may not illuminate
or flash depending on the rate of battery
depletion.
ï‚·Additional keys can be obtained at an
Authorized Mazda Dealer. Up to 6 keys
can be used with the keyless functions
per vehicle. Bring all keys to an
Authorized Mazda Dealer when
additional keys are required.
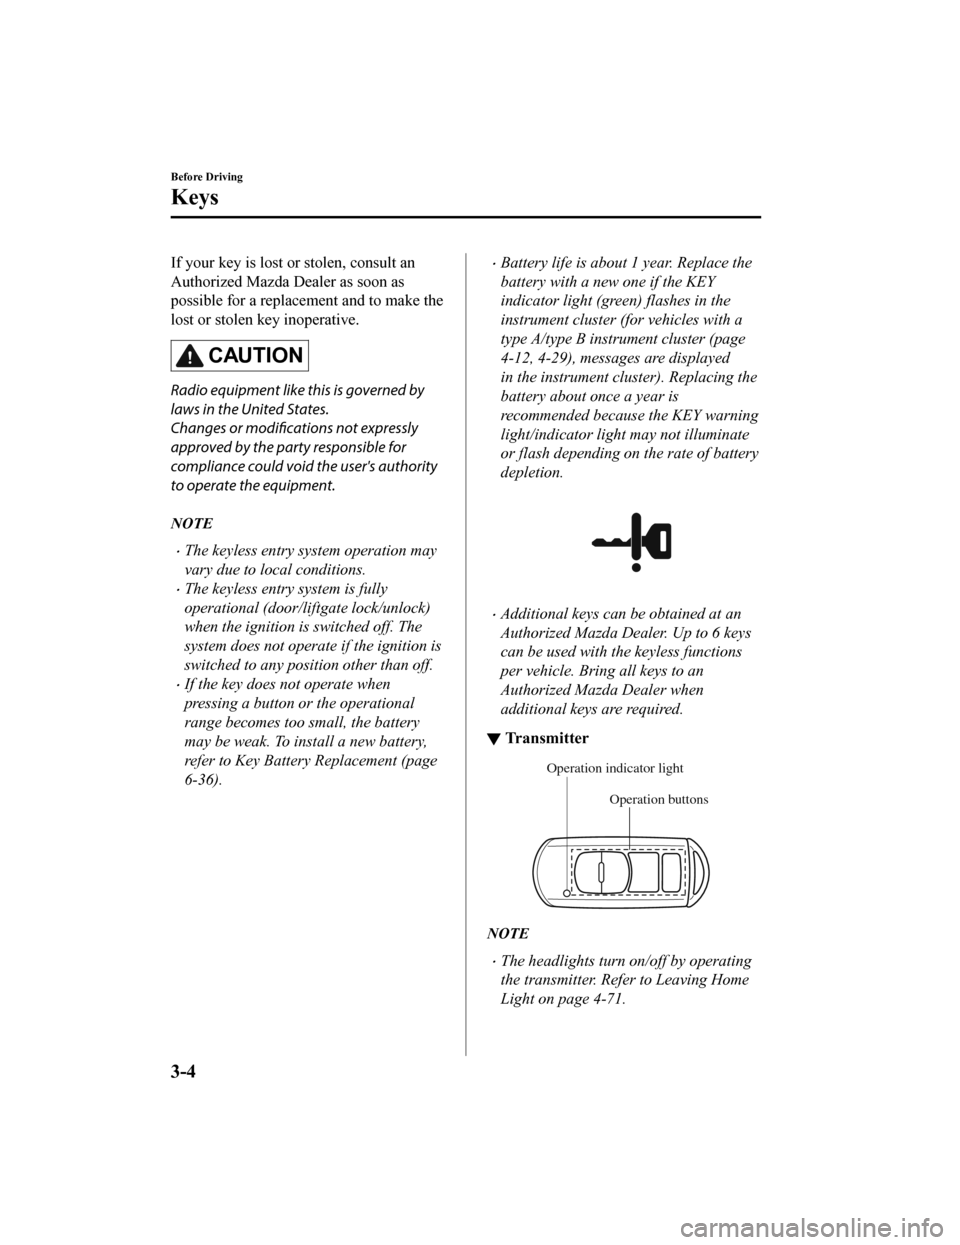
â–¼Tr a n s m i t t e r
Operation buttons
Operation indicator light
NOTE
ï‚·The headlights turn on/off by operating
the transmitter. Refer to Leaving Home
Light on page 4-71.
Before Driving
Keys
3-4
CX-9_8HB2-EA-18G_Edition1
2018-5-11 13:09:27
Page 101 of 692

ï‚·(With theft-deterrent system)
The hazard warning lights flash when
the theft-deterrent system is armed or
turned off.
Refer to Theft-Deterrent System on page
3-45.
ï‚·(With the advanced keyless function)
A beep sound can be heard for
confirmation when the doors and the
liftgate are locked/unlocked using the
key. If you prefer, the beep sound can be
turned off.
The volume of the beep sound can also
be changed.
Refer to Personalization Features on
page 9-10.
Use the following procedure to change the
setting.
1. Switch the ignition off and close all of the doors and the liftgate.
2. Open the driver's door.
3. Within 30 seconds of opening the driver's door, press and hold the LOCK
button on the key for 5 seconds or
longer (All of the doors and the liftgate
are locked and unlocked when the
LOCK button on the key is pressed and
held for 5 seconds.).
The beep sound activates at the
currently set volume. The setting
changes each time the LOCK button on
the key is pressed and the beep sound
activates at the set volume. (If the beep
sound has been set to not activate, it
will not activate.)
4. The setting change is completed by
doing any one of the following:
ï‚·Switching the ign ition to ACC or
ON.
ï‚·Closing the driver's door.
ï‚·Opening the liftgate.
ï‚·Not operating the key for ten
seconds.
ï‚·Pressing any button except the
LOCK button on the key.
ï‚·Pressing a request switch.
The operation indicator light flashes when
the buttons are pressed.
Lock button
To lock the doors and the liftgate, press the
lock button and the hazard warning lights
will flash once.
(With the advanced k eyless function)
A beep sound will be heard once.
To confirm that all doors and the liftgate
have been locked, press the lock button
again within 5 seconds. If they are closed
and locked, the horn will sound.
NOTE
ï‚·The doors and the liftgate can be locked
by pressing the lock button while any
other door or the liftgate is open. The
hazard warning lights will not flash.
When the lock button is pressed while
any door is open and then the door is
closed, all the doors and the liftgate are
locked.
ï‚·Confirm that all doors and the liftgate
are locked visually or audibly by use of
the double click.
ï‚·Make sure all doors and the liftgate are
locked after pressing the button.
Before Driving
Keys
3-5
CX-9_8HB2-EA-18G_Edition1 2018-5-11 13:09:27
Page 102 of 692

ï‚·(With theft-deterrent system)
When the doors are locked by pressing
the lock button on the key while the
theft-deterrent system is armed, the
hazard warning lights will flash once to
indicate that the system is armed.
Unlock button
To unlock the driver's door, press the
unlock button and the hazard warning
lights will flash twice.
(With the advanced keyless function)
A beep sound will be heard twice.
To unlock all doors and the liftgate, press
the unlock button again within three
seconds and two more beep sounds will be
heard.
NOTE
ï‚·The system can be set to unlock all
doors by performing a single operation.
Refer to Personalization Features on
page 9-10.
Use the following procedure to change
the setting.
1. Switch the ignition off and close all of the doors and the liftgate.
2. Open the driver's door.
3. Within 30 seconds of opening the driver's door, press and hold the
UNLOCK button on the key for 5
seconds or longer (the sound of the
doors locking/unlocking can be
heard).
After this, the system switches the
setting each time the UNLOCK
button is pressed (the sound of the
doors locking/unlocking can be
heard).
4. The setting change is completed by doing any one of the following:
ï‚·Switching the igni tion to ACC or
ON.
ï‚·Closing the driver's door.
ï‚·Opening the liftgate.
ï‚·Not operating the key for ten
seconds.
ï‚·Pressing any button except the
UNLOCK button on the key.
ï‚·Pressing a request switch.
ï‚·(Auto re-lock function)
After unlocking with the key, all doors
and the liftgate will automatically lock if
any of the following operations are not
performed within about 60 seconds. If
your vehicle has a theft-deterrent
system, the hazard warning lights will
flash for confirmation.
The time required for the doors to lock
automatically can be changed.
Refer to Personalization Features on
page 9-10.
ï‚·A door or the liftgate is opened.
ï‚·The ignition is switched to any
position other than off.
ï‚·(With theft-deterrent system)
When the doors are unlocked by
pressing the unlock button on the key
while the theft-deterrent system is turned
off, the hazard warning lights will flash
twice to indicate that the system is
turned off.
Before Driving
Keys
3-6
CX-9_8HB2-EA-18G_Edition1 2018-5-11 13:09:27
Page 104 of 692

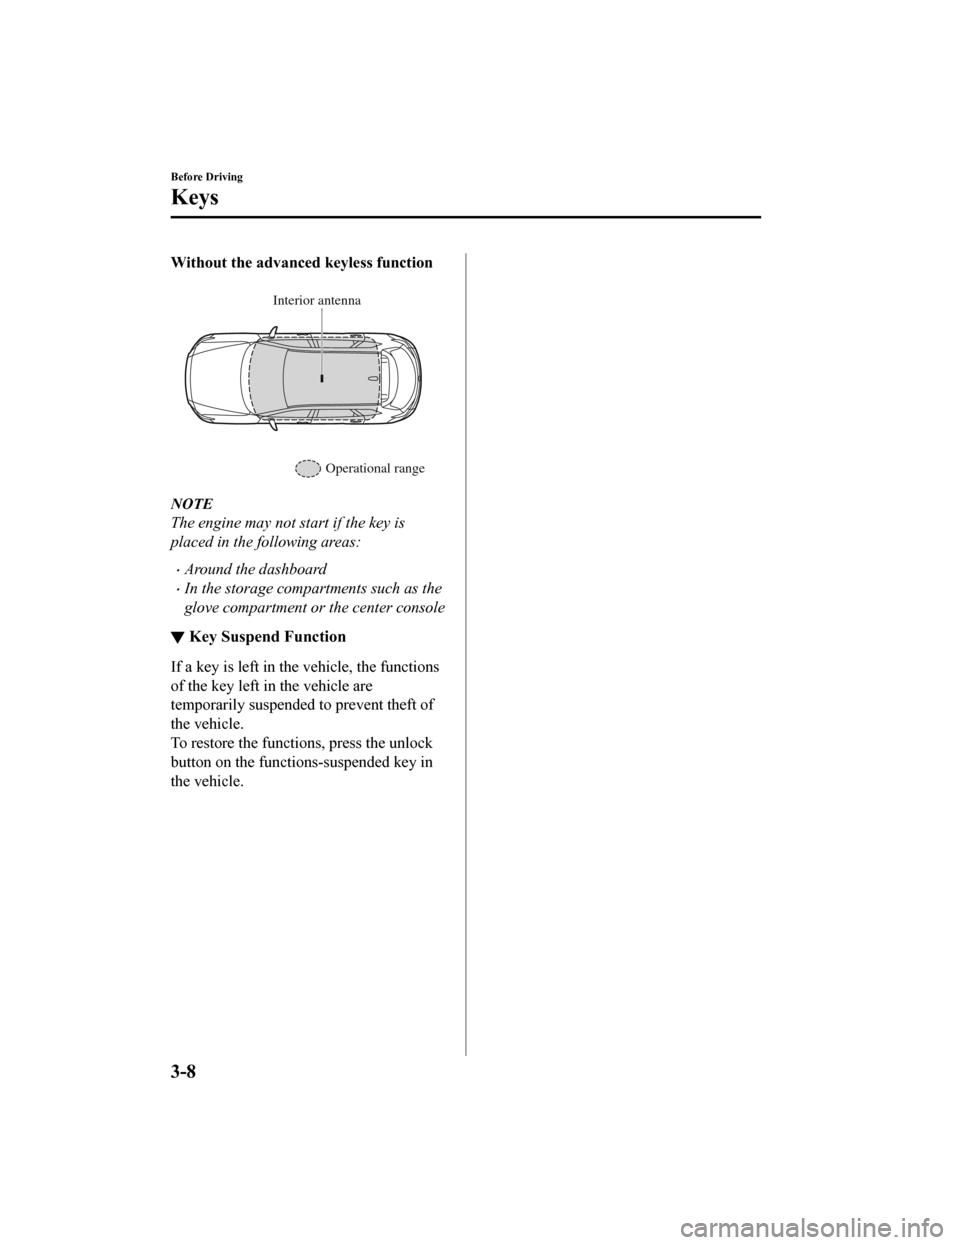
Without the advanced keyless function
Interior antennaOperational range
NOTE
The engine may not start if the key is
placed in the following areas:
ï‚·Around the dashboard
ï‚·In the storage compartments such as the
glove compartment or the center console
â–¼Key Suspend Function
If a key is left in the v
ehicle, the functions
of the key left in the vehicle are
temporarily suspended to prevent theft of
the vehicle.
To restore the functions, press the unlock
button on the functions-suspended key in
the vehicle.
Before Driving
Keys
3-8
CX-9_8HB2-EA-18G_Edition1 2018-5-11 13:09:27