turn signal MAZDA MODEL MAZDASPEED 3 2009 (in English) User Guide
[x] Cancel search | Manufacturer: MAZDA, Model Year: 2009, Model line: MODEL MAZDASPEED 3, Model: MAZDA MODEL MAZDASPEED 3 2009Pages: 412, PDF Size: 6.18 MB
Page 183 of 412
Black plate (183,1)
Horn
To sound the horn, press themark on
the steering wheel.
Hazard Warning Flasher
The hazard warning lights should always
be used when you stop on or near a
roadway in an emergency.
The hazard warning lights warn other
drivers that your vehicle is a traffic hazard
and that they must take extreme caution
when near it.
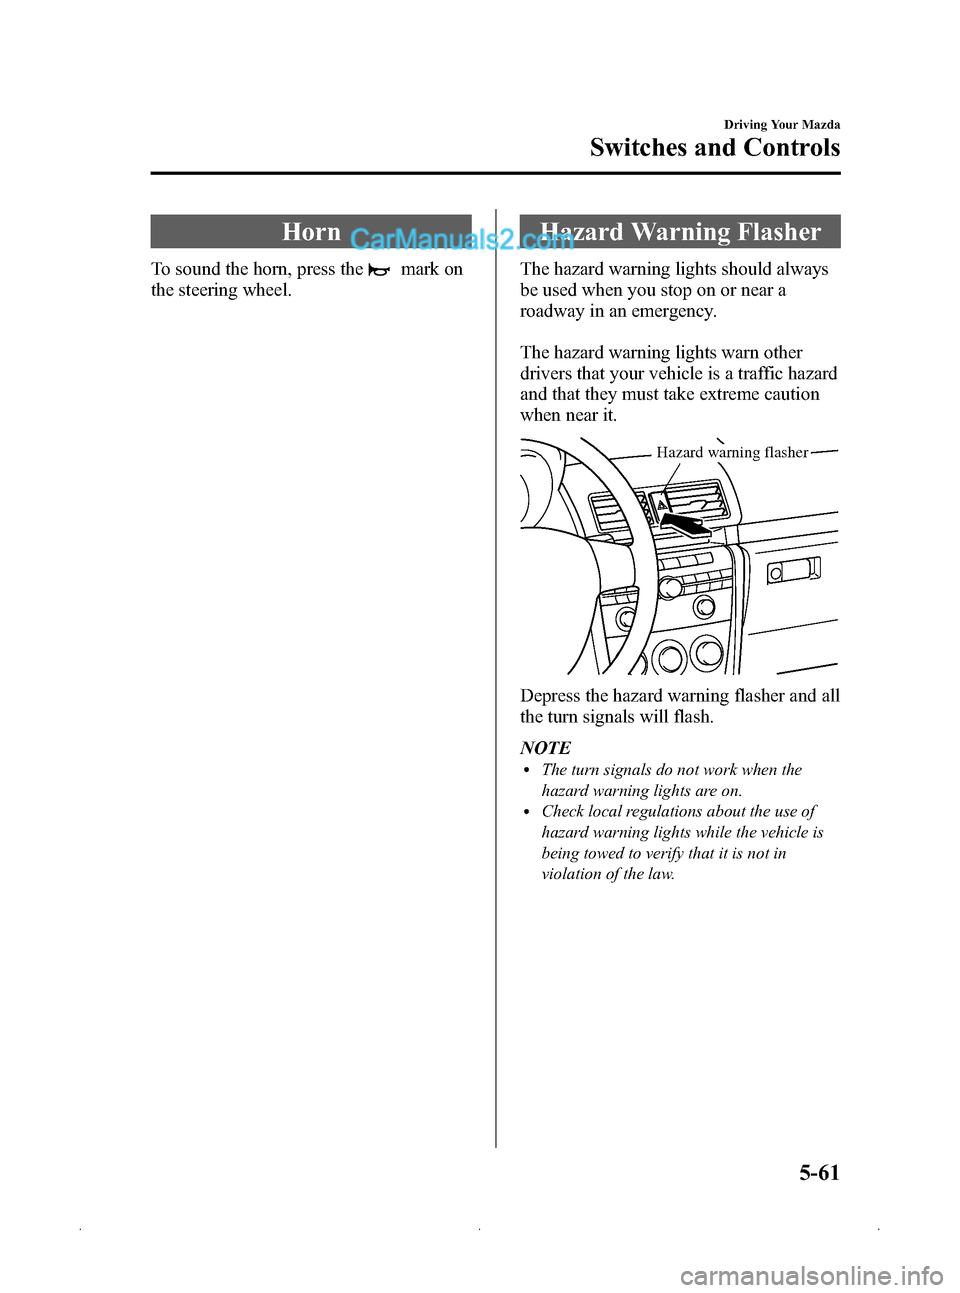
Hazard warning flasher
Depress the hazard warning flasher and all
the turn signals will flash.
NOTE
lThe turn signals do not work when the
hazard warning lights are on.
lCheck local regulations about the use of
hazard warning lights while the vehicle is
being towed to verify that it is not in
violation of the law.
Driving Your Mazda
Switches and Controls
5-61
Mazda3_8Z87-EA-08F_Edition1 Page183
Monday, May 19 2008 9:57 AM
Form No.8Z87-EA-08F
Page 203 of 412
Black plate (203,1)
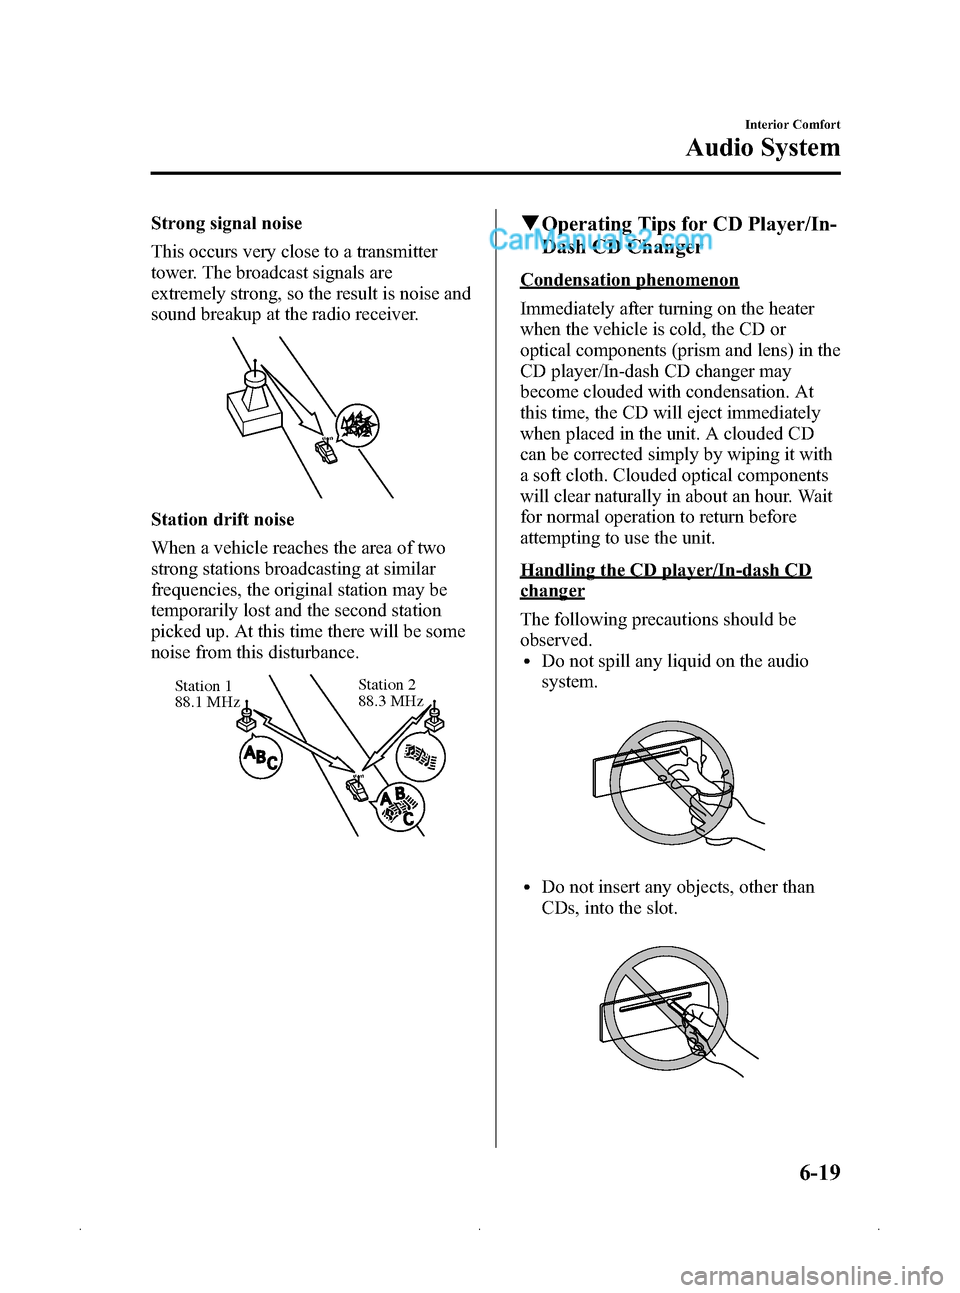
Strong signal noise
This occurs very close to a transmitter
tower. The broadcast signals are
extremely strong, so the result is noise and
sound breakup at the radio receiver.
Station drift noise
When a vehicle reaches the area of two
strong stations broadcasting at similar
frequencies, the original station may be
temporarily lost and the second station
picked up. At this time there will be some
noise from this disturbance.
Station 2
88.3 MHz
Station 1
88.1 MHz
q
Operating Tips for CD Player/In-
Dash CD Changer
Condensation phenomenon
Immediately after turning on the heater
when the vehicle is cold, the CD or
optical components (prism and lens) in the
CD player/In-dash CD changer may
become clouded with condensation. At
this time, the CD will eject immediately
when placed in the unit. A clouded CD
can be corrected simply by wiping it with
a soft cloth. Clouded optical components
will clear naturally in about an hour. Wait
for normal operation to return before
attempting to use the unit.
Handling the CD player/In-dash CD
changer
The following precautions should be
observed.
lDo not spill any liquid on the audio
system.
lDo not insert any objects, other than
CDs, into the slot.
Interior Comfort
Audio System
6-19
Mazda3_8Z87-EA-08F_Edition1 Page203
Monday, May 19 2008 9:57 AM
Form No.8Z87-EA-08F
Page 214 of 412
Black plate (214,1)
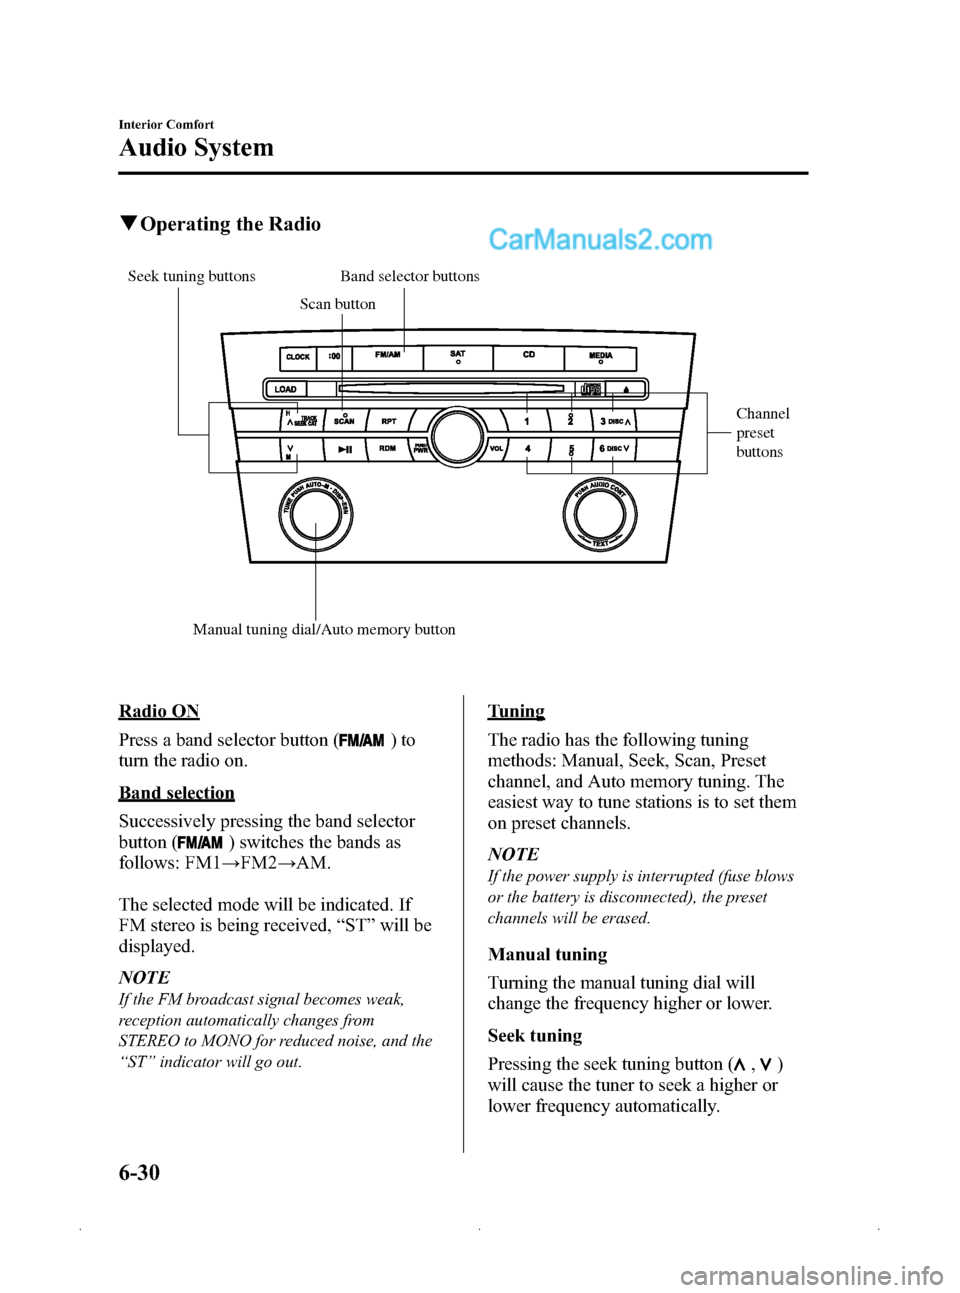
qOperating the Radio
Channel
preset
buttons
Manual tuning dial/Auto memory button Scan button
Band selector buttons
Seek tuning buttons
Radio ON
Press a band selector button (
)to
turn the radio on.
Band selection
Successively pressing the band selector
button (
) switches the bands as
follows: FM1 →FM2 →AM.
The selected mode will be indicated. If
FM stereo is being received, “ST ”will be
displayed.
NOTE
If the FM broadcast signal becomes weak,
reception automatically changes from
STEREO to MONO for reduced noise, and the
“ ST ”indicator will go out.
Tuning
The radio has the following tuning
methods: Manual, Seek, Scan, Preset
channel, and Auto memory tuning. The
easiest way to tune stations is to set them
on preset channels.
NOTE
If the power supply is interrupted (fuse blows
or the battery is disconnected), the preset
channels will be erased.
Manual tuning
Turning the manual tuning dial will
change the frequency higher or lower.
Seek tuning
Pressing the seek tuning button (
,)
will cause the tuner to seek a higher or
lower frequency automatically.
6-30
Interior Comfort
Audio System
Mazda3_8Z87-EA-08F_Edition1 Page214
Monday, May 19 2008 9:57 AM
Form No.8Z87-EA-08F
Page 220 of 412
Black plate (220,1)
lValid credit card information (type,
number, expiration date)
When you are ready to receive the on-air
activation signals you will be instructed
(for activation via phone) to turn on your
tuner, have the antenna pointed skyward,
and to set the channel to channel 184.
Once the signal is sent from the national
studio it may take up to 10 minutes to be
received by your unit.
NOTE
On-air activation is completed after the
procedure, in most cases from 10 seconds to
10 minutes.
*ESN: Electronic Serial Number
SIRIUS operation
All operations of the satellite radio are
conducted by means of the audio unit.
SIRIUS radio mode selection
When the satellite button is pressed during
ACC ON, it will play the last SIRIUS
channel in use before the mode was
switched over to another mode or the
power was turned off.
When the satellite button is pressed in a
mode other than the SIRIUS mode, the
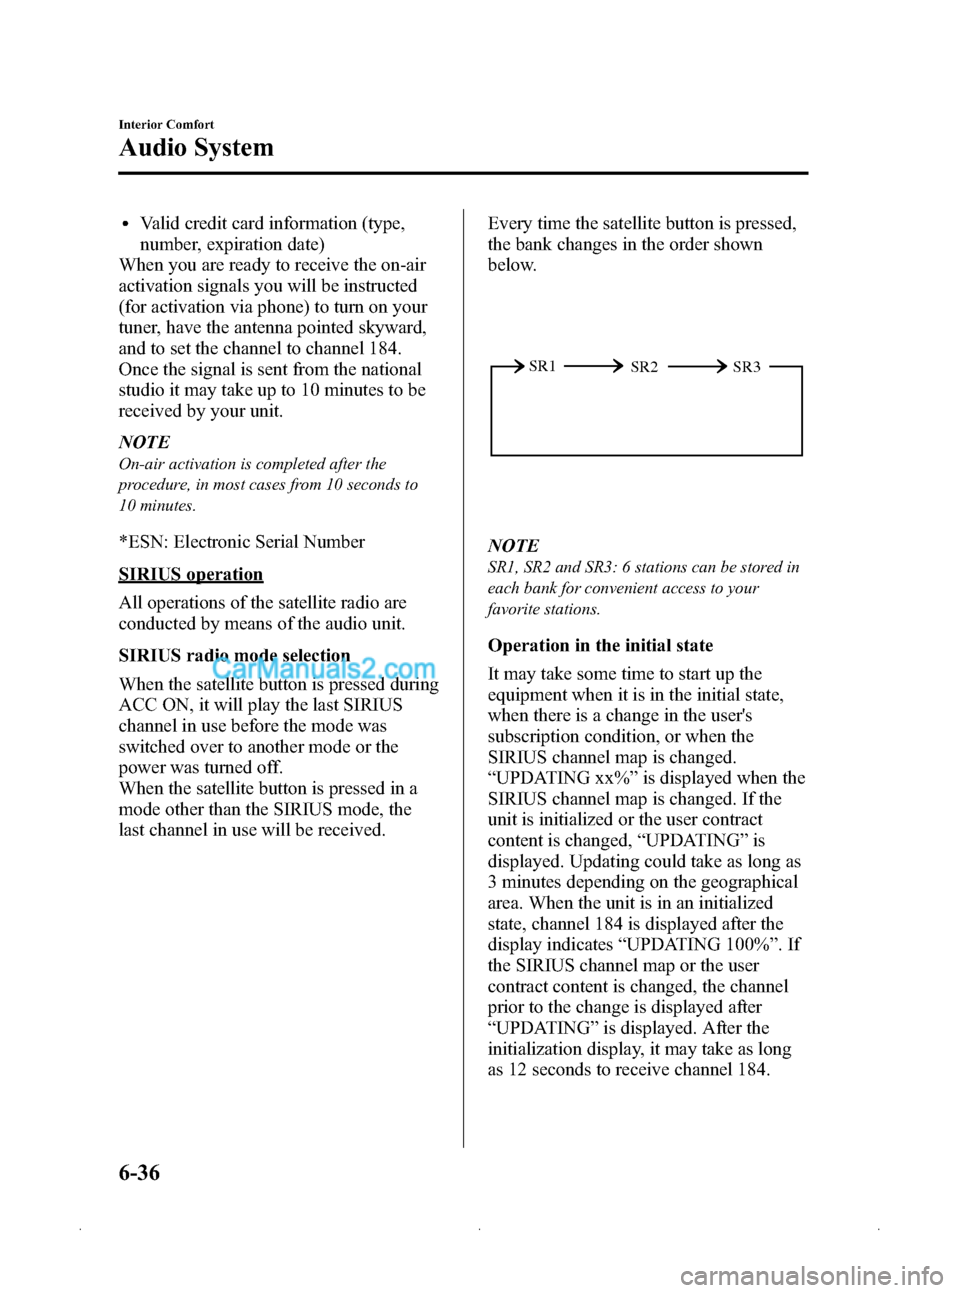
last channel in use will be received. Every time the satellite button is pressed,
the bank changes in the order shown
below.
SR2
SR1
SR3
NOTE
SR1, SR2 and SR3: 6 stations can be stored in
each bank for convenient access to your
favorite stations.
Operation in the initial state
It may take some time to start up the
equipment when it is in the initial state,
when there is a change in the user's
subscription condition, or when the
SIRIUS channel map is changed.
“UPDATING xx% ”is displayed when the
SIRIUS channel map is changed. If the
unit is initialized or the user contract
content is changed, “UPDATING ”is
displayed. Updating could take as long as
3 minutes depending on the geographical
area. When the unit is in an initialized
state, channel 184 is displayed after the
display indicates “UPDATING 100% ”.If
the SIRIUS channel map or the user
contract content is changed, the channel
prior to the change is displayed after
“ UPDATING ”is displayed. After the
initialization display, it may take as long
as 12 seconds to receive channel 184.
6-36
Interior Comfort
Audio System
Mazda3_8Z87-EA-08F_Edition1 Page220
Monday, May 19 2008 9:57 AM
Form No.8Z87-EA-08F
Page 264 of 412

Black plate (264,1)
Parking in an Emergency
The hazard warning lights should always
be used when you stop on or near a
roadway in an emergency.
The hazard warning lights warn other
drivers that your vehicle is a traffic hazard
and that they must take extreme caution
when near it.
Depress the hazard warning flasher and all
the turn signals will flash.
NOTE
lThe turn signals do not work when the
hazard warning lights are on.
lCheck local regulations about the use of
hazard warning lights while the vehicle is
being towed to verify that it is not in
violation of the law.
7-2
In Case of an Emergency
Parking in an Emergency
Mazda3_8Z87-EA-08F_Edition1 Page264
Monday, May 19 2008 9:58 AM
Form No.8Z87-EA-08F
Page 270 of 412
Black plate (270,1)
Changing a Flat Tire
NOTE
If the following occurs while driving, it could
indicate a flat tire.
lSteering becomes difficult.lThe vehicle begins to vibrate excessively.lThe vehicle pulls in one direction.
If you have a flat tire, drive slowly to a
level spot that is well off the road and out
of the way of traffic to change the tire.
Stopping in traffic or on the shoulder of a
busy road is dangerous.
WARNING
Be sure to follow the directions for
changing a tire, and never get under a
vehicle that is supported only by a jack:Changing a tire is dangerous if not
done properly. The vehicle can slip off
the jack and seriously injure
someone.
Never allow anyone inside a vehicle
supported by a jack: Allowing someone to remain in a
vehicle supported by a jack is
dangerous. The occupant could cause
the vehicle to fall resulting in serious
injury.
CAUTION
(With Tire Pressure Monitoring
System)
The wheels equipped on your Mazda
are specially designed for installation
of the tire pressure sensors. Do not
use non-genuine wheels, otherwise it
may not be possible to install the tire
pressure sensors. NOTE
lMake sure the jack is well lubricated before
using it.
(With Tire Pressure Monitoring System)
lBe sure to register the tire pressure sensor
ID signal code whenever tires or wheels are
changed (page 5-31).
1. Park on a level surface off the right-of- way and firmly set the parking brake.
2. Put a vehicle with an automatic transaxle in Park (P), a manual
transaxle in Reverse (R) or 1, and turn
off the engine.
3. Turn on the hazard warning flasher.
4. Have everyone get out of the vehicle and away from the vehicle and traffic.
5. Remove the jack, tool, and spare tire (page 7-3).
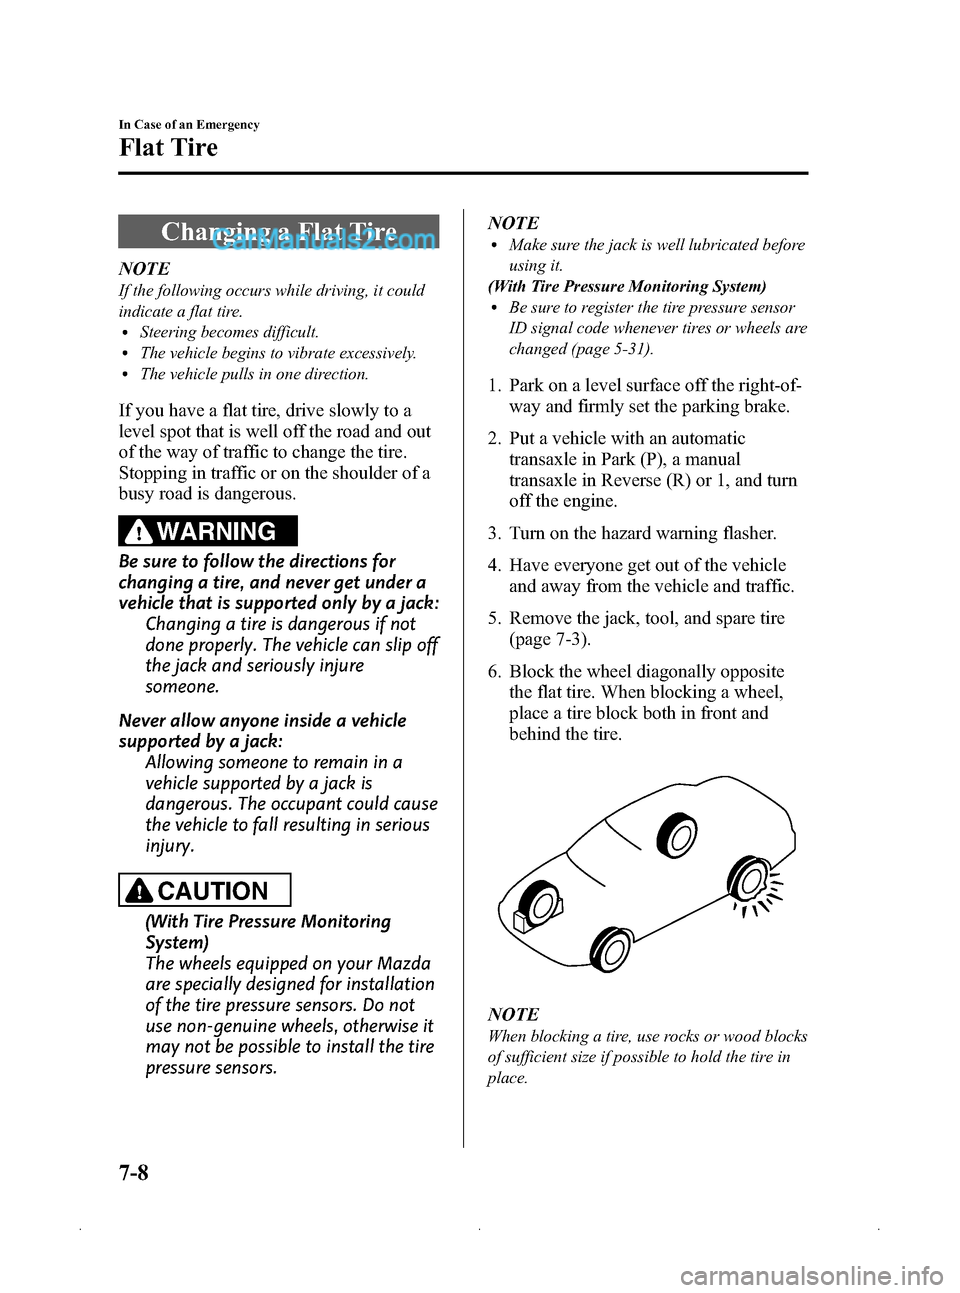
6. Block the wheel diagonally opposite the flat tire. When blocking a wheel,
place a tire block both in front and
behind the tire.
NOTE
When blocking a tire, use rocks or wood blocks
of sufficient size if possible to hold the tire in
place.
7-8
In Case of an Emergency
Flat Tire
Mazda3_8Z87-EA-08F_Edition1 Page270
Monday, May 19 2008 9:58 AM
Form No.8Z87-EA-08F
Page 325 of 412
Black plate (325,1)
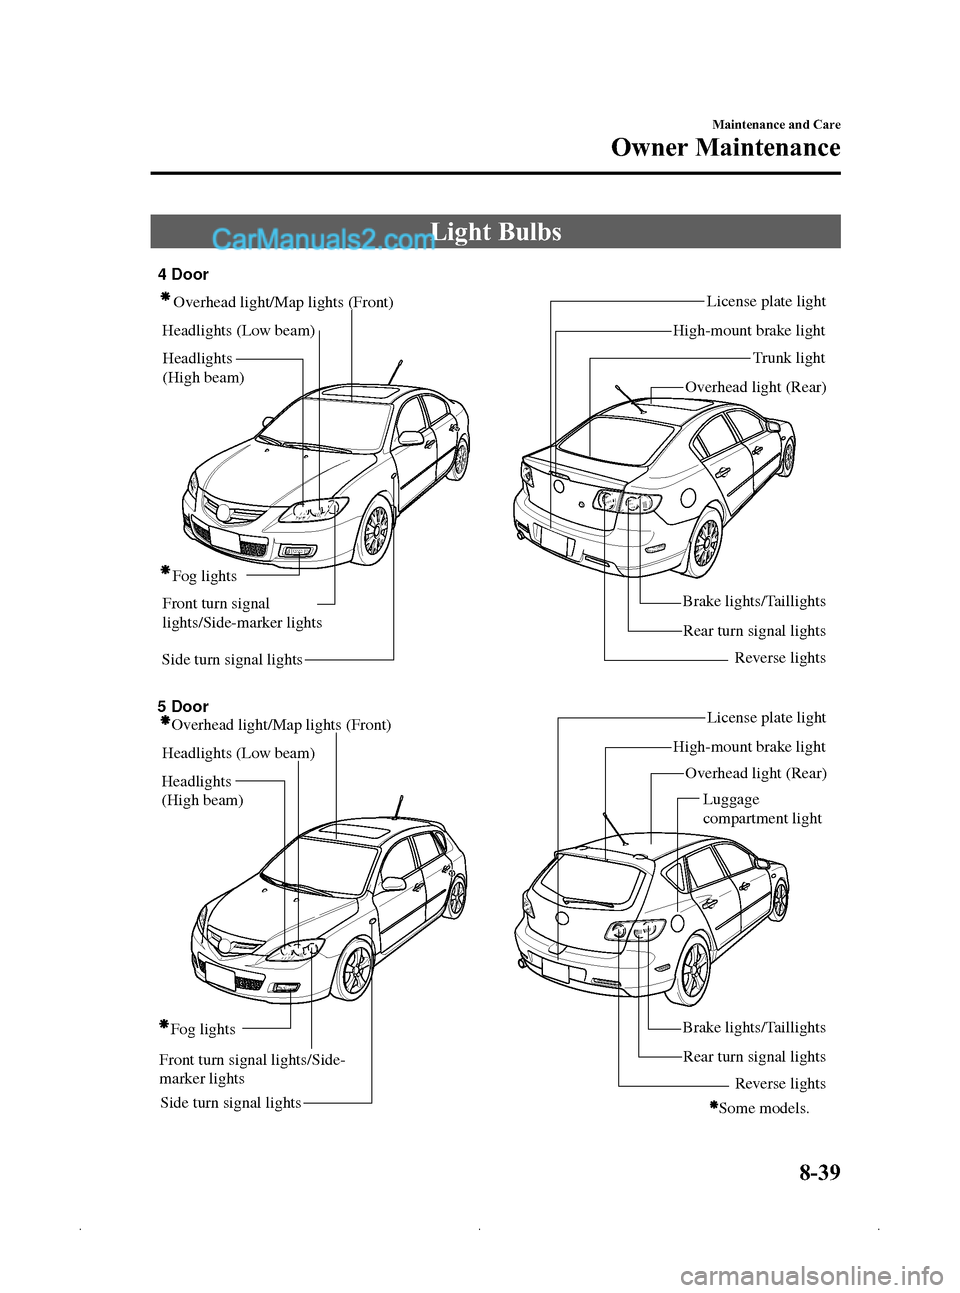
Light Bulbs
Side turn signal lightsRear turn signal lightsLicense plate light
Overhead light/Map lights (Front)
Headlights (Low beam)
Fog lights Brake lights/Taillights
Reverse lights
High-mount brake light
Trunk light
4 Door
5 Door Overhead light (Rear)
Overhead light/Map lights (Front)
Headlights (Low beam)
Side turn signal lights Fog lights
License plate light
High-mount brake light Overhead light (Rear)
Rear turn signal lights
Brake lights/Taillights
Reverse lights
Some models.
Front turn signal lights/Side-
marker lightsHeadlights
(High beam)
Front turn signal
lights/Side-marker lights
Headlights
(High beam) Luggage
compartment light
Maintenance and Care
Owner Maintenance
8-39
Mazda3_8Z87-EA-08F_Edition1 Page325
Monday, May 19 2008 9:58 AM
Form No.8Z87-EA-08F
Page 329 of 412
Black plate (329,1)
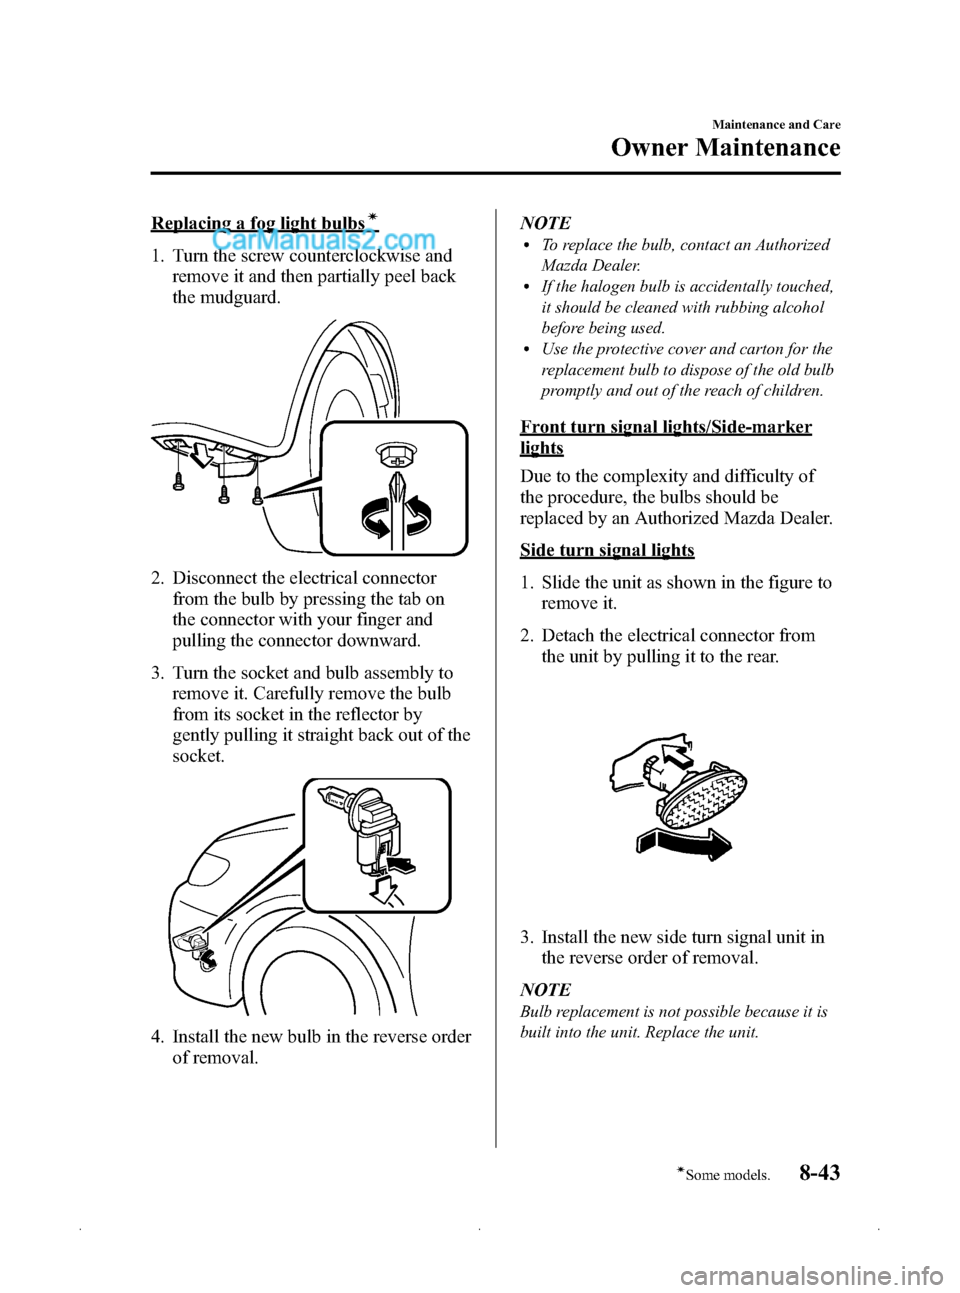
Replacing a fog light bulbsí
1. Turn the screw counterclockwise andremove it and then partially peel back
the mudguard.
2. Disconnect the electrical connector
from the bulb by pressing the tab on
the connector with your finger and
pulling the connector downward.
3. Turn the socket and bulb assembly to remove it. Carefully remove the bulb
from its socket in the reflector by
gently pulling it straight back out of the
socket.
4. Install the new bulb in the reverse order
of removal. NOTE
lTo replace the bulb, contact an Authorized
Mazda Dealer.
lIf the halogen bulb is accidentally touched,
it should be cleaned with rubbing alcohol
before being used.
lUse the protective cover and carton for the
replacement bulb to dispose of the old bulb
promptly and out of the reach of children.
Front turn signal lights/Side-marker
lights
Due to the complexity and difficulty of
the procedure, the bulbs should be
replaced by an Authorized Mazda Dealer.
Side turn signal lights
1. Slide the unit as shown in the figure to
remove it.
2. Detach the electrical connector from the unit by pulling it to the rear.
3. Install the new side turn signal unit inthe reverse order of removal.
NOTE
Bulb replacement is not possible because it is
built into the unit. Replace the unit.
Maintenance and Care
Owner Maintenance
8-43íSome models.
Mazda3_8Z87-EA-08F_Edition1 Page329
Monday, May 19 2008 9:58 AM
Form No.8Z87-EA-08F
Page 331 of 412
Black plate (331,1)
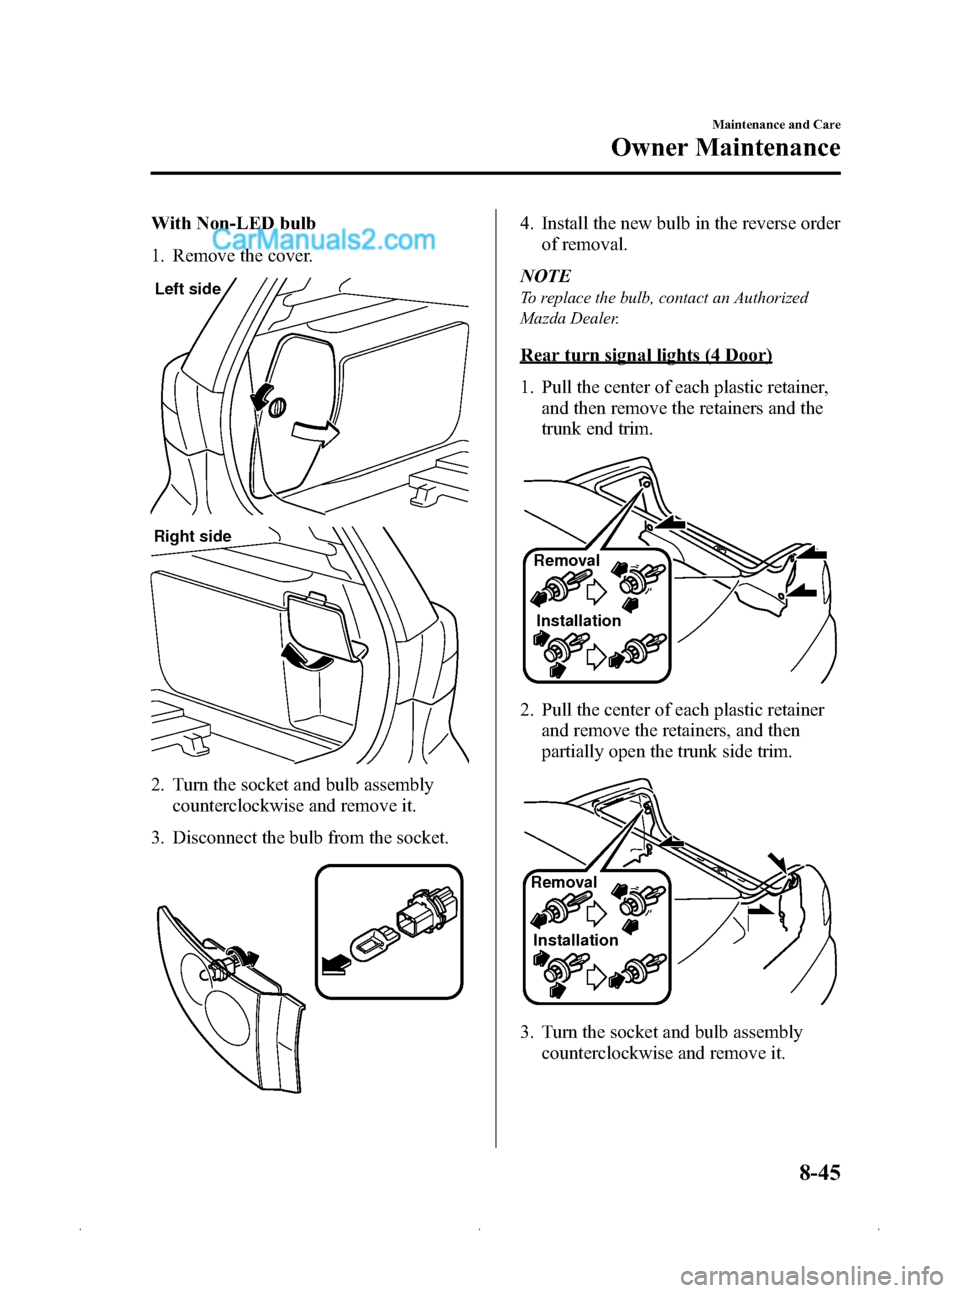
With Non-LED bulb
1. Remove the cover.
Left side
Right side
2. Turn the socket and bulb assemblycounterclockwise and remove it.
3. Disconnect the bulb from the socket.
4. Install the new bulb in the reverse order of removal.
NOTE
To replace the bulb, contact an Authorized
Mazda Dealer.
Rear turn signal lights (4 Door)
1. Pull the center of each plastic retainer, and then remove the retainers and the
trunk end trim.
Removal
Installation
2. Pull the center of each plastic retainer and remove the retainers, and then
partially open the trunk side trim.
Removal
Installation
3. Turn the socket and bulb assembly counterclockwise and remove it.
Maintenance and Care
Owner Maintenance
8-45
Mazda3_8Z87-EA-08F_Edition1 Page331
Monday, May 19 2008 9:58 AM
Form No.8Z87-EA-08F
Page 332 of 412
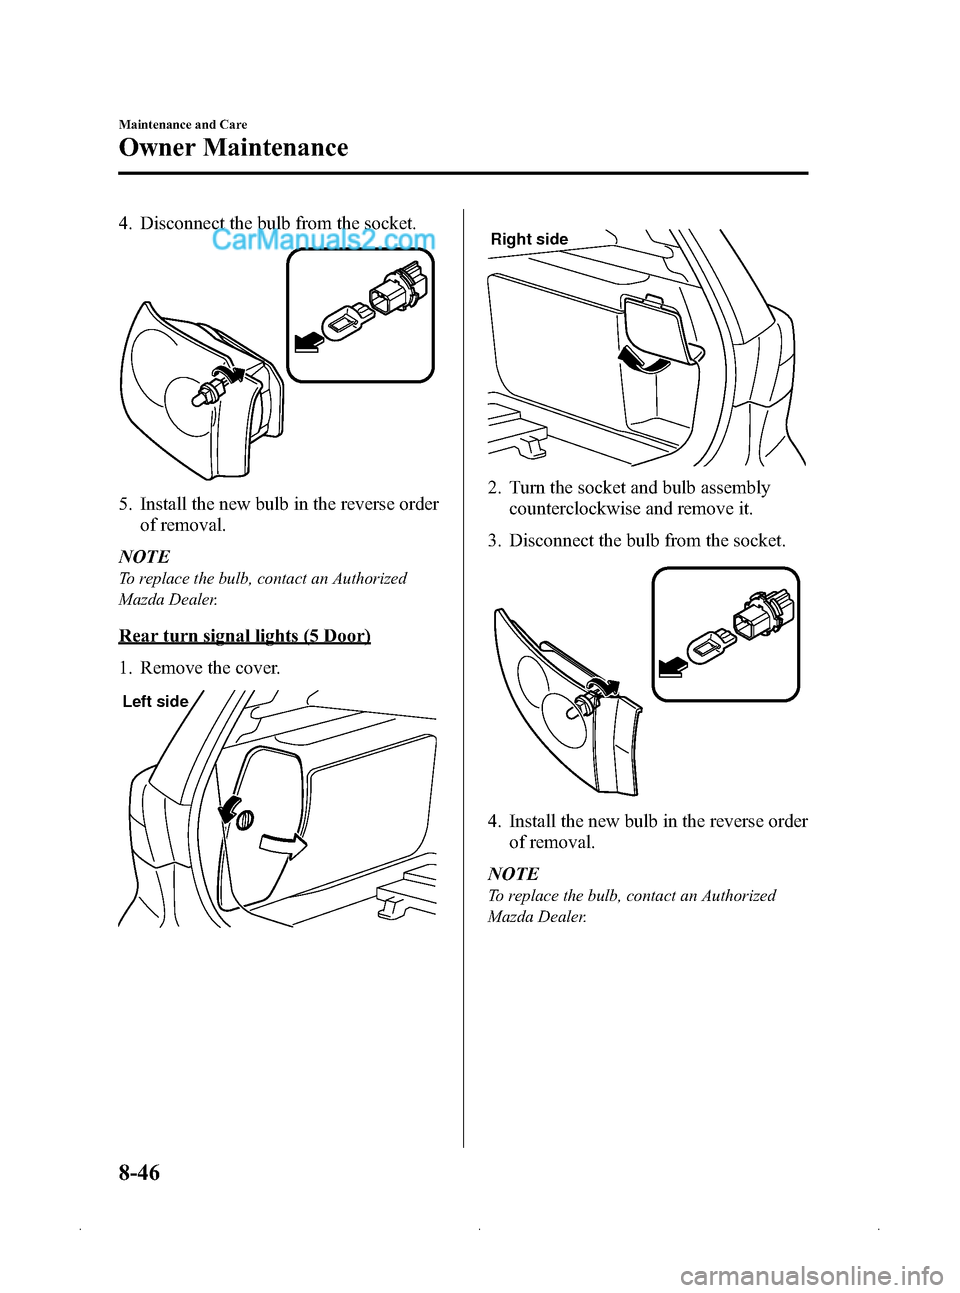
Black plate (332,1)
4. Disconnect the bulb from the socket.
5. Install the new bulb in the reverse orderof removal.
NOTE
To replace the bulb, contact an Authorized
Mazda Dealer.
Rear turn signal lights (5 Door)
1. Remove the cover.
Left side
Right side
2. Turn the socket and bulb assembly counterclockwise and remove it.
3. Disconnect the bulb from the socket.
4. Install the new bulb in the reverse order of removal.
NOTE
To replace the bulb, contact an Authorized
Mazda Dealer.
8-46
Maintenance and Care
Owner Maintenance
Mazda3_8Z87-EA-08F_Edition1 Page332
Monday, May 19 2008 9:59 AM
Form No.8Z87-EA-08F