buttons MAZDA MODEL MAZDASPEED 3 2013 (in English) Owner's Manual
[x] Cancel search | Manufacturer: MAZDA, Model Year: 2013, Model line: MODEL MAZDASPEED 3, Model: MAZDA MODEL MAZDASPEED 3 2013Pages: 611, PDF Size: 7.02 MB
Page 333 of 611
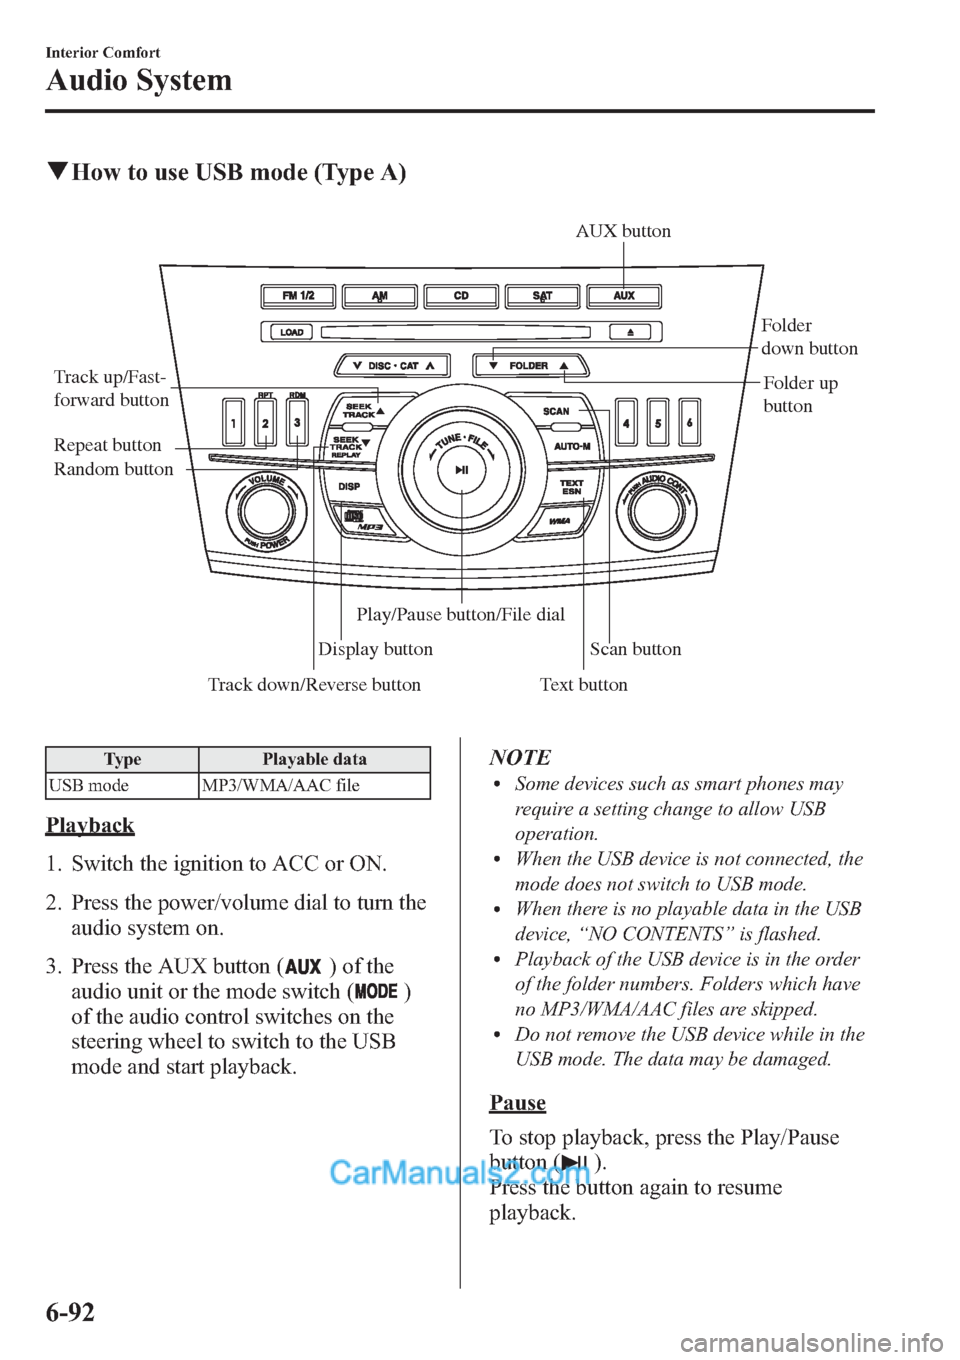
qHow to use USB mode (Type A)
Track down/Reverse button Track up/Fast-
forward button
Display buttonFolder
down button
Folder up
button
Random button Repeat button
Text buttonScan button AUX button
Play/Pause button/File dial
Type Playable data
USB mode MP3/WMA/AAC file
Playback
1. Switch the ignition to ACC or ON.
2. Press the power/volume dial to turn the
audio system on.
3. Press the AUX button (
) of the
audio unit or the mode switch (
)
of the audio control switches on the
steering wheel to switch to the USB
mode and start playback.NOTE
lSome devices such as smart phones may
require a setting change to allow USB
operation.
lWhen the USB device is not connected, the
mode does not switch to USB mode.
lWhen there is no playable data in the USB
device,“NO CONTENTS”is flashed.
lPlayback of the USB device is in the order
of the folder numbers. Folders which have
no MP3/WMA/AAC files are skipped.
lDo not remove the USB device while in the
USB mode. The data may be damaged.
Pause
To stop playback, press the Play/Pause
button (
).
Press the button again to resume
playback.
6-92
Interior Comfort
Audio System
Page 353 of 611
2. Press the audio control dial to
determine the mode.
After“ENTER PIN”is displayed on
the information display for three
seconds,“PIN 0000”is displayed and
the PIN code can be input.
3. Input the PIN code of your Bluetooth
®
audio device by pressing channel
preset buttons 1 to 4 while“PIN 0000”
is displayed.
Press channel preset button 1 to input
the first digit, 2 for the second, 3 for
the third, and 4 for the forth. For
example, if the PIN code were“4213”,
press channel preset button 1 four
times (1, 2, 3, 4), button 2 twice (1, 2),
button 3 once (1), and button 4 three
times (1, 2, 3). If the“PIN 0000”
display disappears before finishing the
PIN code input, repeat the procedure
from Step 1.
NOTE
Some devices accept only a particular pairing
code (Usually,“0000”or“1234”).
If pairing cannot be completed, refer to the
owner's manual of your mobile device, and try
those numbers if necessary.
4. Press the audio control dial while the
input PIN code is displayed.
“PAIRING”flashes on the display.
5. Operate the Bluetooth
®audio device
and set it to the program mode while
“PAIRING”is flashing.
6. When the programming is completed,
“
”and“PAIR SUCCESS”are
displayed after about 10-30 seconds,
after which“PAIR SUCCESS”
continues to be displayed for three
seconds, and then the unit returns to the
normal display.NOTE
lSome Bluetooth®audio devices need a
certain amount of time before the“
”
symbol is displayed.
lIf the programming failed,“Err”flashes
for three seconds.
lProgramming cannot be performed while
the vehicle is moving. If you attempt to
perform programming while the vehicle is
moving,“PAIR DISABLE”is displayed.
lIf seven Bluetooth®audio devices have
already been programmed to the vehicle,
programming cannot be performed and
“MEMORY FULL”is displayed. Delete
one programmed device to program
another one.
Programming a Bluetooth®audio
device which does not have a four-digit
PIN code
1. Using the audio control dial, select the
pairing program mode
“PAIR DEVICE”in the“BT SETUP”
mode. (Refer to“Bluetooth
®audio set
up”for details.)
2. Press the audio control dial to
determine the mode.
After“ENTER PIN”is displayed on
the information display for three
seconds,“PIN 0000”is displayed and
the PIN code can be input.
3. Press the audio control dial while
“PIN 0000”is displayed.
“PAIRING”flashes on the display.
4. Operate the Bluetooth
®audio device
and set it to the program mode while
“PAIRING”is flashing.
5. As the Bluetooth
®audio device
requires a PIN code, input“0000”.
6-112
Interior Comfort
Bluetooth® Audio (Type A)
Page 419 of 611
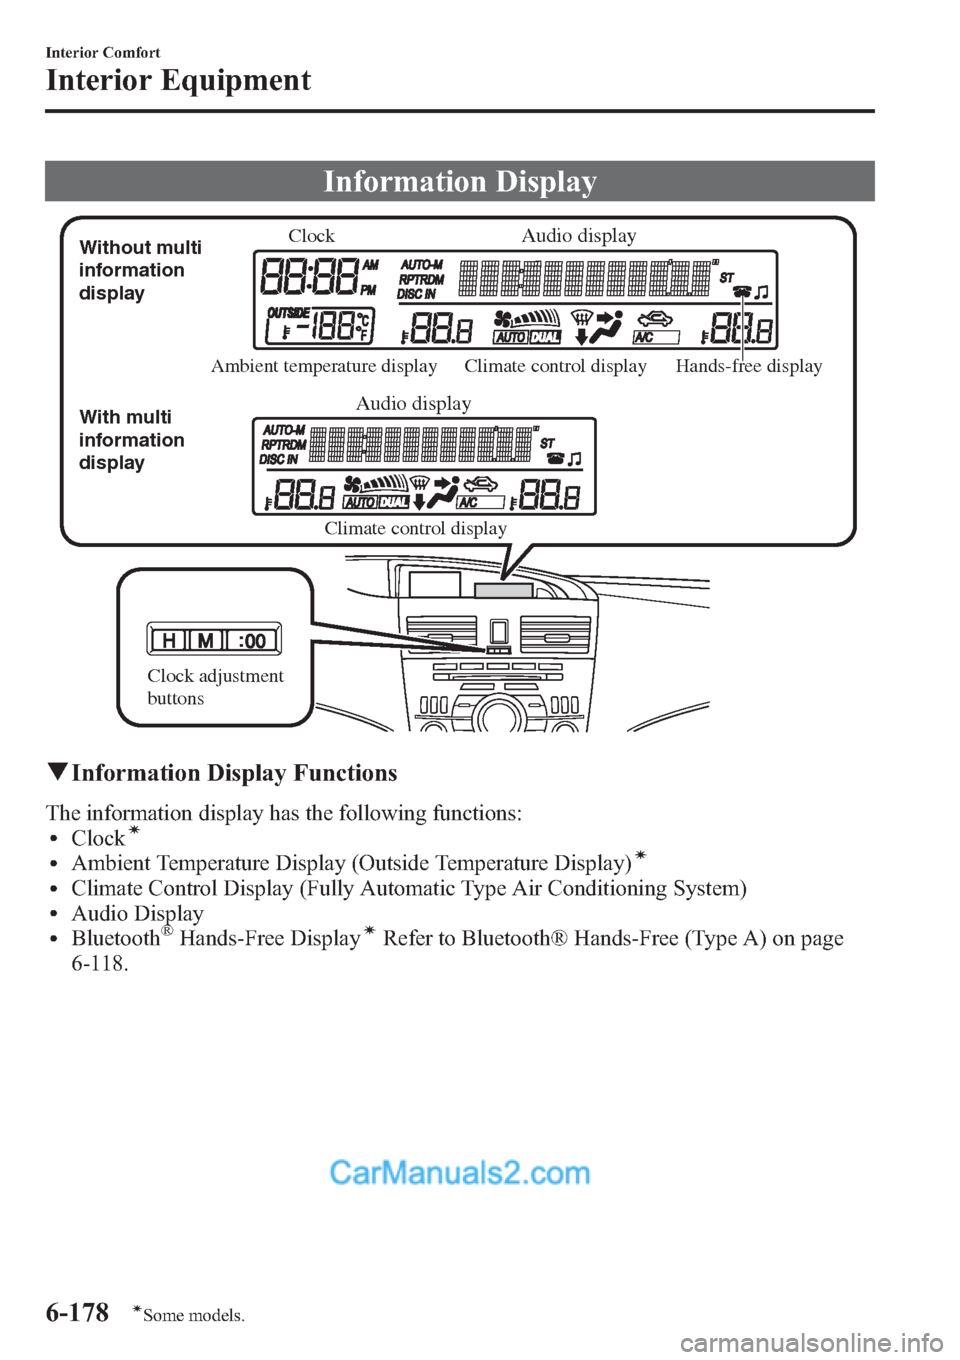
Information Display
ClockAudio display
Audio display
Ambient temperature display Climate control display
Climate control displayHands-free display Without multi
information
display
With multi
information
display
Clock adjustment
buttons
qInformation Display Functions
The information display has the following functions:lClockí
lAmbient Temperature Display (Outside Temperature Display)í
lClimate Control Display (Fully Automatic Type Air Conditioning System)lAudio DisplaylBluetooth®Hands-Free DisplayíRefer to Bluetooth® Hands-Free (Type A) on page
6-118.
6-178
Interior Comfort
íSome models.
Interior Equipment
Page 420 of 611
qClockí
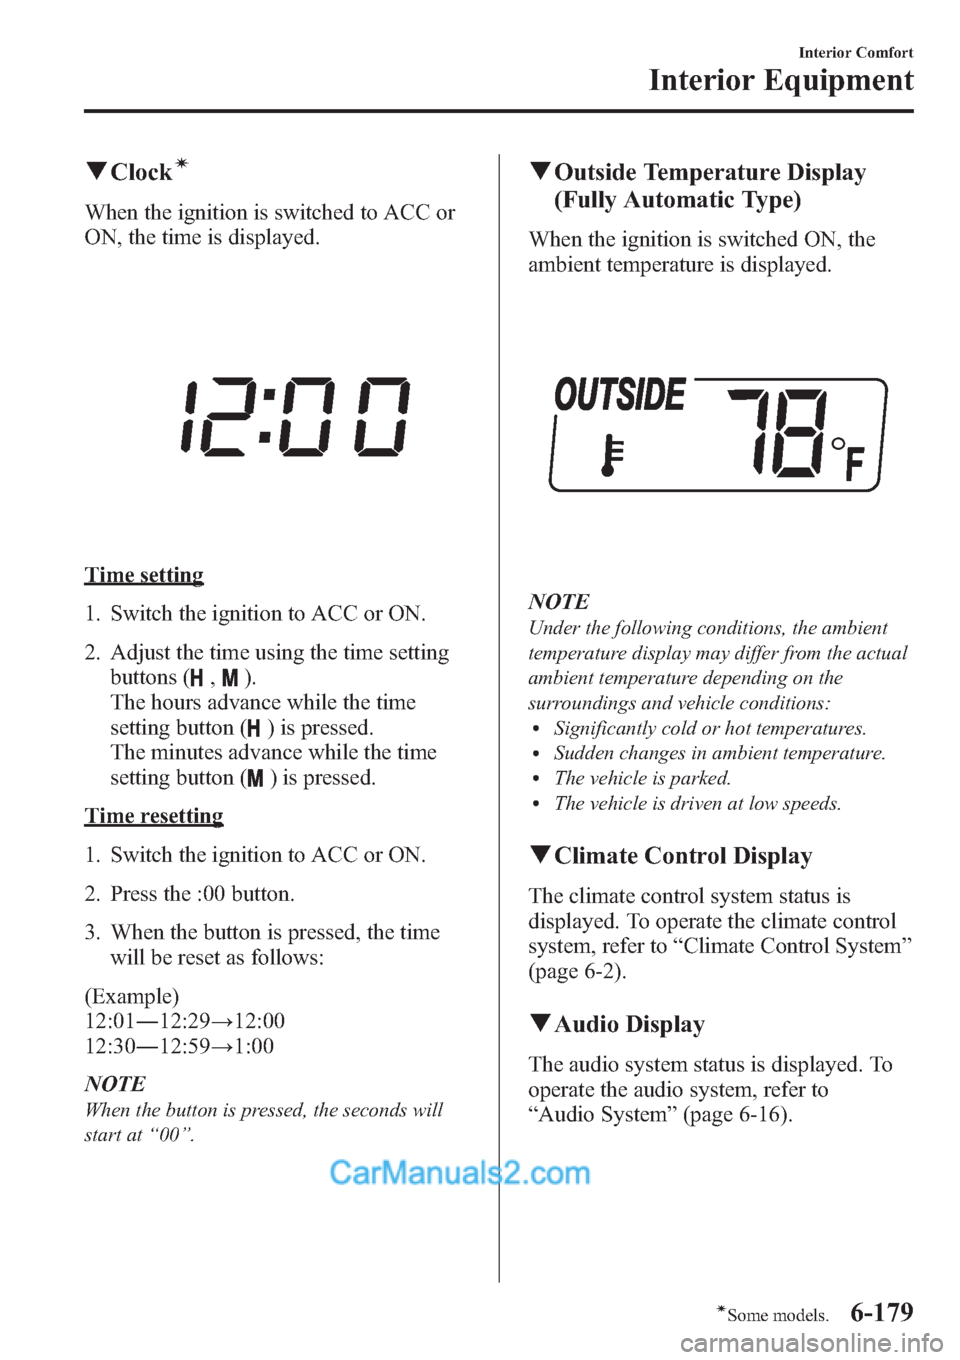
When the ignition is switched to ACC or
ON, the time is displayed.
Time setting
1. Switch the ignition to ACC or ON.
2. Adjust the time using the time setting
buttons (
,).
The hours advance while the time
setting button (
) is pressed.
The minutes advance while the time
setting button (
) is pressed.
Time resetting
1. Switch the ignition to ACC or ON.
2. Press the :00 button.
3. When the button is pressed, the time
will be reset as follows:
(Example)
12:01―12:29→12:00
12:30―12:59→1:00
NOTE
When the button is pressed, the seconds will
start at“00”.
qOutside Temperature Display
(Fully Automatic Type)
When the ignition is switched ON, the
ambient temperature is displayed.
NOTE
Under the following conditions, the ambient
temperature display may differ from the actual
ambient temperature depending on the
surroundings and vehicle conditions:
lSignificantly cold or hot temperatures.lSudden changes in ambient temperature.lThe vehicle is parked.lThe vehicle is driven at low speeds.
qClimate Control Display
The climate control system status is
displayed. To operate the climate control
system, refer to“Climate Control System”
(page 6-2).
qAudio Display
The audio system status is displayed. To
operate the audio system, refer to
“Audio System”(page 6-16).
Interior Comfort
Interior Equipment
6-179íSome models.
Page 421 of 611
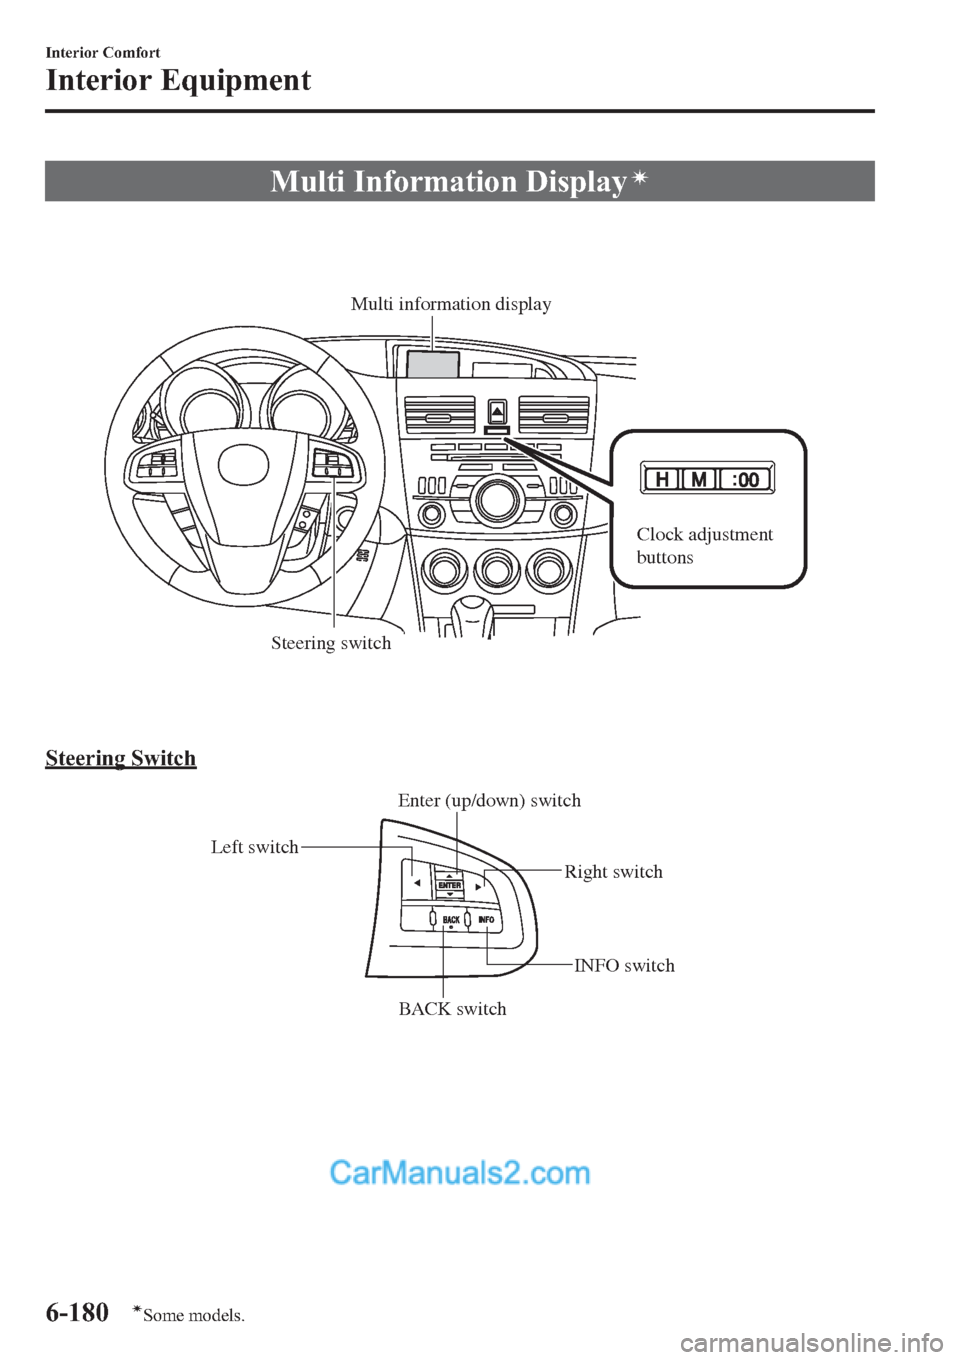
Multi Information Displayí
Steering switch
Multi information display
Clock adjustment
buttons
Steering Switch
Left switch
Right switch
BACK switchINFO switch Enter (up/down) switch
6-180
Interior Comfort
íSome models.
Interior Equipment