reset MAZDA MODEL MPV 2001 Quick Tips (in English)
[x] Cancel search | Manufacturer: MAZDA, Model Year: 2001, Model line: MODEL MPV, Model: MAZDA MODEL MPV 2001Pages: 10, PDF Size: 0.94 MB
Page 3 of 10

INSTRUMENT CLUSTER
Always check the Owner’s Manual for more operating information and safety features
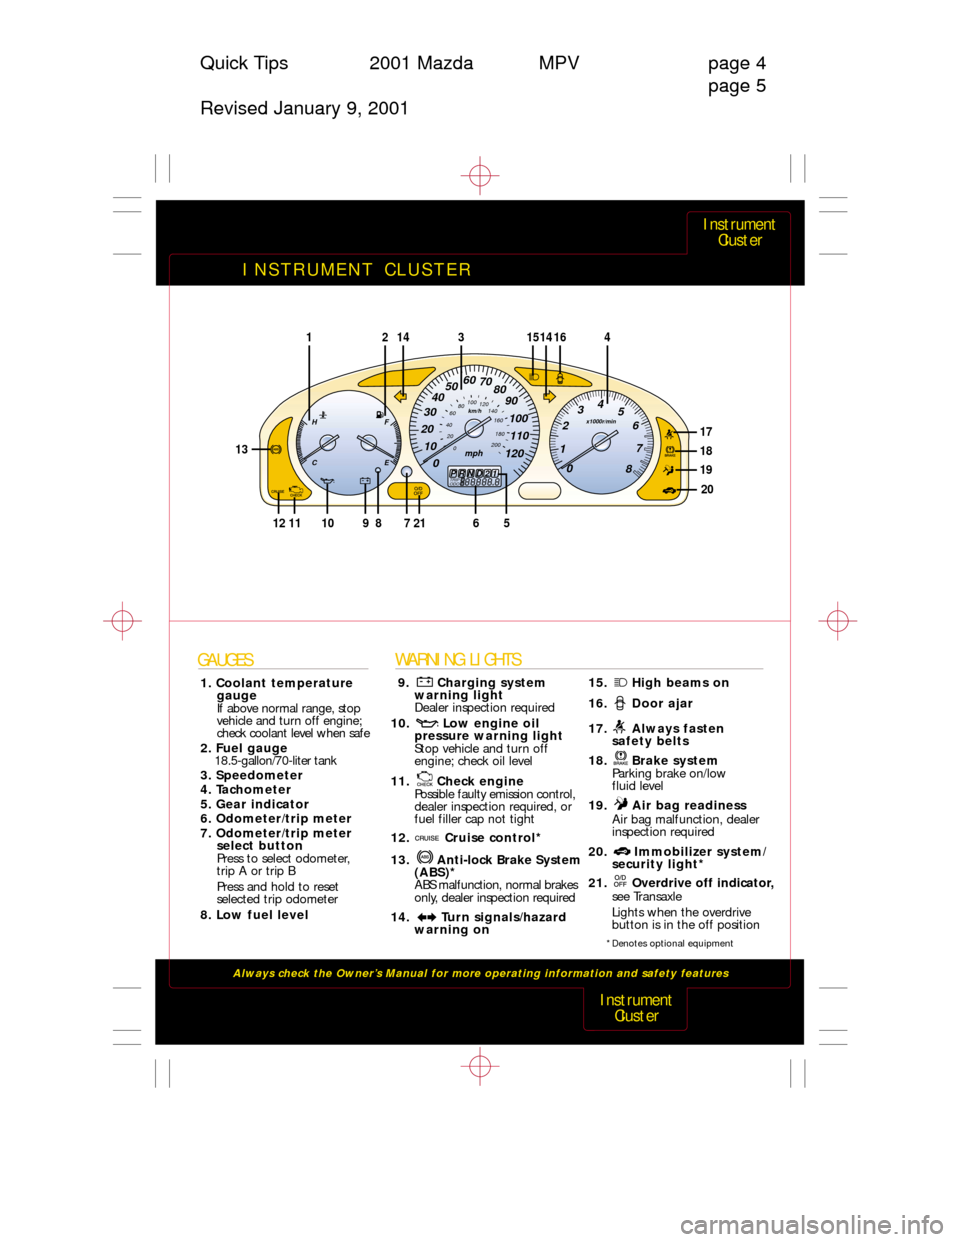
GAUGES
1. Coolant temperature
gauge
If above normal range, stop
vehicle and turn off engine;
check coolant level when safe
2. Fuel gauge
18.5-gallon/70-liter tank
3. Speedometer
4. Tachometer
5. Gear indicator
6. Odometer/trip meter
7. Odometer/trip meter
select button
Press to select odometer,
trip A or trip B
Press and hold to reset
selected trip odometer
8. Low fuel level
WARNING LIGHTS
9. Charging system
warning light
Dealer inspection required
10. Low engine oil
pressure warning light
Stop vehicle and turn off
engine; check oil level
11. Check engine
Possible faulty emission control,
dealer inspection required, or
fuel filler cap not tight
12. Cruise control*
13. Anti-lock Brake System
(ABS)*
ABS malfunction, normal brakes
only, dealer inspection required
14. Turn signals/hazard
warning on15. High beams on
16. Door ajar
17. Always fasten
safety belts
18. Brake system
Parking brake on/low
fluid level
19. Air bag readiness
Air bag malfunction, dealer
inspection required
20. Immobilizer system/
security light*
21. Overdrive off indicator,
see Transaxle
Lights when the overdrive
button is in the off position
Instrument
Cluster
Instrument
Cluster
Quick Tips 2001 Mazda MPV page 4
page 5
Revised January 9, 2001
x1000r/min
0 1 234
5
6
7
8
H
CF
E
10911127218
14144121516
13
17
18
19
20
0 10 20 30405060
70
80
90
100
110
120
200
0 20 406080100
120
140
160
180mph
km/h
3
TRIP
ODOA88888.8BPRND21
65
*Denotes optional equipment
Page 4 of 10

DRIVER CONTROLS
Always check the Owner’s Manual for more operating information and safety features
Driver
Controls
Transaxle
Quick Tips 2001 Mazda MPV page 6
page 7
Revised January 9, 2001
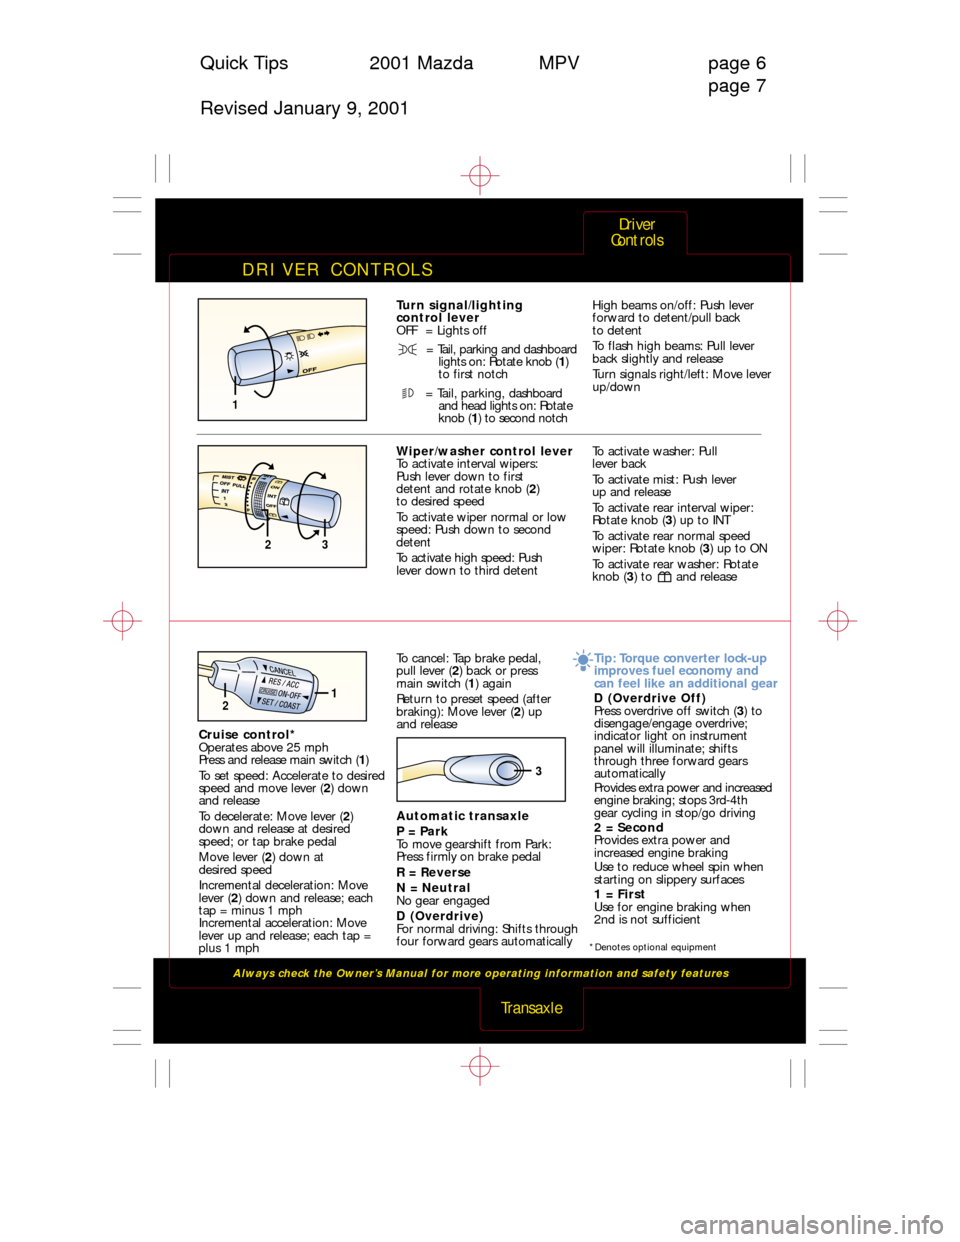
Turn signal/lighting
control lever
OFF = Lights off
= Tail, parking and dashboard
lights on: Rotate knob (1)
to first notch
= Tail, parking, dashboard
and head lights on: Rotate
knob (1) to second notchHigh beams on/off: Push lever
forward to detent/pull back
to detent
To flash high beams: Pull lever
back slightly and release
Turn signals right/left: Move lever
up/down
Wiper/washer control lever
To activate interval wipers:
Push lever down to first
detent and rotate knob (2)
to desired speed
To activate wiper normal or low
speed: Push down to second
detent
To activate high speed: Push
lever down to third detentTo activate washer: Pull
lever back
To activate mist: Push lever
up and release
To activate rear interval wiper:
Rotate knob (3) up to INT
To activate rear normal speed
wiper: Rotate knob (3) up to ON
To activate rear washer: Rotate
knob (3) to and release
Cruise control*
Operates above 25 mph
Press and release main switch (1)
To set speed: Accelerate to desired
speed and move lever (2) down
and release
To decelerate: Move lever (2)
down and release at desired
speed; or tap brake pedal
Move lever (2) down at
desired speed
Incremental deceleration: Move
lever (2) down and release; each
tap = minus 1 mph
Incremental acceleration: Move
lever up and release; each tap =
plus 1 mph To cancel: Tap brake pedal,
pull lever (2) back or press
main switch (1) again
Return to preset speed (after
braking): Move lever (2) up
and release
Automatic transaxle
P = Park
To move gearshift from Park:
Press firmly on brake pedal
R = Reverse
N = Neutral
No gear engaged
D (Overdrive)
For normal driving: Shifts through
four forward gears automaticallyTip: Torque converter lock-up
improves fuel economy and
can feel like an additional gear
D (Overdrive Off)
Press overdrive off switch (3) to
disengage/engage overdrive;
indicator light on instrument
panel will illuminate; shifts
through three forward gears
automatically
Provides extra power and increased
engine braking; stops 3rd-4th
gear cycling in stop/go driving
2 = Second
Provides extra power and
increased engine braking
Use to reduce wheel spin when
starting on slippery surfaces
1 = First
Use for engine braking when
2nd is not sufficient
12
1
3 2
3
*Denotes optional equipment
Page 8 of 10

RADIO/CASSETTE/COMPACT DISC
Always check the Owner’s Manual for more operating information and safety features
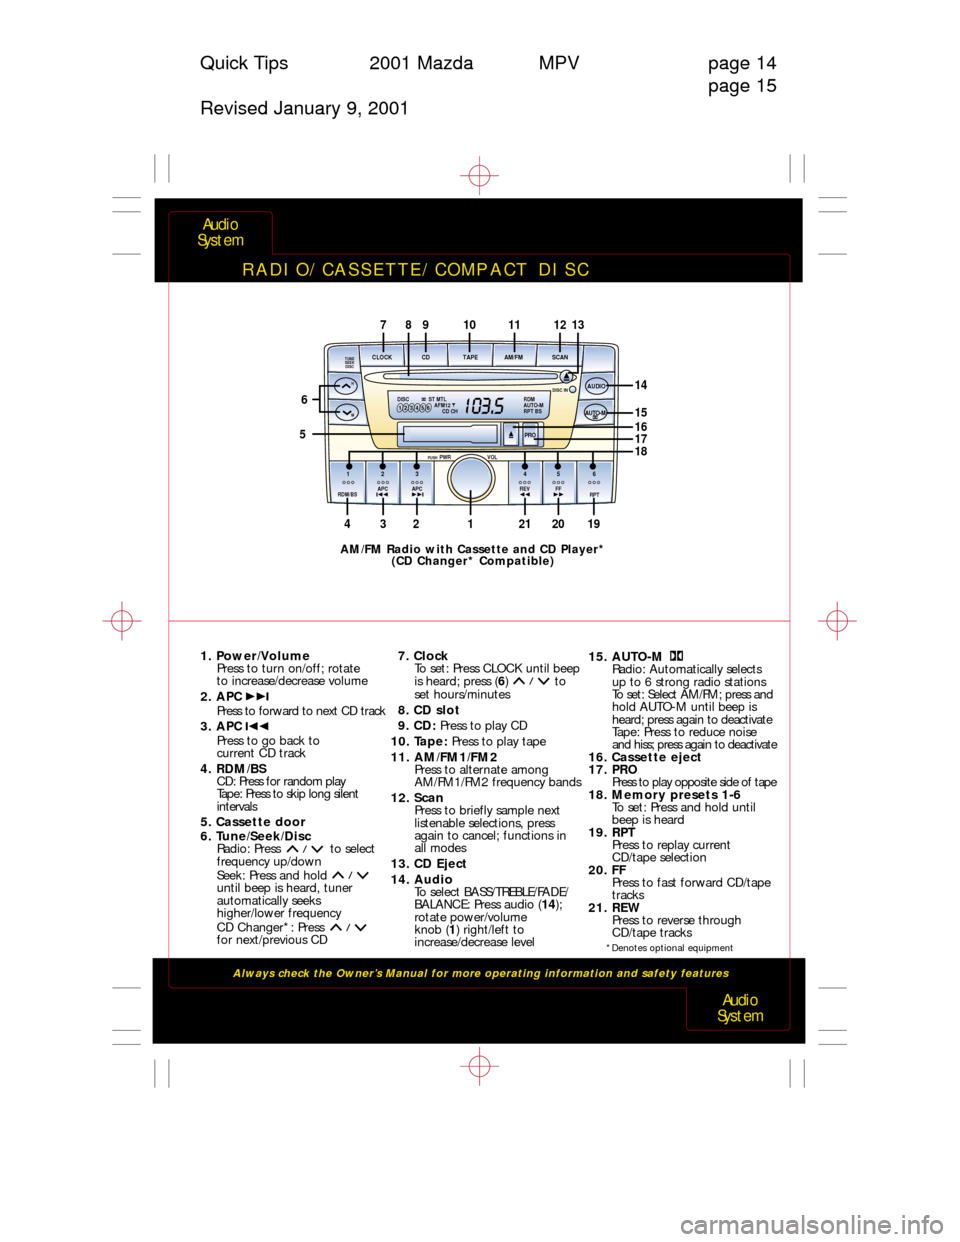
1. Power/Volume
Press to turn on/off; rotate
to increase/decrease volume
2. APC
Press to forward to next CD track
3. APC
Press to go back to
current CD track
4. RDM/BS
CD: Press for random play
Tape: Press to skip long silent
intervals
5. Cassette door
6. Tune/Seek/Disc
Radio: Press to select
frequency up/down
Seek: Press and hold
until beep is heard, tuner
automatically seeks
higher/lower frequency
CD Changer*: Press
for next/previous CD7. Clock
To set: Press CLOCK until beep
is heard; press (6)to
set hours/minutes
8. CD slot
9. CD: Press to play CD
10. Tape: Press to play tape
11. AM/FM1/FM2
Press to alternate among
AM/FM1/FM2 frequency bands
12. Scan
Press to briefly sample next
listenable selections, press
again to cancel; functions in
all modes
13. CD Eject
14. Audio
To select BASS/TREBLE/FADE/
BALANCE: Press audio (14);
rotate power/volume
knob (1) right/left to
increase/decrease level15. AUTO-M
Radio: Automatically selects
up to 6 strong radio stations
To set: Select AM/FM; press and
hold AUTO-M until beep is
heard; press again to deactivate
Tape: Press to reduce noise
and hiss; press again to deactivate
16. Cassette eject
17. PRO
Press to play opposite side of tape
18. Memory presets 1-6
To set: Press and hold until
beep is heard
19. RPT
Press to replay current
CD/tape selection
20. FF
Press to fast forward CD/tape
tracks
21. REW
Press to reverse through
CD/tape tracks
Audio
System
Audio
System
Quick Tips 2001 Mazda MPV page 14
page 15
Revised January 9, 2001
14
123 45 6AUTO-MAUDIO SCAN AM/FM TAPE CD CLOCKAPC
H
M
RDM/BSAPC REVPWR
PUSH TUNE
SEEK
DISCVOL
RPT
DISC IN
FF
234212019
98711101213
6
1
DISC ST MTL
AFM12
CD CHRDM
AUTO-M
RPT BS123456
PRO5
15161718
AM/FM Radio with Cassette and CD Player*
(CD Changer* Compatible)
*Denotes optional equipment
Page 9 of 10

RADIO/COMPACT DISC
Always check the Owner’s Manual for more operating information and safety features
Audio
System
Audio
System
Quick Tips 2001 Mazda MPV page 16
page 17
Revised January 9, 2001
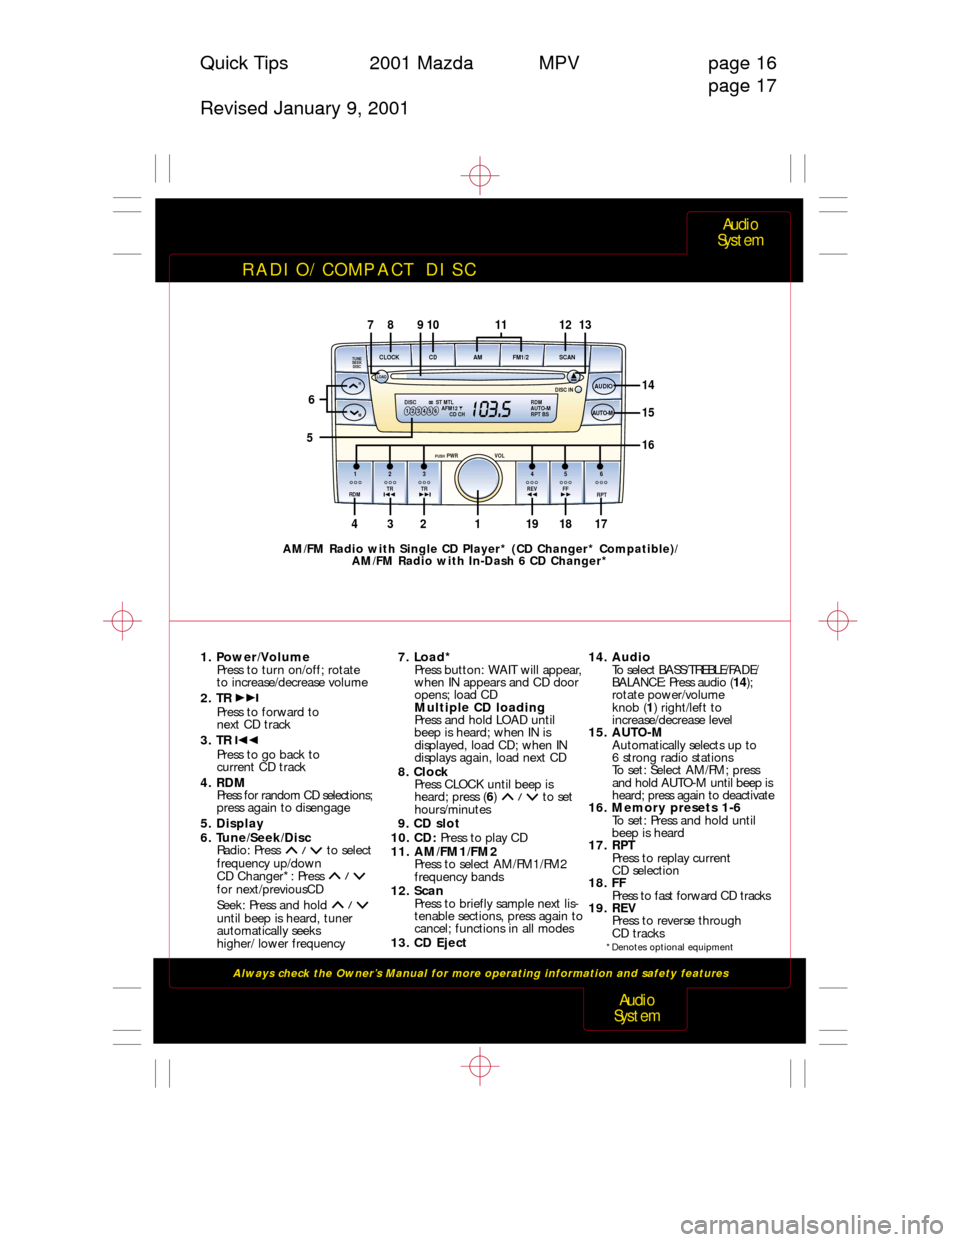
1. Power/Volume
Press to turn on/off; rotate
to increase/decrease volume
2. TR
Press to forward to
next CD track
3. TR
Press to go back to
current CD track
4. RDM
Press for random CD selections;
press again to disengage
5. Display
6. Tune/Seek/Disc
Radio: Press to select
frequency up/down
CD Changer*: Press
for next/previousCD
Seek: Press and hold
until beep is heard, tuner
automatically seeks
higher/ lower frequency7. Load*
Press button: WAIT will appear,
when IN appears and CD door
opens; load CD
Multiple CD loading
Press and hold LOAD until
beep is heard; when IN is
displayed, load CD; when IN
displays again, load next CD
8. Clock
Press CLOCK until beep is
heard; press (6) to set
hours/minutes
9. CD slot
10. CD: Press to play CD
11. AM/FM1/FM2
Press to select AM/FM1/FM2
frequency bands
12. Scan
Press to briefly sample next lis-
tenable sections, press again to
cancel; functions in all modes
13. CD Eject14. Audio
To select BASS/TREBLE/FADE/
BALANCE: Press audio (14);
rotate power/volume
knob (1) right/left to
increase/decrease level
15. AUTO-M
Automatically selects up to
6 strong radio stations
To set: Select AM/FM; press
and hold AUTO-M until beep is
heard; press again to deactivate
16. Memory presets 1-6
To set: Press and hold until
beep is heard
17. RPT
Press to replay current
CD selection
18. FF
Press to fast forward CD tracks
19. REV
Press to reverse through
CD tracks
AM/FM Radio with Single CD Player* (CD Changer* Compatible)/
AM/FM Radio with In-Dash 6 CD Changer*
515
14
123 45 6AUTO-MAUDIO SCAN FM1/2 AM CD CLOCKTR
H
M
RDMTR REVPWR
PUSH TUNE
SEEK
DISCVOL
RPT DISC IN
FF
LOAD
23419181716
10981171312
6
1
DISC ST MTL
AFM12
CD CHRDM
AUTO-M
RPT BS123456
*Denotes optional equipment