clock MAZDA MODEL MPV 2004 Quick Tips (in English)
[x] Cancel search | Manufacturer: MAZDA, Model Year: 2004, Model line: MODEL MPV, Model: MAZDA MODEL MPV 2004Pages: 14, PDF Size: 1.25 MB
Page 7 of 14

INTERIOR LIGHT\b
Always check the Owner’s Manual for more operating information and safety features
Interior Lights
Transaxle
Quick Tips 2004 Mazda MPV page 12 page 13
*Denotes optional equipment
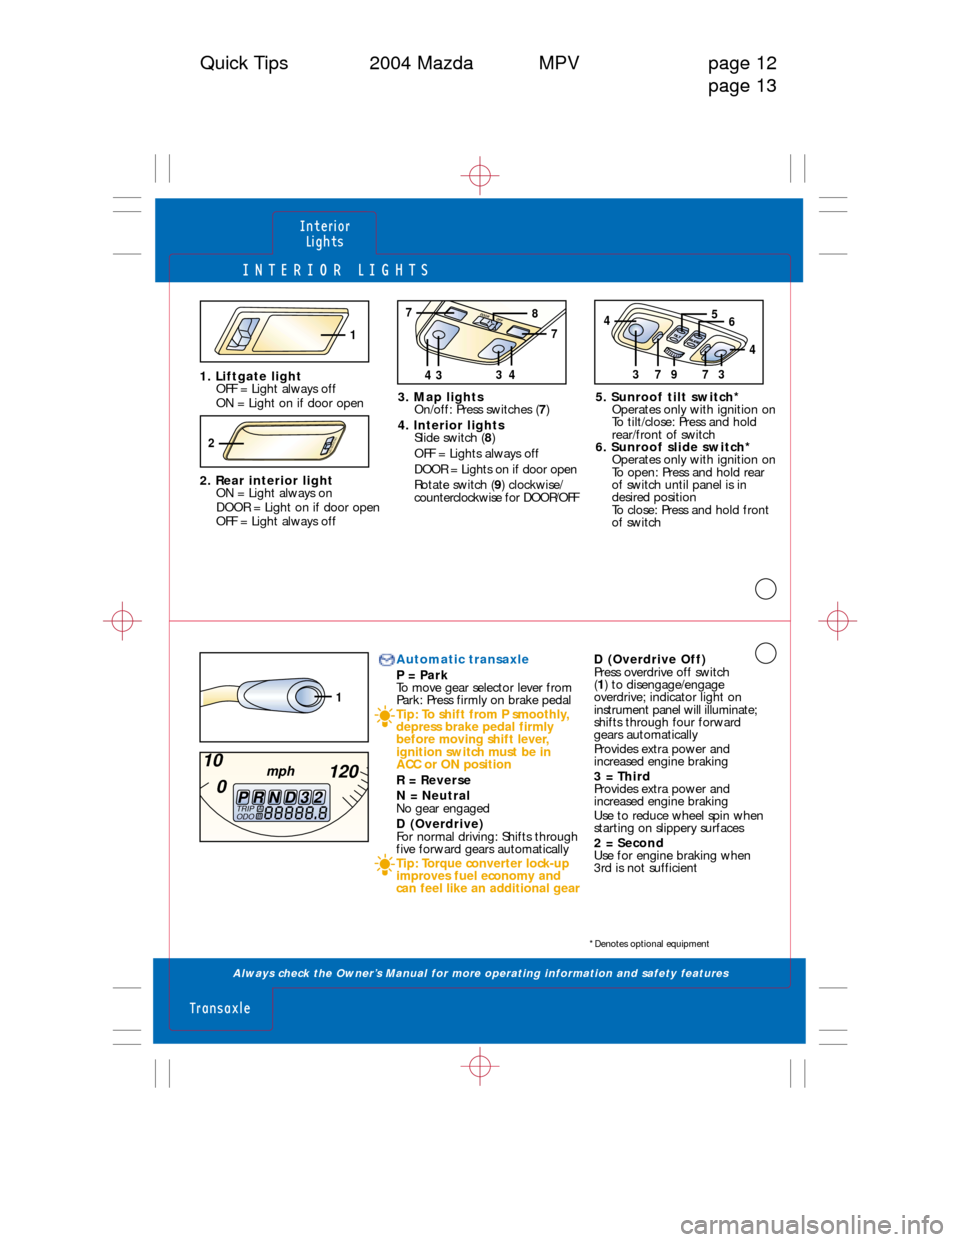
1. Liftgate lightOFF = Light always off
ON = Light on if door open
2. Rear interior light ON = Light always on
DOOR = Light on if door open
OFF = Light always off 3. Map lights
On/off: Press switches ( 7)
4. Interior lights Slide switch ( 8)
OFF = Lights always off
DOOR = Lights on if door open
Rotate switch ( 9) clockwise/
counterclockwise for DOOR/OFF 5. Sunroof tilt switch*
Operates only with ignition on
To tilt/close: Press and hold
rear/front of switch
6. Sunroof slide switch* Operates only with ignition on
To open: Press and hold rear
of switch until panel is in
desired position
To close: Press and hold front
of switch
1
ON DOOR OFF2
97373
4
4
65DO OR O
FF
3443
7
7
8
1
TRIP
ODOA88888.8BPRND320
10
120
mph
Automatic transaxle
P = Park
To move gear selector lever from
Park: Press firmly on brake pedal
Tip: To shift from P smoothly,
depress brake pedal firmly
before moving shift lever,
ignition switch must be in
ACC or ON position
R = Reverse
N = Neutral
No gear engaged
D (Overdrive)
For normal driving: Shifts through
five forward gears automatically
Tip: Torque converter lock-up
improves fuel economy and
can feel like an additional gear D (Overdrive Off)
Press overdrive off switch
(
1 ) to disengage/engage
overdrive; indicator light on
instrument panel will illuminate;
shifts through four forward
gears automatically
Provides extra power and
increased engine braking
3 = Third
Provides extra power and
increased engine braking
Use to reduce wheel spin when
starting on slippery surfaces
2 = Second
Use for engine braking when
3rd is not sufficient
Page 8 of 14

\bWITCHE\b/LOCK\b
Always check the Owner’s Manual for more operating information and safety features
\bwitches/Locks
Locks
Quick Tips 2004 Mazda MPV page 14page 15
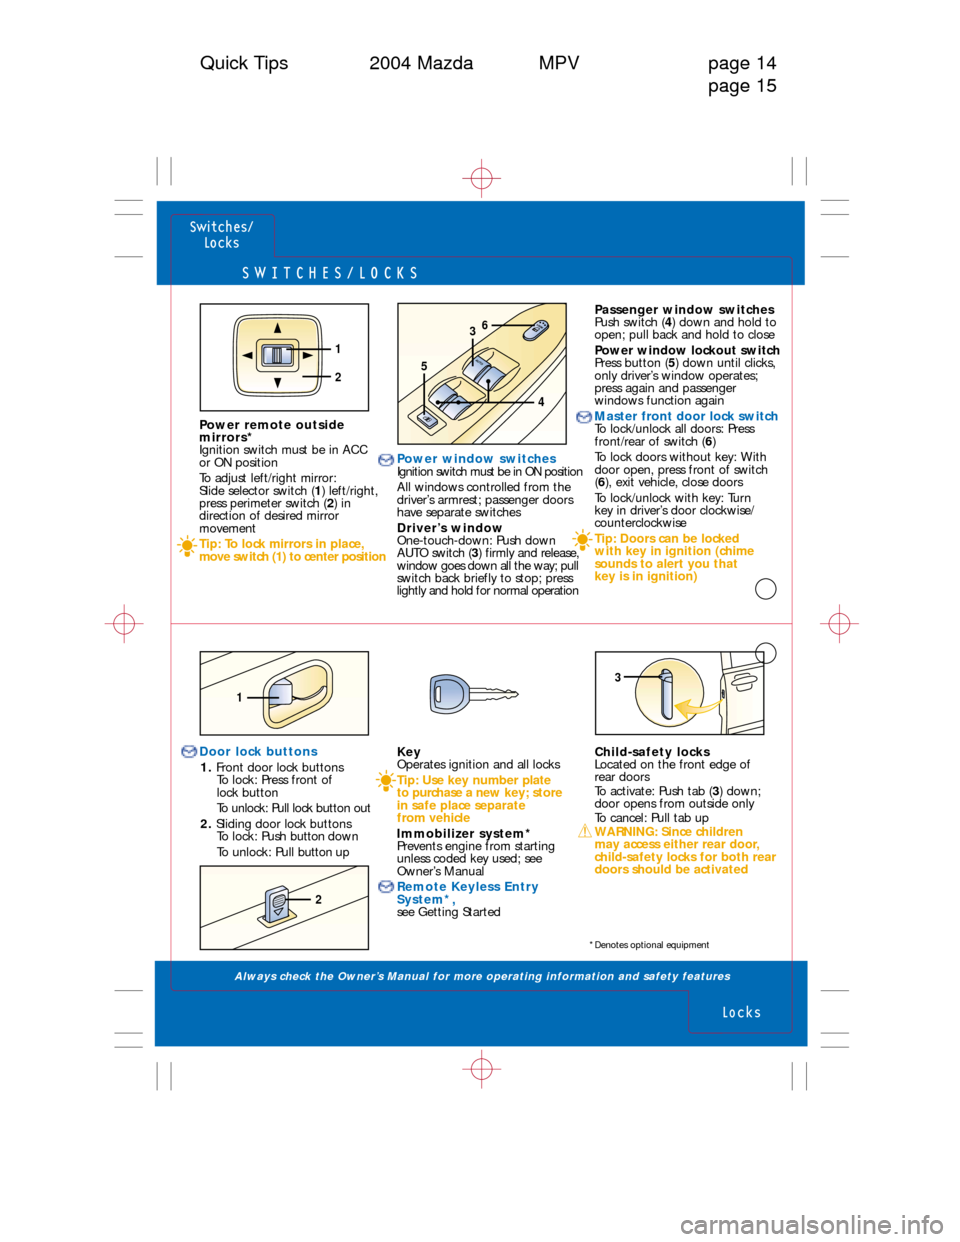
Power window switches
Ignition switch must be in ON position
All windows controlled from the
driver’s armrest; passenger doors
have separate switches
Driver’s window
One-touch-down: Push down
AUTO switch (3) firmly and release,
window goes down all the way; pull
switch back briefly to stop; press
lightly and hold for normal operation
Child-safety locks
Located on the front edge of
rear doors
To activate: Push tab (3) down;
door opens from outside only
To cancel: Pull tab up
WARNING: Since children
may access either rear door,
child-safety locks for both rear
doors should be activated
Passenger window switches
Push switch ( 4) down and hold to
open; pull back and hold to close
Power window lockout switch
Press button ( 5) down until clicks,
only driver’s window operates;
press again and passenger
windows function again
Master front door lock switch
To lock/unlock all doors: Press
front/rear of switch ( 6)
To lock doors without key: With
door open, press front of switch
( 6 ), exit vehicle, close doors
To lock/unlock with key: Turn
key in driver’s door clockwise/
counterclockwise
Tip: Doors can be locked
with key in ignition (chime
sounds to alert you that
key is in ignition)
2
Key
Operates ignition and all locks
Tip: Use key number plate
to purchase a new key; store
in safe place separate
from vehicle
Immobilizer system*
Prevents engine from starting
unless coded key used; see
Owner’s Manual
Remote Keyless Entry
System*,
see Getting Started
Door lock buttons
1. Front door lock buttons
To lock: Press front of
lock button
To unlock: Pull lock button out
2. Sliding door lock buttons
To lock: Push button down
To unlock: Pull button up
Power remote outside
mirrors*
Ignition switch must be in ACC
or ON position
To adjust left/right mirror:
Slide selector switch (
1) left/right,
press perimeter switch ( 2) in
direction of desired mirror
movement
Tip: To lock mirrors in place,
move switch (1) to center position
1
3
*Denotes optional equipment
1
2
AU TO
3
5
4
6
Page 12 of 14

RADIO/CA\b\bETTE/COMPACT DI\bC/MD
Always check the Owner’s Manual for more operating information and safety features
Audio
\bystems
Audio
\bystems
Quick Tips 2004 Mazda MPV page 22
page 23
3. SEEK/TRACK/APCRadio: Press to
automatically seek higher/
lower frequency
CD: Press to select
next/previous track
Tape: Press to
automatically advance tape to
beginning of next selection/
replay selection; to stop this
operation, press button again
4. FM1/2/AM Press to select between FM1/FM2/
AM station preset buttons ( 2)
5. SAT* If equipped with a separately sold
Sirius digital satellite radio, refer to
Sirius digital satellite radio manual
6. CD Press to play CD
7. MD*/Tape* Press to play Mini-disc Player/
cassette tape
Steering-wheel audio
controls, see Getting Started
Audio Systems
1. Power/Volume Press to turn on/off; rotate
to increase/decrease volume
2. Memory preset buttons To set: Tune to station, press and
hold until beep sound is heard
Press H (10) to set hour; then
press (CLOCK) button; Min
ADJ will be displayed next
with minutes flashing; press
M ( 10) to set minutes; then
press (CLOCK) to complete
9. CD eject button
10. Scan/Auto-Memory Press to briefly sample next
listenable selections
Radio: Press and hold until a
beep sound is heard; system auto-
matically scans and temporarily
stores six strong stations in each
band; pr ess again to cancel
11. Tuning/Audio Control Tune: Rotate counterclock-
wise/clockwise for lower
frequency/higher frequency
Audio control: Press to select
BASS/MID/TREBLE/FADE/
BALANCE/BEEP; rotate right/left
to adjust selected feature
8. Clock
To set: With ignition in ACC
or ON position, press (CLOCK)
and hold until beep sounds,
12 Hr/24 Hr will be displayed;
rotate Audio Control dial ( 11)to
switch between 12 Hr/24 Hr,
selection will flash; press (CLOCK)
again; Hr ADJ will be displayed
next with hour flashing
19. LOAD*To load multiple discs:
Press and hold LOAD ( 19)
until beep sound is heard; insert
CD when “In” is displayed
To eject disc: Press Eject ( 9)
To eject specific disc: Press and
hold Eject ( 9) until beep sound is
heard; within five seconds press
the desired tray number 1-6 ( 2)
20. Mini Disc slot*
21. DISP* Press: Changes display during
MD play
22. Mini Disc display*
23. Dolby
®Noise Reduction*
Reduces tape noise and hiss,
press to activate/deactivate
24. Cassette door*
25. Eject button*
26. Display Text dial: Use for MP3 CD
Player* or Sirius Radio*
Tips: Rotate (11) to display
complete song titles
Some song titles will not
display, see Owner
’s Manual
12. Fast forward Press to fast forward through a track
13. Reverse Press to reverse through a track
14. Program Random
†Press to enable/cancel random play
15. Repeat Press to replay current CD/
tape selection
16. Disc up
†
Press to skip forward to
beginning of next CD
17. Disc down
†
Press to skip back to
beginning of previous CD
18. CD slot*
SEEK
TRACK
APC
1 DISC 2 DISC 3 RPT 4 PROG RDM56
FM/AM SAT CD MD/TAPE
TEXT
CLOCKH SCAN
M AUTO-MDISP/ESN
DSP
. . . . . . . . . . . . .
14151713161211120222125
232425
4567891019
3
2
DISC INLOAD
TUNE PUSH AUDIO CONT
VOL PUSH POWER
18
26
*Denotes optional equipment†For use with cassette tape player,
MD player, or CD changer*