start stop button MAZDA MODEL MPV 2005 Quick Tips (in English)
[x] Cancel search | Manufacturer: MAZDA, Model Year: 2005, Model line: MODEL MPV, Model: MAZDA MODEL MPV 2005Pages: 14, PDF Size: 0.96 MB
Page 3 of 14

GETTING STARTED
Always check the Owner’s Manual for more operating information and safety features
Getting
Started
Getting
Started
Quick Tips 2005 Mazda MPV page 4
page 5
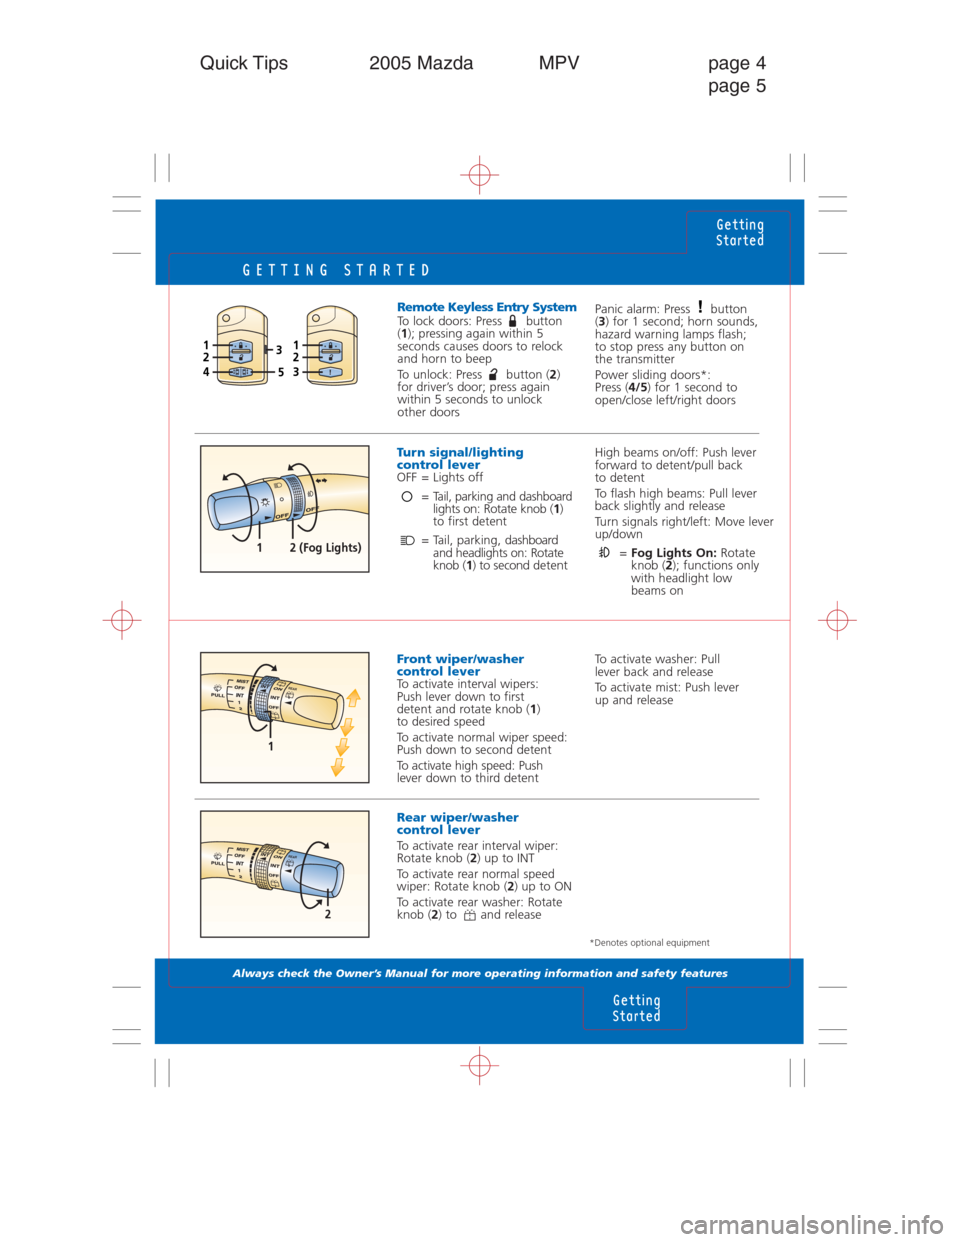
Remote Keyless Entry System
To lock doors: Press button
(1); pressing again within 5
seconds causes doors to relock
and horn to beep
To unlock: Press button (2)
for driver’s door; press again
within 5 seconds to unlock
other doors
High beams on/off: Push lever
forward to detent/pull back
to detent
To flash high beams: Pull lever
back slightly and release
Turn signals right/left: Move lever
up/down
=
Fog Lights On:Rotate
knob (2); functions only
with headlight low
beams on
Turn signal/lighting
control lever
OFF = Lights off
= Tail, parking and dashboard
lights on: Rotate knob (1)
to first detent
= Tail, parking, dashboard
and headlights on: Rotate
knob (1) to second detent
Panic alarm: Press button
(3) for 1 second; horn sounds,
hazard warning lamps flash;
to stop press any button on
the transmitter
Power sliding doors*:
Press (4/5) for 1 second to
open/close left/right doors
12 (Fog Lights)
To activate washer: Pull
lever back and release
To activate mist: Push lever
up and releaseFront wiper/washer
control lever
To activate interval wipers:
Push lever down to first
detent and rotate knob (1)
to desired speed
To activate normal wiper speed:
Push down to second detent
To activate high speed: Push
lever down to third detent
1
R
E
A
R
Rear wiper/washer
control lever
To activate rear interval wiper:
Rotate knob (2) up to INT
To activate rear normal speed
wiper: Rotate knob (2) up to ON
To activate rear washer: Rotate
knob (2) to and release
2
R
E
A
R
5
124
3123
*Denotes optional equipment
Page 6 of 14

INSTRUMENT CLUSTER
Always check the Owner’s Manual for more operating information and safety features
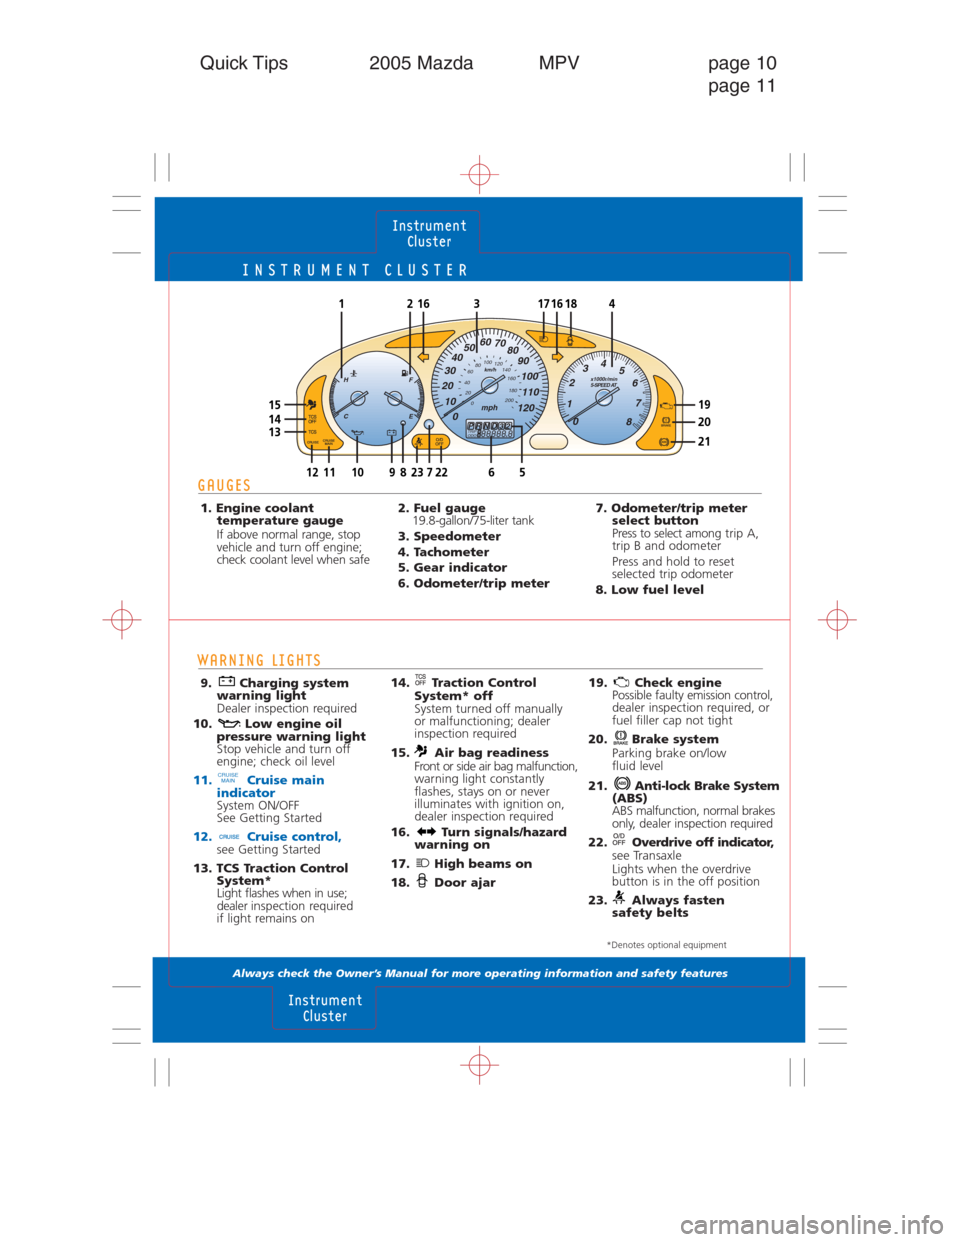
WARNING LIGHTS
9. Charging system
warning light
Dealer inspection required
10. Low engine oil
pressure warning light
Stop vehicle and turn off
engine; check oil level
11. Cruise main
indicator
System ON/OFF
See Getting Started
12. Cruise control,see Getting Started
13. TCS Traction Control
System*
Light flashes when in use;
dealer inspection required
if light remains on
CRUISE
MAIN
14. Traction Control
System* off
System turned off manually
or malfunctioning; dealer
inspection required
15. Air bag readiness
Front or side air bag malfunction,
warning light constantly
flashes, stays on or never
illuminates with ignition on,
dealer inspection required
16. Turn signals/hazard
warning on
17. High beams on
18. Door ajar19. Check enginePossible faulty emission control,
dealer inspection required, or
fuel filler cap not tight
20. Brake system
Parking brake on/low
fluid level
21. Anti-lock Brake System
(ABS)
ABS malfunction, normal brakes
only, dealer inspection required
22. Overdrive off indicator,
see Transaxle
Lights when the overdrive
button is in the off position
23. Always fasten
safety belts
Instrument
Cluster
Instrument
Cluster
Quick Tips 2005 Mazda MPV page 10
page 11
x1000r/min
5-SPEED AT
0 1234
5
6
7
8
H
CF
E
1092312117228
16164121718
15
1413
0 10 2030405060
70
80
90
100
110
120
200
0 20 406080100
120
140
160
180mph
km/h
3
TRIP
ODOA88888.8BPRND32
65
19
20
21
*Denotes optional equipment
GAUGES
1. Engine coolant
temperature gauge
If above normal range, stop
vehicle and turn off engine;
check coolant level when safe2. Fuel gauge
19.8-gallon/75-liter tank
3. Speedometer
4. Tachometer
5. Gear indicator
6. Odometer/trip meter7. Odometer/trip meter
select button
Press to select amongtrip A,
trip B and odometer
Press and hold to reset
selected trip odometer
8. Low fuel level
Page 8 of 14

SWITCHES/LOCKS
Always check the Owner’s Manual for more operating information and safety features
Switches/
Locks
Locks
Quick Tips 2005 Mazda MPV page 14
page 15
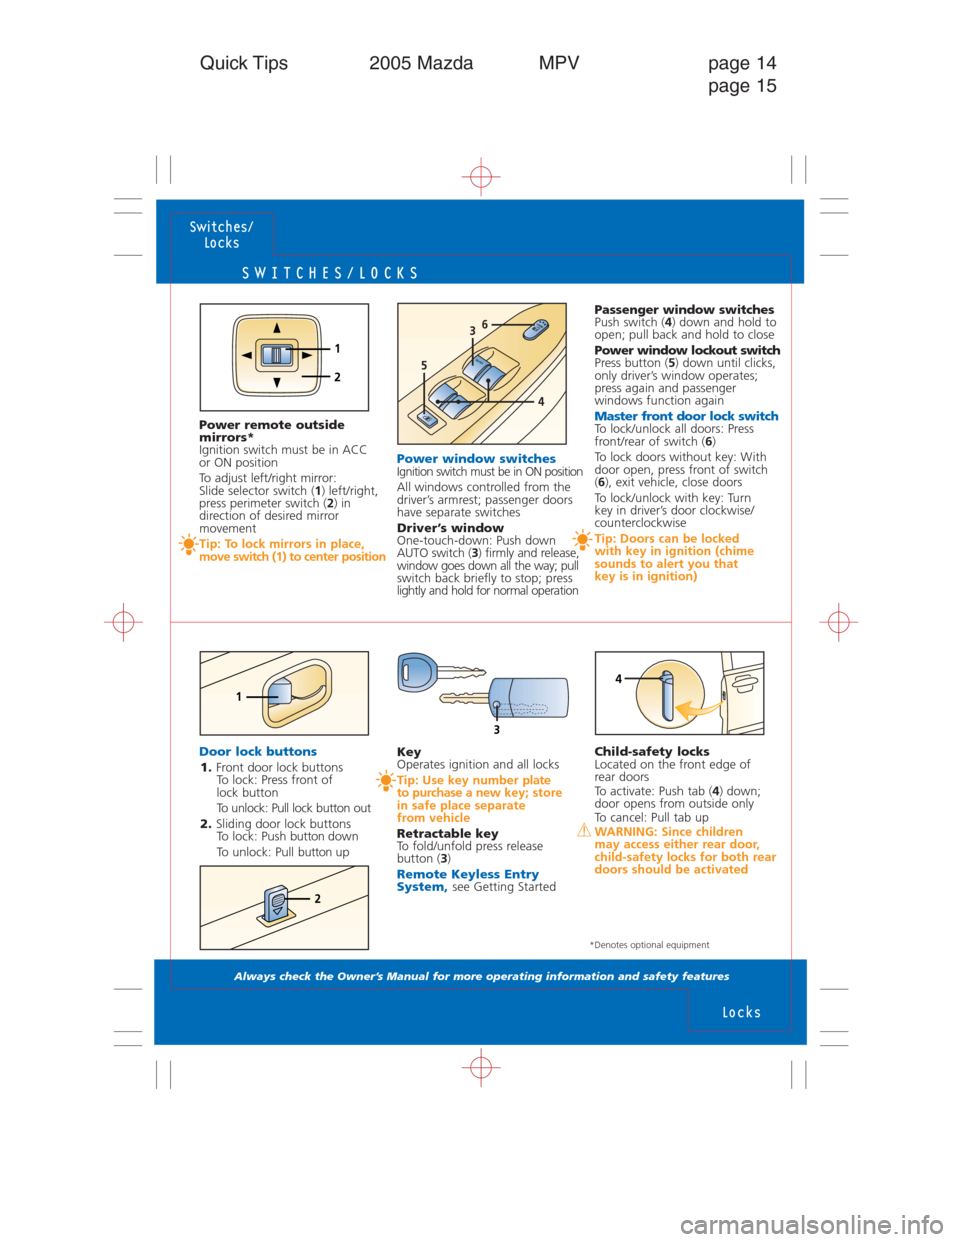
Power window switchesIgnition switch must be in ON position
All windows controlled from the
driver’s armrest; passenger doors
have separate switches
Driver’s window
One-touch-down: Push down
AUTO switch (3) firmly and release,
window goes down all the way; pull
switch back briefly to stop; press
lightly and hold for normal operation
Child-safety locks
Located on the front edge of
rear doors
To activate: Push tab (4) down;
door opens from outside only
To cancel: Pull tab up
WARNING: Since children
may access either rear door,
child-safety locks for both rear
doors should be activated
Passenger window switches
Push switch (4) down and hold to
open; pull back and hold to close
Power window lockout switch
Press button (5) down until clicks,
only driver’s window operates;
press again and passenger
windows function again
Master front door lock switchTo lock/unlock all doors: Press
front/rear of switch (6)
To lock doors without key: With
door open, press front of switch
(6), exit vehicle, close doors
To lock/unlock with key: Turn
key in driver’s door clockwise/
counterclockwise
Tip: Doors can be locked
with key in ignition (chime
sounds to alert you that
key is in ignition)
2
Key
Operates ignition and all locks
Tip: Use key number plate
to purchase a newkey; store
in safe place separate
from vehicle
Retractable key
To fold/unfold press release
button (3)
Remote Keyless Entry
System,see Getting Started
Door lock buttons1. Front door lock buttons
To lock: Press front of
lock button
To unlock: Pull lock button out
2. Sliding door lock buttons
To lock: Push button down
To unlock: Pull button up Power remote outside
mirrors*
Ignition switch must be in ACC
or ON position
To adjust left/right mirror:
Slide selector switch (1) left/right,
press perimeter switch (2) in
direction of desired mirror
movement
Tip: To lock mirrors in place,
move switch (1) to center position
1
4
*Denotes optional equipment
1
2
AUTO
3
5
4
6
3
Page 12 of 14

RADIO/CASSETTE/COMPACT DISC/MD
Always check the Owner’s Manual for more operating information and safety features
Audio
Systems
Audio
Systems
Quick Tips 2005 Mazda MPV page 22
page 23
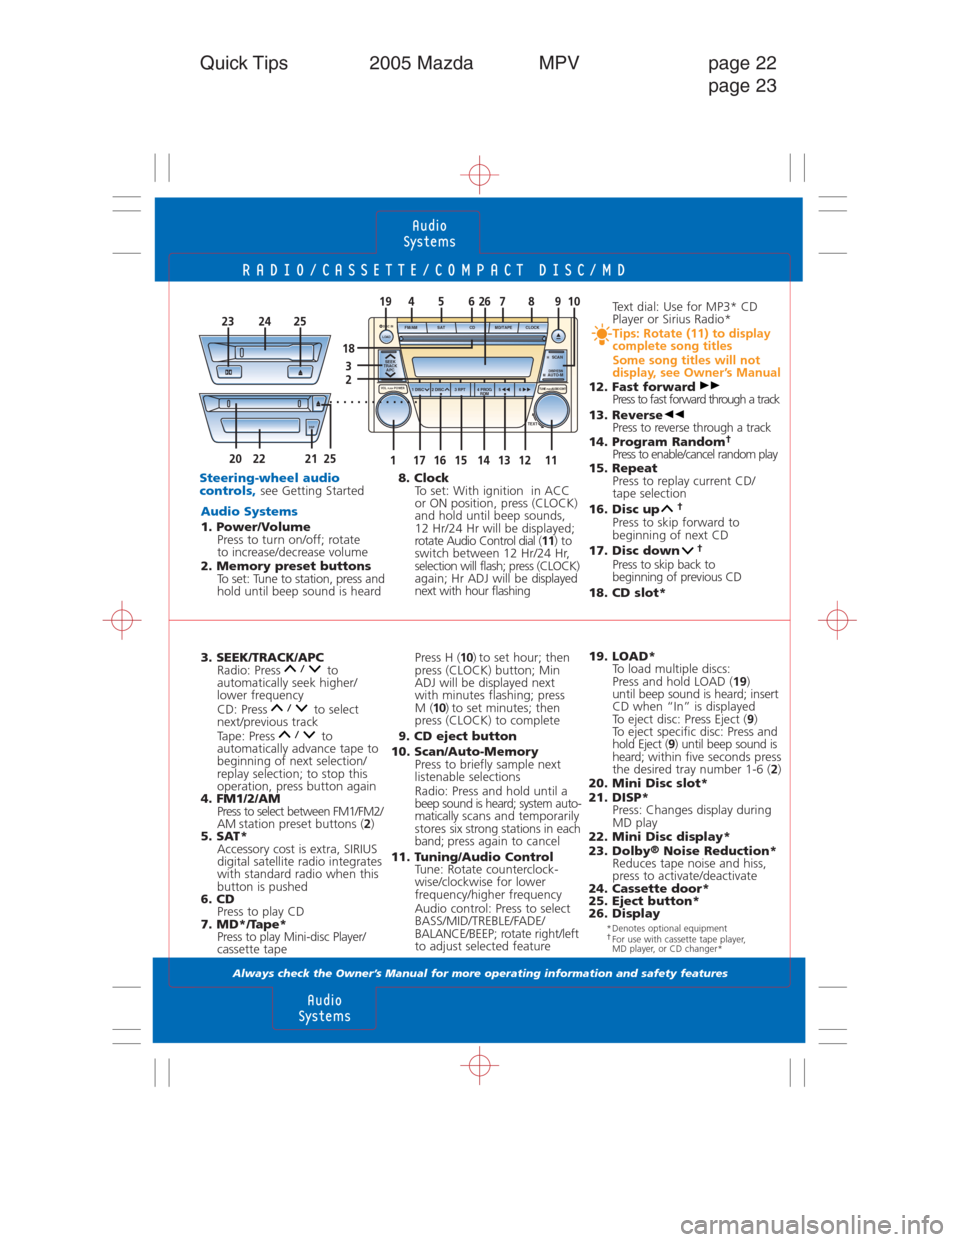
3. SEEK/TRACK/APC
Radio: Press to
automatically seek higher/
lower frequency
CD: Press to select
next/previous track
Tape: Press to
automatically advance tape to
beginning of next selection/
replay selection; to stop this
operation, press button again
4. FM1/2/AM
Press to select between FM1/FM2/
AM station preset buttons (2)
5. SAT*
Accessory cost is extra, SIRIUS
digital satellite radio integrates
with standard radio when this
button is pushed
6. CD
Press to play CD
7. MD*/Tape*
Press to play Mini-disc Player/
cassette tape
Steering-wheel audio
controls,see Getting Started
Audio Systems1. Power/Volume
Press to turn on/off; rotate
to increase/decrease volume
2. Memory preset buttons
To set: Tune to station, press and
hold until beep sound is heard
Press H (10) to set hour; then
press (CLOCK) button; Min
ADJ will be displayed next
with minutes flashing; press
M (10) to set minutes; then
press (CLOCK) to complete
9. CD eject button
10. Scan/Auto-Memory
Press to briefly sample next
listenable selections
Radio: Press and hold until a
beep sound is heard; system auto-
maticallyscans and temporarily
stores six strong stations in each
band; press again to cancel
11. Tuning/Audio Control
Tune: Rotate counterclock-
wise/clockwise for lower
frequency/higher frequency
Audio control: Press to select
BASS/MID/TREBLE/FADE/
BALANCE/BEEP; rotate right/left
to adjust selected feature 8. Clock
To set: With ignition in ACC
or ON position, press (CLOCK)
and hold until beep sounds,
12 Hr/24 Hr will be displayed;
rotate Audio Control dial (11)to
switch between 12 Hr/24 Hr,
selection will flash; press (CLOCK)
again; Hr ADJ will be displayed
next with hour flashing
19. LOAD*
To load multiple discs:
Press and hold LOAD (19)
until beep sound is heard; insert
CD when “In” is displayed
To eject disc: Press Eject (9)
To eject specific disc: Press and
hold Eject (9) until beep sound is
heard;within five seconds press
the desired tray number 1-6 (2)
20. Mini Disc slot*
21. DISP*
Press: Changes display during
MD play
22. Mini Disc display*
23. Dolby
®Noise Reduction*
Reduces tape noise and hiss,
press to activate/deactivate
24. Cassette door*
25. Eject button*
26. DisplayText dial: Use for MP3* CD
Player or Sirius Radio*
Tips: Rotate (11) to display
complete song titles
Some song titles will not
display, see Owner’s Manual
12. Fast forward
Press to fast forward through a track
13. Reverse
Press to reverse through a track
14. Program Random
†Press to enable/cancel random play
15. Repeat
Press to replay current CD/
tape selection
16. Disc up
†
Press to skip forward to
beginning of next CD
17. Disc down
†
Press to skip back to
beginning of previous CD
18. CD slot*
SEEK
TRACK
APC
1 DISC 2 DISC 3 RPT 4 PROG
RDM56 FM/AM SAT CD MD/TAPE
TEXT CLOCKH SCAN
M AUTO-MDISP/ESN
DSP
. . . . . . . . . . . . .
14151713161211120222125
232425
4567891019
3
2
DISC INLOAD
TUNE PUSH AUDIO CONT VOL PUSH POWER
18
26
*Denotes optional equipment†For use with cassette tape player,
MD player, or CD changer*