child lock MAZDA MODEL MPV 2006 Quick Tips (in English)
[x] Cancel search | Manufacturer: MAZDA, Model Year: 2006, Model line: MODEL MPV, Model: MAZDA MODEL MPV 2006Pages: 14, PDF Size: 1.07 MB
Page 5 of 14

GETTING STARTED
Always check the Owner’s Manual for more operating information and safety features
Getting
Started
Getting
Started
Tip: Each time switch is
pressed, a beeper will
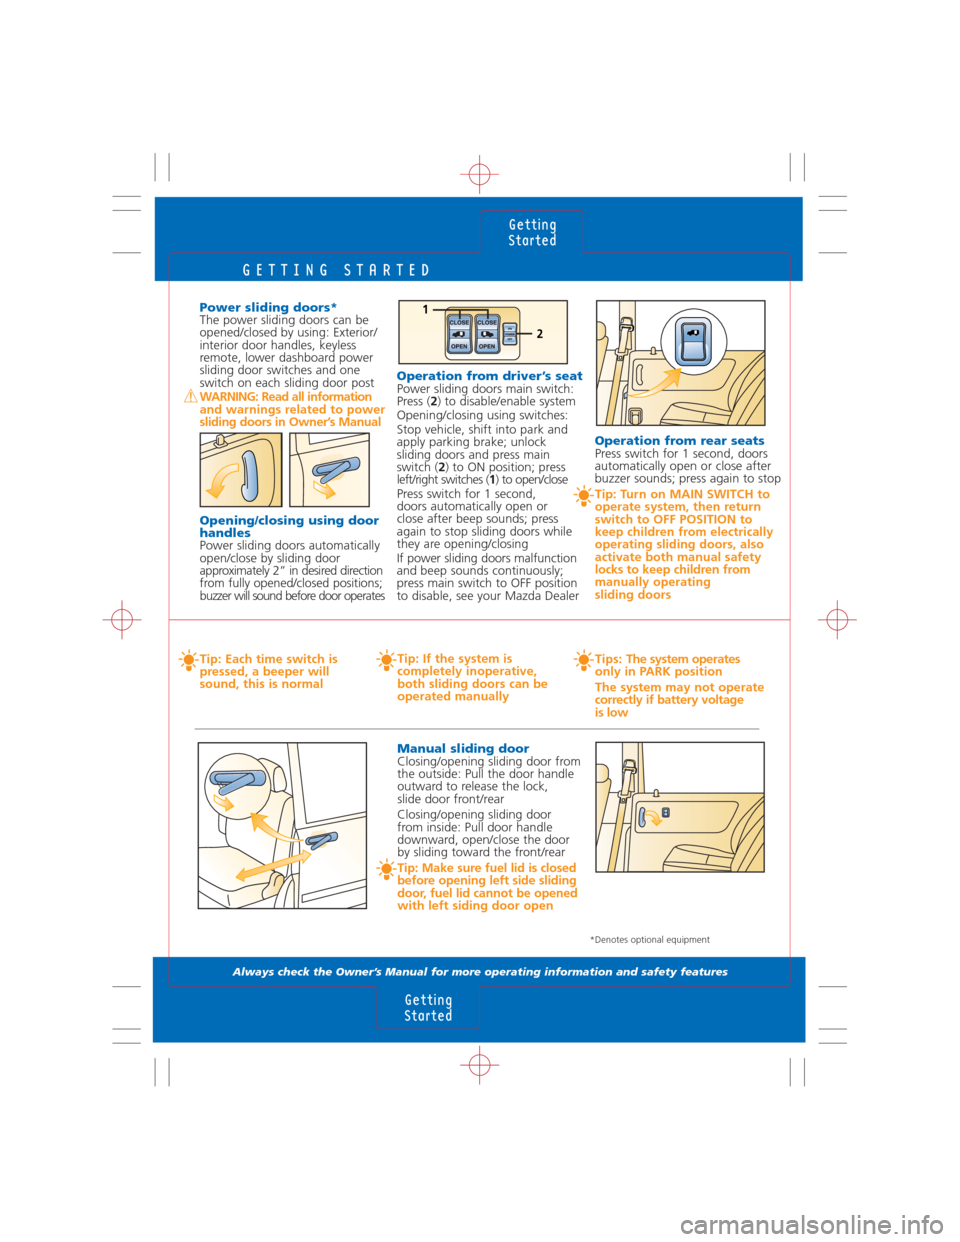
sound, this is normal Power sliding doors*
The power sliding doors can be
opened/closed by using: Exterior/
interior door handles, keyless
remote, lower dashboard power
sliding door switches and one
switch on each sliding door post
WARNING: Read all information
and warnings related to power
sliding doors in Owner’s Manual
Opening/closing using door
handles
Power sliding doors automatically
open/close by sliding door
approximately 2” in desired direction
from fully opened/closed positions;
buzzer will sound before door operates
Tip: If the system is
completely inoperative,
both sliding doors can be
operated manually
Operation from rear seatsPress switch for 1 second, doors
automatically open or close after
buzzer sounds; press again to stop
Tip: Turn on MAIN SWITCH to
operate system, then return
switch to OFF POSITION to
keep children from electrically
operating sliding doors, also
activate both manual safety
locks to keep children from
manually operating
sliding doors Operation from driver’s seat
Power sliding doors main switch:
Press (2) to disable/enable system
Opening/closing using switches:
Stop vehicle, shift into park and
apply parking brake; unlock
sliding doors and press main
switch (2) to ON position; press
left/right switches (1) to open/close
Press switch for 1 second,
doors automatically open or
close after beep sounds; press
again to stop sliding doors while
they are opening/closing
If power sliding doors malfunction
and beep sounds continuously;
press main switch to OFF position
to disable, see your Mazda Dealer
2
1
Tips: The system operates
only in PARK position
The system may not operate
correctly if battery voltage
is low
Manual sliding door
Closing/opening sliding door from
the outside: Pull the door handle
outward to release the lock,
slide door front/rear
Closing/opening sliding door
from inside: Pull door handle
downward, open/close the door
by sliding toward the front/rear
Tip: Make sure fuel lid is closed
before opening left side sliding
door, fuel lid cannot be opened
with left siding door open
*Denotes optional equipment
Page 8 of 14

SWITCHES/LOCKS
Always check the Owner’s Manual for more operating information and safety features
Switches/
Locks
Locks
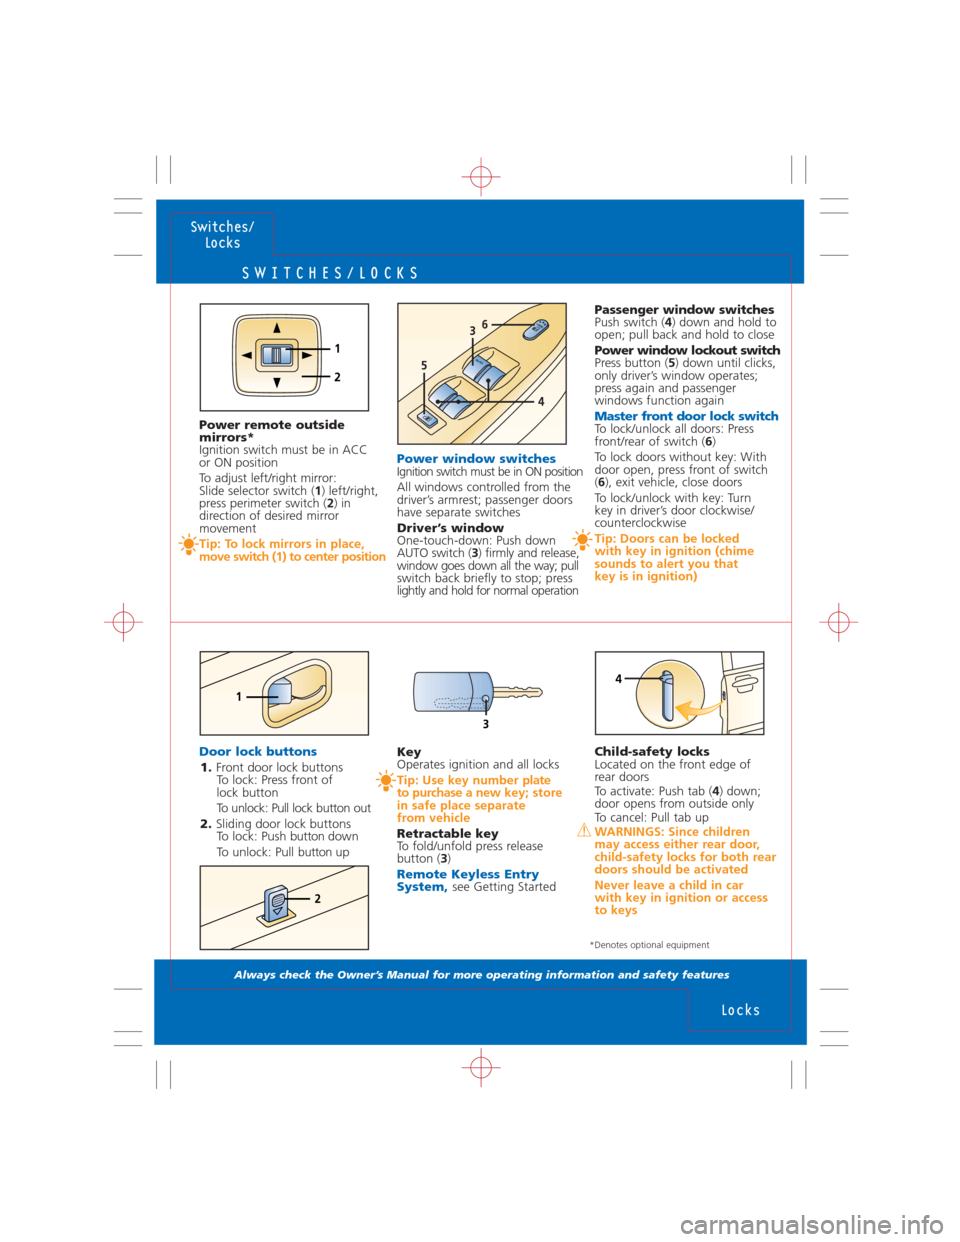
Power window switchesIgnition switch must be in ON position
All windows controlled from the
driver’s armrest; passenger doors
have separate switches
Driver’s window
One-touch-down: Push down
AUTO switch (3) firmly and release,
window goes down all the way; pull
switch back briefly to stop; press
lightly and hold for normal operation
Child-safety locks
Located on the front edge of
rear doors
To activate: Push tab (4) down;
door opens from outside only
To cancel: Pull tab up
WARNINGS: Since children
may access either rear door,
child-safety locks for both rear
doors should be activated
Never leave a child in car
with key in ignition or access
to keys
Passenger window switches
Push switch (4) down and hold to
open; pull back and hold to close
Power window lockout switch
Press button (5) down until clicks,
only driver’s window operates;
press again and passenger
windows function again
Master front door lock switchTo lock/unlock all doors: Press
front/rear of switch (6)
To lock doors without key: With
door open, press front of switch
(6), exit vehicle, close doors
To lock/unlock with key: Turn
key in driver’s door clockwise/
counterclockwise
Tip: Doors can be locked
with key in ignition (chime
sounds to alert you that
key is in ignition)
2
Key
Operates ignition and all locks
Tip: Use key number plate
to purchase a newkey; store
in safe place separate
from vehicle
Retractable key
To fold/unfold press release
button (3)
Remote Keyless Entry
System,see Getting Started
Door lock buttons1. Front door lock buttons
To lock: Press front of
lock button
To unlock: Pull lock button out
2. Sliding door lock buttons
To lock: Push button down
To unlock: Pull button up Power remote outside
mirrors*
Ignition switch must be in ACC
or ON position
To adjust left/right mirror:
Slide selector switch (1) left/right,
press perimeter switch (2) in
direction of desired mirror
movement
Tip: To lock mirrors in place,
move switch (1) to center position
1
4
*Denotes optional equipment
1
2
AUTO
3
5
4
6
3
Page 9 of 14

82
3
1
5
4
SEATS
Always check the Owner’s Manual for more operating information and safety features
Seats
Seats
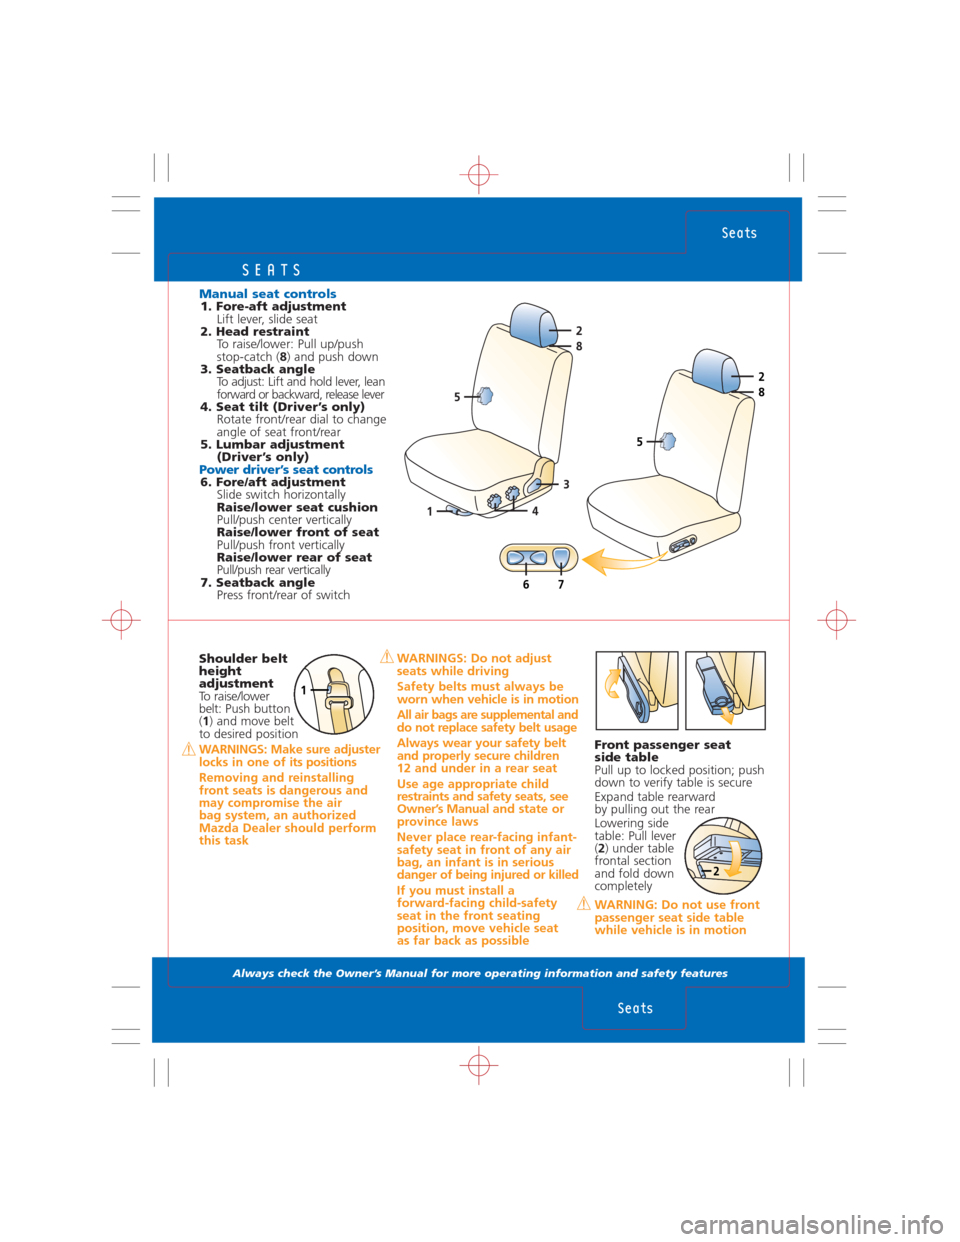
Manual seat controls1. Fore-aft adjustment
Lift lever, slide seat
2. Head restraint
To raise/lower: Pull up/push
stop-catch (8) and push down
3. Seatback angle
To adjust: Lift and hold lever, lean
forward or backward, release lever
4. Seat tilt (Driver’s only)
Rotate front/rear dial to change
angle of seat front/rear
5. Lumbar adjustment
(Driver’s only)
Power driver’s seat controls6. Fore/aft adjustment
Slide switch horizontally
Raise/lower seat cushion
Pull/push center vertically
Raise/lower front of seat
Pull/push front vertically
Raise/lower rear of seat
Pull/push rear vertically
7. Seatback angle
Press front/rear of switch
WARNINGS: Do not adjust
seats while driving
Safety belts must always be
worn when vehicle is in motion
All air bags are supplemental and
do not replace safety belt usage
Always wear your safety belt
and properly secure children
12 and under in a rear seat
Use age appropriate child
restraints and safety seats, see
Owner’s Manual and state or
province laws
Never place rear-facing infant-
safety seat in front of any air
bag, an infant is in serious
danger of being injured or killed
If you must install a
forward-facing child-safety
seat in the front seating
position, move vehicle seat
as far back as possible
Front passenger seat
side table
Pull up to locked position; push
down to verify table is secure
Expand table rearward
by pulling out the rear
Lowering side
table: Pull lever
(2) under table
frontal section
and fold down
completely
WARNING: Do not use front
passenger seat side table
while vehicle is in motion
Shoulder belt
height
adjustment
To raise/lower
belt: Push button
(1) and move belt
to desired position
WARNINGS: Make sure adjuster
locks in one of its positions
Removing and reinstalling
front seats is dangerous and
may compromise the air
bag system, an authorized
Mazda Dealer should perform
this task
1
2
82
5
67
Page 10 of 14

SEATS
Always check the Owner’s Manual for more operating information and safety features
Seats
Child-safety
Seats
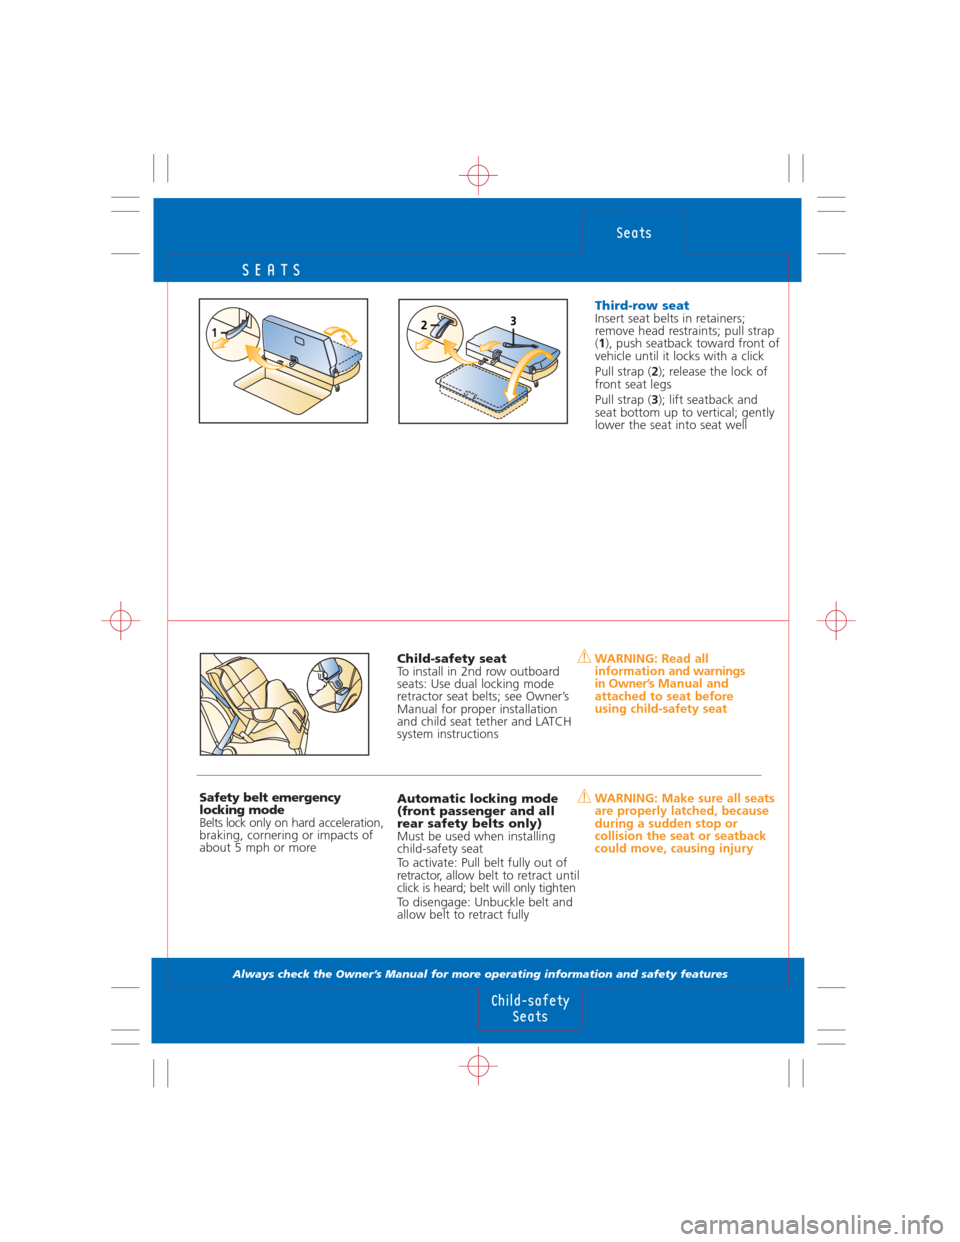
Child-safety seat
To install in 2nd row outboard
seats: Use dual locking mode
retractor seat belts; see Owner’s
Manual for proper installation
and child seat tether and LATCH
system instructionsWARNING: Read all
informationand warnings
in Owner’sManual and
attached to seat before
using child-safety seat
Safety belt emergency
locking mode
Belts lockonly on hard acceleration,
braking, cornering or impacts of
about 5 mph or moreAutomatic locking mode
(front passenger and all
rear safety belts only)
Must be used when installing
child-safety seat
To activate: Pull belt fully out of
retractor, allow belt to retract until
click is heard; belt will only tighten
To disengage: Unbuckle belt and
allow belt to retract fullyWARNING: Make sure all seats
are properly latched, because
during a sudden stop or
collision the seat or seatback
could move, causing injury
Third-row seatInsert seat belts in retainers;
remove head restraints; pull strap
(1), push seatback toward front of
vehicle until it locks with a click
Pull strap (2); release the lock of
front seat legs
Pull strap (3); lift seatback and
seat bottom up to vertical; gently
lower the seat into seat well123