cruise control MAZDA MODEL MPV 2006 Quick Tips (in English)
[x] Cancel search | Manufacturer: MAZDA, Model Year: 2006, Model line: MODEL MPV, Model: MAZDA MODEL MPV 2006Pages: 14, PDF Size: 1.07 MB
Page 2 of 14

DRIVER’S VIEW
Always check the Owner’s Manual for more operating information and safety features
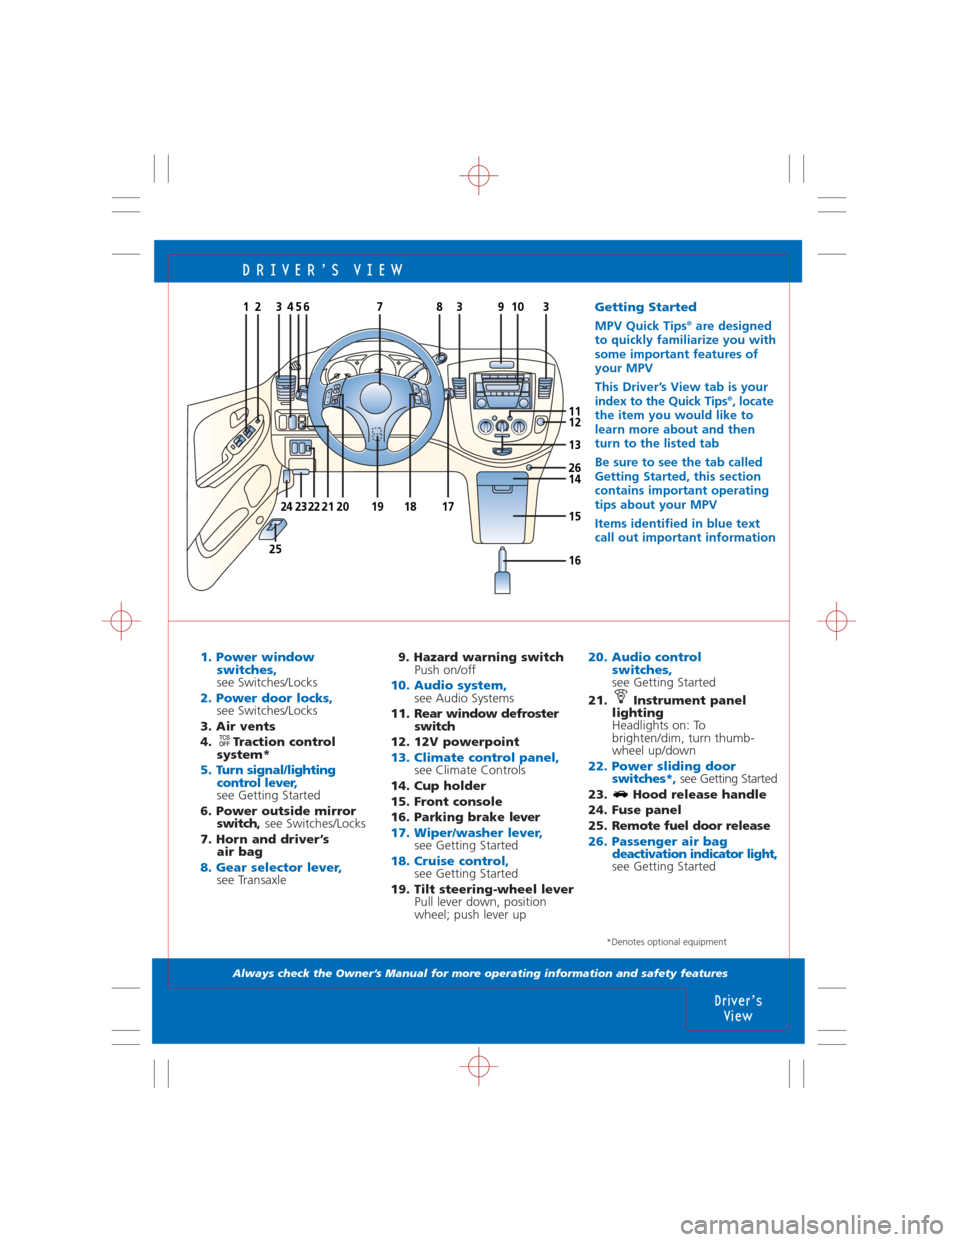
1. Power window
switches,
see Switches/Locks2. Power door locks,see Switches/Locks
3. Air vents
4. Traction control
system*
5. Turn signal/lighting
control lever,
see Getting Started
6. Power outside mirror
switch, see Switches/Locks
7. Horn and driver’s
air bag
8. Gear selector lever, see Transaxle
9. Hazard warning switch
Push on/off
10. Audio system,see Audio Systems
11. Rear window defroster
switch
12. 12V powerpoint
13. Climate control panel,see Climate Controls
14. Cup holder
15. Front console
16. Parking brake lever
17. Wiper/washer lever,see Getting Started18. Cruise control,see Getting Started
19. Tilt steering-wheel lever
Pull lever down, position
wheel; push lever up
20. Audio control
switches,
see Getting Started
21. Instrument panel
lighting
Headlights on: To
brighten/dim, turn thumb-
wheel up/down
22. Power sliding door
switches*,see Getting Started
23. Hood release handle
24. Fuse panel
25. Remote fuel door release
26. Passenger air bag
deactivation indicator light,
see Getting Started
Driver’s
View
24
1
13
1211
1426
15
1625
231722
23456383109
SET
ACCEL ON
OFF
CANCELMODEV
O
LSET
COAST
18192021
7
*Denotes optional equipment
Getting Started
MPV Quick Tips®are designed
to quickly familiarize you with
some important features of
your MPV
This Driver’s View tab is your
index to the Quick Tips
®, locate
the item you would like to
learn more about and then
turn to the listed tab
Be sure to see the tab called
Getting Started, this section
contains important operating
tips about your MPV
Items identified in blue text
call out important information
Page 4 of 14

GETTING STARTED
Always check the Owner’s Manual for more operating information and safety features
Getting
Started
Getting
Started
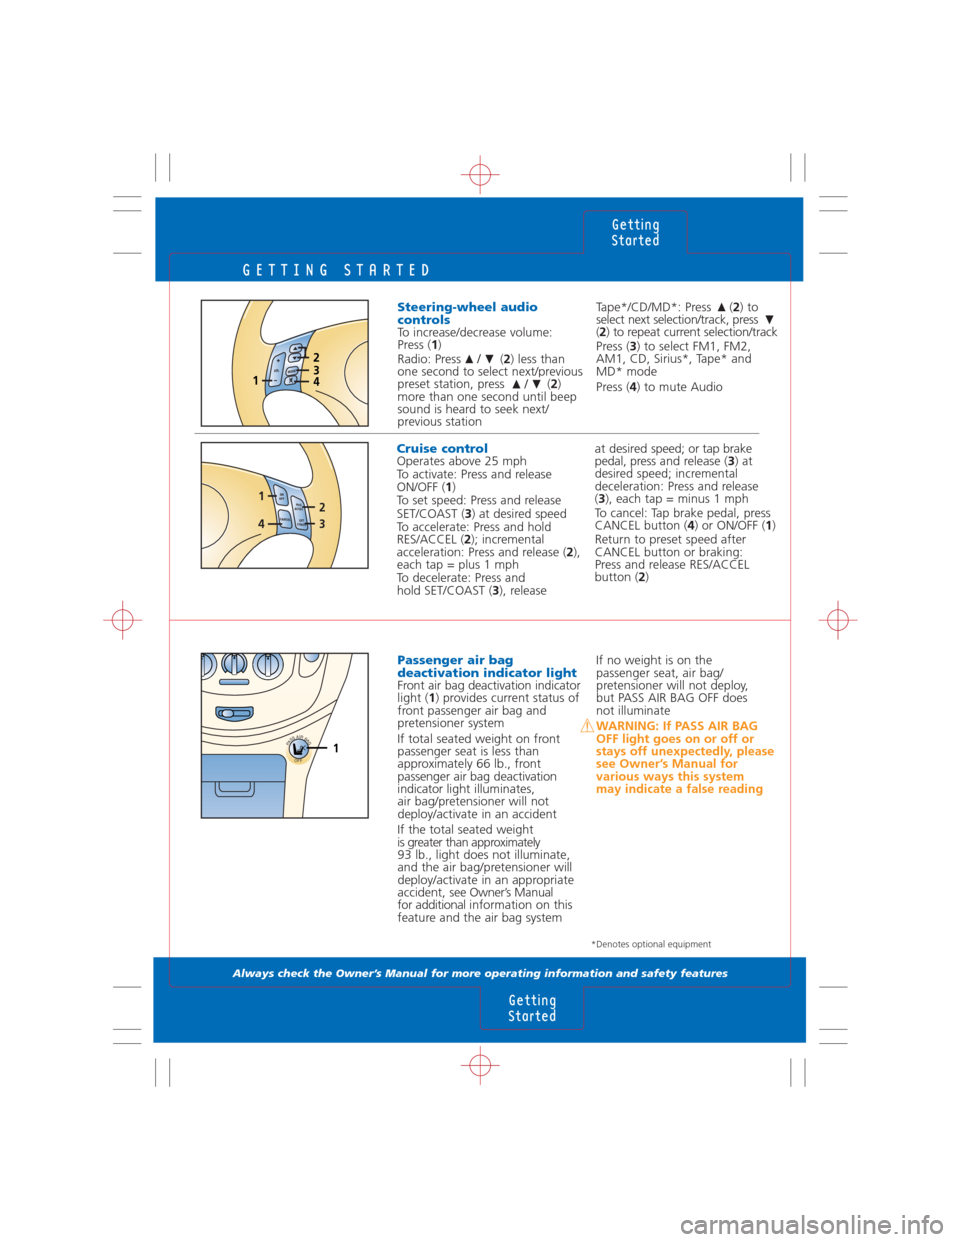
at desired speed; or tap brake
pedal, pressand release (3) at
desired speed; incremental
deceleration: Press and release
(3), each tap = minus 1 mph
To cancel: Tap brake pedal, press
CANCEL button (4) or ON/OFF (1)
Return to preset speed after
CANCEL button or braking:
Press and release RES/ACCEL
button (2)Cruise controlOperates above 25 mph
To activate: Press and release
ON/OFF (1)
To set speed: Press and release
SET/COAST (3) at desired speed
To accelerate: Press and hold
RES/ACCEL (2); incremental
acceleration: Press and release (2),
each tap = plus 1 mph
To decelerate: Press and
hold SET/COAST (3), release
RES
ACCEL ON
OFF
CANCELSE
T
COAS
T43
12
Steering-wheel audio
controls
To increase/decrease volume:
Press (1)
Radio: Press (2) less than
one second to select next/previous
preset station, press (2)
more than one second until beep
sound is heard to seek next/
previous station
/
/
Tape*/CD/MD*: Press (2) to
select next selection/track, press
(2) to repeat current selection/track
Press (3) to select FM1, FM2,
AM1, CD, Sirius*, Tape* and
MD* mode
Press (4) to mute Audio
M
O
D
EV
O
L1
234
Passenger air bag
deactivation indicator light
Front air bag deactivation indicator
light (1) provides current status of
front passenger air bag and
pretensioner system
If total seated weight on front
passenger seat is less than
approximately 66 lb., front
passenger air bag deactivation
indicator light illuminates,
air bag/pretensioner will not
deploy/activate in an accident
If the total seated weight
is greater than approximately
93 lb., light does not illuminate,
and the air bag/pretensioner will
deploy/activate in an appropriate
accident, see Owner’s Manual
for additional information on this
feature and the air bag systemIf no weight is on the
passenger seat, air bag/
pretensioner will not deploy,
but PASS AIR BAG OFF does
not illuminate
WARNING: If PASS AIR BAG
OFF light goes on or off or
stays off unexpectedly, please
see Owner’s Manual for
various ways this system
may indicate a false readingPASSAIRBAG
OFF1
*Denotes optional equipment
Page 6 of 14

INSTRUMENT CLUSTER
Always check the Owner’s Manual for more operating information and safety features
WARNING LIGHTS
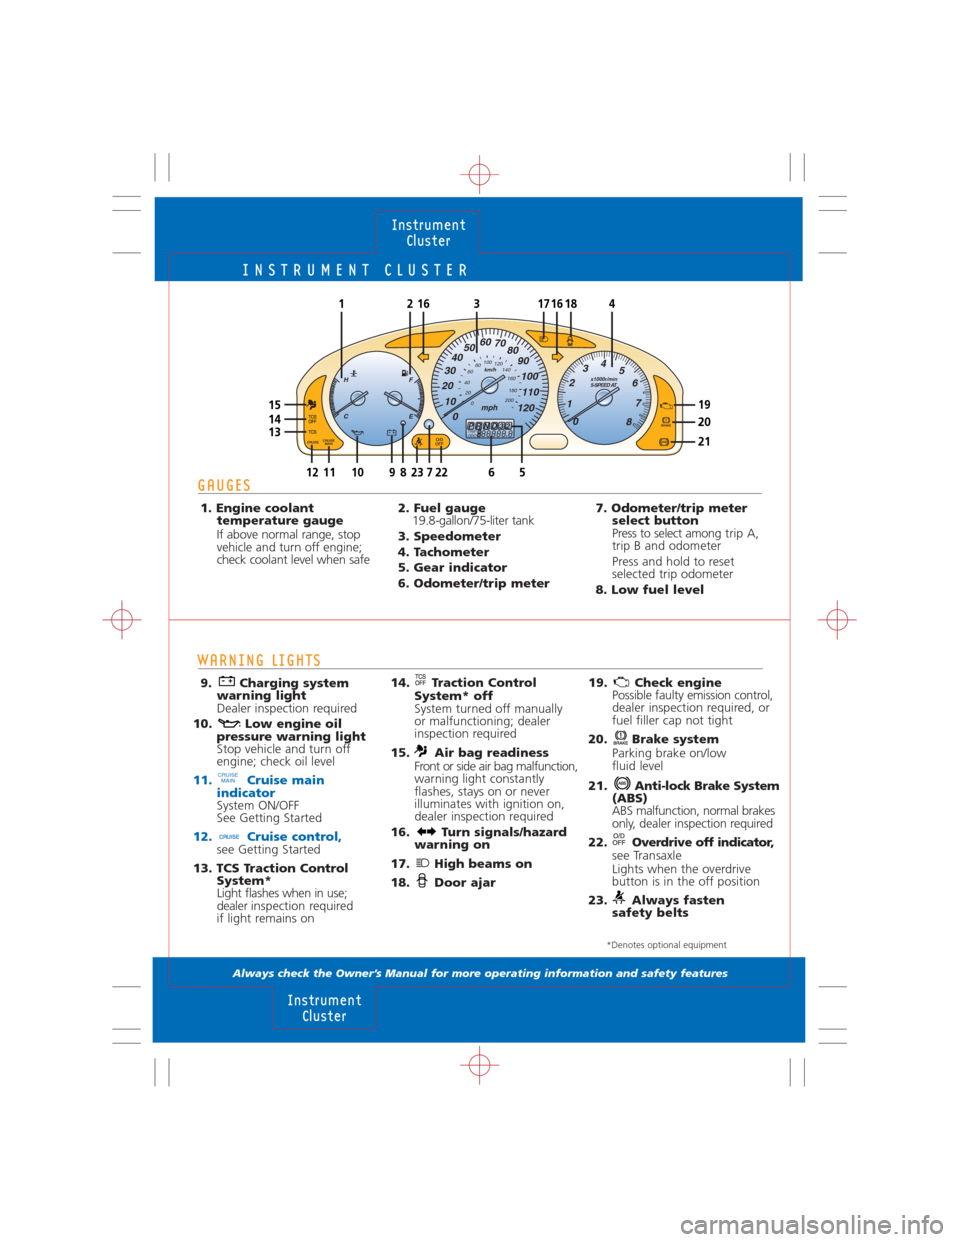
9. Charging system
warning light
Dealer inspection required
10. Low engine oil
pressure warning light
Stop vehicle and turn off
engine; check oil level
11. Cruise main
indicator
System ON/OFF
See Getting Started
12. Cruise control,see Getting Started
13. TCS Traction Control
System*
Light flashes when in use;
dealer inspection required
if light remains on
CRUISE
MAIN
14. Traction Control
System* off
System turned off manually
or malfunctioning; dealer
inspection required
15. Air bag readiness
Front or side air bag malfunction,
warning light constantly
flashes, stays on or never
illuminates with ignition on,
dealer inspection required
16. Turn signals/hazard
warning on
17. High beams on
18. Door ajar19. Check enginePossible faulty emission control,
dealer inspection required, or
fuel filler cap not tight
20. Brake system
Parking brake on/low
fluid level
21. Anti-lock Brake System
(ABS)
ABS malfunction, normal brakes
only, dealer inspection required
22. Overdrive off indicator,
see Transaxle
Lights when the overdrive
button is in the off position
23. Always fasten
safety belts
Instrument
Cluster
Instrument
Cluster
x1000r/min
5-SPEED AT
0 1234
5
6
7
8
H
CF
E
1092312117228
16164121718
15
1413
0 10 2030405060
70
80
90
100
110
120
200
0 20 406080100
120
140
160
180mph
km/h
3
TRIP
ODOA88888.8BPRND32
65
19
20
21
*Denotes optional equipment
GAUGES
1. Engine coolant
temperature gauge
If above normal range, stop
vehicle and turn off engine;
check coolant level when safe2. Fuel gauge
19.8-gallon/75-liter tank
3. Speedometer
4. Tachometer
5. Gear indicator
6. Odometer/trip meter7. Odometer/trip meter
select button
Press to select amongtrip A,
trip B and odometer
Press and hold to reset
selected trip odometer
8. Low fuel level