ambient temperature MAZDA MODEL MX-30 EV 2022 Owners Manual
[x] Cancel search | Manufacturer: MAZDA, Model Year: 2022, Model line: MODEL MX-30 EV, Model: MAZDA MODEL MX-30 EV 2022Pages: 547, PDF Size: 79.35 MB
Page 93 of 547
Vibration of the brake pedal might
be felt under the following
conditions:
The power switch is switched ON.The brake pedal is operated.
High voltage battery level and
temperature
If the high voltage battery level is low
or the high voltage battery temperature
is low, the vehicle speed may not
increase even if the accelerator pedal is
depressed because the motor output is
restricted. Drive the vehicle following
the instructions displayed on the
multi-information display.
To Extend Cruising Distance
The electrical power consumption
while driving can be reduced and the
cruising distance can be extended by
doing the following operations.
With the charging connector
connected, turn on the climate
control system to provide a
comfortable temperature in the
cabin before driving.
When driving during cold
temperatures, use the seat warmer
or steering warmer instead of the
climate control system.
Adjust the climate control system
to a moderate airflow and
temperature setting.
Refrain from using the defogger
under conditions other than when
a window is fogged or frozen.
Unload unnecessary cargo to
reduce the vehicle weight.
Avoid unnecessary sudden
acceleration, rapid acceleration,
and rapid deceleration. Instead,
perform smooth starts,
acceleration, and deceleration.
Try to drive maintaining a constant
speed and avoid speeding.
Inspect the tire pressures regularly
and always adjust the tire pressures
to the speci fied inflation pressure.
By maintaining a su fficient distance
between vehicles and using the
regenerative braking well, more
electrical power can be charged to
the high voltage battery.
Pointers for Maintaining Long Battery
Life
The high voltage battery life changes
depending on the vehicle conditions or
charging method.
For maintaining a long high voltage
battery life, be careful of the following:
Charging the high voltage battery
Avoid unnecessary, frequent
charging.
Charge the battery normally and
avoid quick charging as much as
possible.
Only charge the battery with as much
power as needed, and do not always
fully charge the battery. The
maximum charge limit can be set.
Refer to Charging Settings on page
3-21.
Pa r k i n g t h e v e h i c l e
Do not park the vehicle in a place
where the ambient temperature is
extremely high or low.
Do not leave the vehicle while the
remaining high voltage battery power
is extremely low.
If the Excessive Battery Temperature noti fication is displayed on the
center display after driving the
vehicle, select Start.
Before Driving
Electric Vehicles
3-6
MX -30_8JD4-EA -21G_Edition2_new 2021-5-18 14:38:07
Page 101 of 547
NOTE
When the driver's door is locked using
any of the following functions, the
charge lid is also locked at the same
time.
Vehicle speed sensing auto door lock
function
Auto re-lock function
Quick charge port
The quick charge port is the part to
which the connector of the quick
charger is connected. This is used for
quick charging.
Battery heater
The battery heater is designed to
maintain the appropriate high voltage
battery temperature.
Because the driving performance and
the charging performance decrease if
the high voltage battery temperature
decreases, decreases in their
performance are reduced by
maintaining the appropriate high
voltage battery temperature using the
battery heater.
When the high voltage battery
temperature decreases signi ficantly
while parking or charging , the battery
heater operates. When the
temperature increases to the speci fied
value, the heater turns o ff.
However, when the high voltage
battery level is low, the battery heater
does not operate.
NOTE
Because the electrical power of the
high voltage battery is used by the
battery heater, we recommend that
the charge connector is left
connected to the vehicle when
parked in a location where charging
is available.
If the vehicle is not used for a long
period of time, we recommend that
the battery heater is turned o ff using
[Settings] in Mazda Connect.
When the battery heater operates,
the charging time could take longer.
Battery cooling
If the high voltage battery temperature
reaches 40 ℃ (104 ℉) or higher after
driving the vehicle, it is possible to cool
the high voltage battery while the
vehicle is parked for maintaining a long
high voltage battery life.
If the Excessive Battery Temperature
noti fication is displayed on the center
display after completing a trip, select
Start to operate the battery cooling.
NOTE
Because the electrical power of the
high voltage battery is used by the
battery cooling , we recommend that
the charge connector is connected to
the vehicle while the battery cooling is
operating , when parked in a location
where charging is available.
▼ Charging
Charging type
There are two methods of charging the
high voltage battery, normal charging
and quick charging.
We recommend that you use normal
charging as the preferred charging
method as this will help to keep the
high voltage battery in optimal
condition and maintain a long battery
life.
The exact charging time depends on
various conditions at the time of
charging , such as the type of charger,
battery condition, ch
arging patterns, as
well as the battery temperature and
ambient temperature. In cold weather
Before Driving
Electric Vehicles
3-14
MX -30_8JD4-EA -21G_Edition2_new 2021-5-18 14:38:07
Page 102 of 547
conditions, both the battery and
ambient temperature will affect the
required charging time and, in certain
situations, this may lead to a signi ficant
increase in the charging time.
Normal charging
Normal Charging can be performed at
home using either a household power
source such as a wall outlet or wall
box, or similar method (alternating
current). Additionally, charging can be
performed at a public charging facility
using a charger other than a quick
charger (direct current).
When charging is started after the
remaining high voltage battery power
warning indication/warning light turns
on, the time it takes to fully charge the
high voltage battery at a public AC
charging facility is about 5 hours. Using
a household power source for charging
will increase the charging time to fully
charge the high voltage battery.
For normal charging , the charging
timer function can be used to charge
automatically from start to finish.
For details on how to use the charging
timer function, refer to Charging
Settings on page 3-21.
Quick charging
When charging is started at a quick
charging station (DC with 50 kW or
higher) the high voltage battery can be
charged from a 20% to 80% battery
charge level in about 36 minutes. The
exact charging time depends on
various conditions at the time of
charging , such as the type of charger,
battery condition, ch arging patterns, as
well as the battery temperature and
ambient temperature. In cold weather
conditions, both the battery and
ambient temperature will aff ect the
required charging time and, in certainsituations, this may lead to a significant
increase in the charging time.
WARNING
Always heed the following when
using a quick charger:
Otherwise, it could lead to an
accident.
Do not use a charge cable which
exceeds 30 m (98 ft).
This vehicle is compatible with quick
chargers with charge cables of 30 m
(98 ft) or shorter and which do not
charge other devices or vehicles at
the same time.
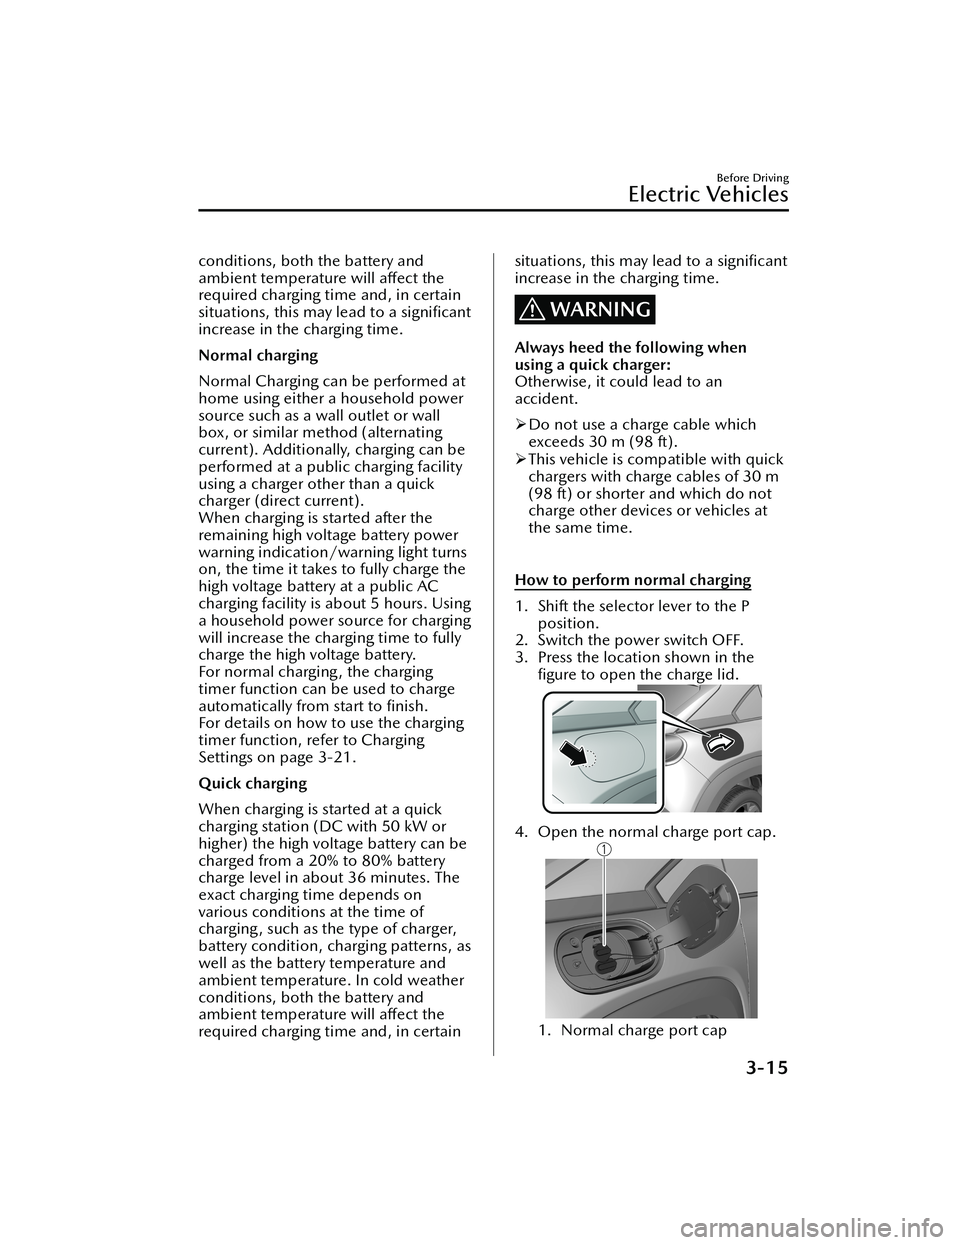
How to perform normal charging
1. Shift the selector lever to the P position.
2. Switch the power switch OFF.
3. Press the location shown in the figure to open the charge lid.
4. Open the normal charge port cap.
1. Normal charge port cap
Before Driving
Electric Vehicles
3-15
MX -30_8JD4-EA -21G_Edition2_new 2021-5-18 14:38:07
Page 329 of 547

Tire Pressure MonitoringSystem (TPMS)
▼Tire Pressure Monitoring System
(TPMS)
The TPMS monitors the air pressure of
each tire and if it decreases below the
speci
fied value, the system
notifies the
driver by turning on the TPMS warning
light in the instrument cluster and
indicating a message on the
multi-information display.
For the TPMS, the air pressure data
sent from the tire pressure sensors
installed on each wheel via radio signal
is received by the receiver unit in the
vehicle to monitor the tire pressures.
1. Tire pressure sensors
In addition, the current tire pressures
can be checked using the center
display.
Refer to the Vehicle Status Monitor
section in the Mazda Connect
Owner's Manual.
NOTE
When the ambient temperature is
low, the tire temperatures also
decrease. If the tire temperatures
decrease, the air pressure in the tires
will also decrease which could turn
on the TPMS warning light.
Before driving, visually inspect the
tires for abnormalities. Additionally,
inspect the tire pressures monthly. A
digital type air pressure gauge is
recommended for inspecting the tire
pressures.
The TPMS is not a substitute for your
own periodic inspection of the tires.
Always inspect the tires yourself
periodically.
CAUTION
Each tire, including the spare (if
provided), should be checked
monthly when cold and
inflated to
the in flation pressure recommended
by the vehicle manufacturer on the
vehicle placard or tire inflation
pressure label. (If your vehicle has
tires of a different size than the size
indicated on the vehicle placard or
tire in flation pressure label, you
should determine the proper tire in flation pressure for those tires.)
As an added safety feature, your
vehicle has been equipped with a
tire pressure monitoring system
(TPMS) that illuminates a low tire
pressure telltale when one or more
of your tires is significantly
under-in flated. Accordingly, when
the low tire pressure telltale
illuminates, you should stop and
check your tires as soon as possible,
and in flate them to the proper
pressure. Driving on a signi ficantly
under-in flated tire causes the tire to
overheat and can lead to tire failure.
Under-in flation also reduces fuel
e ffi ciency and tire tread life, and may
a ff ect the vehicle's handling and
stopping ability.
When Driving
Tire Pressure Monitoring System (TPMS)
4-180
MX -30_8JD4-EA -21G_Edition2_new 2021-5-18 14:38:07
Page 349 of 547

The system may have a malfunction if a message indicating a system malfunction is
displayed. Have your vehicle inspected by an Authorized Mazda Dealer.
A message may be displayed even when the ambient temperature is extremely
cold, or mud, ice, or snow adheres to the sensor area. Remove any foreign matter
from the sensor area.
▼Sensor Detection Range
The sensors detect obstructions within the following range.
1. Front ultrasonic sensor detection range
2. Rear corner/Rear side ultrasonic sensor detection range
3. Rear ultrasonic sensor detection range
4. Front corner ultrasonic sensor detection range
A
: About 55.0 cm (About 21.6 in)
B : About 150 cm (About 59.0 in)
C : About 100 cm (About 39.3 in)
Viewing distance display
Display Distance between vehicle and obstruc-
tion
Without 360° view monitor
With 360° viewmonitor Front ultrasonic
sensor
*/Front cor-
ner ultrasonic sen-
sor
*
Rear ultrasonic sen-sor/Rear corner ul- trasonic sensor/
Rear side ultrasonic
sensor
*
Without front ul-trasonic sensor
and front corner
ultrasonic sensor With front ultra-
sonic sensor and
front corner ultra- sonic sensor
Green
Front ultrasonic sen- sor:
Approx. 100― 60.0
cm (39.3 ―23.6 in) Rear ultrasonic sen-
sor:
Approx. 150― 60.0
cm (59.0 ―23.6 in)
When Driving
Pa r k i n g S e n s o r Sys te m
4-200*Some models.
MX -30_8JD4-EA -21G_Edition2_new 2021-5-18 14:38:07
Page 360 of 547

NOTE
AUTO switch indicator light
ON
The indicator light turns on during
auto operation.
OFF
When any switch or icon is operated
during auto operation, including the
, , , , , , , the
fan control switch, or the defroster
switch, the indicator light turns o ff.
At this time, the functions other than
the one operated operate
automatically.
▼ Temperature Control Switch/Icon
The temperature setting can be
adjusted between 15 °C (60 °F) and
29 °C (84 °F) by pressing the
temperature setting switch, or touching
the
(red) or (blue).
The temperature setting can be quickly
adjusted by pressing and holding the
temperature setting switch, or touching
and holding the
(red) or
(blue).
NOTE
When you set the temperature to the
lower or upper limit, “LO” or “HI” is
displayed.
The temperature units for the
temperature setting display can be
changed in conjunction with the
temperature units for the outside
temperature display.
When swiping the (red) or
(blue) up/down, the temperature
can be adjusted up or down in
increments of 3 °C (6 °F).
To reduce power consumption by
the climate control system, warm air flow may not be supplied when
the ambient temperature is 25 °C
(77 °F) or more.
▼ Fan Control Switch/Icon
The air
flow amount can be adjusted to
7 levels.
The air flow amount can be adjusted by
pressing the fan control switch, or by
touching the
or .
In addition, when the fan control
switch,
, or is pressed and held,
the air flow amount can be adjusted
quickly.
NOTE
When the or is swiped
upward, the air flow amount can be
increased at 3 levels. When swiped
downward, the air flow amount can
be decreased at 3 levels.
▼ Climate Control Power Switch
(System On/Off
)
The climate control system turns on
and
off each time the climate control
power switch is pressed.
▼ Rear Window Defogger Switch
Press the rear window defogger switch
to defrost the rear window.
When the defroster is operated, the
outside mirror defogger
* and the
windshield wiper de-icer* operate in
conjunction.
▼ Display Setting Icon
To u c h t h e to display the display
setting screen.
You can adjust the brightness (41
levels), select the screen from
Interior Features
Climate Control System
*Some models.5-5
MX -30_8JD4-EA -21G_Edition2_new 2021-5-18 14:38:07
Page 362 of 547
NOTE
When on the auto operation screen,
touch the seat indication in the
center of the screen to display the
, , , , and icons.
When swiping the , , , ,
or
to the left, the icon two icons
to the left can be selected. When
swiping to the right, the icon two
icons to the right can be selected.
Basic Climate Control
System Operation
▼ Air Conditioner Basic Operation
Operate the air conditioner (cooling,
defrosting functions) with the EV
system started. The air conditioner can
be used while charging when the
power switch is switched ON. In
addition, Cabin preconditioning can
also be used when the power switch is
switched OFF.
NOTE
When the charging is completed with
the power switch switched ON, the air
conditioner (cooling , heating ,
defrosting functions) stops
automatically.
1. Press the AUTO switch. Selection of
the air flow mode, air intake
selector and amount of air flow will
be automatically controlled.
2. Operate the temperature setting
switch/
(red) or (blue) to
set the desired temperature.
NOTE
The recommended set
temperature is 22 °C (72 °F).
Setting the temperature to
maximum hot or cold will not
provide the desired temperature
at a faster rate.
The power consumption of the
air conditioner changes
depending on the set
temperature and the ambient
temperature. If the set
temperature is too low or high,
the remaining distance to full
discharge shortens.
3. To turn o ff the system, press the
climate control power switch.
Interior Features
Climate Control System
5-7
MX -30_8JD4-EA -21G_Edition2_new 2021-5-18 14:38:07
Page 363 of 547

▼Adjusting the Vents
Directing air
flow
To adjust the direction of air flow, move
the adjustment knob.
NOTE
When using the air conditioner
under humid ambient temperature
conditions, the system may blow fog
from the vents. This is not a sign of
trouble but a result of humid air
being suddenly cooled.
The air vents can be fully opened and
closed by operating the knob.
Side Vents
Air vent open/close
1. Knob
2. Open
3. Close
Air flow direction adjustment
1. Knob
Center Vents
Air vent open/close
1. Knob
2. Close
3. Open
Air flow direction adjustment
1. Knob
▼ Selecting the
Airflow Mode
Dashboard Vents
Interior Features
Climate Control System
5-8
MX
-30_8JD4-EA -21G_Edition2_new 2021-5-18 14:38:07
Page 476 of 547

Do not ignore the TPMS warning light
when it is turned on or flashing:
Continuing to drive the vehicle while
ignoring the illumination/ flashing of
the TPMS warning light is dangerous
because a tire may burst which could
lead to an accident. Take appropriate
measures as soon as possible.
NOTE
While the TPMS is learning the tire
positions, such as immediately after a
tire position has been changed, the tire
pressure at the tire position prior to it
being changed is displayed until the
system completes the learning. For this
reason, the tire pressures displayed for
the tire positions may be di fferent from
the actual tire pressures at the tire
positions.
Action to be taken
Adjust the tire pressures to the
appropriate pressures.
Refer to Tire In flation Pressure on page
6-23.
CAUTION
Adjust the tire pressures while the
tires are cool. Because the air
pressure in the tires fluctuates
depending on the temperature,
before adjusting the tire pressures,
let the vehicle sit for an hour or drive
it only within a 1.6 km (1 mile)
distance. If the tire pressures are
adjusted while the tires are warm,
the tire pressures may decrease
below the specified air pressure after
cooling down which could turn on
the warning light. In addition,
because the air pressure in the tires
decreases when the ambient
temperature is low, if the ambient
temperature increases, an
illuminated TPMS warning light may
turn o ff. Under any circumstances,
always adjust the tire pressures while
the tires are cool.
After adjusting the tire pressures, the
TPMS warning light turns o ff. If the
TPMS warning light does not turn off,
drive the vehicle at a speed of about
25 km (16 mph) or faster for 3
minutes or longer and make sure the
warning light turns off.
If the TPMS warning light remains on
even after adjusting the tire pressures,
one of the tires may have a puncture.
▼ KEY Indicator Light (Green)
(Flashing)
If Trouble Arises
Warning/Indicator Lights and Warning Sounds
7-31
MX
-30_8JD4-EA -21G_Edition2_new 2021-5-18 14:38:07
Page 534 of 547
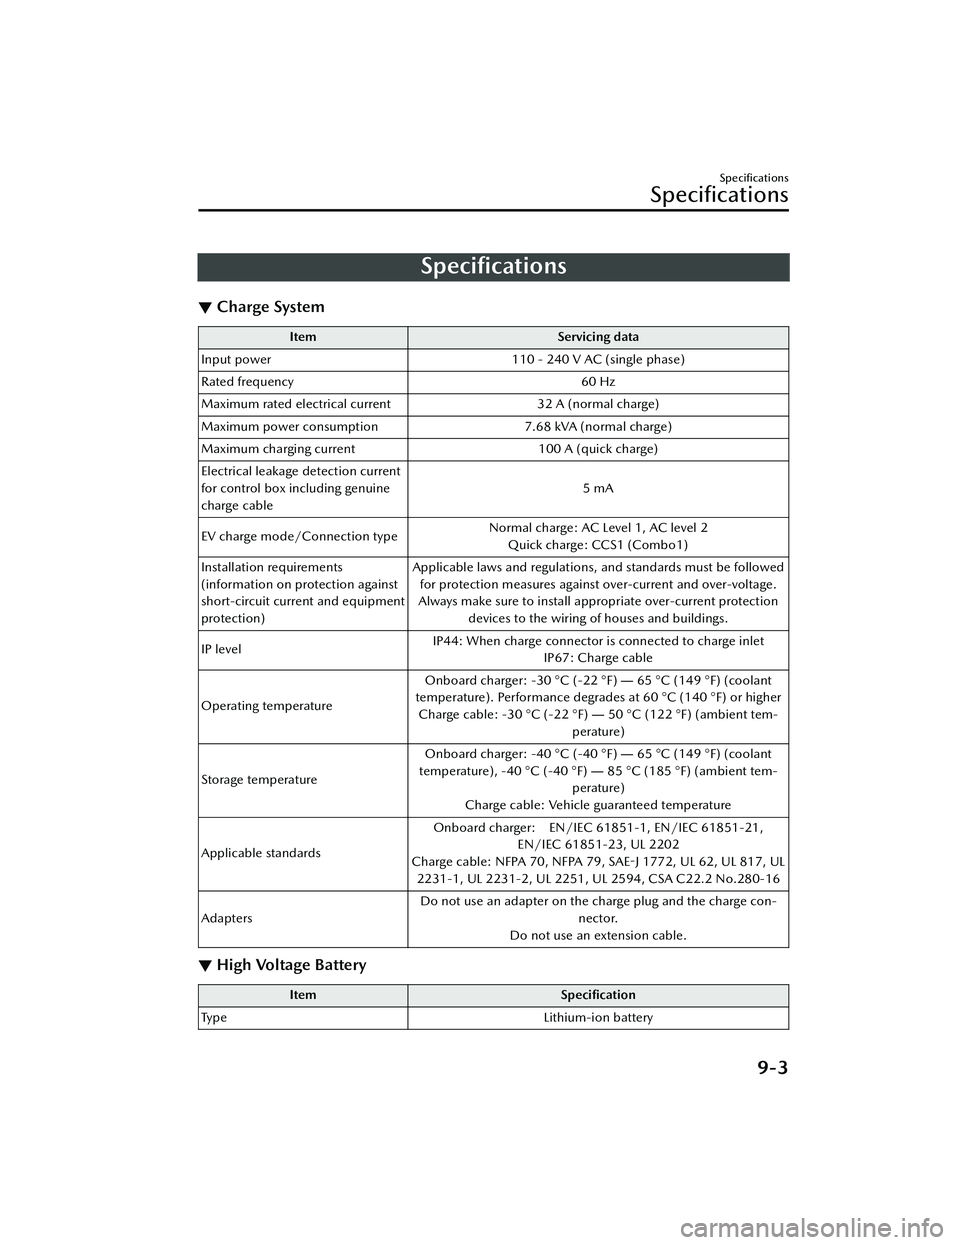
Specifications
▼ Charge System
Item
Servicing data
Input power 110 - 240 V AC (single phase)
Rated frequency 60 Hz
Maximum rated electrical current 32 A (normal charge)
Maximum power consumption 7.68 kVA (normal charge)
Maximum charging current 100 A (quick charge)
Electrical leakage detection current
for control box including genuine
charge cable 5 mA
EV charge mode/Connection type Normal charge: AC Level 1, AC level 2
Quick charge: CCS1 (Combo1)
Installation requirements
(information on protection against
short-circuit current and equipment
protection) Applicable laws and regulations, and standards must be followed
for protection measures against over-current and over-voltage.
Always make sure to install a ppropriate over-current protection
devices to the wiring of houses and buildings.
IP level IP44: When charge connector is connected to charge inlet
IP67: Charge cable
Operating temperature Onboard charger: -30 °C (-22 °F)
― 65 °C (149 °F) (coolant
temperature). Performance degrades at 60 °C (140 °F) or higher Charge cable: -30 °C (-22 °F) ― 50 °C (122 °F) (ambient tem-
perature)
Storage temperature Onboard charger: -40 °C (-40 °F)
― 65 °C (149 °F) (coolant
temperature), -40 °C (-40 °F) ― 85 °C (185 °F) (ambient tem-
perature)
Charge cable: Vehicle guaranteed temperature
Applicable standards Onboard charger:
EN/IEC 61851-1, EN/IEC 61851-21,
EN/IEC 61851-23, UL 2202
Charge cable: NFPA 70, NFPA 79, SAE -J 1772, UL 62, UL 817, UL
2231-1, UL 2231-2, UL 2251, UL 2594, CSA C22.2 No.280-16
Adapters Do not use an adapter on the charge plug and the charge con-
nector.
Do not use an extension cable.
▼ High Voltage Battery
Item
Specification
Type Lithium-ion battery
Specifications
Speci fications
9-3
MX-30_8JD4-EA -21G_Edition2_new 2021-5-18 14:38:07