set clock MAZDA MODEL MX-5 2006 Quick Tips (in English)
[x] Cancel search | Manufacturer: MAZDA, Model Year: 2006, Model line: MODEL MX-5, Model: MAZDA MODEL MX-5 2006Pages: 14, PDF Size: 1.62 MB
Page 10 of 14

CLIMATE CONTROLS
Always check the Owner’s Manual for more operating information and safety features
Climate
Controls
Climate
Controls
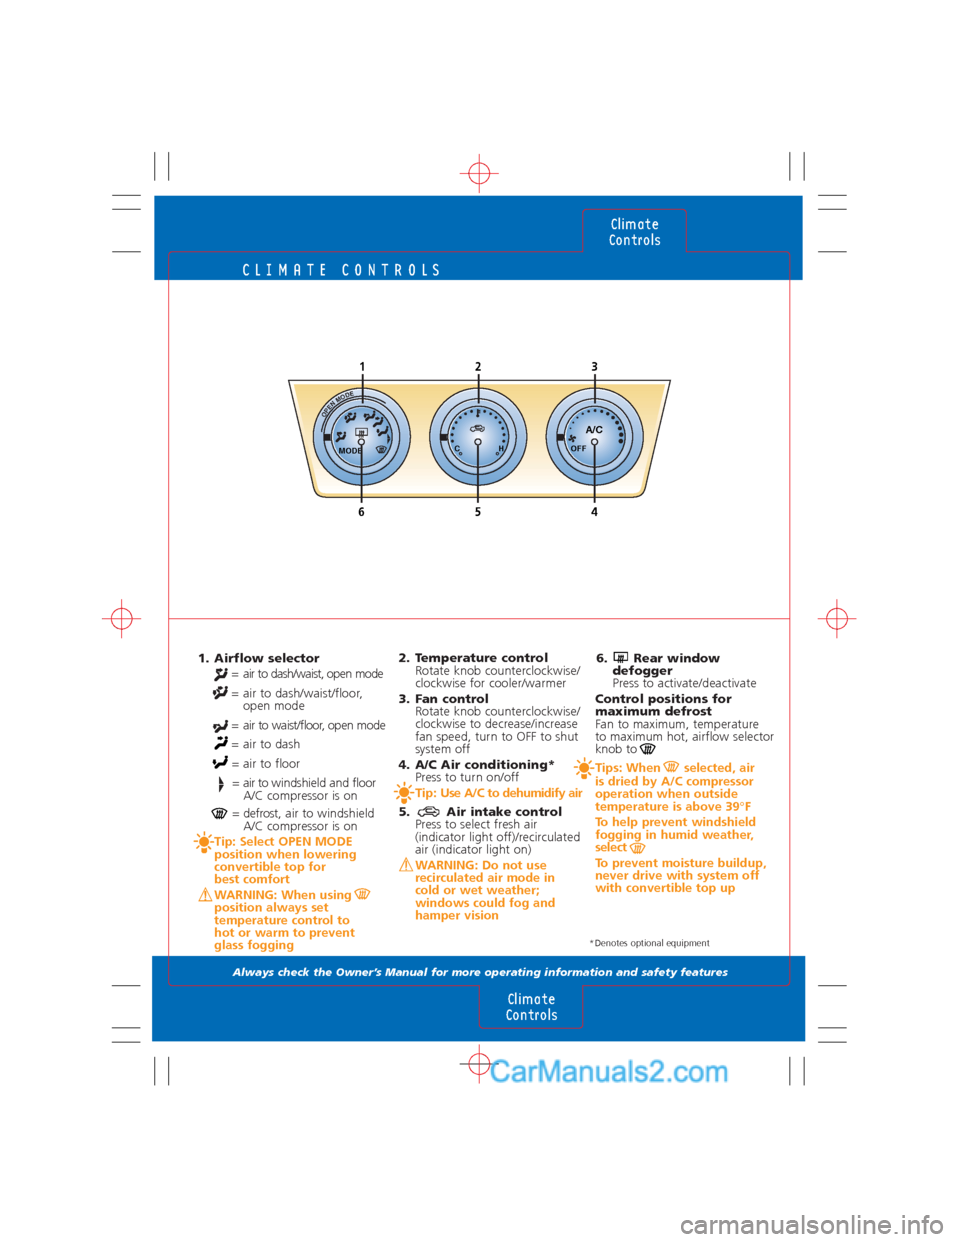
2. Temperature control
Rotate knob counterclockwise/
clockwise for cooler/warmer
3. Fan control
Rotate knob counterclockwise/
clockwise to decrease/increase
fan speed, turn to OFF to shut
system off
4. A/C Air conditioning*
Press to turn on/off
Tip: Use A/C to dehumidify air
5. Air intake control
Press to select fresh air
(indicator light off)/recirculated
air (indicator light on)
WARNING: Do not use
recirculated air mode in
cold or wet weather;
windows could fog and
hamper vision
1. Airflow selector
= air to dash/waist, open mode
= air to dash/waist/floor,
open mode
= air to waist/floor, open mode
= air to dash
= air to floor
= air to windshield and floor
A/C compressor is on
= defrost, air to windshield
A/C compressor is on
Tip: Select OPEN MODE
position when lowering
convertible top for
best comfort
WARNING: When using
position always set
temperature control to
hot or warm to prevent
glass fogging
OPEN MODE
MODECHOFF
A/C
123
456
6. Rear window
defogger
Press to activate/deactivate
Control positions for
maximum defrost
Fan to maximum, temperature
to maximum hot, airflow selector
knob to
Tips: When selected, air
is dried by A/C compressor
operation when outside
temperature is above 39°F
To help prevent windshield
fogging in humid weather,
select
To prevent moisture buildup,
never drive with system off
with convertible top up
*Denotes optional equipment
Page 11 of 14

AM/FM STEREO/CD/MP3
Always check the Owner’s Manual for more operating information and safety features
Audio
Systems
Audio
Systems
1. Power/Volume
Press to turn on/off; rotate
to increase/decrease volume
2. LOAD
CD: When LOAD button is
pressed, CD will load and play
even if CD eject button has
been previously pressed
CD changer*: To load multiple
discs: Press and hold LOAD (2)
until beep sound is heard; insert
CD when “In” is displayed
To eject disc: Press Eject (8)
To eject specific disc: Press and
hold Eject (8) until beep sound is
heard; within five seconds press
the desired tray number 1-6 (10)
3. FM/AM
Press to turn radio on and
select between FM1/FM2/AM
station preset buttons (10)
4. CD slot
5. SAT*, Satellite ready capability
11. Reverse /Fast forward
Press to reverse/fast forward
through a track
12. Auto-Memory
Press and hold until a beep
sound is heard; system auto-
matically scans and temporarily
stores six strong stations in each
band; press again to switch to
another preset station
13. Scan
Radio: Press to sample strong
stations, press again to stop at
current station
CD/MP3: Press to play first few
seconds of each selection, press
again to stop at current selection
14. Random*
Press toplay CD/MP3selections
in random order
15. RPT
Press to replay current
CD/MP3 selection
1 DISC 2 DISC 3 RPT 4 PROG/RDM 5 6
SEEK
TRACK
APCCLOCK
DISP
ESNAUTO-MSCAN
FM/AM MEDIASAT CD
VOL PUSH POWER TUNE PUSH AUDIO CONT.
TEXT1
19
9
10
1217141513181116
356
LOAD28
47
6. CD
Press to play CD
7. Display
8. CD eject button
9. Tune/Audio/Text Control
Radio: Rotate counter-
clockwise/clockwise for lower/
higher frequency
Audio: Press to select ALC or
AudioPLT*/BASS/TREB/FADE/
BAL/BEEP
Rotate right/left to adjust
selected feature
Text*(MP3): Rotate right/left
to display titles
Tip: Automatic Level Control
(ALC) automatically adjusts
audio volume depending
on vehicle speed
10. Memory preset buttons
To set: Tune to station, press and
hold until beep sound is heard
16. DISP
CD/MP3: Press repeatedly
to scroll through displays
17. Clock
To set: With ignition
in ACC or ON position,
press top of switch (17) until
beeper sounds and time flashes;
press top of switch (18) to set
hour, press bottom of switch
(18) to set minutes, press top
of switch (17) to start clock
18. SEEK/TRACK/APC
Radio: Press to
automatically seek higher/
lower frequency
CD/MP3: Press to
select next track/beginning
of current track
19. Disc *
Press to skip to next/previous CD
/
/
*Denotes optional equipment
Tip: Insert single CD into slot, auto-loading function will
set CD and begin play without pressing LOAD button