stop start MAZDA MODEL MX-5 2016 (in English) User Guide
[x] Cancel search | Manufacturer: MAZDA, Model Year: 2016, Model line: MODEL MX-5, Model: MAZDA MODEL MX-5 2016Pages: 526, PDF Size: 28.82 MB
Page 110 of 526

4–6
When Driving
Start/Stop Engine
8. After starting the engine, let it idle for
about ten seconds.
NOTE
Whether the engine is cold or warm, it
should be started without the use of the
accelerator. If the engine does not start the first
time, refer to Starting a Flooded Engine
under Emergency Starting. If the engine
still does not start, have your vehicle
inspected by an Authorized Mazda
Dealer (page 7-26).
Engine Start Function When Key
Battery is Dead
CAUTION
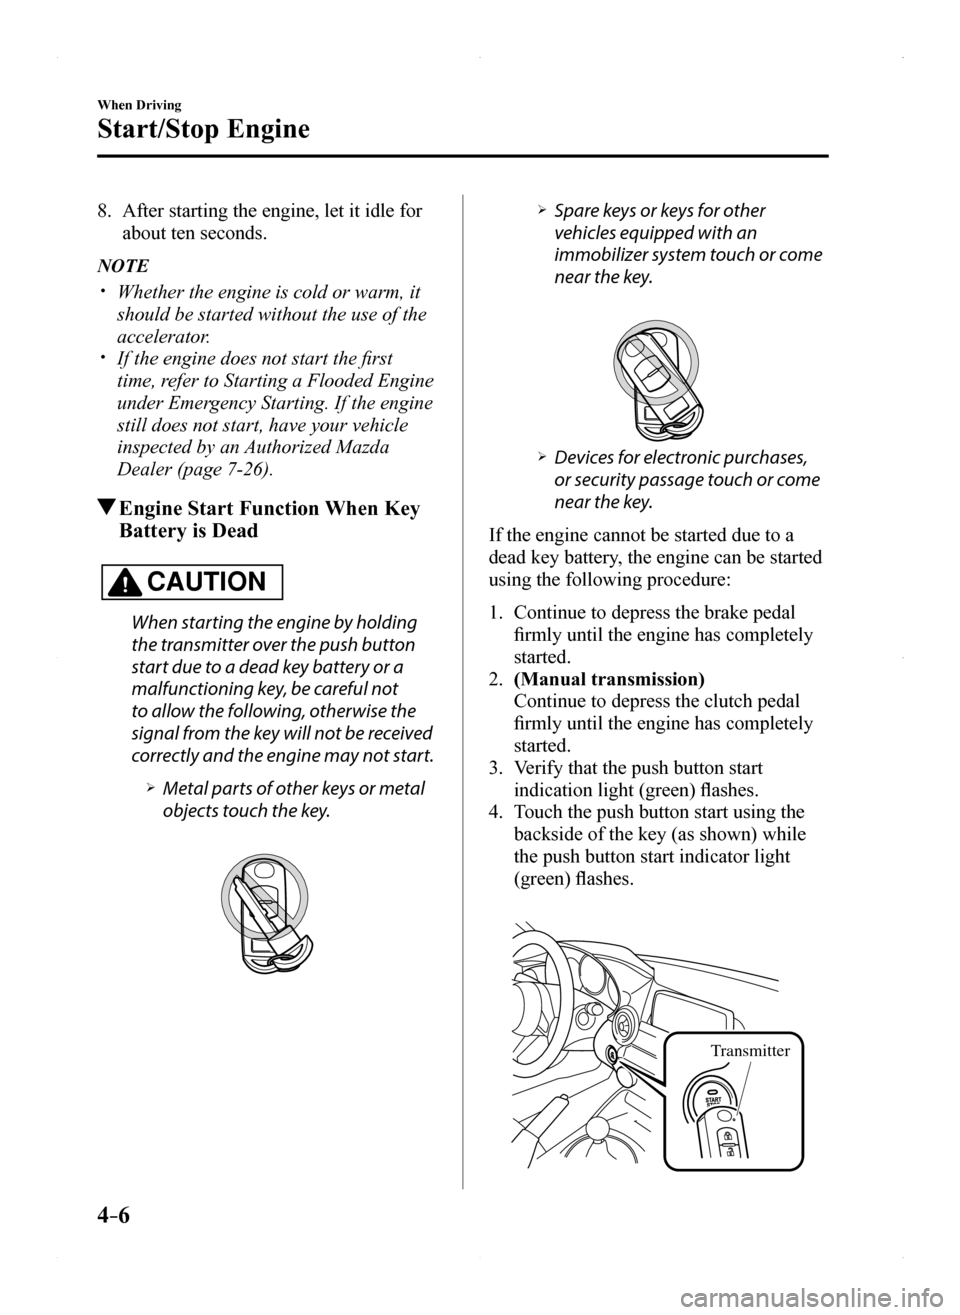
When starting the engine by holding
the transmitter over the push button
start due to a dead key battery or a
malfunctioning key, be careful not
to allow the following, otherwise the
signal from the key will not be received
correctly and the engine may not start.
Metal parts of other keys or metal
objects touch the key.
Spare keys or keys for other
vehicles equipped with an
immobilizer system touch or come
near the key.
Devices for electronic purchases,
or security passage touch or come
near the key.
If the engine cannot be started due to a
dead key battery, the engine can be started
using the following procedure:
1. Continue to depress the brake pedal
firmly until the engine has completely
started.
2. (Manual transmission)
Continue to depress the clutch pedal
firmly until the engine has completely
started.
3. Verify that the push button start
indication light (green) flashes.
4. Touch the push button start using the
backside of the key (as shown) while
the push button start indicator light
(green) flashes.
Transmitter
MX-5_8EU4-EA-15D_Edition1.indb 62015/03/10 9:54:49
Page 111 of 526

4–7
When Driving
Start/Stop Engine
NOTE
When touching the push button start using
the backside of the key as shown in the
illustration, touch the push button start
with the lock switch side of the key facing
up.
5. Verify that the push button start
indicator light (green) turns on.
6. Press the push button start to start the
engine.
NOTE
The engine cannot be started unless the
clutch pedal is fully depressed (manual
transmission) or the brake pedal is fully
depressed (automatic transmission). If there is a malfunction with the push
button start function, the push button
start indicator light (amber) flashes.
In this case, the engine may start,
however, have the vehicle checked at an
Authorized Mazda Dealer as soon as
possible. If the push button start indicator light
(green) does not illuminate, perform the
operation from the beginning again. If
it does not illuminate, have the vehicle
checked at an Authorized Mazda Dealer. To switch the ignition position without
starting the engine, perform the
following operations after the push
button start indicator light (green) turns
on.
1. Release the clutch pedal (manual
transmission) or brake pedal
(automatic transmission).
2. Press the push button start to switch
the ignition position. The ignition
switches in the order of ACC, ON,
and off each time the push button
start is pressed. To switch the
ignition position again, perform the
operation from the beginning.
Emergency Operation for Starting
the Engine
If the KEY warning light (red) illuminates,
or the push button start indicator light
(amber) flashes, this could indicate that
the engine may not start using the usual
starting method. Have your vehicle
inspected at an Authorized Mazda Dealer
as soon as possible. If this occurs, the
engine can be force-started. Press and hold
the push button start until the engine starts.
Other procedures necessary for starting
the engine such as having the key in the
cabin, and depressing the clutch pedal
(manual transmission) or the brake pedal
(automatic transmission) are required.
MX-5_8EU4-EA-15D_Edition1.indb 72015/03/10 9:54:49
Page 112 of 526

4–8
When Driving
Start/Stop Engine
Turning the Engine Off
WARNING
Do not stop the engine while the vehicle
is moving:
Stopping the engine while the vehicle
is moving for any reason other than in
an emergency is dangerous. Stopping
the engine while the vehicle is moving
will result in reduced braking ability
due to the loss of power braking, which
could cause an accident and serious
injury.
1. Stop the vehicle completely.
2. (Manual transmission)
Shift into neutral and set the parking
brake.
(Automatic transmission)
Shift the selector lever to the P position
and set the parking brake.
3. Press the push button start to turn off
the engine. The ignition position is off.
CAUTION
When leaving the vehicle, make sure
the push button start is off.
NOTE
The cooling fan in the engine
compartment could turn on for a few
minutes after the ignition is switched
from ON to OFF, whether or not the
A/C is on or off, to cool the engine
compartment quickly. When the push button start is pressed
from ON to ACC or OFF, the KEY
indicator light (green) may flash for
approximately 30 seconds indicating
that the remaining battery power of the
key is low.
Replace with a new battery before the
key becomes unusable.
Refer to Key Battery Replacement on
page 6-38. (Automatic transmission)
If the engine is turned off while the
selector lever is in a position other than
P, the ignition switches to ACC.
Emergency Engine Stop
Continuously pressing the push button
start or quickly pressing it any number of
times while the engine is running or the
vehicle is being driven will turn the engine
off immediately. The ignition switches to
ACC.
MX-5_8EU4-EA-15D_Edition1.indb 82015/03/10 9:54:49
Page 129 of 526

4–25
When Driving
Transmission
Shift Position Indication
The selector position is indicated when the
ignition is switched ON.
Gear position indication
In manual shift mode, the “M” of the shift
position indication illuminates and the
numeral for the selected gear is displayed.
Warning Light
The warning light turns on when the
system has a malfunction.
Refer to Warning Lights on page 4-16.
Transmission Ranges
The shift position indicator light in the
instrument cluster illuminates. Refer to
Warning/Indicator Lights on page
4-16. The selector lever must be in P or N to
operate the starter.
P (Park)
P locks the transmission and prevents the
rear wheels from rotating.
WARNING
Always set the selector lever to P and set
the parking brake:
Only setting the selector lever to the
P position without using the parking
brake to hold the vehicle is dangerous.
If P fails to hold, the vehicle could move
and cause an accident.
CAUTION
Shifting into P, N or R while the vehicle is
moving can damage your transmission. Shifting into a driving gear or reverse
when the engine is running faster than
idle can damage the transmission.
R (Reverse)
In position R, the vehicle moves only
backward. You must be at a complete
stop before shifting to or from R, except
under rare circumstances as explained in
Rocking the Vehicle (page 3-45).
N (Neutral)
In N, the wheels and transmission are not
locked. The vehicle will roll freely even
on the slightest incline unless the parking
brake or brakes are on.
WARNING
If the engine is running faster than idle,
do not shift from N or P into a driving
gear:
It's dangerous to shift from N or P
into a driving gear when the engine
is running faster than idle. If this is
done, the vehicle could move suddenly,
causing an accident or serious injury.
Do not shift into N when driving the
vehicle:
Shifting into N while driving is
dangerous. Engine braking cannot
be applied when decelerating which
could lead to an accident or serious
injury.
MX-5_8EU4-EA-15D_Edition1.indb 252015/03/10 9:55:04
Page 130 of 526

4–26
When Driving
Transmission
CAUTION
Do not shift into N when driving the
vehicle. Doing so can cause transaxle
damage.
NOTE
Apply the parking brake or depress the
brake pedal before moving the selector
lever from N to prevent the vehicle from
moving unexpectedly.
D (Drive)
D is the normal driving position. From a
stop, the transmission will automatically
shift through a 6-gear sequence.
M (Manual)
M is the manual shift mode position. Gears
can be shifted up or down by operating the
selector lever. Refer to Manual Shift Mode
on page 4-27.
Active Adaptive Shift (AAS)
Active Adaptive Shift (AAS)
automatically controls the transmission
shift points to best suit the road conditions
and driver input. This improves driving
feel. The transmission may switch to AAS
mode when driving up and down slopes,
cornering, driving at high elevations,
or depressing the accelerator pedal
quickly while the selector lever is in the
D position. Depending on the road and
driving conditions/vehicle operations, gear
shifting could be delayed or not occur,
however, this does not indicate a problem
because the AAS mode will maintain the
optimum gear position.
Shift-Lock System
The shift-lock system prevents shifting out
of P unless the brake pedal is depressed.
To shift from P:
1. Depress and hold the brake pedal.
2. Start the engine.
3. Press and hold the lock-release button.
4. Move the selector lever.
NOTE
When the ignition is switched to ACC or
the ignition is switched off, the selector
lever cannot be shifted from P. The ignition cannot be switched to OFF
if the selector lever is not in P.
Shift-Lock Override
If the selector lever will not move from P
using the proper shift procedure, continue
to hold down the brake pedal.
1. Remove the shift-lock override cover
using a cloth-wrapped flat head
screwdriver.
2. Insert a screwdriver and push it down.
Cove r
3. Press and hold the lock-release button.
4. Move the selector lever.
MX-5_8EU4-EA-15D_Edition1.indb 262015/03/10 9:55:04
Page 158 of 526

4–54
When Driving
Brake
WARNING
Do not rely completely on Hill Launch
Assist (HLA):
Hill Launch Assist (HLA) is an auxiliary
device for accelerating from a stop
on a slope. The system only operates
for about two seconds and therefore,
relying only on the system, when
accelerating from a stop is dangerous
because the vehicle may move (roll)
unexpectedly and cause an accident.
The vehicle could roll depending on
the vehicle's load or if it is towing
something. In addition, for vehicles
with a manual transmission, the
vehicle could still roll depending on
how the clutch pedal or the accelerator
pedal is operated.
Always confirm the safety around the
vehicle before starting to drive the
vehicle.
NOTE
Hill Launch Assist (HLA) does not
operate on a gentle slope. In addition,
the gradient of the slope on which the
system will operate changes depending
on the vehicle's load. Hill Launch Assist (HLA) does not
operate if the parking brake is applied,
the vehicle has not stopped completely,
or the clutch pedal is released. While Hill Launch Assist (HLA) is
operating, the brake pedal may feel
stiff and vibrate, however, this does not
indicate a malfunction. Hill Launch Assist (HLA) does not
operate while the TCS/DSC indicator
light is illuminated.
Refer to Warning/Indicator Lights on
page 4-16. Hill Launch Assist (HLA) does not
turn off even if the DSC OFF switch is
pressed to turn off the TCS/DSC.
MX-5_8EU4-EA-15D_Edition1.indb 542015/03/10 9:55:12
Page 159 of 526

4–55
When Driving
ABS/TCS/DSC
Antilock Brake System
(ABS)
The ABS control unit continuously
monitors the speed of each wheel. If
one wheel is about to lock up, the ABS
responds by automatically releasing and
reapplying that wheel's brake.
The driver will feel a slight vibration in
the brake pedal and may hear a chattering
noise from the brake system. This is
normal ABS system operation. Continue to
depress the brake pedal without pumping
the brakes.
The warning light turns on when the
system has a malfunction.
Refer to Warning Lights on page 4-16.
WARNING
Do not rely on ABS as a substitute for
safe driving:
The ABS cannot compensate for unsafe
and reckless driving, excessive speed,
tailgating (following another vehicle
too closely), driving on ice and snow,
and hydroplaning (reduced tire friction
and road contact because of water on
the road surface). You can still have an
accident.
NOTE
Braking distances may be longer on
loose surfaces (snow or gravel, for
example) which usually have a hard
foundation. A vehicle with a normal
braking system may require less
distance to stop under these conditions
because the tires will build up a wedge
of surface layer when the wheels skid. The sound of the ABS operating may
be heard when starting the engine
or immediately after starting the
vehicle, however, it does not indicate a
malfunction.
MX-5_8EU4-EA-15D_Edition1.indb 552015/03/10 9:55:12
Page 198 of 526

4–94
When Driving
Tire Pressure Monitoring System
CAUTION
Each tire, including the spare (if provided), should be checked monthly when cold and
inflated to the inflation pressure recommended by the vehicle manufacturer on the vehicle
placard or tire inflation pressure label. (If your vehicle has tires of a different size than the
size indicated on the vehicle placard or tire inflation pressure label, you should determine
the proper tire inflation pressure for those tires.)
As an added safety feature, your vehicle has been equipped with a tire pressure monitoring
system (TPMS) that illuminates a low tire pressure telltale when one or more of your tires
is significantly under-inflated. Accordingly, when the low tire pressure telltale illuminates,
you should stop and check your tires as soon as possible, and inflate them to the proper
pressure. Driving on a significantly under-inflated tire causes the tire to overheat and can
lead to tire failure. Under-inflation also reduces fuel efficiency and tire tread life, and may
affect the vehicle's handling and stopping ability.
Please note that the TPMS is not a substitute for proper tire maintenance, and it is the
driver's responsibility to maintain correct tire pressure, even if under-inflation has not
reached the level to trigger illumination of the TPMS low tire pressure telltale.
Your vehicle has also been equipped with a TPMS malfunction indicator to indicate when
the system is not operating properly.
The TPMS malfunction indicator is combined with the low tire pressure telltale. When the
system detects a malfunction, the telltale will flash for approximately one minute and then
remain continuously illuminated. This sequence will continue upon subsequent vehicle
start-ups as long as the malfunction exists. When the malfunction indicator is illuminated,
the system may not be able to detect or signal low tire pressure as intended. TPMS
malfunctions may occur for a variety of reasons, including the installation of replacement
or alternate tires or wheels on the vehicle that prevent the TPMS from functioning properly.
Always check the TPMS malfunction telltale after replacing one or more tires or wheels on
your vehicle to ensure that the replacement or alternate tires and wheels allow the TPMS to
continue to function properly. To avoid false readings, the system samples for a little while before indicating a problem. As
a result it will not instantaneously register a rapid tire deflation or blow out.
MX-5_8EU4-EA-15D_Edition1.indb 942015/03/10 9:55:20
Page 228 of 526

5–28
Interior Features
Audio System
Operating the Radio
Band selector button Channel preset buttons
Scan button Auto memory button
Tuning button
Audio display
Radio ON
Press a band selector button () to
turn the radio on.
Band selection
Successively pressing the band selector
button () switches the bands as
follows: FM1→FM2→AM.
The selected mode will be indicated.
NOTE
If the FM broadcast signal becomes weak,
reception automatically changes from
STEREO to MONO for reduced noise.
Tuning
The radio has the following tuning
methods: Manual, Seek, Scan, Preset
channel, and Auto memory tuning. The
easiest way to tune stations is to set them
on preset channels.
Manual tuning
Select the station by pressing the tuning
button (, ) lightly.
Seek tuning
Automatic search for radio stations starts
when the tuning button (, ) is pressed
until a beep sound is heard. The search
stops when a station is found.
NOTE
If you continue to press and hold the
button, the frequency will continue
changing without stopping.
Scan tuning
Press and hold the scan button () to
automatically sample strong stations.
Scanning stops at each station for about 5
seconds. To hold a station, press and hold
the scan button () again during this
interval.
Preset channel tuning
The 6 preset channels can be used to store
6 AM and 12 FM stations.
1. To set a channel first select AM, FM1,
or FM2. Tune to the desired station.
2. Press a channel preset button for
about 2 seconds until a beep is heard.
The preset channel number or station
frequency will be displayed. The
station is now held in the memory.
MX-5_8EU4-EA-15D_Edition1.indb 282015/03/10 9:55:29
Page 230 of 526

5–30
Interior Features
Audio System
Operating the Compact Disc (CD) Player
CD eject b utton
CD slot
Media/Scan b
utton F
older do wn button
F
older up b utton
Play/Pause button
Random b utton
Repeat button
Audio display
Text b utton
T
rack do wn/ Reverse b utton
Track up/ Fast-forward b utton
TypePlayable data
Music/MP3/WMA/AAC CD playerMusic data (CD-DA)MP3/WMA/AAC file
NOTE
If a disc has both music data (CD-DA)
and MP3/WMA/AAC files, playback of the
two or three file types differs depending on
how the disc was recorded.
Inserting the CD
Insert the CD into the slot, label-side up.
The auto-loading mechanism will set the
CD and begin play.
NOTE
There will be a short lapse before play
begins while the player reads the digital
signals on the CD.
Ejecting the CD
Press the CD eject button () to eject the
CD.
Playback
Press the media button () to switch
to CD mode and start playback.
NOTE
The CD mode cannot be selected if a CD
has not been inserted.
Pause
To stop playback, press the Play/Pause
button (4).
Press the button again to resume playback.
MX-5_8EU4-EA-15D_Edition1.indb 302015/03/10 9:55:29