Trunk light MAZDA MODEL MX-5 MIATA 2014 Owner's Manual
[x] Cancel search | Manufacturer: MAZDA, Model Year: 2014, Model line: MODEL MX-5 MIATA, Model: MAZDA MODEL MX-5 MIATA 2014Pages: 452, PDF Size: 5.35 MB
Page 312 of 452

Black plate (312,1)
18. Install the tire valve cap.
19. Put the emergency flat tire repair kitin the trunk and continue driving.
CAUTION
ØDrive carefully to an Authorized
Mazda Dealer and keep the
vehicle speed below 80 km/h (50
mph).
Ø If the vehicle is driven 80 km/h (50
mph) or higher, the vehicle might
begin to vibrate.
NOTE
(With Tire Pressure Monitoring System)
If the tire is not properly inflated, the tire
pressure monitoring system warning light will
illuminate (page 5-32).
20. After driving the vehicle for 10 minutes or 5 km (3 miles), check the
tire pressure with the tire pressure
gauge equipped with the compressor.
If the tire pressure has fallen below
the correct tire pressure, inflate the
tire to the correct pressure again
following the steps from number 15.
CAUTION
ØIf the tire inflation pressure falls
below 130 kPa (1.3 kgf/cm2or bar,
18.9 psi), repair cannot be done
with the repair kit. Park the
vehicle on a level surface off the
right-of-way and contact an
Authorized Mazda Dealer.
Ø If the tire inflation pressure
continues to remain low after
repeating steps 14 to 21, park the
vehicle on a level surface off the
right-of-way and contact an
Authorized Mazda Dealer. NOTE
When checking the tire inflation pressure with
the tire pressure gauge on the compressor unit,
make sure the compressor switch is turned off.
21. The emergency flat tire repair is
completed if the tire air pressure does
not decrease. Drive the vehicle
carefully to the nearest Authorized
Mazda Dealer promptly and have the
tire replaced. Mazda recommends that
the tire be replaced with a new one. If
the tire is to be repaired and reused,
consult an Authorized Mazda Dealer.
CAUTION
ØFor a tire which has undergone an
emergency flat tire repair using
the emergency flat tire repair kit,
Mazda recommends that the tire
be replaced with a new one as
soon as possible. If the tire is to be
repaired and reused, consult an
Authorized Mazda Dealer.
Ø The wheel can be reused after any
sealant adhering to it is wiped off
and carefully inspected. However,
replace the tire valve with a new
one.
qInspecting the IMS Emergency
Flat Tire Repair Kit
Inspect the emergency tire repair kit at
regular intervals.
lCheck the tire sealant period of
effective use.
lCheck the operation of the tire
compressor.
7-12
In Case of an Emergency
Flat Tire
MX-5_8DG6-EA-13F_Edition3 Page312
Monday, December 16 2013 2:11 PM
Form No.8DG6-EA-13F
Page 368 of 452

Black plate (368,1)
Light Bulbs
High-mount brake light
License plate lights
Trunk light
Reverse lights
Rear turn signal lights
Brake lights/Taillights
Rear side-marker lights Overhead light
Headlights (Low beam) Headlights (High beam)
Fog lights
Front turn signal lights/Parking lights Front side-marker lights
8-38
Maintenance and Care
Owner Maintenance
MX-5_8DG6-EA-13F_Edition3 Page368
Monday, December 16 2013 2:12 PM
Form No.8DG6-EA-13F
Page 373 of 452

Black plate (373,1)
5. Disconnect the bulb from the socket.
6. Install the new bulb in the reverse orderof the removal procedure.
Front turn signal lights/Parking lights
1. If you are changing the right bulb, startthe engine, turn the steering wheel all
the way to the right, and turn off
engine. If you are changing the left
bulb, turn the steering wheel to the left,
and turn off engine.
2. Make sure the turn signal switch is off.
3. Turn the center section of the plastic retainer counterclockwise and remove
the retainers and partially peel back the
mudguard.
Removal
Installation
4. Turn the socket and bulb assemblycounterclockwise and remove it. 5. Disconnect the bulb from the socket.
6. Install the new bulb in the reverse order
of the removal procedure.
Rear turn signal lights, Reverse lights,
Brake lights/Taillights, Rear side
marker lights
Rear side marker lights
Due to the complexity and difficulty of
the procedure, the LED bulbs must be
replaced by an Authorized Mazda Dealer.
NOTE
LED bulb replacement is not possible because
it is built into the unit. Replace the unit.
Rear turn signal lights, Reverse lights,
Brake lights/Taillights
1. Make sure the ignition is switched offand the applicable light switch is off.
2. Lift the trunk.
Maintenance and Care
Owner Maintenance
8-43
MX-5_8DG6-EA-13F_Edition3 Page373
Monday, December 16 2013 2:12 PM
Form No.8DG6-EA-13F
Page 374 of 452

Black plate (374,1)
3. Pull the center section of the plasticretainers and remove them, then
remove the trunk end trim.
Removal
Installation
4. Remove the trunk light connector.
5. Remove the trunk lid release lock-out button connector.
6. Pull the center section of the plasticretainers and remove them, then
remove the trunk side trim.
Removal
Installation
7. Turn the socket and bulb assembly counterclockwise and remove it.
8. Disconnect the bulb from the socket.
Rear turn signal lights
8-44
Maintenance and Care
Owner Maintenance
MX-5_8DG6-EA-13F_Edition3 Page374
Monday, December 16 2013 2:12 PM
Form No.8DG6-EA-13F
Page 375 of 452

Black plate (375,1)
Reverse lights
Brake lights/Taillights
9. Install the new bulb in the reverse orderof the removal procedure.
High-mount brake light
Due to the complexity and difficulty of
the procedure, the LED bulbs must be
replaced by an Authorized Mazda Dealer.
NOTE
LED bulb replacement is not possible because
it is built into the unit. Replace the unit.
License plate lights
1. Make sure the ignition is switched off,
and the headlight switch is off.
2. Lift the trunk. 3. Slide the light to the left side of the
vehicle and remove it.
4. Turn the socket and bulb assembly
counterclockwise and remove it.
5. Disconnect the bulb from the socket.
6. Install the new bulb in the reverse order of the removal procedure.
Maintenance and Care
Owner Maintenance
8-45
MX-5_8DG6-EA-13F_Edition3 Page375
Monday, December 16 2013 2:12 PM
Form No.8DG6-EA-13F
Page 376 of 452

Black plate (376,1)
qReplacing Interior Light Bulbs
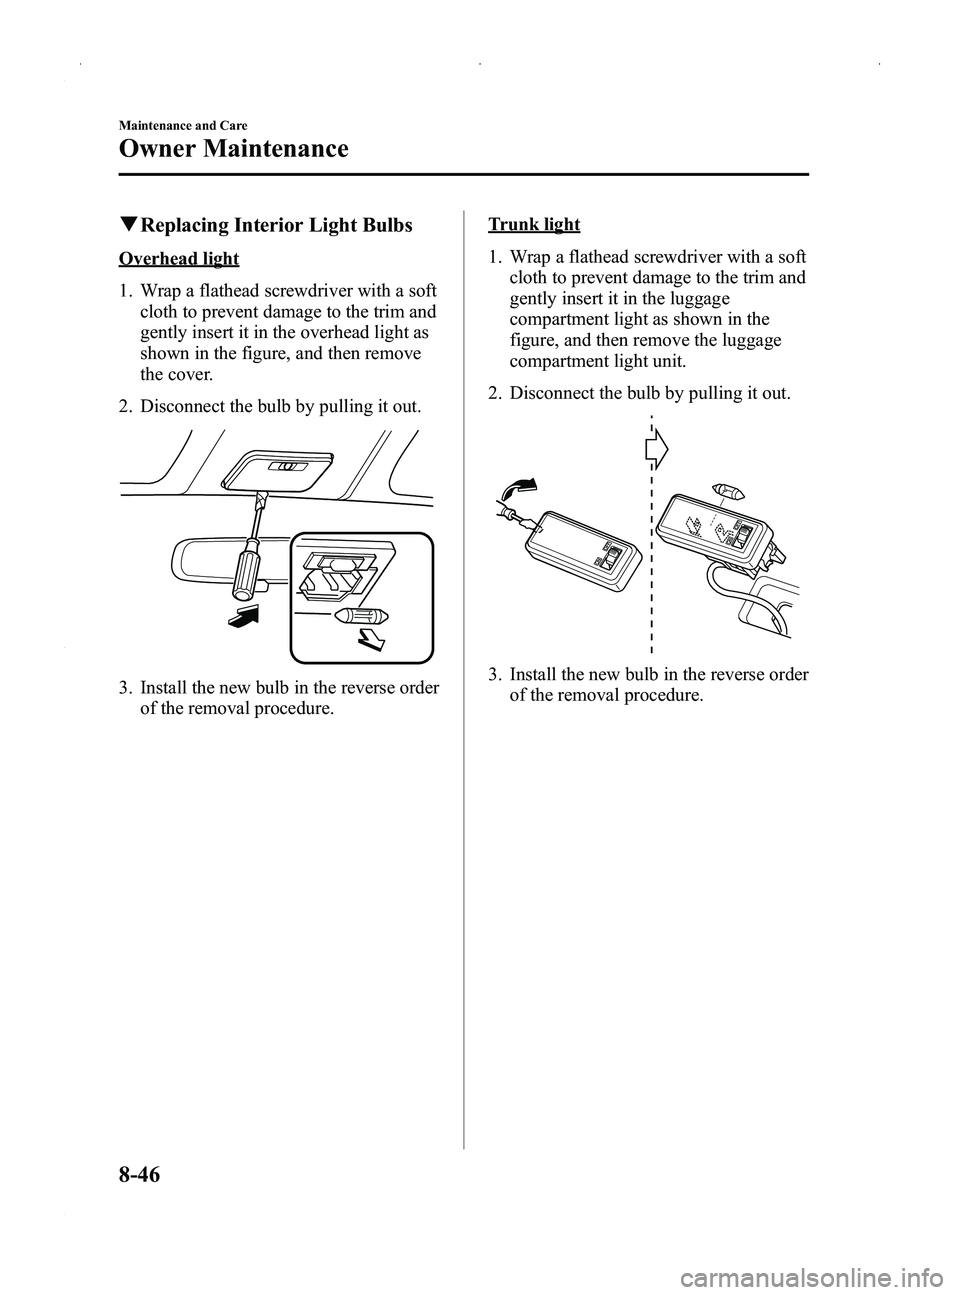
Overhead light
1. Wrap a flathead screwdriver with a soft
cloth to prevent damage to the trim and
gently insert it in the overhead light as
shown in the figure, and then remove
the cover.
2. Disconnect the bulb by pulling it out.
3. Install the new bulb in the reverse order of the removal procedure.
Trunk light
1. Wrap a flathead screwdriver with a softcloth to prevent damage to the trim and
gently insert it in the luggage
compartment light as shown in the
figure, and then remove the luggage
compartment light unit.
2. Disconnect the bulb by pulling it out.
3. Install the new bulb in the reverse order of the removal procedure.
8-46
Maintenance and Care
Owner Maintenance
MX-5_8DG6-EA-13F_Edition3 Page376
Monday, December 16 2013 2:12 PM
Form No.8DG6-EA-13F
Page 379 of 452

Black plate (379,1)
qFuse Panel Description
Fuse block (Engine compartment)
DESCRIPTION FUSE
RATING PROTECTED COMPONENT
1 FAN 30 A Cooling fan
2 FAN 7.5 A Cooling fan
3 DEFOG 20 A Rear window defroster
4 H/CLEAN ――
5 ROOM 15 A Overhead lights, Luggage compartment light, For protection of
various circuits, Trunk opener
6 IG KEY2 15 A For protection of various circuits
7 HEATER 40 A Air conditioner
í
8 ABS 30 A ABS
9 FOG 15 A Front fog lightsí
10R.FOG ――
11 RHT L 30 A Power retractable hardtop (LH)í
12 RHT R 30 A Power retractable hardtop (RH)í
13MAG 7.5 A Air conditionerí
14ST 20 A Starter
15 TAIL 15 A Taillights, Parking lights, License plate lights, Illumination
16 ABS 40 A ABS
Maintenance and Care
Owner Maintenance
8-49íSome models.
MX-5_8DG6-EA-13F_Edition3 Page379
Monday, December 16 2013 2:12 PM
Form No.8DG6-EA-13F
Page 388 of 452

Black plate (388,1)
ØDo not spray water with a hose or
a car washing device directly on
the seam area of the body and the
convertible top as it could result in
water penetrating the trunk.
ØSome leather treatment products
can ruin the convertible top's
gloss. Be careful of the one you
choose.
Ø Test on an inconspicuous, small
corner of the convertible top if you
are not sure.
Ø Do not get any car wax on the
convertible top.
If you do, remove it with a good
leather cleaner.
Ø Too much treatment on the
convertible top can be as
damaging as too little. Follow the
manufacturer's directions.
Do not overdo it!
Ø Let the convertible top dry
completely before lowering after
applying treatment or dressing.
qHardtop Maintenanceí
Washing
To help protect the hardtop's finish, use a
soft cloth or sponge to wash it.
Insects, tar, tree sap, bird droppings,
industrial fallout, and similar deposits can
damage the finish if they are not removed
immediately. When prompt washing with
plain water is ineffective use a mild soap
made for use on vehicles.
CAUTION
Ø Don't use an automatic car wash.
Ø Don't use strong soap, chemical
detergents, or hot water, and don't
wash the hardtop in direct
sunlight or when the surface is
warm.
Thoroughly rinse with lukewarm or cold
water. Don't allow soap to dry on the
finish.
Waxing
Wax the hardtop when water no longer
beads on the paint. Always wash and dry
it before waxing.
CAUTION
Ø Wiping off dust or dirt with a dry
cloth will scratch the finish.
Ø Don't use abrasive wax. This may
damage the protective coating and
discolor or deteriorate the paint.
NOTE
A spot remover to remove oil, tar, and similar
materials will usually also take off the wax.
Rewax these areas.
8-58
Maintenance and Care
íSome models.
Appearance Care
MX-5_8DG6-EA-13F_Edition3 Page388
Monday, December 16 2013 2:12 PM
Form No.8DG6-EA-13F
Page 442 of 452

Black plate (442,1)
(Automatic transmission)Item Weight
Without power retractable hardtop With power retractable
hardtop
GVWR (Gross Vehicle Weight Rating) 1,396 kg (3,078 lbs) 1,416 kg (3,122 lbs)
GAWR (Gross Axle Weight Rating) Front 714 kg (1,574 lbs) 714 kg (1,574 lbs)
Rear 693 kg (1,528 lbs) 702 kg (1,548 lbs)
q
Air Conditioner
Item Classification
Refrigerant Type HFC134a (R-134a)
qLight Bulbs
Exterior light
Light bulb Category
Wattage ECE R (SAE)
Headlights High beam 65 H9 (H9)
Low beam
Halogen 55 H7 (H7)
Xenon fusion 35 D2S (D2S)
Front turn signal lights/Parking lights 28/8 ―(#7444NA)
Fog lights 55 H11 (H11)
Front side-marker lights 5 ―(― )
High-mount brake light LED
*1― (― )
Rear turn signal lights 21 WY21W (7443NA)
Brake lights/Taillights 21/5 W21/5W (7443)
Reverse lights 18 W16W (921)
License plate lights 5 W5W ( ―)
Rear side-marker lights LED
*1― (― )
*1 LED is the abbreviation for Light Emitting Diode.
Interior light
Light bulb Wattage
Overhead light 10
Trunk light 8
10-6
Specifications
MX-5_8DG6-EA-13F_Edition3 Page442
Monday, December 16 2013 2:12 PM
Form No.8DG6-EA-13F
Page 444 of 452

Black plate (444,1)
Personalization Features
The following“Personalization Features ”are available. These settings can only be changed by an Authorized
Mazda Dealer.
Item Feature Factory Setting Available Settings
Advanced keyless
entry The advanced key's remaining battery level
warning light in the instrument cluster can be
deactivated
Activated Deactivated
The beep sound which is heard when
locking/unlocking both doors or the trunk lid
can be deactivated
*1Activated Deactivated
The function to automatically lock the doors
when leaving the vehicle while carrying the key
can be activated
*2Deactivated Activated
*1 When the autolock function is operating, the warning sound will be heard regardless of the setting.
*2 When the autolock function is enabled, windows will not automatically close. You must close them before leaving vehicle.
10-8
Personalization Features
MX-5_8DG6-EA-13F_Edition3 Page444
Monday, December 16 2013 2:12 PM
Form No.8DG6-EA-13F