lights MAZDA MODEL MX-5 MIATA 2015 Service Manual
[x] Cancel search | Manufacturer: MAZDA, Model Year: 2015, Model line: MODEL MX-5 MIATA, Model: MAZDA MODEL MX-5 MIATA 2015Pages: 448, PDF Size: 4.7 MB
Page 364 of 448

Black plate (364,1)
Light Bulbs
High-mount brake light
License plate lights
Trunk light
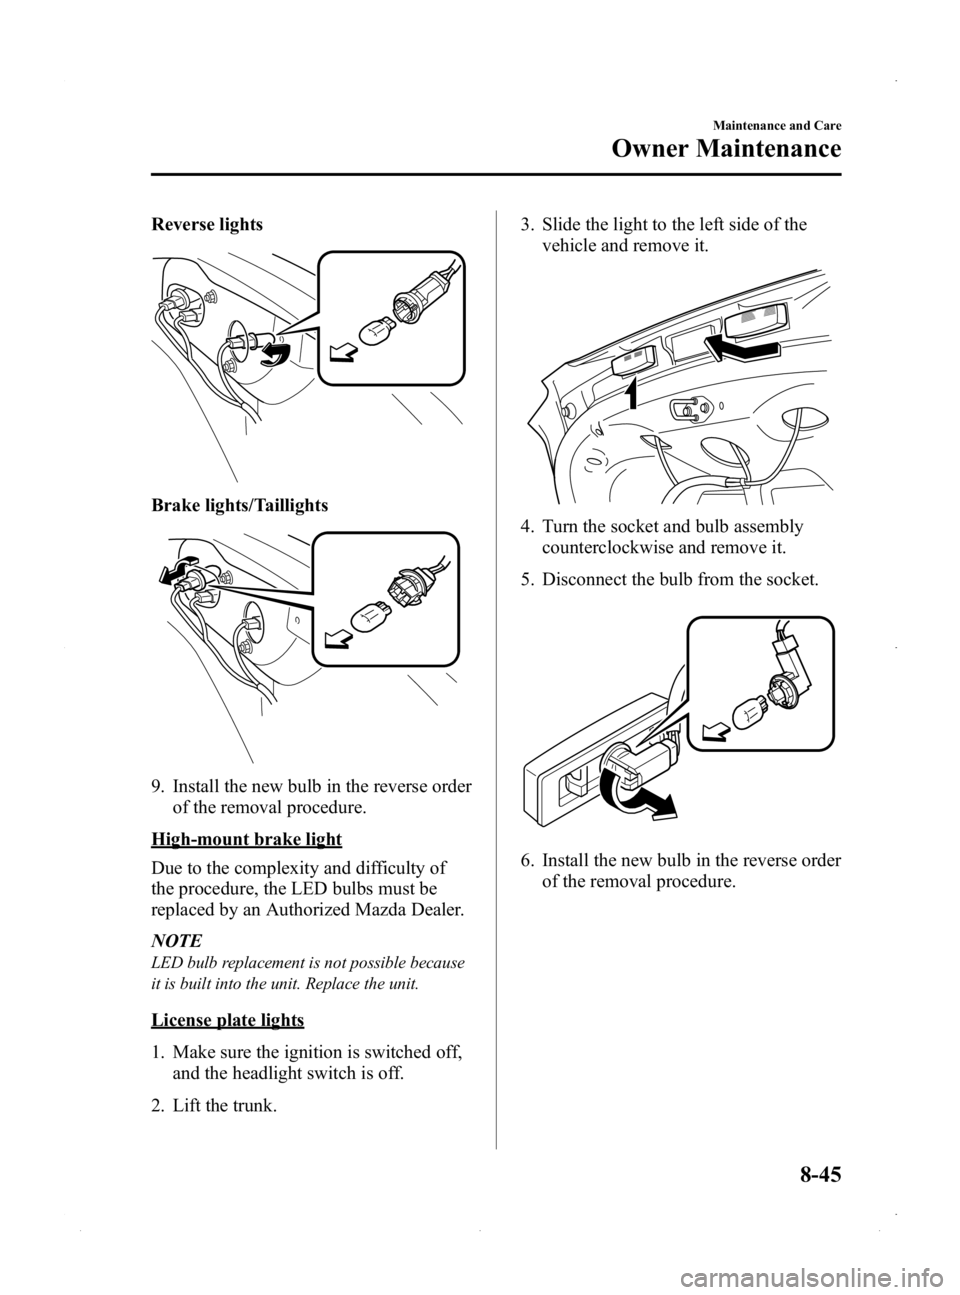
Reverse lights
Rear turn signal lights
Brake lights/Taillights
Rear side-marker lights Overhead light
Headlights (Low beam) Headlights (High beam)
Fog lights
Front turn signal lights/Parking lights Front side-marker lights
8-38
Maintenance and Care
Owner Maintenance
MX-5_8EN7-EA-14E_Edition3 Page364
Friday, September 5 2014 3:20 PM
Form No.8EN7-EA-14E
Page 367 of 448

Black plate (367,1)
7. Remove the adapter.
8. Install the new bulb in the reverse orderof the removal procedure.
Fog light bulbs
1. Make sure the ignition is switched off,and the headlight switch is off.
2. Turn the screws and the center section of the plastic retainers
counterclockwise and remove them,
then partially peel back the mudguard.
Removal
Installation
3. Disconnect the connector from the bulbby pressing the tab on the connector
with your finger and pulling the
connector downward.
4. Turn the socket and bulb assembly toremove it. Carefully remove the bulb
from its socket in the reflector by
gently pulling it straight backward out
of the socket.
5. Install the new bulb in the reverse order
of the removal procedure.
Front side-marker lights
1. Make sure the ignition is switched off,and the headlight switch is off.
Maintenance and Care
Owner Maintenance
8-41
MX-5_8EN7-EA-14E_Edition3 Page367
Friday, September 5 2014 3:20 PM
Form No.8EN7-EA-14E
Page 369 of 448

Black plate (369,1)
5. Disconnect the bulb from the socket.
6. Install the new bulb in the reverse orderof the removal procedure.
Front turn signal lights/Parking lights
1. If you are changing the right bulb, startthe engine, turn the steering wheel all
the way to the right, and turn off
engine. If you are changing the left
bulb, turn the steering wheel to the left,
and turn off engine.
2. Make sure the turn signal switch is off.
3. Turn the center section of the plastic retainer counterclockwise and remove
the retainers and partially peel back the
mudguard.
Removal
Installation
4. Turn the socket and bulb assemblycounterclockwise and remove it. 5. Disconnect the bulb from the socket.
6. Install the new bulb in the reverse order
of the removal procedure.
Rear turn signal lights, Reverse lights,
Brake lights/Taillights, Rear side
marker lights
Rear side marker lights
Due to the complexity and difficulty of
the procedure, the LED bulbs must be
replaced by an Authorized Mazda Dealer.
NOTE
LED bulb replacement is not possible because
it is built into the unit. Replace the unit.
Rear turn signal lights, Reverse lights,
Brake lights/Taillights
1. Make sure the ignition is switched offand the applicable light switch is off.
2. Lift the trunk.
Maintenance and Care
Owner Maintenance
8-43
MX-5_8EN7-EA-14E_Edition3 Page369
Friday, September 5 2014 3:20 PM
Form No.8EN7-EA-14E
Page 370 of 448

Black plate (370,1)
3. Pull the center section of the plasticretainers and remove them, then
remove the trunk end trim.
Removal
Installation
4. Remove the trunk light connector.
5. Remove the trunk lid release lock-out button connector.
6. Pull the center section of the plasticretainers and remove them, then
remove the trunk side trim.
Removal
Installation
7. Turn the socket and bulb assembly counterclockwise and remove it.
8. Disconnect the bulb from the socket.
Rear turn signal lights
8-44
Maintenance and Care
Owner Maintenance
MX-5_8EN7-EA-14E_Edition3 Page370
Friday, September 5 2014 3:20 PM
Form No.8EN7-EA-14E
Page 371 of 448

Black plate (371,1)
Reverse lights
Brake lights/Taillights
9. Install the new bulb in the reverse orderof the removal procedure.
High-mount brake light
Due to the complexity and difficulty of
the procedure, the LED bulbs must be
replaced by an Authorized Mazda Dealer.
NOTE
LED bulb replacement is not possible because
it is built into the unit. Replace the unit.
License plate lights
1. Make sure the ignition is switched off,
and the headlight switch is off.
2. Lift the trunk. 3. Slide the light to the left side of the
vehicle and remove it.
4. Turn the socket and bulb assembly
counterclockwise and remove it.
5. Disconnect the bulb from the socket.
6. Install the new bulb in the reverse order of the removal procedure.
Maintenance and Care
Owner Maintenance
8-45
MX-5_8EN7-EA-14E_Edition3 Page371
Friday, September 5 2014 3:20 PM
Form No.8EN7-EA-14E
Page 373 of 448

Black plate (373,1)
Fuses
Your vehicle's electrical system is
protected by fuses.
If any lights, accessories, or controls don't
work, inspect the appropriate circuit
protector. If a fuse has blown, the inside
element will be melted.
If the same fuse blows again, avoid using
that system and consult an Authorized
Mazda Dealer as soon as possible.
qFuse Replacement
Replacing the fuses on the vehicle's left
side
If the electrical system does not work,
first inspect the fuses on the vehicle's left
side.
1. Make sure the ignition is switched off,
and other switches are off.
2. Remove the cover.
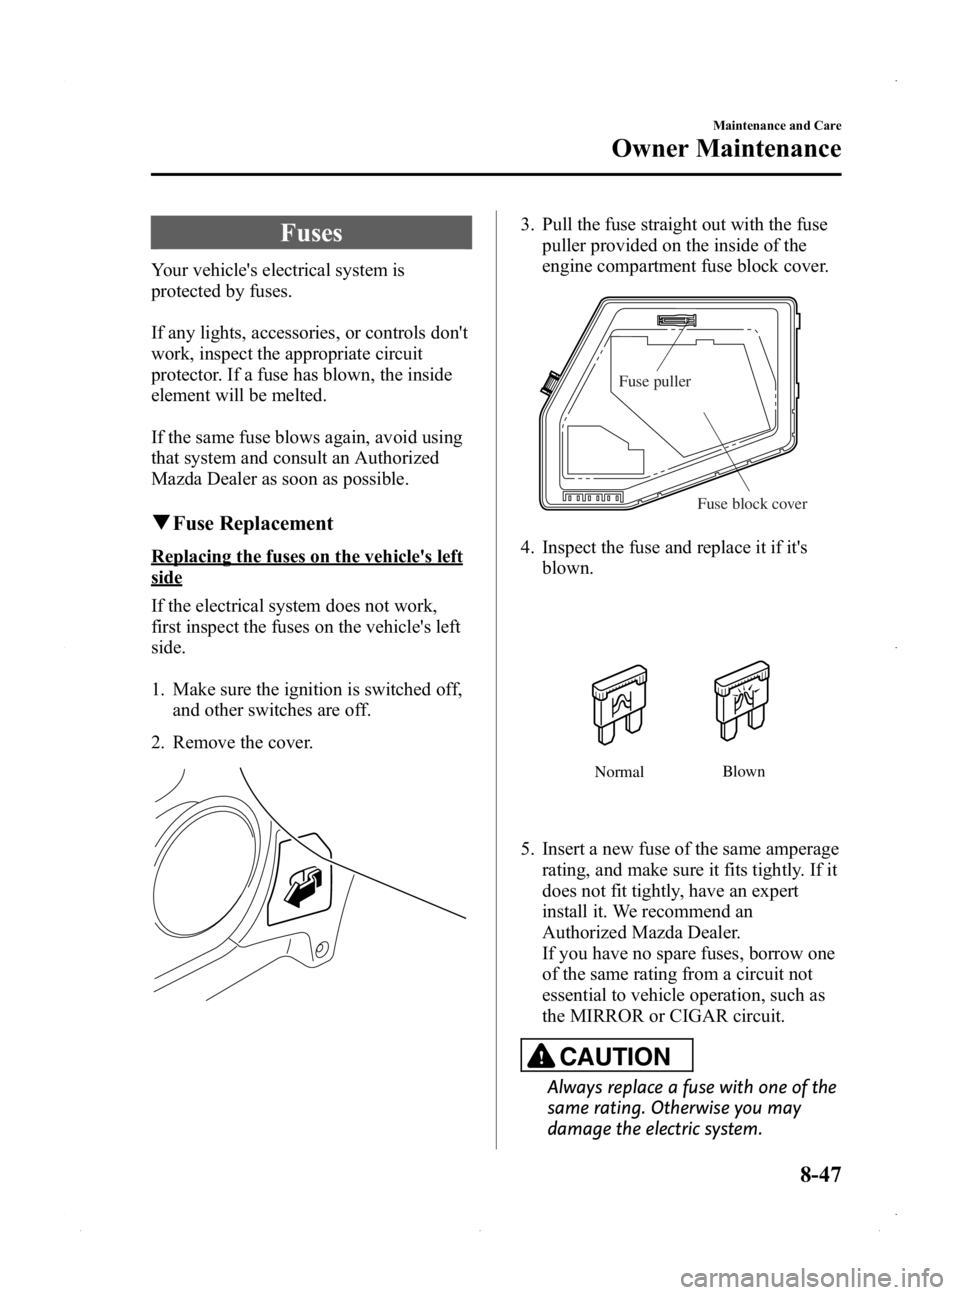
3. Pull the fuse straight out with the fuse puller provided on the inside of the
engine compartment fuse block cover.
Fuse puller
Fuse block cover
4. Inspect the fuse and replace it if it'sblown.
Normal Blown
5. Insert a new fuse of the same amperage
rating, and make sure it fits tightly. If it
does not fit tightly, have an expert
install it. We recommend an
Authorized Mazda Dealer.
If you have no spare fuses, borrow one
of the same rating from a circuit not
essential to vehicle operation, such as
the MIRROR or CIGAR circuit.
CAUTION
Always replace a fuse with one of the
same rating. Otherwise you may
damage the electric system.
Maintenance and Care
Owner Maintenance
8-47
MX-5_8EN7-EA-14E_Edition3 Page373
Friday, September 5 2014 3:20 PM
Form No.8EN7-EA-14E
Page 374 of 448

Black plate (374,1)
6. Reinstall the cover and make sure thatit is securely installed.
Replacing the fuses under the hood
If the headlights or other electrical
components do not work and the fuses in
the cabin are normal, inspect the fuse
block under the hood. If a fuse is blown, it
must be replaced. Follow these steps:
1. Make sure the ignition is switched off,
and other switches are off.
2. Remove the fuse block cover.
3. If any fuse but the MAIN fuse is blown, replace it with a new one of the
same amperage rating .
Normal
Blown
WARNING
Do not replace the main fuse by
yourself. Have an Authorized Mazda
Dealer perform the replacement:
Replacing the fuse by yourself is
dangerous because the MAIN fuse is
a high current fuse. Incorrect
replacement could cause an electrical
shock or a short circuit resulting in a
fire.
4. Reinstall the cover and make sure that it is securely installed.
8-48
Maintenance and Care
Owner Maintenance
MX-5_8EN7-EA-14E_Edition3 Page374
Friday, September 5 2014 3:20 PM
Form No.8EN7-EA-14E
Page 375 of 448

Black plate (375,1)
qFuse Panel Description
Fuse block (Engine compartment)
DESCRIPTION FUSE
RATING PROTECTED COMPONENT
1 FAN 30 A Cooling fan
2 FAN 7.5 A Cooling fan
3 DEFOG 20 A Rear window defogger
4 H/CLEAN ――
5 ROOM 15 A Overhead lights, Luggage compartment light, For protection of
various circuits, Trunk opener
6 IG KEY2 15 A For protection of various circuits
7 HEATER 40 A Air conditioner
í
8 ABS 30 A ABS
9 FOG 15 A Front fog lightsí
10R.FOG ――
11 RHT L 30 A Power retractable hardtop (LH)í
12 RHT R 30 A Power retractable hardtop (RH)í
13MAG 7.5 A Air conditionerí
14ST 20 A Starter
15 TAIL 15 A Taillights, Parking lights, License plate lights, Illumination
16 ABS 40 A ABS
Maintenance and Care
Owner Maintenance
8-49íSome models.
MX-5_8EN7-EA-14E_Edition3 Page375
Friday, September 5 2014 3:20 PM
Form No.8EN7-EA-14E
Page 376 of 448

Black plate (376,1)
DESCRIPTIONFUSE
RATING PROTECTED COMPONENT
17 BTN 30 A For protection of various circuits
18 MAIN 120 A For protection of all circuits
19 EGI INJ 10 A Injector
20 EGI COMP1 10 A Engine control system
21 EGI COMP2 10 A Engine control system
22 HEAD LOW L 15 A Headlight low beam (LH)
23 HEAD LOW R 15 A Headlight low beam (RH)
24 HEAD 15 A Headlight high beams
25 P.WIND 20 A Power windows
26 ENGINE 15 A Engine control system
27 WIPER 20 A Windshield wipers and washer
28 DRL 15 A DRL
í
29HORN 15 A Horn
30 STOP 10 A Brake lights
31 ETV 10 A Electric throttle valve
32 FUEL PUMP 15 A Fuel Pump
33 HAZARD 10 A Turn signals, Hazard warning flashers
34 P.WIND2 20 A Power windows
í
35 IG KEY140 A For protection of various circuits
8-50
Maintenance and Care
íSome models.
Owner Maintenance
MX-5_8EN7-EA-14E_Edition3 Page376
Friday, September 5 2014 3:20 PM
Form No.8EN7-EA-14E
Page 385 of 448

Black plate (385,1)
NOTE
A spot remover to remove oil, tar, and similar
materials will usually also take off the wax.
Rewax these areas.
qPlastic Part Maintenance
lWhen cleaning the plastic lenses of the
lights, do not use gasoline, kerosene,
rectified spirit, paint, thinner, highly
acidic detergents, or strongly alkaline
detergents. Otherwise, these chemical
agents can discolor or damage the
surfaces resulting in a significant loss
in functionality. If plastic parts become
inadvertently exposed to any of these
chemical agents, flush with water
immediately.
lIf plastic parts such as the bumpers
become inadvertently exposed to
chemical agents or fluids such as
gasoline, oil, engine coolant, or battery
fluid, it could cause discoloration,
staining, or paint peeling. Wipe off any
such chemical agents or fluids using a
soft cloth immediately.
lHigh water temperature and high water
pressure car washers are available
depending on the type of high pressure
car washer device. If the car washer
nozzle is put too close to the vehicle or
aimed at one area for an extended
period of time, it could deform plastic
parts or damage the paint.
lDo not use wax containing compounds
(polish). Otherwise, it could result in
paint damage.
lIn addition, do not use an electrical or
air tool to apply wax. Otherwise, the
frictional heat generated could result in
deformation of plastic parts or paint
damage.
Interior Care
WARNING
Do not spray water in the cabin:
Splashing water on electrical parts
such as the audio unit and switches
is dangerous as it could cause a
malfunction or a fire.
qDashboard Precautions
Prevent caustic solutions such as perfume
and cosmetic oils from contacting the
dashboard. They'll damage and discolor
the dashboard. If these solutions get on
the dashboard, wipe them off
immediately.
CAUTION
Do not use glazing agents.
Glazing agents contain ingredients
which may cause discoloration,
wrinkling, cracks and peeling.
qCleaning the Upholstery and
Interior Trim
Vinyl
Remove dust and loose dirt from vinyl
with a whisk broom or vacuum cleaner.
Clean vinyl with a leather-and-vinyl
cleaner.
Maintenance and Care
Appearance Care
8-59
MX-5_8EN7-EA-14E_Edition3 Page385
Friday, September 5 2014 3:20 PM
Form No.8EN7-EA-14E