reset MAZDA MODEL MX-5 MIATA PRHT 2011 User Guide
[x] Cancel search | Manufacturer: MAZDA, Model Year: 2011, Model line: MODEL MX-5 MIATA PRHT, Model: MAZDA MODEL MX-5 MIATA PRHT 2011Pages: 454, PDF Size: 5.69 MB
Page 254 of 454
Black plate (254,1)
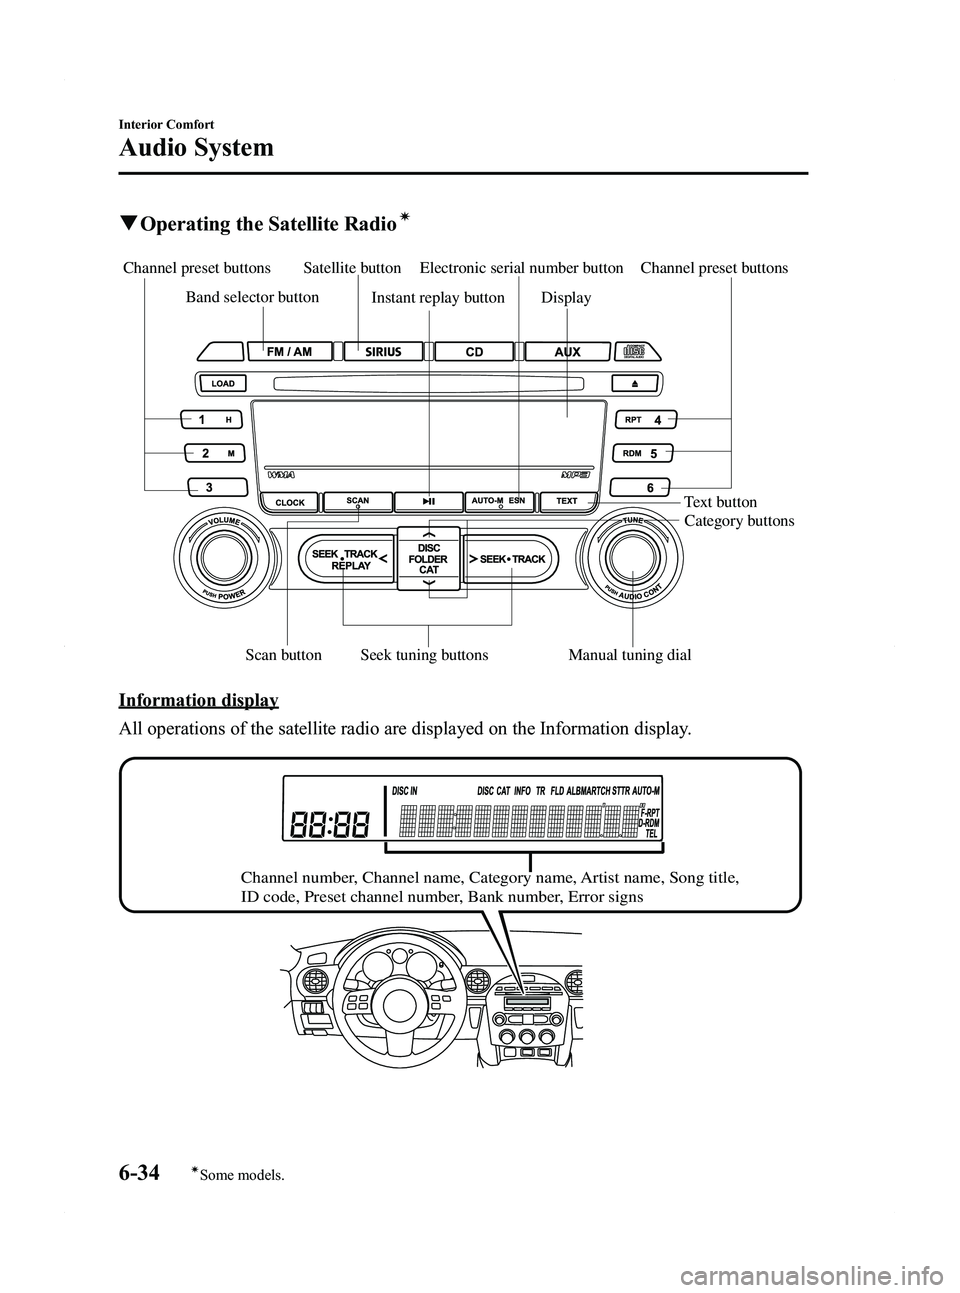
qOperating the Satellite Radioí
Band selector button
Seek tuning buttons
Scan button Instant replay button Display
Text buttonCategory buttons
Electronic serial number button Channel preset buttons
Channel preset buttons Satellite button
Manual tuning dial
Information display
All operations of the satellite radio are displayed on the Information display.
Channel number, Channel name, Category name, Artist name, Song title,
ID code, Preset channel number, Bank number, Error signs
6-34
Interior Comfort
íSome models.
Audio System
MX-5_8BR3-EA-10F_Edition3 Page254
Wednesday, March 2 2011 5:26 PM
Form No.8BR3-EA-10F
Page 257 of 454
Black plate (257,1)
NOTE
Do not perform the following operation while
“UPDATING ”is displayed. Otherwise, the
updating procedure will be cancelled.
lTurning off the audio powerlSwitching to other modeslSwitching the ignition off
When the SIRIUS mode is switched to
another mode, or when the power is
turned off, the present channel which is
being received is stored as the last
channel.
Channel selection
Turning the manual tuning dial allows you
to select the desired receiving channel.
lTurn the knob clockwise: Channel UplTurn the knob counterclockwise:
Channel Down
Unsubscribed channel
When a selected station has not been
subscribed to, the display indicates the
following:
[CALL
888] and [539SIRI]
(Flashes alternately)
NOTE
When the subscription contract is canceled, all
of the channels including channel 184 appear
as unsubscribed.
Invalid channel
When a selected channel is not
broadcasting, [SR
(bank number)
INVALID] is displayed for one second,
followed by [SR
(bank number)
CHANNEL], which is also displayed for
one second. The display then returns to
the previous valid channel. NOTE
If the last channel selected has become
unavailable because of a channel update the
above indication is displayed until any button
is pressed.
Preset channel programming
(Programming with
“channel number ”
display)
1. Select the desired channel to be programmed. At this point, the
following is displayed:
[SR
(bank number)(channel
number)]
2. Keep pressing the channel preset button for 1.5 seconds or more.
The programming process is complete
after the channel number flashes. Then,
[SR
(bank number)] is displayed
and a beep sound is heard at the same
time.
3. [SR
(bank number)CH
(preset number)(channel number)]
are displayed.
(Programming with “text ”display (e.g.
channel name))
1. Select the desired channel to be programmed. At this point, the
following is displayed:
[SR
(bank number)(selected text
(e.g. channel name))]
2. Keep pressing the channel preset button for 1.5 seconds or more.
The programming process is complete
after the text (e.g. channel name)
flashes. Then, [SR
(bank number)]
is displayed and you will hear beep
sound at the same time.
Interior Comfort
Audio System
6-37
MX-5_8BR3-EA-10F_Edition3 Page257
Wednesday, March 2 2011 5:26 PM
Form No.8BR3-EA-10F
Page 258 of 454
![MAZDA MODEL MX-5 MIATA PRHT 2011 User Guide Black plate (258,1)
3. SR(bank number)CH(preset
number)
(channel number)] are
displayed.
4. Three seconds later, it returns to normal display. [SR
(bank number)(text
(e.g. channel name))]
NOTE
Six sta MAZDA MODEL MX-5 MIATA PRHT 2011 User Guide Black plate (258,1)
3. SR(bank number)CH(preset
number)
(channel number)] are
displayed.
4. Three seconds later, it returns to normal display. [SR
(bank number)(text
(e.g. channel name))]
NOTE
Six sta](/img/28/41014/w960_41014-257.png)
Black plate (258,1)
3. SR(bank number)CH(preset
number)
(channel number)] are
displayed.
4. Three seconds later, it returns to normal display. [SR
(bank number)(text
(e.g. channel name))]
NOTE
Six stations can be stored in each bank, SR1,
SR2, and SR3 for convenient access to your
favorite stations.
Preset channel call-up
Press and release the channel preset
button,
[SR
(bank number)CH(preset
number)
(channel number)] appears.
When the preset button is pressed during
text mode, its channel number is
displayed first for three second and then
its text is displayed.
NOTE
In the initial setting, all channels are preset to
184.
Category change
Press the category button (UP or DOWN)
and select the desired category.
lPress the category button (UP):
Category up
lPress the category button (DOWN):
Category down
Every time the category (UP) button is
pressed for 1.5 second or less, the
category is changed over in the order
shown below.
At this time, the lowest (smallest-number)
channel within the category indicated is
received.
When the highest (or lowest) category is
reached, the category is changed over in
the order shown below. Highest category
→All categories →
Lowest category
NOTE
While all categories are selected, all channels
covering a category can be accessed
(Category off condition).
Channel selection within a category
If you are in a selected category and the
channel number is displayed, turning the
manual tuning dial moves the channel
number up/down in that category.
lTurn the manual tuning dial clockwise:
Channel Up
lTurn the manual tuning dial
counterclockwise: Channel Down
NOTE
The channel number needs to be indicated in
the display to use manual tuning dial for this
function.
Scan tuning
Press the scan button (
)to
automatically sample stations. Scanning
stops at each station for about five
seconds. To hold a station, press the scan
button (
) again during this interval.
NOTE
lUnsubscribed channels, invalid channels
and parental lock channels are not subject
to the scan, therefore these channels will
skip automatically.
lYou can scan all channels while all
categories are selected. If you are in a
selected category, you can only scan the
channels in that category.
6-38
Interior Comfort
Audio System
MX-5_8BR3-EA-10F_Edition3 Page258
Wednesday, March 2 2011 5:27 PM
Form No.8BR3-EA-10F
Page 261 of 454
Black plate (261,1)
When the seek tuning button ()is
pressed (about 1.5 seconds), playback
starts from the beginning of the next
program. When the seek tuning button
(
) is pressed (about 1.5 seconds) while
the last program is being played, the
instant replay mode is cancelled.
When the seek tuning button (
)is
pressed for 1.5 seconds or longer, the
program is fast-forwarded while the
button is being pressed. When pressing
and holding the button until the end of the
program, the instant replay mode is
cancelled.
When the instant replay button is pressed
again, playback is paused, or playback
starts if it has been paused.
Instant replay (PAUSE)
If the instant replay button is pressed
while the instant replay mode is off,
instant replay mode is turned on in a
paused condition (PAUSE). Press the
instant replay button again to resume
playback from the point at which it was
paused.
NOTE
lIf the channel is changed, the instant replay
buffer data is deleted.
lAfter turning on the power and switching to
SIRIUS digital satellite radio mode, the
instant replay mode is not available for
several seconds after changing channels.
Displaying the SIRIUS ID (ESN)
When the ESN button is pressed for 1.5
seconds or longer, a 12-digit Electronic
Serial Number (ESN) for the SIRIUS
tuner is displayed. (If the SIRIUS ID (ESN) for the tuner
does not display)
If
“ESN
FAIL ”is displayed after
pressing the ESN button for 1.5 seconds
or longer, contact an Authorized Mazda
Dealer.
Initialization of ID code
If the registered ID code is forgotten,
return the ID code to the default [0000] by
performing the following steps:
Setting condition: SAT mode
(Master code input preparation)
1. Press and hold the scan button, then press channel preset button 4. Hold
both buttons together for 1.5 seconds.
2. “ENTER PIN ”appears for three
seconds which indicates that it is in
code input mode.
3. “SR1 - - - - ”appears, which indicates
that it is ready for code input.
(Master code input)
4. Input the master code using the channel preset buttons 1-4.
(The master code is already set at the
time of factory shipment.)
(Master code input determination)
5. Determine the master code which has been input by pressing the scan button.
6. “PIN CLEARED ”appears which
indicates that the master code input has
been completed.
7. The ID code is set to the default [0000] and the initialization process is
completed.
Interior Comfort
Audio System
6-41
MX-5_8BR3-EA-10F_Edition3 Page261
Wednesday, March 2 2011 5:27 PM
Form No.8BR3-EA-10F
Page 262 of 454
![MAZDA MODEL MX-5 MIATA PRHT 2011 User Guide Black plate (262,1)
NOTE
Master code:
The Master Code is used to initialize or re-
initialize the ID code in the event that the code
is not set to [0000] and/or the personalized ID
code is not known. MAZDA MODEL MX-5 MIATA PRHT 2011 User Guide Black plate (262,1)
NOTE
Master code:
The Master Code is used to initialize or re-
initialize the ID code in the event that the code
is not set to [0000] and/or the personalized ID
code is not known.](/img/28/41014/w960_41014-261.png)
Black plate (262,1)
NOTE
Master code:
The Master Code is used to initialize or re-
initialize the ID code in the event that the code
is not set to [0000] and/or the personalized ID
code is not known. The initialization process
resets the ID code to [0000]. The master code
can potentially defeat the intent of the security
of the parental lock if it is located by persons
not authorized by the owner to access certain
channels.
SIRIUS Satellite Radio Master Code: [0913]
NOTElWhen a numeric value other than the
master code is input and the scan button is
pressed,“SR1 Err ”is displayed and then it
returns to the “SR1---- ”display again.
lIf an ID code is not input for ten seconds,
“Err ”is displayed and it returns to the
former display.
lChannel preset buttons 1, 2, 3, 4 and the
scan button are used for inputting the ID
code. Buttons 5 and 6 cannot be used.
Change of ID code
Setting condition: SAT mode
When changing the ID code, the new ID
code is input after the previous one is
input first.
(Registered ID code input)
1. Press and hold the scan button, then press channel preset button 5. Hold
both buttons together for 1.5 seconds.
2. “ENTER PIN ”appears for three
seconds which indicates that it is in
code input mode.
3. “SR1 - - - - ”appears, which indicates
that it is ready for code input. 4. Input the registered ID code using
channel preset buttons 1-4.
Example: When the registered ID code
is“2323 ”, input “2323 ”. At this time
“ SR1 2323 ”is displayed.
Press 1 for the first digit, 2 for the
second, 3 for the third, and 4 for the
last digit. For example, if your number
is 2323, press 1 three times (includes
0), 2 four times, 3 three times, and 4
four times. If the display goes off while
inputting, begin from Step 1.
NOTE
The registered ID code is the default [0000] at
the time of factory shipment. If [0000] results
in “Err ”on the display, go to the
“ INITIALIZATION OF ID CODE” section to
reset to [0000].
(Verification with the registered ID
code)
5. Determine the input code by pressing the scan button.
6. If it does not match with the previously registered code, “SR1 Err ”is displayed
and then it returns to “SR1 - - - - ”.
7. If it matches with the previously registered code, “ENTER PIN ”appears
again and it switches to code input
mode.
8. “SR1 - - - - ”appears, and it is ready for
input of the new ID code.
(New ID code input)
9. Input the new ID code using channel preset buttons 1-4.
Example: If “1234 ”is input as the new
code, “SR1 1234 ”is displayed.
6-42
Interior Comfort
Audio System
MX-5_8BR3-EA-10F_Edition3 Page262
Wednesday, March 2 2011 5:27 PM
Form No.8BR3-EA-10F
Page 263 of 454
Black plate (263,1)
(New ID code input determination)
10. Determine the new ID code whichhas been input by pressing the scan
button.
11. “PIN CHANGED ”appears for three
seconds which indicates that the new
ID code input has been completed.
12. It returns to the former display.
NOTE
lIf an ID code is not input for ten seconds,
“ Err ”is displayed and it returns to the
former display.
lChannel preset buttons 1, 2, 3, 4 and the
scan button are used for input of the ID
code. Buttons 5 and 6 cannot be used.
Individual channel locking
If a channel is locked, the channel is
muted.
NOTE
If the registered ID code is forgotten, return
the ID code to the default [0000]. (See
“ INTIALIZATION OF ID CODE” section)
(Locking a channel)
1. Select a channel to be locked by
turning the manual tuning dial.
Example: Select channel 100
(Registered ID code input preparation)
2. Press and hold the scan button, then press channel preset button 6. Hold
both buttons together for 1.5 seconds.
3. “ENTER PIN ”appears for three
seconds which indicates that it is in
code input mode.
4. “SR1 - - - - ”appears which indicates
that it is ready for code input. (Registered ID code input)
5. Input the registered ID code using
channel preset buttons 1-4. Example: If
the registered ID code is “2323 ”, input
“ 2323 ”. At this time “SR1 2323 ”is
displayed.
(Registered ID code input
determination)
6. Determine the code which has been input by pressing the scan button.
7. If it does not match the registered code, “SR1 Err ”is displayed and then it
returns to “SR1 - - - - ”.
8. If it matches the registered code, “SR1 LOCK ”appears for three
seconds which indicates that the code
input has been completed.
9. “SR1 LOCK 100 ”appears which
indicates that the parental lock is
activated. At this time, mute is on and
no sound is heard.
NOTElIf an ID code is not input for ten seconds,
“ Err ”is displayed and it returns to the
former display.
lChannel preset buttons 1, 2, 3, 4 and the
scan button are used for input of the ID
code. Buttons 5 and 6 cannot be used.
Lock cancellation
Setting condition: SAT mode
(Releasing a locked channel)
1. Select a channel to be released by turning the manual tuning dial.
Example: Select the locked channel
(i.e. 100). At this time,
“SR1 LOCK 100 ”is displayed.
Interior Comfort
Audio System
6-43
MX-5_8BR3-EA-10F_Edition3 Page263
Wednesday, March 2 2011 5:27 PM
Form No.8BR3-EA-10F
Page 264 of 454
Black plate (264,1)
(Registered ID code input preparation)
2. Press and hold the scan button, thenpress channel preset button 6. Hold
both buttons together for 1.5 seconds.
3. “ENTER PIN ”appears for three
seconds which indicates that it is in
code input mode.
4. “SR1 - - - - ”appears, which indicates
that it is ready for code input.
(Registered ID code input)
5. Input the registered ID code using channel preset buttons 1-4. Example:
When the registered ID code is “2323 ”,
input “2323 ”. At this time “SR1 2323 ”
is displayed.
NOTE
If “Err ”is displayed, go to the
“ INITIALIZATION OF ID CODE” section to
reset the ID code to [0000].
(Registered ID code input
determination)
6. Determine the input code by pressing the scan button.
7. If it does not match the registered code, “SR1 Err ”is displayed and then it
returns to “SR1 - - - - ”.
8. If it matches the registered code, “SR1 UNLOCK ”appears for three
seconds which indicates that the code
input has been completed.
9. “SR1 100 ”appears which indicates that
the parental lock is off. At this time,
sound is heard. NOTE
lIf an ID code is not input for ten seconds,
“
Err ”is displayed and it returns to the
former display.
lChannel preset buttons 1, 2, 3, 4 and the
scan button are used for input of the ID
code. Buttons 5 and 6 cannot be used.
6-44
Interior Comfort
Audio System
MX-5_8BR3-EA-10F_Edition3 Page264
Wednesday, March 2 2011 5:27 PM
Form No.8BR3-EA-10F
Page 270 of 454
Black plate (270,1)
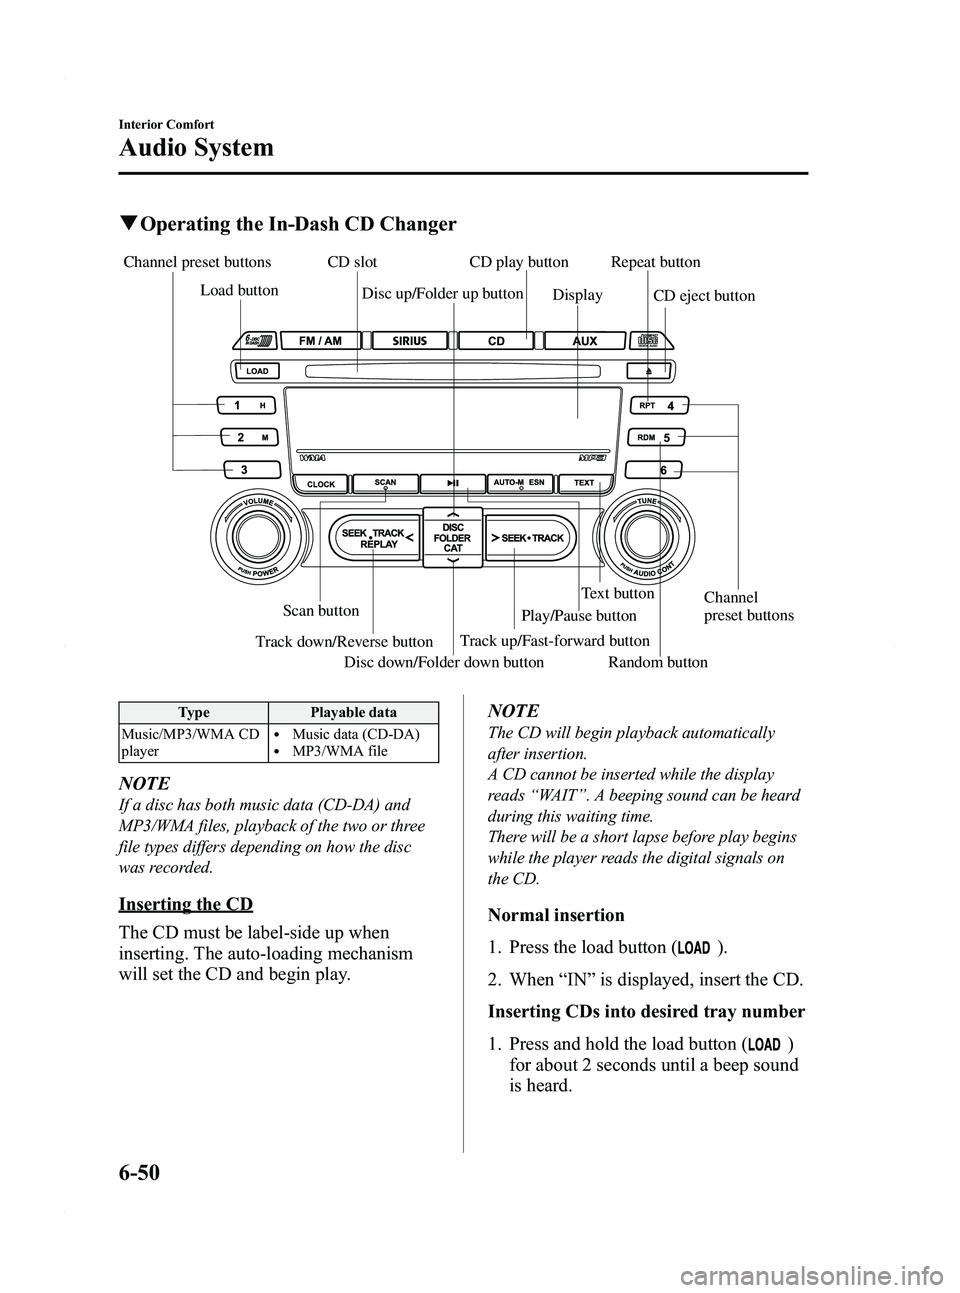
qOperating the In-Dash CD Changer
Disc up/Folder up button
Track down/Reverse button
Channel preset buttons
Text button
Scan button
Random button
Disc down/Folder down button Track up/Fast-forward buttonPlay/Pause button
Load button
CD slot
Channel
preset buttons
Display
CD play button
CD eject button
Repeat button
Type
Playable data
Music/MP3/WMA CD
player
lMusic data (CD-DA)lMP3/WMA file
NOTE
If a disc has both music data (CD-DA) and
MP3/WMA files, playback of the two or three
file types differs depending on how the disc
was recorded.
Inserting the CD
The CD must be label-side up when
inserting. The auto-loading mechanism
will set the CD and begin play. NOTE
The CD will begin playback automatically
after insertion.
A CD cannot be inserted while the display
reads
“WAIT ”. A beeping sound can be heard
during this waiting time.
There will be a short lapse before play begins
while the player reads the digital signals on
the CD.
Normal insertion
1. Press the load button (
).
2. When “IN ”is displayed, insert the CD.
Inserting CDs into desired tray number
1. Press and hold the load button (
)
for about 2 seconds until a beep sound
is heard.
6-50
Interior Comfort
Audio System
MX-5_8BR3-EA-10F_Edition3 Page270
Wednesday, March 2 2011 5:27 PM
Form No.8BR3-EA-10F
Page 271 of 454

Black plate (271,1)
2. Press the channel preset button for thedesired tray number while “WAIT ”is
displayed.
3. When “IN ”is displayed, insert the CD.
NOTE
The CD cannot be inserted to the desired tray
number if the number is already occupied.
Multiple insertion
1. Press and hold the load button (
)
for about 2 seconds until a beep sound
is heard.
2. When “IN ”is displayed, insert the CD.
3. When “IN ”is displayed again, insert
the next CD.
NOTE
The first-inserted CD will be played
automatically when:
lNo other CD is inserted within 15 seconds
after “IN ”is displayed.
lThe CD trays are full.
Ejecting the CD
Normal ejection
1. Press the CD eject button (
). The
disc number and “DISC OUT ”will be
displayed.
2. Pull out the CD.
NOTE
When the CD is ejected during play, the next
CD will be played automatically.
Ejecting CDs from desired tray number
1. Press and hold the CD eject button (
)
for about 2 seconds until a beep sound
is heard.
The “DISC OUT ”display flashes. 2. Press the channel preset button for the
desired CD number for less than 5
seconds after the beep sound is heard.
3. Pull out the CD.
Multiple ejection
1. Press and hold the CD eject button (
)
for about 2 seconds until a beep sound
is heard.
The “DISC OUT ”display flashes.
2. Pull out the CD, then the next CD will be ejected.
NOTE
lCDs will be ejected starting with the one
with the lowest number.
lAll CDs in the tray will be ejected
continuously.
lCDs can be ejected when the ignition is
switched off. Press and hold the CD eject
button (
) for about 2 seconds and all
CDs will eject.
Playback
Press the CD play button (
) to start
play when a CD is in the unit.
If a CD is not in the unit when the CD
play button (
) is pressed, “NO DISC ”
will flash on and off.
Pause
To stop playback, press the Play/Pause
button (
).
Press the button again to resume
playback.
Fast-forward/Reverse
Press and hold the fast-forward button
(
) to advance through a track at high
speed.
Press and hold the reverse button (
)to
reverse through a track at high speed.
Interior Comfort
Audio System
6-51
MX-5_8BR3-EA-10F_Edition3 Page271
Wednesday, March 2 2011 5:27 PM
Form No.8BR3-EA-10F
Page 323 of 454
Black plate (323,1)
Overheating
If the temperature gauge indicates
overheating, the vehicle loses power, or
you hear a loud knocking or pinging
noise, the engine is probably too hot.
WARNING
Switch the ignition to off and
make sure the fan is not running before
attempting to work near the cooling
fan: Working near the cooling fan when it
is running is dangerous. The fan
could continue running indefinitely
even if the engine has stopped and
the engine compartment temperature
is high. You could be hit by the fan
and seriously injured.
Do not remove the cooling
system cap when the engine and
radiator are hot: When the engine and radiator are
hot, scalding coolant and steam may
shoot out under pressure and cause
serious injury.
Open the hood ONLY after steam is no
longer escaping from the engine: Steam from an overheated engine is
dangerous. The escaping steam could
seriously burn you.
NOTE
Once the engine coolant exceeds a preset
temperature, an electrical cooling fan turns
on. It will continue running for about 10
minutes after the ignition is switched off.
If the temperature gauge indicates
overheating:
1. Drive safely to the side of the road and park off the right-of-way.
2. Put a vehicle with an automatic transmission in park (P), a manual
transmission in neutral.
3. Apply the parking brake.
4. Turn off the air conditioner.
5. Check whether coolant or steam is escaping from under the hood or from
the engine compartment.
If steam is coming from the engine
compartment:
Do not go near the front of the vehicle.
Stop the engine.
Wait until the steam dissipates, then
open the hood and start the engine.
If neither coolant nor steam is
escaping:
Open the hood and idle the engine until
it cools.
CAUTION
If the cooling fan does not operate
while the engine is running, the
engine temperature will increase.
Stop the engine and call an
Authorized Mazda Dealer.
6. Make sure the cooling fan is operating, then turn off the engine after the
temperature has decreased.
7. When cool, check the coolant reservoir level.
If it's low, look for coolant leaks from
the radiator and hoses.
In Case of an Emergency
Overheating
7-19
MX-5_8BR3-EA-10F_Edition3 Page323
Wednesday, March 2 2011 5:27 PM
Form No.8BR3-EA-10F